Help - Galvanized drain pipes/vent pipe in 2 story home is rusted, broken, leaking.

Users who are viewing this thread

Mnalep

Member
Messages
186
Reaction score
0
Points
16
Location
Redford, Michigan
I have a 2 story flat. The galvanized pipes are rusted, and breaking, and leaking.

The pipes are a combination of kitchen drain pipes for the upper level kitchen and lower story kitchen - and is part of what I think is also a vent pipe out the roof.

My problem is the drain pipes coming from the upper level kitchen has rusted out right at and below the Tee connector, and is leaking water down between the walls, past the first floor, and eventually into the basement.

I am looking for a temporary, and a permanent fix.

Is the EPOXY putty (magic putty, jb weld, etc.) any good as a temporary fix. I think that is what was on the pipes already from a long time ago.

What type of piping can I use to permanently fix. (PVC, rubber gaskets, etc.?)

If I cut the existing rusted sections of pipes, what problem would I have with the old pipes being supported? Are these old pipes just sitting on top of each other, or would there be existing brackests/braces holding them up also from when the home was built (in the 1920's).

Also, any ideas about cutting pipes if the solution requires it. As you can see from the pictures, these pipes are about 1" from the wall.

Also, can anyone tell from the pics what the actual size of these galvanized pipes are?

The basement pipe is also rusted where it goes into the basment floor, but not leaking, and I hope I don't have to do anything with that right now. I just want to stop the leaks.

This started about 7 - 10 days ago. Is there anything I should eventually do, or worry about in regards to mold?

I am going to try to insert a few pictures below, to best illustrate my challenge ;-)

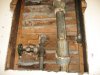
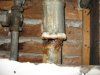
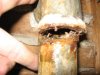
The first 2 pictures show the upper story pipes.

It looks like there was some type of Epoxy putty on them in the 1st picture, and after I poked at it, it broke off as seen in the 2nd closeup picture.

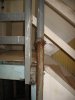
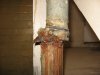
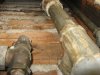
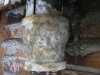
The last 2 pictures show the pipes in the basement.

I don't know what the tee and pipes out of the 1st floor kitchen look like yet.
 

Attachments

  • IMG_0660.JPG
    IMG_0660.JPG
    91.5 KB · Views: 11,269
  • IMG_0684.JPG
    IMG_0684.JPG
    93.8 KB · Views: 10,775
  • IMG_0656.JPG
    IMG_0656.JPG
    71.1 KB · Views: 5,875
  • IMG_0654.JPG
    IMG_0654.JPG
    69.2 KB · Views: 9,750
  • IMG_0685.JPG
    IMG_0685.JPG
    80.5 KB · Views: 9,513

Jimbo

Plumber
Messages
8,918
Reaction score
18
Points
0
Location
San Diego, CA
You will have continued problems and clogs if you try to patch this. It really needs to be cut out and new pipe coupled in with proper banded couplings. This is not a huge job for any plumber.

If you want to try it yourself, get more details with further questions here.
 

Mnalep

Member
Messages
186
Reaction score
0
Points
16
Location
Redford, Michigan
Hi Jimbo,

I would like to try and do it myself. If you know how I should do this, that would be great.

What kind of pipe and couplings should I use?

Also, any suggestions for cutting, since it is close to the wall?

Will the pipe 'fall down' if I cut?

Thnks,
Matt
 

Jadnashua

Retired Defense Industry Engineer xxx
Messages
32,770
Reaction score
1,190
Points
113
Location
New England
Because the stuff is so rusted, it's hard to say what's really holding it up. Galvanized is not as heavy as cast iron, but is still heavy. Bascially, when it T's off to a horizontal run, the joint normally would hold the rest in place, but that's probably not a safe bet now. There are hanger clamps that could be installed to hold pieces in place while you cut out sections to rebuild. If the vertical pipes are that bad, the horizontal ones are probably worse, so you should consider replacing all of it. This can be a major project, as it could be between the ceiling and the upper floors.

It's hard to tell for sure what size it is. Take a piece of string and wrap it around the pipe, then measure it and divide by pi (3.14). That should tell you the diameter. Pipe is measured by the interior diameter, so it would be probably 1/2" less than the OD to account for approximately 1/4" per wall.

A sawsall or hacksaw will cut galvanized fairly easily. The parts you can see should be fairly easy to replace...it's the stuff burried in the walls that might be more of a pain. Without being there, it's hard to tell how much skill level it would take to do a good job, or determine your skill level.

PVC is fairly easy to work with, and as long as you don't get high from the pvc cement and cleaner, making a joint isn't a big deal. The harder thing to get a grip on is you can't dry fit it all together, then glue it up. The fittings are meant to be tight, and until you apply the cement, which actually melts the plastic and welds it together, it is very diffucult to push the pipe down into the fitting fully so you could dry fit. If you do, you'd end up short since the pipe will go down more than when you dry fit. The magic here is to measure from the stop in the fitting.
 

Gary Swart

In the Trades
Messages
8,101
Reaction score
84
Points
48
Location
Yakima, WA
I have to side with Jimbo's suggestion about getting a plumber. Although you have some very good questions, it is obvious that you are a total novice and this may be more of a job than you can accomplish without spending a great deal of time and extra effort than you realize. Also to reinforce Jimbo, forget about the patches. The pipes are way past the point of stopping up a pinhole leak or small drip with any kind of patching materials.
 

Redwood

Master Plumber
Messages
7,335
Reaction score
13
Points
0
Location
Connecticut
Its sawzall time without a doubt!
jason2.gif


Running a pipe from the 2nd fl to the basement is guite a task for a newbie DIYer you will do well hiring a plumber. You could make sure that the walls are opened up to save $
 
Last edited:

Mnalep

Member
Messages
186
Reaction score
0
Points
16
Location
Redford, Michigan
jadnashua,

I did measure already, the outside of the pipe was 6 1/4, so if I divide that by 3.14, I get 1.99", then subtract 1/2", gives me a 1 and 1/2 galvanized pipe.

The pipe is all in the wall running from the 2nd story to the basement, except for the stub outs that go under the kitchen sink area.

I was hoping to just find a solution involving just fixing the pipe that is bad, at least for now.

I saw a Fernco "Quick T" fitting (http://www.fernco.com/QT.asp), and thought that would not be too hard, but I'd have to consider supporting the vent pipes above this T (if they are currently just supported by the old "T" joint.) I can't see up the walls to see if there are any hanger claps there, so I guess I'd have to play it safe and put one in.

With PVC measuring, isn't there a 'standard' insertion distance to arrive at the lengths the pipes need to be?
 

Redwood

Master Plumber
Messages
7,335
Reaction score
13
Points
0
Location
Connecticut
You do not want to use a fernco Qwik Tee!
The pipe needs to be cut off above the leaking tee, connected to new 1 1/2" schedule 40 PVC, or, ABS your pick whatever is available to you with a coupling such as a Fernco Proflex Coupling #3000-150...

proflex.gif


Then replace all the bad piping with pretty much the same stuff that is there now. As long as what is there meets code and is installed correctly. I cannot tell if it is correct from the pictures you provided and you are not a plumber so you do not know!
 

Mnalep

Member
Messages
186
Reaction score
0
Points
16
Location
Redford, Michigan
Gary,

Yes I am a novice, but have done some plumbing stuff (hot water tank, kitchen sink and counter).

I am not working, and it would be hard to afford a plumber, so I thought I'd try it myself. I am fairly handy, and learn quickly when I need to.
 

Mnalep

Member
Messages
186
Reaction score
0
Points
16
Location
Redford, Michigan
Redwood,

So you are saying cut out above the Tee (after I put in a bracket to ensure it is supported), then use plastic replacement Tee, new plastic stubout, and new plastic "tail" below the Tee, and tie this new plastic above, and below, with the Fernco Proflex coupling?

I could then repeat the same patch on the basement section?
 

Redwood

Master Plumber
Messages
7,335
Reaction score
13
Points
0
Location
Connecticut
Yes, that is in effect what I'm saying but I wouldn't leave old junk in the middle... That pipe is hurting! Replace it all from the sink on down!
 

Mnalep

Member
Messages
186
Reaction score
0
Points
16
Location
Redford, Michigan
Redwood,

Thanks for the advice. I would eventually replace the middle stuff. Would you use say PVC for that also?

But for the first step I just want to get the sink functioning upstairs.

I feel safer tackling one step at a time, as this is more than I've done before.

Is this the type Tee you are thinking of? (Threaded?)


or (unthreaded?)


What does schedule 40 mean? Can the threaded PVC go to galvanized pipe, or is there threaded PVC lengths of pipe also (like threaded galvanized lengths)?
 
Last edited by a moderator:

Redwood

Master Plumber
Messages
7,335
Reaction score
13
Points
0
Location
Connecticut
Seriously dude you do need a plumber! Also with the line shared on 2 floors I have serious doubts that it is vented properly!
 

Jadnashua

Retired Defense Industry Engineer xxx
Messages
32,770
Reaction score
1,190
Points
113
Location
New England
On the horizontal arms, cut off maybe 3". Then, once you only have the horizontal stubs sticking out, replace the vertical sections with the appropriate SanTees (not a straight T, the inlet is curved). Install a short stub sticking out the arm, and use the connector shown to then attach that stub to what's left in the wall. A section of pvc (it comes in 10' lenghts) is cheap, so just replace all of the vertical stuff and stub out to the horizontal.

I doubt any of the existing galvanized fittings that are threaded would be worth saving, but if you do find one, you can attach a pvc male fitting and thread it into the galvanized female, but do not do it the other way - the metal can eventually crack the female fitting if you screw it in too far. You'd probably need a couple of pretty good sized pipe wrenches, and I doubt you'd get any apart without twisting off other things, so I wouldn't try...just cut out the cancerous stuff and install new.
 

Mnalep

Member
Messages
186
Reaction score
0
Points
16
Location
Redford, Michigan
jadnashua,

I wish I had 3" of the horizontal pipe coming out of the wall. But there is only about 1" between the wall and the pipe, and the arm of the existing tee is butting up to the wall. I would have to get that whole horizontal section out by going under the kitchen sink, and then still would not be able to have it stick out 3", or it would be 2" past the existing pipes.

I was hoping I could use that existing tee, clean the threads out (the old pipe is rusted right out of that tee), and then screw in a new piece of pvc there. The existing tee seems to still be ok from what I recall seeing.

Thanks for more advice. I need it.
 

Mnalep

Member
Messages
186
Reaction score
0
Points
16
Location
Redford, Michigan
Redwood,

I understand your opinion. I just am short on cash these days.

Regarding the venting, the upper part of this pipe is larger, it has to be at least 2", maybe 2 1/2". See the pics below, the upper part of the pipe has a reducer fitting on it, leading to the larger diameter pipe going out the roof.
 

Attachments

  • IMG_0678.JPG
    IMG_0678.JPG
    83.7 KB · Views: 3,620
  • IMG_0677.JPG
    IMG_0677.JPG
    81.4 KB · Views: 3,533

Redwood

Master Plumber
Messages
7,335
Reaction score
13
Points
0
Location
Connecticut
The code sometimes calls for an increase in size for frost closure that may be what you are describing I cannot say from here. What I'm talking about is for proper venting of the first floor sink there would be a 2nd pipe that extends from a point above the flood rim of the 2nd floor sink. (actual height above flood rim dictated by local code used) down to the 1st floor sink where it privides a vent that does not have water running through it.

Believe me... I understand what its like to have a cash flow crunch! There never is a good time to have a plumbing emergency. I take it that 2 floors and 2 kitchen sinks means there is a tennant involved... Things need to be fixed before an ugly tennant-landlord situation develops. I have seen situations where landlords have been forced by the local authorities to put up a tennant in a motel because the building was unusable by the tennant that had paid rent. Literally I had just finished making repairs and the guy from the city stopped by to check things out or, he was going to make the landlord pay for another night. This happened because the landlord wasted valuable time trying to fix it himself unsuccessfully. They do have the power to sweep in and say we're paying for a motel we choose while repairs are made, we give you a bill which you pay, If you don't pay the city puts a lien on the building.
 
Last edited:

Mnalep

Member
Messages
186
Reaction score
0
Points
16
Location
Redford, Michigan
Redwood, I did not look to see if there was any other vent pipe present. I have not opened up any walls around the 1st floor sink. And the only parts of the 2nd floor sink pipes I can see is shown inthe photo above, where a section of the plaster wall about 1 foot by 2 foot was removed. I can't see very far up or down between the walls.

Assuming these are all original pipes - I would think that they were installed to the codes that existed at the time? This was originally built as a 2 unit home (not a 2nd floor kitchen patched in afterwards).

I am trying to visualize what you are describing, and take a closer look to see if it exists.

Is the paintbrush drawing below what you are telling me: (The red is what I think is in there now, and the blue is what I think you are saying it should be).

The person living upstairs is not having a problem with this. The exposed pipes are on the back wall of the kitchen facing a stairway, and the water is leaking on the basement floor when they use the sink. They don't use the basement or the backstairs, so they don't even know there is a leak back there. They will when I tell them they have to stop draining the sink for a while when the repairs are made. (I plan on asking them to put a plastic tub in the sink, then emptying it into either the toilet, or off the back porch, when they wash their dishes.)
 

Attachments

  • tarnow kitchen pipes 2.bmp
    89.3 KB · Views: 2,517

Jadnashua

Retired Defense Industry Engineer xxx
Messages
32,770
Reaction score
1,190
Points
113
Location
New England
The upper part is okay (joining the vent at 42" above the floor, or 6" above the flood plane - it was based on a standard kitchen counter at 36" so use 42" for most normal situations). The lower part, the vent should be coming off at the level of the p-trap. Maximum distance from the p-trap depends on the diameter of the pipe - smaller means shorter distance.
 

Mnalep

Member
Messages
186
Reaction score
0
Points
16
Location
Redford, Michigan
Jim, The drawing is not to any scale.

The upper kitchen vent pipe (in red)attaches to the top of the Tee, as seen in the pic, but is probably threaded in at the Tee at about 18" to 20" above the 2nd story's kitchen floor. The 1 1/2" pipe goes up from there about 12 inches into the reducer, where the pipe widens to perhaps 2" and goes through the attic (about about 8'). I'm not sure that it meets your description of "joining the vent at 42" above the floor"?

When you said "the vent should be coming off at the level of the p-trap" for the 1st floor, I take it you meant that as a 2nd pipe (as the blue line in my diagram), and not just straight out (as in the red line shows) in my diagram?

And when you said "at the level of the p-trap", I assume you mean just above where the horizontal pipe from the Tee leads to the p-trap?

Sorry for a stupid question, but is the 'flood plane' the level of where the kitchen sink would overflow? On either story?

Thanks
 
Top
Hey, wait a minute.

This is awkward, but...

It looks like you're using an ad blocker. We get it, but (1) terrylove.com can't live without ads, and (2) ad blockers can cause issues with videos and comments. If you'd like to support the site, please allow ads.

If any particular ad is your REASON for blocking ads, please let us know. We might be able to do something about it. Thanks.
I've Disabled AdBlock    No Thanks