Help - Galvanized drain pipes/vent pipe in 2 story home is rusted, broken, leaking.

Users who are viewing this thread

Mnalep

Member
Messages
186
Reaction score
0
Points
16
Location
Redford, Michigan
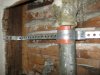
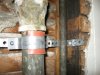
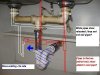
Redwood, from looking at the cast iron pipe that goes through the roof, it appears that the only thing holding that cast iron up is the galvanized pipe below it? Would that be correct? (I mean, the roof flashing can't be holding it up, right?)

IF the galvanized IS holding up the cast iron portion, then the cast iron would not come down until the galvanized below is removed? So I'd have to hold up the cast iron while simultaneously taking out the galvanized below it, and then drop the cast iron down into the attic?
 
Last edited:

Mnalep

Member
Messages
186
Reaction score
0
Points
16
Location
Redford, Michigan
Another question I have related to the support of the pipes - when I was thinking about replacing just the cast iron tee, with the PVC tee and the proflex couplings - is the PVC as strong as the galvanized? I mean - it would not have cracked under the weight of galvanized pipes and that cast iron pipe going through the roof?

Also - the proflex couplings - they would not have flexed out, or snapped out of line, under the weight of the pipes above it? IS the rubber gasket, and steel band, in that proflex coupling that strong/rigid?

I guess we were talking about using PVC as it is easier to work with than galvanized, yet just as strong? Otherwise, the fix would have been to put in new galvanized tee with proflex couplings?
 
Last edited:

Redwood

Master Plumber
Messages
7,335
Reaction score
13
Points
0
Location
Connecticut
The galvanized is holding up the cast iron, Yes, you will have to hold it up remove the galv. then lower it unless you can sneak it by the galv. without damaging the lead flashing.

We are going new top to bottom you will not be using the proflex couplings.
The pipes would have had to be supported.

we will be using pipehangers to support the new pipes as well.
 
Last edited:

Mnalep

Member
Messages
186
Reaction score
0
Points
16
Location
Redford, Michigan
Any stores you'd suggest that have pipe hangers. I've been to Home Depot, and a decent local hardware/plumbing store, and the best I've found are either horizantal hangers, or the hanger I made out of bolting together plumbers tape, and a "C" shaped pipe clamp, and the nscrewing that into the wall studs - as in the pictures below.

I've seen pictures of 'riser clamps/stack clamps' in a plummbing manual, but can't find at stores here.
 

Attachments

  • IMG_0763.JPG
    IMG_0763.JPG
    45.8 KB · Views: 1,806
  • IMG_0764.JPG
    IMG_0764.JPG
    44.8 KB · Views: 3,517
  • IMG_0765.JPG
    IMG_0765.JPG
    44.6 KB · Views: 1,642

Redwood

Master Plumber
Messages
7,335
Reaction score
13
Points
0
Location
Connecticut
You may have to go to a plumbing supply house for those.

What are you doing hanging up the old junk...

Arent you demo'ing all that out?
Everything I saw was shot top to bottom. Most of it looked so bad that you didn't even need a sawzall to remove it!

When I was saying the pipes would have to be supported I was talking the new stuff or, if just a section was being replaced which is not what we are doing.

All you need now is a helper to keep it from falling on you while you cut!
 
Last edited:

Mnalep

Member
Messages
186
Reaction score
0
Points
16
Location
Redford, Michigan
I've been thinking about doing the replacement in stages - so I've been seeing if I can get some pipe hangers working.

First I'd get that leaky 2nd floor tee replaced, with a PVC tee inserted.

Then I'd try to get that cast iron roof vent pipe out.

Then I'd cut out the wall, and replace the tee section for the 1st floor kitchen.

Then I'd drill the pipe out of the leaded joint in the basement floor, and replace it.

Then I'd replace the remaining galvanized with PVC - tying into the 2 new PVC tee's from the kitchens as I move. (I'd just replace the proflex couplings with PVC couplings as I move up).

I can see me spending 3-4 hours on each of these stages, so this way I can take my time, be careful, reduce my stress, and still maintain the drain for the 2nd floor kitchen.

The advantage would be that I don't interrupt the lady upstairs, while I allow myself time to spread the work out over as many days as I need.

The other big advantage this gives me is the time to ask questions on this forum, that I could then wait overnight for an answer to.

I'd only be doing a little more work over just tearing it all out at once - basically securing the pipes with some hangers before I do the sections.

So, that is the idea I've been thinking about. It seems reasonable - doesn't it?
 
Last edited:

Redwood

Master Plumber
Messages
7,335
Reaction score
13
Points
0
Location
Connecticut
I'm thinking a few hours to rip it all out and a few hours to put it all back in... Coulda been done today! Go back and do all the hangers tommorrow.
 

Mnalep

Member
Messages
186
Reaction score
0
Points
16
Location
Redford, Michigan
Redwood, I have no doubt you would have done this job in a day or less. But I am not a pro - like you. You know what you're doing, but I'm learning a lot as I go, and I thank you for your help.

Since the old galvanized are 2" pipes, is that what I should be getting in the new PVC, and the tee's should be 2" top and bottom, but 1.5" teeing out under the kitchen sink, to match the pipes there?

(I assume 1.5" all around would not be adequate which is why 2" is there now, except for this one section of 1.5" that must have been added in at a later time?)

Also, do you plan on having me re-use the cast iron going out the roof, or will I replace that with PVC also? (I guess it's 4", but I need to measure).
 
Last edited:

Mnalep

Member
Messages
186
Reaction score
0
Points
16
Location
Redford, Michigan
As far as a 2nd vent off the 1st floor kitchen, what will the piping look like there? Will there be a wye, or tee, off the horizontal pipe under the 1st floor kitchen - between the J trap and the sanitary tee, to accomodate the 2nd vent pipe (2"x1.5"x1.5)?

Then what? The 2nd vent pipe gets a 90 back into the wall, another 90 to turn up the wall, runs straight between the walls until it is above the J and sanitary tee of the 2nd floor, then takes another 90 back towards the 1st vent pipe, then ties in there with another wye?
 

Mnalep

Member
Messages
186
Reaction score
0
Points
16
Location
Redford, Michigan
But I'm not even sure what all the replacement pipes are going to be (2" for all the drains/vents? , 3" or 4" out the roof?), or just how I'm going to have to configure them (that 2nd vent piping in particular).

I don't want to tear everything out when I'm in doubt about what to buy, don't have it at the house yet, and still not sure about what I need to assemble.

If the house was empty, I would just demo. But I'm still trying to get some questions figured out. I need a clearer plan.
 

Mnalep

Member
Messages
186
Reaction score
0
Points
16
Location
Redford, Michigan
Redwood, I finally found it in my spam folder. Sometimes forget to look there.

Anyways, that's a great drawing you provided me! Thanks!

I want to make sure I understand the pipeing for the new vent pipe in the drawing. Below is what I have attempted to draw in MS Paint, on my kitchen picture. (I hope you can see what I'm trying to draw).
 

Attachments

  • IMG_0689.JPG
    IMG_0689.JPG
    26.1 KB · Views: 956
  • IMG_0689a.jpg
    IMG_0689a.jpg
    29 KB · Views: 901
  • IMG_0689b.jpg
    IMG_0689b.jpg
    41.2 KB · Views: 938

Mnalep

Member
Messages
186
Reaction score
0
Points
16
Location
Redford, Michigan
The other things that I'm concerned about are: drilling out the lead in the basement floor cast iron pipe (I don't want to damage the cast iron pipe in/under the basement floor), and getting the cast iron vent pipe down out of the roof (concern is damaging the roof flashing). I guess it will be a case of learn by doing.
 

Redwood

Master Plumber
Messages
7,335
Reaction score
13
Points
0
Location
Connecticut
You got it Bud!
Either offsetting the center outlet continious waste line, or, using an end outlet continious waste line like the one pictured below will do the trick. An end outlet is probably your best choice.

549666.jpg
 

Redwood

Master Plumber
Messages
7,335
Reaction score
13
Points
0
Location
Connecticut
Yes, We don't want the scale of this project to get bigger!:eek:
You may have to get on the roof to clean roofing cement off the vent pipe so it slides out without damaging the flashing. That cast iron in the basement looks very tender and it would be nice to save jackhammering the basement floor, or, roof repairs for your next project and not include it in this one!

On the sink drain installations you may want to come out of the wall with some 1 1/2" PVC before adapting to the trap. You have to access how much distance you have. You are the plumber on-site with a measuring stick not me.

And get rid of that old chrome extension going down to the trap... use a nice new plastic one.
 
Last edited:

Mnalep

Member
Messages
186
Reaction score
0
Points
16
Location
Redford, Michigan
Any way you can think of that would let me leave that roof vent in place? Or could I run something sharp around the pipe from in the attic?

What do you think about leaving the basement drain alone, just for now, until I get all the other new PVC up. Then handling that last, once all this other stuff is done and off my mind?
 
Top
Hey, wait a minute.

This is awkward, but...

It looks like you're using an ad blocker. We get it, but (1) terrylove.com can't live without ads, and (2) ad blockers can cause issues with videos and comments. If you'd like to support the site, please allow ads.

If any particular ad is your REASON for blocking ads, please let us know. We might be able to do something about it. Thanks.
I've Disabled AdBlock    No Thanks