Help - Galvanized drain pipes/vent pipe in 2 story home is rusted, broken, leaking.

Users who are viewing this thread

Redwood

Master Plumber
Messages
7,335
Reaction score
13
Points
0
Location
Connecticut
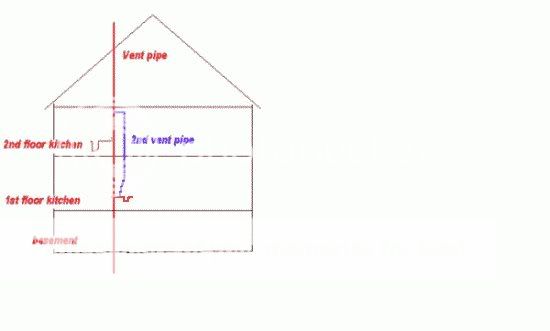
Nice drawing... Here is a corrected version.
The purpose of the vent is to protect the trap seal from the pressure and suction created in a drain by the falling water. If the water is falling ahead of it there is pressure which may pop bubbles of air out through the 1st floor trap. Likewise after the slug of water goes by the first floor trap there may be suction that sucks the water out of the trap. This would leave a dry trap and sewer gases could vent into the kitchen. Here it is corrected below.
We'll work with ya! I just hope your tennant will!

tarnow20kitchen20pipes202.jpg


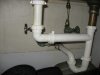
Here is several references for plastic fittings. It may help our discussion some. Are you using PVC or, ABS pipe and fittings? ABS is black and PVC is white... We've got to keep these guys segregated here though... Mixing isn't good I mean it can be done but only in certain ways. Generally a line coming in like the sinkon the vert. run would come in with a sani tee and a line coming in on a horiz. run would come in on a wye & 45 elbow or a combo fitting. The glues used for PVC and ABS are different too.

The first is just an installation hand book alot of it doesn't apply but there is a need to look through it really quick to see what applies to you cutting and gluing supporting etc. not chemical resistance and other ******** stuff. The second is actual drawings of the parts so we can communicate better.

http://www.charlottepipe.com/Default.aspx?Page=AllTechInstall

http://www.charlottepipe.com/Documents/DimensionalCatalogs/Plastic_Pipe_Fittings.pdf

Lets get going!:D
 

Redwood

Master Plumber
Messages
7,335
Reaction score
13
Points
0
Location
Connecticut
You need to get the wall opened up behind the sink so connections may be made. Pipes can be passed up and down through places where opening a wall is bad news as long as there are no connections to be made. Generally sawzall away to get the old pipe out open as you need to get the old pipe out and if you got the pipe out okay we can probably get the new stuff in! See if you can get us some pictures of the work area from further back so we can see the big picture. For sawzall blades I'm going to recommend Lenox Gold Blades 14 Teeth per inch available at most good plumbing supply houses not big box! Get going! We've got work to do!
 

Mnalep

Member
Messages
186
Reaction score
0
Points
16
Location
Redford, Michigan
Redwood, Great. I'll take some more pictures as you suggest, and I will browse the info at the links you provided, and try to get more informed. The re-draw you provided and desciption of why a vent is needed clears that question up for me.

Thanks.
 

Redwood

Master Plumber
Messages
7,335
Reaction score
13
Points
0
Location
Connecticut
We need pics the show basically both sides of the wall the pipe runs down, we gotta see where its best to open up and also the run in the basement.
 

Mnalep

Member
Messages
186
Reaction score
0
Points
16
Location
Redford, Michigan
Got some pictures.

First picture is 1st floor kitchen front.

Second and third pictures are 1st floor kitchen back wall, from 2 angles. One is taken from the back door, it shows the open back door, and in the background is the wall where the kitchen is. (I accidentally got the camera strap in the picture runnign right down the middle, sorry). The next picture shows the same wall, but this time from the basement angle. The drain pipe is just behind the stair railing.

Fourth picture shows the drain in the basment running just next to the stairway.

Fifth picture is a close up of the drain pipe in the basement, showing the rusty, misaligned pipes, at about 7' above the basment floor

More pictures in the next post to follow ....
 

Attachments

  • IMG_0690.JPG
    IMG_0690.JPG
    59.9 KB · Views: 1,733
  • IMG_0691.JPG
    IMG_0691.JPG
    55.3 KB · Views: 1,735
  • IMG_0692.JPG
    IMG_0692.JPG
    67.5 KB · Views: 1,714
  • IMG_0693.JPG
    IMG_0693.JPG
    76.2 KB · Views: 1,694
  • IMG_0697.JPG
    IMG_0697.JPG
    76 KB · Views: 1,792

Mnalep

Member
Messages
186
Reaction score
0
Points
16
Location
Redford, Michigan
More pictures...

Top picture here is the base of the drain pipe in the basment floor. I dont think its leaking, but looks rusty and wet perhaps from the water leaking from above on the drain pipe.

The 2nd picture shows the 2nd floor kitchen from the front. (The leaking pipes and Tee are behind this sink).

Third picture is the back wall behind the 2nd floor kitchen. The cutout in the wall is just visible in the picture to the left of the stairs, and at the top of a landing.

The fourth and fifth pictures again show the wall behind the 2nd floor kitchen, this time taken from a differnt angle, from on the landing. The cutoout in the wall was done by someone else, and is about 15" by 17".
 

Attachments

  • IMG_0695_1.JPG
    IMG_0695_1.JPG
    49.2 KB · Views: 1,710
  • IMG_0703.JPG
    IMG_0703.JPG
    66.7 KB · Views: 1,670
  • IMG_0698.JPG
    IMG_0698.JPG
    35 KB · Views: 1,664
  • IMG_0699.JPG
    IMG_0699.JPG
    32 KB · Views: 1,644
  • IMG_0700.JPG
    IMG_0700.JPG
    36.6 KB · Views: 1,676

Mnalep

Member
Messages
186
Reaction score
0
Points
16
Location
Redford, Michigan
The first picture here shows the pipes under the sink of the 2nd floor kitchen.

The 2nd picture shows the vent pipes in the attic. The vent pipe on the left is the one that is attached to the 2 sinks. The vent pipe on the right is not connected to anything. It has been cutoff just above the attic floor, and a bucket is under it to catch the rain water I guess.

There is no pipe running down the wall from the attic from the vent pipe in the right. I don't know if there ever was. I do see electrical wires in a cutout below that unattached vent, which is what the 3rd picture shows.

The 4th picture shows both pipes, again on the edge of a stairway, this time the attic stairway.

The 5th picture is of the attic stairway wall which contains the one vent pipe.
 

Attachments

  • IMG_0702.JPG
    IMG_0702.JPG
    52.3 KB · Views: 1,672
  • IMG_0719.JPG
    IMG_0719.JPG
    94.1 KB · Views: 1,617
  • IMG_0738.JPG
    IMG_0738.JPG
    58.2 KB · Views: 1,651
  • IMG_0727.JPG
    IMG_0727.JPG
    90.6 KB · Views: 1,596
  • IMG_0725.JPG
    IMG_0725.JPG
    45.2 KB · Views: 1,606

Mnalep

Member
Messages
186
Reaction score
0
Points
16
Location
Redford, Michigan
The first picture here is down in the basement. The upper left part of the picture shows the cleanout and drain pipe at the basement floor. What is the other pipe in the lower right part of the picture?


The next picture is looking up at the ceiling from in the basement. The hole appears to be about where the hole in the attic was just below the unattached vent pipe. I see several electric wires here, so I wonder if this opening was ever for a 2nd vent pipe, or was just for electric wires from day one?

The 3rd and 4th pictures are looking up at basement ceiling, from the basment, of the vent pipe.

The 5th picture is again of the basment ceiling, this time showing all the supply pipes going up to both kitchens.
 

Attachments

  • IMG_0740.JPG
    IMG_0740.JPG
    83.4 KB · Views: 1,592
  • IMG_0741.JPG
    IMG_0741.JPG
    82.4 KB · Views: 1,568
  • IMG_0742.JPG
    IMG_0742.JPG
    84.8 KB · Views: 1,593
  • IMG_0743.JPG
    IMG_0743.JPG
    79.6 KB · Views: 1,564
  • IMG_0744.JPG
    IMG_0744.JPG
    88.7 KB · Views: 1,561

Mnalep

Member
Messages
186
Reaction score
0
Points
16
Location
Redford, Michigan
The picture here is of the drain and Tee from the 2nd floor kitchen.

Looking at it - I just realized that one of the supply pipes (on the left) comes up from below, while the other one (on the right) seems to come down from the attic. I know it can't come from the atttic, so I guess it makes a "u" turn in the wall, because it must come from the basment. (This pic also shows my temporary patch)

Too many pictures? :)

Redwood, when you use the sawzall to cut the galvanized pipes, doesn't that create a lot of vibration, making it hard to cut the pipes? Does it vibrate enough to break other joints on the pipe run?
 

Attachments

  • IMG_0688.JPG
    IMG_0688.JPG
    95 KB · Views: 1,652
Last edited:

Mnalep

Member
Messages
186
Reaction score
0
Points
16
Location
Redford, Michigan
Redwood, To answer some of your earlier questions, I thought I'd use the white PVC. I've not noticed the black ABS so much in the stores around here, and I don;t know that there is any advantage using one or the other? The PVC does not seem pricey to me.

I did pick ups some 1.5" PVC pipes (SaniTee and 6' of straight), primer/glue, and Proflex couplings the other day, but just enough to do a repair to the leaky joint. I thought I could fix that first, then continue on with the rest of the system if I am (and I expect to be) successful with the Tee joint repair. I figured I could tie in the new PVC Sanitary Tee using the Proflex coupling right now - then afterward when I'm ready to proceed further down, I could replace the Proflex rubber coupling by gluing on a PVC coupling to continue the run.

If I approach the repair in 2 stages, I guess I should plan on putting in some kind of a vent tee above the Sani tee right now? The other concern is, as I look at the space between the 2 studs in the pic below (the tee from the 2nd floor sink) - there does not seem to be any room left for an additional 1.5" vent pipe to come up from below, unless it was between 2 other adjacent studs in the wall - is this typical for a 2nd vent line?

I have looked at the PVC pipe fittings manual. There are several Wye types. I have also browsed the "cast iron technical manual", and "plastics technical manual" on the other link you sent me.

Looking at these old pipes, I'm kind of surprised that they seem to be so misaligned after they rusted out at the joints. Is this caused by the house settling? Or was there just tension on the pipes when installed, that was released when the joints rusted out?
 

Attachments

  • IMG_0688.JPG
    IMG_0688.JPG
    95 KB · Views: 1,675

Redwood

Master Plumber
Messages
7,335
Reaction score
13
Points
0
Location
Connecticut
Man... Thats 1 ugly pipe top to bottom and maybe even then some.

You have decent access in that stairway though....

Seeing as the vent is supported in a bucket right now leave that and open up the walls in the stairwell below.

Cut the old pipe out starting at the top and work down..,

Then we'll start at the bottom and build it back up.
 

Redwood

Master Plumber
Messages
7,335
Reaction score
13
Points
0
Location
Connecticut
I can't tell you what that other pipe was you'd better find the original plumber and ask him... It might have been a sink or something in the basement.

When you get demo'd down to the bottom...

As far as rusty connection at the bottom its a poured lead and oakum joint see figure a in the picture below. You are going to have to drill out (swiss cheese) the lead and pick it out then get the oakum and that rusty old galv. pipe out. Don't drop a lot of stuff down there and hopefully that cast iron hub doesn't break or, the job gets even bigger.

14069_290_2.jpg


When we go to put it back together we are hoping to make a compression joint like in figure b...

To make that joint we need to put it back together like this...http://www.fernco.com/Donut.asp
 
Last edited:

Mnalep

Member
Messages
186
Reaction score
0
Points
16
Location
Redford, Michigan
I agree, it's an ugly pipe!

Anyway, the vent pipe with the bucket under it is not the vent pipe from the 2 kitchens - the "working" vent pipe (outlined in red) is about 36" to the left of the one with the bucket under it, in the picture below.

The second picture shows the vent pipe, and it is rusted out at the cast iron pipe that goes out the roof. Can I insert new PVC into that cast iron riser that goes out the roof with some type of donut gasket? (I'd rather not pull out the cast iron that goes through the roof).
 

Attachments

  • IMG_0719a.jpg
    IMG_0719a.jpg
    42.9 KB · Views: 2,162
  • IMG_0723.JPG
    IMG_0723.JPG
    84.1 KB · Views: 2,146

Mnalep

Member
Messages
186
Reaction score
0
Points
16
Location
Redford, Michigan
I'm not sure how the cast iron vent is sealed.

I have a couple more pictures of it, but I can't tell from looking at them. I can see where the roof boards were cut to let it clear through the roof. The roof is shingled with asbestos type shingles, but I've never seen the roof from the top, or tried to view it from outside the house.

What were you thinking?
 

Attachments

  • IMG_0723.JPG
    IMG_0723.JPG
    84.1 KB · Views: 1,689
  • IMG_0724.JPG
    IMG_0724.JPG
    78.8 KB · Views: 1,692
  • IMG_0730.JPG
    IMG_0730.JPG
    60.4 KB · Views: 1,727

Mnalep

Member
Messages
186
Reaction score
0
Points
16
Location
Redford, Michigan
I forgot to ask, got any tips for using the sawsall, and keeping the blade from hitting the wood wall behind the pipe, and getting bent? These galvanized pipes are only about 1" from the wall behind them.
 

Sjsmithjr

In the Trades
Messages
314
Reaction score
1
Points
16
Location
Knoxville, Tennessee
The stroke on your sawzall will be about 1 1/4" (at least that's what mine are). Use the shortest blade you can to cut through the pipe. You'll have to start with the saw at a shallow angle to the wall and not let the shoe rest against the pipe as you finish up the cut. You'll get the hang of it pretty quick. I should add that not holding the shoe against the cutting surface probably violates the instructions and all safety rules, but that's how I do it. If the blade bends, don't worry about it. You can straighten it back up with a pair of pliers and keep going. For that operation you should either lock out the saw or unplug it first.
 
Last edited:

Redwood

Master Plumber
Messages
7,335
Reaction score
13
Points
0
Location
Connecticut
It would be good to know how that vent is flashed. You probably will need some roofing work done around the new vent... New Flashing..

The sawing will have less shaking if you can keep the shoe against the pipe... But you can't always do that.

Also as weak as your pipes are you may be able to just move them and break them off! Try that!
 
Last edited:

Mnalep

Member
Messages
186
Reaction score
0
Points
16
Location
Redford, Michigan
I got a couple of pictures of the roof, and from the inside of the house looking right up at where the vent enters the roof .... I'm not climbing up on this roof.

THe last pic shows a strap I put on the pipe, to hold in place as I sawsall it. There is a second strap I put on in the attic.
 

Attachments

  • IMG_0747.JPG
    IMG_0747.JPG
    54.5 KB · Views: 1,636
  • IMG_0750a.jpg
    IMG_0750a.jpg
    51.6 KB · Views: 1,630
  • IMG_0758.JPG
    IMG_0758.JPG
    57 KB · Views: 1,618
  • IMG_0759.JPG
    IMG_0759.JPG
    81.5 KB · Views: 1,630
  • IMG_0764a.jpg
    IMG_0764a.jpg
    34.8 KB · Views: 1,614

Redwood

Master Plumber
Messages
7,335
Reaction score
13
Points
0
Location
Connecticut
Not a problem its flashed with lead... Don't hurt the lead when you take that out. I've got an idea that will seal it when we put the new pipe through... But you will need to get on the roof just for a moment... Just don't hurt the lead.
 
Top
Hey, wait a minute.

This is awkward, but...

It looks like you're using an ad blocker. We get it, but (1) terrylove.com can't live without ads, and (2) ad blockers can cause issues with videos and comments. If you'd like to support the site, please allow ads.

If any particular ad is your REASON for blocking ads, please let us know. We might be able to do something about it. Thanks.
I've Disabled AdBlock    No Thanks