You are using an out of date browser. It may not display this or other websites correctly.
You should upgrade or use an alternative browser.
You should upgrade or use an alternative browser.
Cracked ABS repair options?
- Thread starter Polecatt
- Start date
Users who are viewing this thread
Total: 2 (members: 0, guests: 2)
hj
Master Plumber
- Messages
- 33,607
- Reaction score
- 1,046
- Points
- 113
- Location
- Cave Creek, Arizona
- Website
- www.terrylove.com
You CANNOT " repair" it. You have to replace it.
Sponsor
Paid Advertisement
Polecatt
Member
That’s fair. The “repair” will be replacement of the cracked fitting.
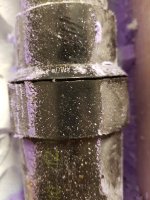
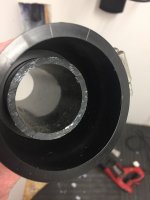
Any tricks or guidance on where to cut and what to squeeze in to get the job done in the tight quarters? The cracked fitting is an ABS 1.5” to 2” coupling. Ever see one separate like this?
Any tricks or guidance on where to cut and what to squeeze in to get the job done in the tight quarters? The cracked fitting is an ABS 1.5” to 2” coupling. Ever see one separate like this?
What clearance is there? It looks like plaster was squished in there and may be in contact with the pipe behind.Any tricks
Could you wrap a leather belt, or even a sheet of paper, around the area below the crack?
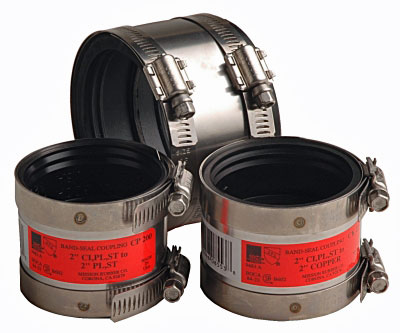
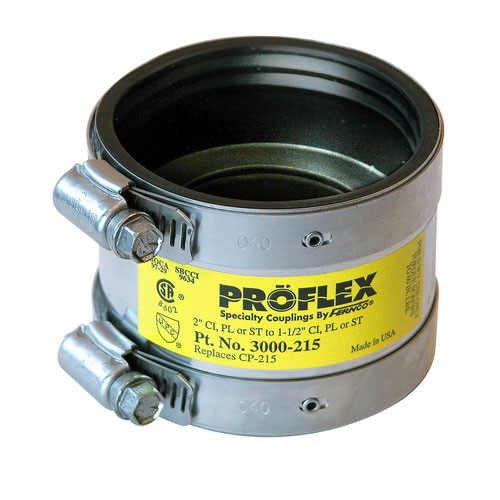
A coupling like this can be used, or also a "slip" coupling. The slip couplings are solvent weld (glued) and need to be installed quickly before the glue sets.
The rubber with metal wrap gives you more time to play with it.
Last edited:
Polecatt
Member
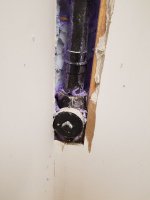
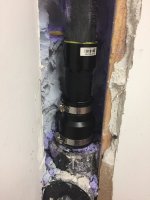
It was encased in spray foam insulation, between the wall framing, with an internal adjoining wall blocking the rest of the framing cavity. Once I cut out a section of pipe I will have about an inch around the pipe if I clear away the insulation.
Polecatt
Member
A coupling like this can be used, or also a "slip" coupling. The slip couplings are solvent weld (glued) and need to be installed quickly before the glue sets.
The rubber with metal wrap gives you more time to play with it.
So two of these with a new reducer coupling in the middle? Are these prone to leaks down the line or are they considered a permanent fix?
Kreemoweet
In the Trades
Shielded couplings are "permanent" and suitable for burying in concealed places. There are 2" x 1.5" shielded couplings
available: https://www.homedepot.com/p/1-1-2-in-x-2-in-EPDM-Rubber-Shielded-Coupling-P3000-215/100372286.
One of those at the bottom, and another 1.5" x 1.5" at some convenient location higher up is all you need.
available: https://www.homedepot.com/p/1-1-2-in-x-2-in-EPDM-Rubber-Shielded-Coupling-P3000-215/100372286.
One of those at the bottom, and another 1.5" x 1.5" at some convenient location higher up is all you need.
Polecatt
Member
That sounds nice and simple! I’ll see if I can source the parts at my local HDShielded couplings are "permanent" and suitable for burying in concealed places. There are 2" x 1.5" shielded couplings
available: https://www.homedepot.com/p/1-1-2-in-x-2-in-EPDM-Rubber-Shielded-Coupling-P3000-215/100372286.
One of those at the bottom, and another 1.5" x 1.5" at some convenient location higher up is all you need.
How about this procedure?
- Cut the 2 inch ABS just below the failed coupling. Make cut pretty horizontal, and don't poke through the wall on the other side with your reciprocating saw. Dress end
- Cut the 1.5 inch about 8 inches higher than that. Let's presume it is 8 inches for purposes of discussion. Dress end.
- Clean out foam and outside of 2 cut pipes. Dig out enough space behind the 1.5 pipe for step 5 also.
- Build assy 1 as shown. Black is ABS about 7.8 inches long. Purple is regular ABS 1.5 inch coupling. Orange is rubber from P3000-215, which kreemoweet pointed to.
a. glue coupler to top of ABS pipe.
b. Lube pipe and rubber a bit with liquid dish soap. Slide rubber only up on pipe, as illustrated, with 2 inch opening down and 1.5 inch opening up. - Slide loose metal shield of P3000-215 up and out of the way on the 1.5 inch pipe. Temporarily secure with string, rubber band, tape, or whatever. Alternatively, the shield could be over the bottom of the ABS coupling during the install of assy 1.
- Drop bottom of assy 1 (1.9 inch OD) into the 2 inch pipe (2.047 ID). This is the thing that makes this work, or not. Check that this is going to work before gluing anything. Otherwise you would need a second shielded coupling.
- Apply ABS glue to inside top of ABS coupling and bottom of ABS pipe, lift and twist. Wait until glue is strong.
- At this point, the bottom of assy 1 and the top of the 2 inch pipe are nearly the same level. Note the level with a marker or tape on the wall. Apply more dish soap, and slide the rubber down over the 2 inch pipe until the middle of the rubber is at your mark.
- Slide the metal shield down over the rubber. Tighten with a 5/16 socket to about 5 ft-lb.
Last edited:
Polecatt
Member
That’s amazing! Thanks for pulling that together! By “dress pipe” I assume you mean make sure there are no sharp edges or other things for debris to get caught on?How about this procedure?
- Cut the 2 inch ABS just below the failed coupling. Make cut pretty horizontal, and don't poke through the wall on the other side with your reciprocating saw. Dress end
- Cut the 1.5 inch about 8 inches higher than that. Let's presume it is 8 inches for purposes of discussion. Dress end.
- Clean out foam and outside of 2 cut pipes. Dig out enough space behind the 1.5 pipe for step 5 also.
- Build assy 1 as shown. Black is ABS about 7.8 inches long. Purple is regular ABS 1.5 inch coupling. Orange is rubber from P3000-215, which kreemoweet pointed to.
a. glue coupler to top of ABS pipe.
b. Lube pipe and rubber a bit with liquid dish soap. Slide rubber only up on pipe, as illustrated, with 2 inch opening down and 1.5 inch opening up.- Slide loose metal shield of P3000-215 up and out of the way on the 1.5 inch pipe. Temporarily secure with string, rubber band, tape, or whatever. Alternatively, the shield could be over the bottom of the ABS coupling during the install of assy 1.
- Drop bottom of assy 1 into the 2 inch pipe.
- Apply ABS glue to inside top of ABS coupling and bottom of ABS pipe, lift and twist. Wait until glue is strong.
- At this point, the bottom of assy 1 and the top of the 2 inch pipe are nearly the same level. Note the level with a marker or tape on the wall. Apply more dish soap, and slide the rubber down over the 2 inch pipe until the middle of the rubber is at your mark.
- Slide the metal shield down over the rubber. Tighten with a 5/16 socket to about 5 ft-lb.View attachment 45332
Yes. Also clean the outside of the pipes where the ABS coupling gets glued or the rubber coupling will slide.I assume you mean make sure there are no sharp edges or other things for debris to get caught on?
Re-thinking the inserting the 1.5 into the 2 inch, maybe making assy 1 longer would be better to let pipe flex work for you.
Last edited:
Polecatt
Member
The rubber coupling will be seated as far down as possible on top of the 2”Yes. Also clean the outside of the pipes where the ABS coupling gets glued or the rubber coupling will slide.
Re-thinking the inserting the 1.5 into the 2 inch, maybe making assy 1 longer would be better to let pipe flex work for you.
Any issues if the 1.5” is left low(nested inside the 2”) as per the pic, once glued to the upper 1.5”
Attachments
Ahh... so no mark needed. You still may want a mark on the pipe to let you know when you can stop pushing.The rubber coupling will be seated as far down as possible on top of the 2”
I am pretty sure there is not an issue with that. I am not a plumber.Any issues if the 1.5” is left low(nested inside the 2”) as per the pic, once glued to the upper 1.5”
Polecatt
Member
The reason we use a metal shield coupling is to prevent pipe shift over time. If there is no pressure there, it may be okay. It won't pass an inspection.
You're not connection cast or steel though, so it should be okay.
You're not connection cast or steel though, so it should be okay.
Last edited:
Polecatt
Member
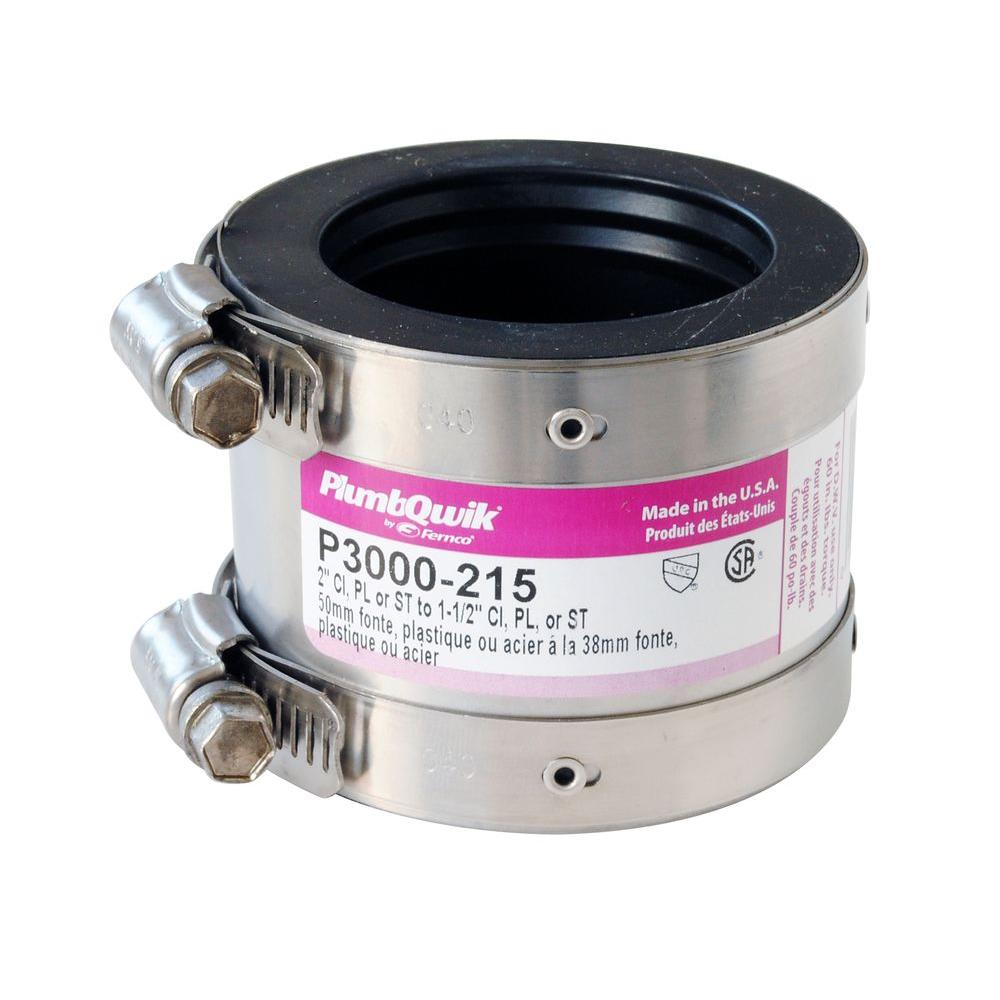
Those look far more robust! Is that a Canada / US thing? My local Canadian HD only had these rubber ones.
The pipes are embedded in spray foam so there will be no movement.
The pipes are embedded in spray foam so there will be no movement.
As Terry said, you will probably be fine. Nobody is going to be opening your wall to inspect.
https://www.homedepot.ca/en/home/p.shielded-coupling-2-x-112.1000450793.html looks like the equivalent on the HD Canadian site. I searched for "shielded coupling", and that is one that came up.
https://www.homedepot.ca/en/home/p.shielded-coupling-2-x-112.1000450793.html looks like the equivalent on the HD Canadian site. I searched for "shielded coupling", and that is one that came up.
Jadnashua
Retired Defense Industry Engineer xxx
What may work for awhile and what will pass an inspection (and should last 'forever') are not necessarily the same thing! The shielded coupling is code compliant. The all-rubber one is not.
Similar threads
- Replies
- 12
- Views
- 497
- Replies
- 7
- Views
- 564
- Replies
- 23
- Views
- 594
- Replies
- 0
- Views
- 290