Leejosepho
DIY scratch-pad engineer
- Messages
- 2,483
- Reaction score
- 0
- Points
- 36
- Location
- 200 miles south of Little Rock
- Website
- www.nonameyet.org
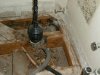
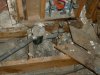
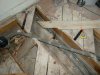
crossthreaded said:I think at this point I am planning on just ripping it out down to the joists and starting over. It will be a big pain to run the new wet vent without tearing up the floors.
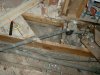
Even though a single layer would have been odd, I did not previously realize you already have 1-1/2" of the 1x3 t-g, and I would caution you about trying to rip all of that out unless you are *quite* sure your walls do not sit on it. In the original part of my old and small house, the main-floor studs (four outside walls and one center wall only) actually run through the floor decking and sit on the basement walls, and I suppose that would make it possible to completely remove the decking. But, I would doubt that is your own case.
Along with doing whatever you truly must to deal with your venting, I would again suggest you simply repair the bad spot, re-nail your existing decking and add your "hardi backer" or whatever and tile. Having also worked as a mechanic in years past, I do understand your "complete overhaul" thinking. However, and unless that entire floor is rotten, I would definitely not attempt that here.