Toilet Leaking at Lock Nut or Shank

Users who are viewing this thread

Kakozar34

New Member
Messages
9
Reaction score
0
Points
1
Location
Denton County, TX
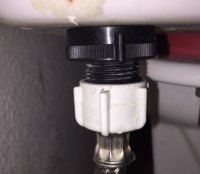
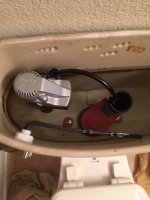
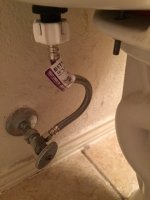
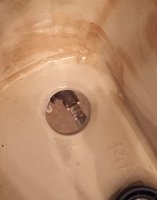
I recently replaced all the contents of my toilet tank. Once completed, I noticed a very slight leak on the floor behind the toilet. I replaced the stainless steel flex supply line and tried again. That did not correct the leak, but it did allow me to see that the leak seemed to be forming from the shank at the lock nut. The lock nut seems tightened enough. Could it be that my shank washer isn't seated quite right?? Any help would be appreciated.
 

Kakozar34

New Member
Messages
9
Reaction score
0
Points
1
Location
Denton County, TX
Here are some pictures. If you look closely, you can see the drop forming on the right side of the shank and also that has dripped down onto the coupling nut.
 

Attachments

  • toilet4.jpg
    toilet4.jpg
    48 KB · Views: 10,371
  • toilet2.jpg
    toilet2.jpg
    80.2 KB · Views: 3,472
  • toilet1.jpg
    toilet1.jpg
    75.2 KB · Views: 5,453

Terry

The Plumbing Wizard
Staff member
Messages
29,942
Reaction score
3,459
Points
113
Location
Bothell, Washington
Website
terrylove.com
You might check for smoothness inside the tank. I sometimes take some emory cloth and smooth the inside before dropping the fill valve in.
 

WJcandee

Wise One
Messages
3,181
Reaction score
170
Points
63
Location
New York, NY
Like Terry said. The issue likely isn't how tight you made the nut, it's likely the seal that the rubber inside the tank is making against the porcelain. Hence Terry's suggestion to sand the thing and make sure it is seated nicely around the hole.
 

Kakozar34

New Member
Messages
9
Reaction score
0
Points
1
Location
Denton County, TX
Like Terry said. The issue likely isn't how tight you made the nut, it's likely the seal that the rubber inside the tank is making against the porcelain. Hence Terry's suggestion to sand the thing and make sure it is seated nicely around the hole.

Thank you.....I will let ya'll know how that turns out tonight. I will have to stop and get some emery cloth. Thank you so much for the ideas.
 

Kakozar34

New Member
Messages
9
Reaction score
0
Points
1
Location
Denton County, TX
You might check for smoothness inside the tank. I sometimes take some emory cloth and smooth the inside before dropping the fill valve in.

Well, I'm more confused than ever with toilet! After spending an hour and a half finding somewhere that had the emery cloth, I tried and tried to sand down the ridge on the right hand side of the fill valve hole to no avail! It appears that the ridge is actually a defect in the porcelain. What doesn't make sense to me, is that the toilet tank wasn't leaking before I changed out the guts. I changed everything out because the fill valve was starting to fail and wasn't working properly, but no leaking whatsoever from the toilet at all. I did the best I could trying to get rid of that ridge and cleaned the bottom of the tank out and left it to dry out overnight. I will re-install the fill valve tonight and pay close attention to how it's seated and tightened down. I will add water to the tank then and see if it leaks when it's not attached to the supply line.

Any other suggestions? I'm baffled.
 

Attachments

  • toilet.jpg
    toilet.jpg
    48.5 KB · Views: 3,264

Reach4

Well-Known Member
Messages
38,898
Reaction score
4,436
Points
113
Location
IL
Have you established that the leaking is at the tank and not at the connecting hose? You could tie some cotton cord around the thread to see if it gets wet, if there is doubt.

I would put silicone grease lightly on the seals before tightening. The lubrication helps the resilient material flow to conform to irregularities better.

https://www.danco.com/product/0-5-oz-silicone-faucet-grease/ Danco 88693
https://www.lowes.com/pd/Oatey-Silicone-Grease/50236505
are one that you may find locally, but there are others.

Non-silicone plumber's grease should work too.

Even liquid dish washing liquid may serve.

I even wonder if a putty would help.
 

Kakozar34

New Member
Messages
9
Reaction score
0
Points
1
Location
Denton County, TX
Have you established that the leaking is at the tank and not at the connecting hose? You could tie some cotton cord around the thread to see if it gets wet, if there is doubt.

I would put silicone grease lightly on the seals before tightening. The lubrication helps the resilient material flow to conform to irregularities better.

https://www.danco.com/product/0-5-oz-silicone-faucet-grease/ Danco 88693
https://www.lowes.com/pd/Oatey-Silicone-Grease/50236505
are one that you may find locally, but there are others.

Non-silicone plumber's grease should work too.

Even liquid dish washing liquid may serve.

I even wonder if a putty would help.

I changed out the supply line just to be sure, but you can see in one of the first pics that the leak seemed to be forming at the locking nut. Just to be safe though, I changed the supply line and still had the leak. So, I switched focus to the fill valve. I will try to grease. It doesn't make sense to me that there isn't a washer of some sort on the bottom side of the fill valve where the shank comes out of the tank.
I'm almost ready to just buy another fill valve and NOT a Korky again. I usually get the Fluidmaster and didn't this time.
 

Reach4

Well-Known Member
Messages
38,898
Reaction score
4,436
Points
113
Location
IL
If you lightly lube the threads that the black nut tightens onto, you may get another 1/2 turn with the same hand strength. Maybe a left-handed friend could get more torque.
 

Kakozar34

New Member
Messages
9
Reaction score
0
Points
1
Location
Denton County, TX
If you lightly lube the threads that the black nut tightens onto, you may get another 1/2 turn with the same hand strength. Maybe a left-handed friend could get more torque.

Well, for some reason the instructions that came with the repair kit...it says specifically not to do that and not to use plumbers tape either. Don't know why.
 

Reach4

Well-Known Member
Messages
38,898
Reaction score
4,436
Points
113
Location
IL
Well, for some reason the instructions that came with the repair kit...it says specifically not to do that and not to use plumbers tape either. Don't know why.
You don't want tape. The reason they said not to lubricate the threads would be to prevent overtightening and stripping out the threads on the plastic nut. I was thinking that the access might be awkward, as it is on mine, so overtightening becomes less probable. You could reserve that thread lube for if the other measures don't work, but before you switch to the Fluidmaster fill valve.
 

Kakozar34

New Member
Messages
9
Reaction score
0
Points
1
Location
Denton County, TX
You don't want tape. The reason they said not to lubricate the threads would be to prevent overtightening and stripping out the threads on the plastic nut. I was thinking that the access might be awkward, as it is on mine, so overtightening becomes less probable. You could reserve that thread lube for if the other measures don't work, but before you switch to the Fluidmaster fill valve.

That makes sense. And yes, you are absolutely correct about the access. Mine is right up against the wall and next to the bath tub, with literally only about 6-12 inches from the tub. Luckily, I'm not a big person and can finagle myself a bit to get to it. It's also difficult to hold the fill valve in place, while reaching down there to tighten the lock nut and make sure it's just right.

I really appreciate all the ideas. I'm starting to do more and more DIY projects. Not all plumbing, but the next plumbing project will be to replace a Moen cartridge in my shower. Those are always fun. The last one was stuck like chuck to the point that I had to have someone come and do it for me and even he had a hard time. Hoping for better luck on this other one. But, at least I have you guys to bounce it off of!
 

WJcandee

Wise One
Messages
3,181
Reaction score
170
Points
63
Location
New York, NY
The Korky valve is just fine. It doesn't need a seal on the outside of the tank, it needs a good seal on the inside, which is why we told you to use some light sanding to even things out. If it's a new valve, that it should be a new rubber seal on the inside. Try reach's suggestions, and tighten the freaking thing a little more than you have if you can, and if not, find a stronger friend to tighten it up a bit more. You're likely to find the problem is the seal between the rubber and the inside of the tank. There's always the possibility that there's a crack somewhere in the valve, but having installed a couple dozen Korkyss, I think it's highly unlikely.
 

Kakozar34

New Member
Messages
9
Reaction score
0
Points
1
Location
Denton County, TX
FINALLY! Success! I actually DID do the sanding wjcandee, on the day the guys suggested it. The ridges would not sand down, as they appeared to be a defect in the porcelain tank. I re-installed the fill valve again yesterday and was very careful to hold it in place to keep the washer flush on the porcelain. I tightened the lock nut and then found something that I could get a hold of it with a little better (channel locks with towel wrapped around it) and tightened it further. I added water to the tank without securing the supply line yet, to see if it leaked and it did not. I added more and still had no leaking. So, I attached the supply line and turned on the water and BOOM.....no leaking!

Thank you guys for all your suggestions! On to the next project!
 

RayT

New Member
Messages
1
Reaction score
1
Points
3
Location
Arkansas
You might check for smoothness inside the tank. I sometimes take some emory cloth and smooth the inside before dropping the fill valve in.
I had the same problem as Kakozar34. When I looked at the new fill valve seal closely, there was a small dent on it. When I felt around the tank hole from the inside, there was a sharp bump in the tank (go figure). So I took Terry's advice and sanded it down with some sandpaper. Reinstalled just with hand-tightening and finally, no leak. Great tip! Thank you so much!
 
Top
Hey, wait a minute.

This is awkward, but...

It looks like you're using an ad blocker. We get it, but (1) terrylove.com can't live without ads, and (2) ad blockers can cause issues with videos and comments. If you'd like to support the site, please allow ads.

If any particular ad is your REASON for blocking ads, please let us know. We might be able to do something about it. Thanks.
I've Disabled AdBlock    No Thanks