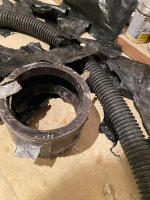
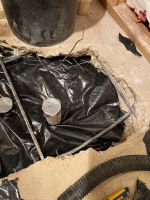
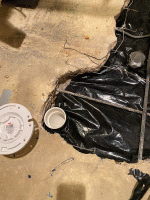
Drain lines for basement bathroom and laundry

Users who are viewing this thread

NickLo

New Member
Messages
25
Reaction score
0
Points
1
Location
Maryland
It sounds like what you are describing is what I suggested. But to be sure, I would need a floor plan showing the existing and proposed. If you are able to get an overhead photo showing the piping on both sides of the wall, you could just draw on that, one color to make the existing pipes clear (maybe dashed for pipes you will be removing), and another color for new pipes.

Cheers, Wayne


@wwhitney , Here is a really simple one...the lines/text in red are new and the black lines would be the ones I'd keep in place. Let me know if this isn't detailed enough and I can do the SketchUp pipe one..it just takes longer.

https://imgur.com/KyEwbof

https://imgur.com/9lB5RpA
 
Last edited:

wwhitney

In the Trades
Messages
6,579
Reaction score
1,852
Points
113
Location
Berkeley, CA
The shower drain has to join the WC drain after the lavatory (2" riser), not before. Hopefully you have room between the lav 2" riser and the washer drain coming in to fit in the shower drain. So going downstream from the closet flange, the junctions would be 3x2 combo upright (not san-tee on its back) for the lav 2" riser (existing), 3x2 wye flat for the shower, 3x2 wye flat (existing) for the washing machine drain.

[If you have trouble getting it all to fit, you could use street wyes. Street combos are not made, to my knowledge, but you can use a street wye plus street 45, I think that ends up more compact on the straight path than a combo.]

I'm not sure I follow what you've drawn at the bottom of the washing machine 2" riser, is it a single LT 90 to go from vertical to horizontal , and then straight into the existing 3x2 flat wye? Or is there another bend in between? If the latter, using another LT90 is inefficient, you could rotate the first LT90 45 degrees and use a 45.

Cheers, Wayne
 

NickLo

New Member
Messages
25
Reaction score
0
Points
1
Location
Maryland
The shower drain has to join the WC drain after the lavatory (2" riser), not before. Hopefully you have room between the lav 2" riser and the washer drain coming in to fit in the shower drain. So going downstream from the closet flange, the junctions would be 3x2 combo upright (not san-tee on its back) for the lav 2" riser (existing), 3x2 wye flat for the shower, 3x2 wye flat (existing) for the washing machine drain.

[If you have trouble getting it all to fit, you could use street wyes. Street combos are not made, to my knowledge, but you can use a street wye plus street 45, I think that ends up more compact on the straight path than a combo.]

I'm not sure I follow what you've drawn at the bottom of the washing machine 2" riser, is it a single LT 90 to go from vertical to horizontal , and then straight into the existing 3x2 flat wye? Or is there another bend in between? If the latter, using another LT90 is inefficient, you could rotate the first LT90 45 degrees and use a 45.

Cheers, Wayne


Ok, why do you have to have it after the lav drain exactly? Just wanted to educate myself on it and understand more. I've been trying to read up on the IPC as much as possible so I like to learn this stuff too. So I think it's going to be tight...but using street wyes just might make it work. Otherwise, I'd need to break up more concrete after the 3x2 existing wye and most likely redo the whole thing. Which if that is the case, it is what it is. I've come this far. LOL.

for the washing machine riser, is it is a single LT90. I was trying to draw a curve...

Thanks,
Nick
 

wwhitney

In the Trades
Messages
6,579
Reaction score
1,852
Points
113
Location
Berkeley, CA
Ok, why do you have to have it after the lav drain exactly?
The general rule is that a fixture drain has to be vented before (dry venting) or as (wet venting) it joins another drain. So you can't join two unvented drains, in this case the shower and the WC. Instead the WC joins the lav drain and is vertically wet vented as it does so, and then the shower joins the lav/WC drain and is horizontally wet vented as it does so.

I don't have an IPC citation handy that makes that explicit. And there is one exception in the IPC called "common venting". 911.2 says "Where the fixture drains being common vented connect at the same level, the vent connection shall be at the interconnection of the fixture drains or downstream of the interconnection." That last bit about "downstream of the interconnection" means you can combine two unvented fixture drains and then use a single vent takeoff to vent them. But that vent takeoff has to be an individual vent (911.1), i.e. a dry vent, so you can't join the shower and WC and then common vent them via the lav vertical wet vent.

https://up.codes/viewer/maryland/ipc-2018/chapter/9/vents#911

If I recall correctly, common venting may be useful for you for your double lav. Note that with common venting, each trap arm still has to separately meet the length limits and the trap weir rule, in relation to where the common vent is taken off.

Cheers, Wayne
 

NickLo

New Member
Messages
25
Reaction score
0
Points
1
Location
Maryland
The general rule is that a fixture drain has to be vented before (dry venting) or as (wet venting) it joins another drain. So you can't join two unvented drains, in this case the shower and the WC. Instead the WC joins the lav drain and is vertically wet vented as it does so, and then the shower joins the lav/WC drain and is horizontally wet vented as it does so.

I don't have an IPC citation handy that makes that explicit. And there is one exception in the IPC called "common venting". 911.2 says "Where the fixture drains being common vented connect at the same level, the vent connection shall be at the interconnection of the fixture drains or downstream of the interconnection." That last bit about "downstream of the interconnection" means you can combine two unvented fixture drains and then use a single vent takeoff to vent them. But that vent takeoff has to be an individual vent (911.1), i.e. a dry vent, so you can't join the shower and WC and then common vent them via the lav vertical wet vent.

https://up.codes/viewer/maryland/ipc-2018/chapter/9/vents#911

If I recall correctly, common venting may be useful for you for your double lav. Note that with common venting, each trap arm still has to separately meet the length limits and the trap weir rule, in relation to where the common vent is taken off.

Cheers, Wayne

Thanks so much for the explanation! I'm trying to make sure I do this right and learn along the way. So I'll either see if I have enough room to connect them with street joints like you had suggested or break up some more concrete and start fresh. I'll keep ya posted.

Thanks

Nick
 

NickLo

New Member
Messages
25
Reaction score
0
Points
1
Location
Maryland
The general rule is that a fixture drain has to be vented before (dry venting) or as (wet venting) it joins another drain. So you can't join two unvented drains, in this case the shower and the WC. Instead the WC joins the lav drain and is vertically wet vented as it does so, and then the shower joins the lav/WC drain and is horizontally wet vented as it does so.

I don't have an IPC citation handy that makes that explicit. And there is one exception in the IPC called "common venting". 911.2 says "Where the fixture drains being common vented connect at the same level, the vent connection shall be at the interconnection of the fixture drains or downstream of the interconnection." That last bit about "downstream of the interconnection" means you can combine two unvented fixture drains and then use a single vent takeoff to vent them. But that vent takeoff has to be an individual vent (911.1), i.e. a dry vent, so you can't join the shower and WC and then common vent them via the lav vertical wet vent.

https://up.codes/viewer/maryland/ipc-2018/chapter/9/vents#911

If I recall correctly, common venting may be useful for you for your double lav. Note that with common venting, each trap arm still has to separately meet the length limits and the trap weir rule, in relation to where the common vent is taken off.

Cheers, Wayne


@wwhitney, I've been out for a while. Work has been rough but I'm back at it again. Few questions I had...
1. Being mindful of the slope for the rough in plumbing, I've noticed that the riser coming out of the ground isn't completely plumb. Is this because the slope is too much or how do I ensure slope while ensuring the riser is completely plumb?
2. I was considering the KBRS shower pan or linear pan. Just confirming by my shower drain configuration/location is specific to the dimensions of the shower pan correct?
2. Once everything is set and glued, I fill back up with dirt, pebbles and then do I need to lay back down some plastic to ensure a vapor barrier is achieved or is that not necessary before I add cement?
4. I cut rebar and the small metal wire to access the plumbing, Do I put that back in as well but not attached to anything?


Thanks and hope all is well.
 

wwhitney

In the Trades
Messages
6,579
Reaction score
1,852
Points
113
Location
Berkeley, CA
1) Good question, I'm not sure I'm the best person to answer. Did your slope end up more than 1/4" per foot? I don't think fittings typically have any allowance for horizontal slope built in, i.e. a 90 is 90 degrees, not the 91.2 degrees you need to go from vertical to 1/4" per foot horizontal. So you end up off plumb a little, but plastic pipe is typically flexible enough that you can force it to plumb with in a foot or two. Where it matters sooner than that, then some other approach is required. [Hopefully a p-trap is one fitting that is a true 91.2 degrees between riser and horizontal outlet, as you need the riser to be vertical.]

2) Definitely, you need to have the shower base on hand before you locate the final shower riser, so you can be sure it's exactly where needed. It's going to vary by product.

3) What is the existing buildup? I would at least match that. For new construction, best practice would typically be undisturbed soil, a layer of 3/4" drain rock (capillary break), a vapor barrier, and the concrete directly on the vapor barrier. So if there's a vapor barrier under your slab, you should put one under your repair as well. It's not necessary (or even possible) to be perfect in joining old and new, just overlap the best you can. If there's no vapor barrier, adding one under your repair isn't going to do much, vapor wise, but it might make it a little easier by keeping the drain rock from mixing with the concrete.

4) Your encountered both rebar and wire mesh? In the same location, or different locations? The fact that you have rebar and wire mesh makes me wonder if the rebar is for a structural purpose beyond the usual temperature and shrinkage reinforcement (which the mesh would typically be sufficient for, and if the builder decided on mesh for that purpose, why use rebar?) If that were the case, then it would be important to restore the integrity of the rebar.

If you want to do that, and you have exposed rebar ends free of concrete, you can just wire new rebar to the exposed ends to complete the grid (the longer the lap the better). If the rebar is cut back flush to the slab edge, then you'd either break more concrete, or drill and epoxy rebar to the concrete near the cut rebar.

Cheers, Wayne
 

NickLo

New Member
Messages
25
Reaction score
0
Points
1
Location
Maryland
1) Good question, I'm not sure I'm the best person to answer. Did your slope end up more than 1/4" per foot? I don't think fittings typically have any allowance for horizontal slope built in, i.e. a 90 is 90 degrees, not the 91.2 degrees you need to go from vertical to 1/4" per foot horizontal. So you end up off plumb a little, but plastic pipe is typically flexible enough that you can force it to plumb with in a foot or two. Where it matters sooner than that, then some other approach is required. [Hopefully a p-trap is one fitting that is a true 91.2 degrees between riser and horizontal outlet, as you need the riser to be vertical.]

2) Definitely, you need to have the shower base on hand before you locate the final shower riser, so you can be sure it's exactly where needed. It's going to vary by product.

3) What is the existing buildup? I would at least match that. For new construction, best practice would typically be undisturbed soil, a layer of 3/4" drain rock (capillary break), a vapor barrier, and the concrete directly on the vapor barrier. So if there's a vapor barrier under your slab, you should put one under your repair as well. It's not necessary (or even possible) to be perfect in joining old and new, just overlap the best you can. If there's no vapor barrier, adding one under your repair isn't going to do much, vapor wise, but it might make it a little easier by keeping the drain rock from mixing with the concrete.

4) Your encountered both rebar and wire mesh? In the same location, or different locations? The fact that you have rebar and wire mesh makes me wonder if the rebar is for a structural purpose beyond the usual temperature and shrinkage reinforcement (which the mesh would typically be sufficient for, and if the builder decided on mesh for that purpose, why use rebar?) If that were the case, then it would be important to restore the integrity of the rebar.

If you want to do that, and you have exposed rebar ends free of concrete, you can just wire new rebar to the exposed ends to complete the grid (the longer the lap the better). If the rebar is cut back flush to the slab edge, then you'd either break more concrete, or drill and epoxy rebar to the concrete near the cut rebar.

Cheers, Wayne
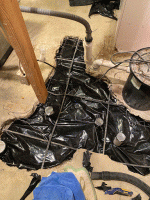

Thanks @wwhitney,
1. I think it's sloped a little more than it needs to be based on where my level shows, I'll look into that first. Code has it at 1/4 per foot of course and I'm over that. @Terry asking for clarity on the plumb if you're able to answer. Thanks for your help.
2. Ok thanks on pan, is it a requirement to use concrete leveling compound for the bath? Not sure if you'd know or not. Assuming the pan manufacturer would say too.
3. Yes, I got some heavy duty plastic sheeting and was going to attempt to push it under the concrete that is there and will bond it as best as I can.
4. I encountered both rebar and the hog fence (you can see from previous photos) The hog fence wire was over the rebar. How do you connect the rebar back together? Do I have to weld it or do they make like a jbweld type solution? Or just join them together by wire tying another piece together? I have most of the rebar exposed and only cut enough to access the plumbing. The cuts are not flush with the concrete so easier to join them together.

Thanks for the quick reply!
 

wwhitney

In the Trades
Messages
6,579
Reaction score
1,852
Points
113
Location
Berkeley, CA
2) I'm not sure if you're asking about the shower base or a separate bathtub. In both cases the perimeter tile flange should be level, so the supports for the base/tub should be shimmed/supported in mortar piles to make that happen (and for tubs, sometimes a ledger is used for the long wall, depending on the tub design). Read the manufacturer's instructions.

A shower base like a foam tileable base needs continuous support, so there you should use a self-leveling material (which requires some help to self-level) to provide a continuous level subsurface. Unless the deviations from level are very small and plausibly filled with thinset mortar when you set the foam base.

3) Just shoving it under for a partial lap is enough, if you have existing sheeting extending out into the concrete hole, then it would be worth taping with the appropriate tape. But it's not worth trying to tape under the existing slab, that sounds very difficult.

4) I tried scanning your previous photos but didn't see the rebar exactly (one of the downsides to using outside links, rather than uploading the photos here, it's harder to scan through them all). Anyway, if you have rebar, I don't think you need welded wire mesh (I guess you might decide on rebar 24" o.c. plus 6" WWM for some reason, not sure.) For the rebar repair, just cut a piece that will extend almost all the way cross your concrete hole, and use rebar wire to tie it to the existing rebar stubs at both ends. (Or 24" of overlap is probably enough (slightly educated guess), so if you cut out the central 1' of a bar of which you exposed 6', putting in a 5' piece to repair it would probably be enough). The wire tie is just to hold the rebar while placing the concrete; after the concrete solidifies, the wire tie has no structural role.

Cheers, Wayne
 

NickLo

New Member
Messages
25
Reaction score
0
Points
1
Location
Maryland
2) I'm not sure if you're asking about the shower base or a separate bathtub. In both cases the perimeter tile flange should be level, so the supports for the base/tub should be shimmed/supported in mortar piles to make that happen (and for tubs, sometimes a ledger is used for the long wall, depending on the tub design). Read the manufacturer's instructions.

A shower base like a foam tileable base needs continuous support, so there you should use a self-leveling material (which requires some help to self-level) to provide a continuous level subsurface. Unless the deviations from level are very small and plausibly filled with thinset mortar when you set the foam base.

3) Just shoving it under for a partial lap is enough, if you have existing sheeting extending out into the concrete hole, then it would be worth taping with the appropriate tape. But it's not worth trying to tape under the existing slab, that sounds very difficult.

4) I tried scanning your previous photos but didn't see the rebar exactly (one of the downsides to using outside links, rather than uploading the photos here, it's harder to scan through them all). Anyway, if you have rebar, I don't think you need welded wire mesh (I guess you might decide on rebar 24" o.c. plus 6" WWM for some reason, not sure.) For the rebar repair, just cut a piece that will extend almost all the way cross your concrete hole, and use rebar wire to tie it to the existing rebar stubs at both ends. (Or 24" of overlap is probably enough (slightly educated guess), so if you cut out the central 1' of a bar of which you exposed 6', putting in a 5' piece to repair it would probably be enough). The wire tie is just to hold the rebar while placing the concrete; after the concrete solidifies, the wire tie has no structural role.

Cheers, Wayne


Thanks as always Wayne. When I would try and upload the photos, I would get a size limitation. I'll shoot you a photo if needed, but your explanation makes sense without sending one.
 

NickLo

New Member
Messages
25
Reaction score
0
Points
1
Location
Maryland
2) I'm not sure if you're asking about the shower base or a separate bathtub. In both cases the perimeter tile flange should be level, so the supports for the base/tub should be shimmed/supported in mortar piles to make that happen (and for tubs, sometimes a ledger is used for the long wall, depending on the tub design). Read the manufacturer's instructions.

A shower base like a foam tileable base needs continuous support, so there you should use a self-leveling material (which requires some help to self-level) to provide a continuous level subsurface. Unless the deviations from level are very small and plausibly filled with thinset mortar when you set the foam base.

3) Just shoving it under for a partial lap is enough, if you have existing sheeting extending out into the concrete hole, then it would be worth taping with the appropriate tape. But it's not worth trying to tape under the existing slab, that sounds very difficult.

4) I tried scanning your previous photos but didn't see the rebar exactly (one of the downsides to using outside links, rather than uploading the photos here, it's harder to scan through them all). Anyway, if you have rebar, I don't think you need welded wire mesh (I guess you might decide on rebar 24" o.c. plus 6" WWM for some reason, not sure.) For the rebar repair, just cut a piece that will extend almost all the way cross your concrete hole, and use rebar wire to tie it to the existing rebar stubs at both ends. (Or 24" of overlap is probably enough (slightly educated guess), so if you cut out the central 1' of a bar of which you exposed 6', putting in a 5' piece to repair it would probably be enough). The wire tie is just to hold the rebar while placing the concrete; after the concrete solidifies, the wire tie has no structural role.

Cheers, Wayne


@wwhitney Here are the photos of the DryFitting and rebar. Not sure why my photos are too large to upload directly. Might need to save them in a different format. From the pics, you should be able to see the two places I cut the rebar. I plan to bend them back down and place a stim of rebar and tie it back down. I figured out the plum issue with the riser, I just had to work with it a little more.
I have the 2x6 as a reference of where my wet wall will be so I could ensure the risers come up pretty close to center, and the WC drain is 12.5 off of it. Slope looks good, in some places it's more than 1/4 of an inch. Here are the questions I have.
1. the WC outer flange will rest on the cement correct? So I'd need to ensure that seats and fits properly while maintaining a good level.
2. The shower drain is close to the wall because I'm installing a linear drain but need to do a little more research on the best placement for a water in water out system vs modular Any thoughts on one system vs the other?
3. I plan to cement in the drainage pipes one by one just to ensure I get all my placement right and check it a few times before I actually pull out the cement. I made my marks but leveling and angles can easily get slightly off as I'm sure you're aware.
4. Once everything is in, I will support pipes, check slope, bury back with dirt and rock. Then place vapor barrier, cement and then put in framing.

Anything else I'm missing?

Thanks!
Nick

https://imgur.com/iwGZt4C
https://imgur.com/Sx3YIVL
https://imgur.com/lXcSBgc
https://imgur.com/459DvvO
https://imgur.com/sKVVQqx
https://imgur.com/wxkMQOQ
 

wwhitney

In the Trades
Messages
6,579
Reaction score
1,852
Points
113
Location
Berkeley, CA
1) Conventional wisdom is to use a closet flange with stainless steel flange, and install the flange so its bottom is on top of the finish floor. So the flange would only be on your slab if your slab is the finish floor. I actually favor putting the top of the flange level with the finish floor, as I've occasionally had trouble with it ending up 1/4" too high and limiting my options for closet seal.

You want to have your flange figured out ahead of time, but install it as late as possible. If you end up with a pipe riser segment and an outside fit flange, you might need to block out the concrete a little around the pipe riser (e.g. with a 4" coupling).

2) No idea.

3) With your dry fitting, were you able to bottom out the pipe segment into the fitting? You definitely want to bottom them out when gluing them up, so if they aren't currently bottomed, you'll need to cut slightly longer segments for the glue up.

4) OK. You want a fairly granular fill around the pipe, no big rocks.

5) You don't want the concrete in contact with the plastic pipe anywhere, so where pipes are rising through the concrete, you wrap them with a foam isolation material. If you are using bag mix, I prefer the ones with a higher nominal psi rating, they have a bit more Portland cement in them.

Cheers, Wayne
 

NickLo

New Member
Messages
25
Reaction score
0
Points
1
Location
Maryland
1) Conventional wisdom is to use a closet flange with stainless steel flange, and install the flange so its bottom is on top of the finish floor. So the flange would only be on your slab if your slab is the finish floor. I actually favor putting the top of the flange level with the finish floor, as I've occasionally had trouble with it ending up 1/4" too high and limiting my options for closet seal.

You want to have your flange figured out ahead of time, but install it as late as possible. If you end up with a pipe riser segment and an outside fit flange, you might need to block out the concrete a little around the pipe riser (e.g. with a 4" coupling).

2) No idea.

3) With your dry fitting, were you able to bottom out the pipe segment into the fitting? You definitely want to bottom them out when gluing them up, so if they aren't currently bottomed, you'll need to cut slightly longer segments for the glue up.

4) OK. You want a fairly granular fill around the pipe, no big rocks.

5) You don't want the concrete in contact with the plastic pipe anywhere, so where pipes are rising through the concrete, you wrap them with a foam isolation material. If you are using bag mix, I prefer the ones with a higher nominal psi rating, they have a bit more Portland cement in them.

Cheers, Wayne


Ok thanks for the head's up on the flange and foam isolation material. When you mentioned the dry fitting, I tried to get them to bottom out as much as possible, but it was difficult for sure. I'll take note of where the position of everything is now and glue piece by piece making sure I keep my same length and checking before I glue. If I need to cut a longer segment, I will for sure. For the shower drain, is it possible to use a true 2" P trap so I can adjust it more easily for possible last minute adjustments? I'll keep ya posted and thanks again.
 

wwhitney

In the Trades
Messages
6,579
Reaction score
1,852
Points
113
Location
Berkeley, CA
For the shower drain, is it possible to use a true 2" P trap so I can adjust it more easily for possible last minute adjustments?
I don't understand the question. For the shower below grade you want a 2" solvent weld p-trap; if by "true" p trap you mean with a union joint in the middle, so I don't think that's best practice for under a slab, it's just another possible leak point.

If you're worried about being able to make fine adjustments for the final pan location, you can box out maybe a 12" x 12" square in your slab repair, with the shower drain entering the box and left long. Then when it's time place the pan, you precisely glue on your p-trap and riser, fill the boxed out area with gravel, and then patch in the slab. Obviously a bit of extra trouble.

BTW, the foam isolation material is just for penetrations rising through the slab. It's because concrete shrinks as it cures, meaning holes shrink, too, and you don't want the concrete clamping down on your DWV pipe. Elsewhere the vapor barrier is plenty of separation.

Cheers, Wayne
 

NickLo

New Member
Messages
25
Reaction score
0
Points
1
Location
Maryland
I don't understand the question. For the shower below grade you want a 2" solvent weld p-trap; if by "true" p trap you mean with a union joint in the middle, so I don't think that's best practice for under a slab, it's just another possible leak point.

If you're worried about being able to make fine adjustments for the final pan location, you can box out maybe a 12" x 12" square in your slab repair, with the shower drain entering the box and left long. Then when it's time place the pan, you precisely glue on your p-trap and riser, fill the boxed out area with gravel, and then patch in the slab. Obviously a bit of extra trouble.

BTW, the foam isolation material is just for penetrations rising through the slab. It's because concrete shrinks as it cures, meaning holes shrink, too, and you don't want the concrete clamping down on your DWV pipe. Elsewhere the vapor barrier is plenty of separation.

Cheers, Wayne

That is what I meant, and I suspected it wouldn't be a good idea, but it's always so helpful to have someone help with you a sanity check. I've seen some of those boxed in methods when I was researching. I was thinking about doing what you had suggested so I could make sure everything was on point measurement wise. For a DIY'er like me, it might be the best option just to make sure I give myself a little leeway.
 

NickLo

New Member
Messages
25
Reaction score
0
Points
1
Location
Maryland
@wwhitney ok, I got the rebar tied and the vapor barrier put in. Here are a few images. I was going to just use liquid nails to adhere the new vb to the old one as much as possible. I don't have overlay in all spots but not sure what else to do there. I also have these spaces I was going to put around the shower drain and then use orange foam around the rest of the pvc to space between that and the cement.

Thoughts?

https://imgur.com/E4BOr3Z
https://imgur.com/ta5ickA
https://imgur.com/qivfaOg
 

Attachments

  • 2021-04-02_4.gif
    2021-04-02_4.gif
    101.1 KB · Views: 142
  • 2021-04-02.gif
    2021-04-02.gif
    92 KB · Views: 143
  • 2021-04-02_1.gif
    2021-04-02_1.gif
    96.3 KB · Views: 139
  • 2021-04-02_3.gif
    2021-04-02_3.gif
    91.5 KB · Views: 144
Last edited:

wwhitney

In the Trades
Messages
6,579
Reaction score
1,852
Points
113
Location
Berkeley, CA
My experience with a repair like this is limited, but it looks good to me. If you go to the trouble to shrink your photos and paste them in the thread, I bet you'll get more people to look at the photos; they can follow your links to the full size images if desired.

You may not have much control over the rebar height, but in a 4" slab you'd want it centered, preferably with a minimum 1-1/2" cover on the top. Certainly any stray metal wire ties or mesh should be folded down to avoid the top 1" of concrete.

I'm not clear on the value and feasibility of trying to seal the new vapor barrier to the old vapor barrier, that level of detail exceeds my knowledge. My first thought is that it is OK to skip but I may be missing something.

Not sure what you mean by orange foam, if you are talking about a gun foam that's not the best choice for this situation. You want to separate the exposed PVC from the concrete you are placing by a thinnish layer of compressible material (and you can wrap any above grade portion with a plastic cover if you want to keep concrete splatter off). "Sill sealer" foam strips are perfect, maybe 2 wraps; you may have some foam packaging materials on hand that would work. In places where you want a larger void (e.g. the WC stub up if you are using an outside fit flange or the flange has any protrusions on the bottom), I would suggest blocking out with a short section of larger sized pipe, along with some packing material to keep the blockout centered around the pipe. The blockout doesn't need the exterior foam wrap, unless you want it to be removable.

Cheers, Wayne
 

NickLo

New Member
Messages
25
Reaction score
0
Points
1
Location
Maryland
My experience with a repair like this is limited, but it looks good to me. If you go to the trouble to shrink your photos and paste them in the thread, I bet you'll get more people to look at the photos; they can follow your links to the full size images if desired.

You may not have much control over the rebar height, but in a 4" slab you'd want it centered, preferably with a minimum 1-1/2" cover on the top. Certainly any stray metal wire ties or mesh should be folded down to avoid the top 1" of concrete.

I'm not clear on the value and feasibility of trying to seal the new vapor barrier to the old vapor barrier, that level of detail exceeds my knowledge. My first thought is that it is OK to skip but I may be missing something.

Not sure what you mean by orange foam, if you are talking about a gun foam that's not the best choice for this situation. You want to separate the exposed PVC from the concrete you are placing by a thinnish layer of compressible material (and you can wrap any above grade portion with a plastic cover if you want to keep concrete splatter off). "Sill sealer" foam strips are perfect, maybe 2 wraps; you may have some foam packaging materials on hand that would work. In places where you want a larger void (e.g. the WC stub up if you are using an outside fit flange or the flange has any protrusions on the bottom), I would suggest blocking out with a short section of larger sized pipe, along with some packing material to keep the blockout centered around the pipe. The blockout doesn't need the exterior foam wrap, unless you want it to be removable.

Cheers, Wayne
@wwhitney , ok I made them gif, so they would show up in the thread. Yeah oddly enough the rebar seems to be on the lower end of the slab. I will fold down the hog wire here shortly for sure.

Yeah I was considering sealing the vb just to try and ensure a better barrier I guess.

Ok, tracking on sill sealer. I was confused but you cleared it up for me thanks.

As for the WC stub, I was going to use the plastic spacer I posted in the photos, but there is some rebar right in that section. the flange would connect to a 3"pipe and into the elbow. Not sure how much space I would need but I should be able to get a wrap around there if the rebar and spacing can stay.
 

wwhitney

In the Trades
Messages
6,579
Reaction score
1,852
Points
113
Location
Berkeley, CA
Yeah oddly enough the rebar seems to be on the lower end of the slab.
That's not so surprising to see, as a common practice for a slab is to make your rebar grid on the base and then lift it up a little as you are placing the concrete. Not a very accurate method.

I must have missed the spacer for the WC in the pictures, but it sounds like you know what you need to do there.

Cheers, Wayne
 

NickLo

New Member
Messages
25
Reaction score
0
Points
1
Location
Maryland
My experience with a repair like this is limited, but it looks good to me. If you go to the trouble to shrink your photos and paste them in the thread, I bet you'll get more people to look at the photos; they can follow your links to the full size images if desired.

You may not have much control over the rebar height, but in a 4" slab you'd want it centered, preferably with a minimum 1-1/2" cover on the top. Certainly any stray metal wire ties or mesh should be folded down to avoid the top 1" of concrete.

I'm not clear on the value and feasibility of trying to seal the new vapor barrier to the old vapor barrier, that level of detail exceeds my knowledge. My first thought is that it is OK to skip but I may be missing something.

Not sure what you mean by orange foam, if you are talking about a gun foam that's not the best choice for this situation. You want to separate the exposed PVC from the concrete you are placing by a thinnish layer of compressible material (and you can wrap any above grade portion with a plastic cover if you want to keep concrete splatter off). "Sill sealer" foam strips are perfect, maybe 2 wraps; you may have some foam packaging materials on hand that would work. In places where you want a larger void (e.g. the WC stub up if you are using an outside fit flange or the flange has any protrusions on the bottom), I would suggest blocking out with a short section of larger sized pipe, along with some packing material to keep the blockout centered around the pipe. The blockout doesn't need the exterior foam wrap, unless you want it to be removable.

Cheers, Wayne
@wwhitney yeah I was actually wondering if anyone else was going to chime in.
 
Last edited:
Top
Hey, wait a minute.

This is awkward, but...

It looks like you're using an ad blocker. We get it, but (1) terrylove.com can't live without ads, and (2) ad blockers can cause issues with videos and comments. If you'd like to support the site, please allow ads.

If any particular ad is your REASON for blocking ads, please let us know. We might be able to do something about it. Thanks.
I've Disabled AdBlock    No Thanks