Check valve substitute

Users who are viewing this thread

Yar02169

Member
Messages
81
Reaction score
0
Points
6
Location
Quincy, MA
Hi guys with all the answers!

You have helped me in the past, and I'm going to pick your brains once again. Long story on my well is that I have an issue with silt. I've given up on trying to develop and be rid of it, and now I just deal with it. [irrigation only].

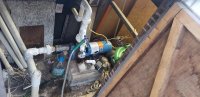
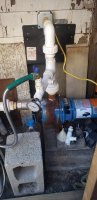
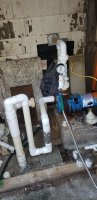
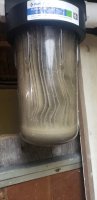
I have a 10"x4" whole house filter mounted after the pump, before any zone valves. I now had to clean the filter for the second time this season. The silt is usually only an issue on pump start, if any comes up while watering, it's minimal

Now, I've omitted the pressure switch and went to a timer system. That has eliminated any zone valve leak dropping pressure and turning on the pump. That caused issues because the pump didn't always build enough pressure to shut off, and would/could run for an extended period.

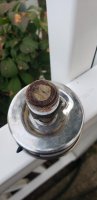
When the system shuts down, I can hear back-flow. The prime drops, as well as whatever pressure was in the system to the zone valves. My guess is there's not enough head pressure for the check valve to close properly, and is all flows back down, mixing up a silt storm for next time.

I think I have a couple options, or a combination of options, and here's where you pros get to shine.

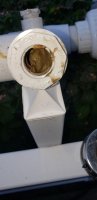
Option 1 - Replace the check valve with a solenoid valve (normally closed). When the switch turns on, the valve opens and we're off to the races

Option 2 - Install a "start zone". Remove the spigot and install a zone that would run the first 5 minutes or so. It would allow the pump to purge out the silt, and then switch to the filter and feed the system.

Option 3 - Both, or a better idea that you may have.

A picture is attached, because why not. I thank you for any help you can provide.
Ray
 

Attachments

  • Pump.jpg
    Pump.jpg
    77.6 KB · Views: 206

Valveman

Cary Austin
Staff member
Messages
14,633
Reaction score
1,304
Points
113
Location
Lubbock, Texas
Website
cyclestopvalves.com
There are special deep well pump control valves designed to do just that. Sometimes purging the first few minutes of water from a well is the only way to deal with the sand. So, setting up a purge zone as number one could be a good idea. However, sand/silt will keep any kind of valve from sealing properly. It is probably what causes your check valve to leak back, and would do the same to a solenoid or any other type of valve.

You have a good metal spring loaded check valve. That is about as good as you can do. I would think you are more likely to have a suction leak prior to the check valve that is causing the loss of prime, not the check valve. Any threaded joint is suspect as well as the union????
 

Yar02169

Member
Messages
81
Reaction score
0
Points
6
Location
Quincy, MA
Thanks for the input, I may have to install a new Zone 1. Before I do, how about this: the head pressure I have now is minimal, omit the "n" and I have about a foot of head, so maybe 2.5 psi. If I removed the hose spigot and attached a 2" vertical pvc pipe (filled with water) id have about 23.5 psi. Would that help in closing the check valve? I'm thinking of testing it by putting a slightly larger diameter garden hose on the spigot, and run the hose up to the 2nd story window to test it. A picture to help.
 

Attachments

  • 20200808_163551.jpg
    20200808_163551.jpg
    83.7 KB · Views: 192

WorthFlorida

Clinical Trail 5th session completed 4/24/24.
Messages
5,763
Solutions
1
Reaction score
998
Points
113
Location
Orlando, Florida
There is a lot of threaded connections before the check valve. Three on the union and one at the check valve. All could be a source for a leak.

I had a well at the church, I worked at, and for years it would always lose prime. After ten years of use I had a repair shop replace the bearing and seal plus the cap. I bought a $180 all brass 2" check valve to replace the already installed brass check valve. After a month or so it started again but only occasionally. A year later it won't whole prime at all and you can hear the water rushing back down the well. It was the brass check valve the problem though the spring tension seemed fine and no debris. All the metal pipes, unions and fitting were all replaced with glued PVC pipe right to the pump a PVC male 2" nipple. Never had a problem since.
 

Yar02169

Member
Messages
81
Reaction score
0
Points
6
Location
Quincy, MA
[
My defense regarding a pre-pump leak. In the spring I did have a leak, I could hear air come through the heads. Covering joints with shaving cream, I could hear a slight change in the pump sound in a leak area. After 15-20 minutes, I could see the 'suction funnel' in the cream to the leak point. Some PVC cleaner fixed those buggers. But, I will check all joints between the pump and the well.

From the pump output it goes to the filter, and then to a ball valve. I close the ball valve when cleaning the filter, it saves a good 5 gallons of draining. I've shut off the pump, quickly closed the ball valve, and I have no draw back, the filter will stay clear and full. That seems to tell me that I'm leak free from the ball valve to the well to the ball valve. If I open the ball valve, it then draws back and the silt in the filter gets mixed up as the water flows back down the well (where it mixes everything up down below).

The zone valves are new this year, and don't leak, when a zone is on, none of the other zones have any leakage. With that in mind, it leads me back to the thought of not having enough head pressure for the check valve to work properly. If by chance there is some silt on the valve seat, my current 2.3-ish PSI is useless, if I have a 10' vertical 'head pipe', that would be about 23 PSI, which could seal any silt and prevent the back flow. Or, maybe instead of the 'head pipe', I could re-install my little bladder tank, and utilize the pressure to simulate head pressure (to what charge pressure?).

Does this seem to make any sense, or am I just over thinking the entire thing? The silt is there, but I would like to reduce interaction with it as much as I can. Eliminating the prime loss would most definitely help, as would the purge zone concept. If I can get the check valve operating properly, it would be better for the pump in the long run, and it may not require the purge zone. I will double check pump to well joints, and I'm open to any and all criticism or solutions that may help. Silt sucks, I hove you never have to deal with it.
 

WorthFlorida

Clinical Trail 5th session completed 4/24/24.
Messages
5,763
Solutions
1
Reaction score
998
Points
113
Location
Orlando, Florida
Your so called head pressure between the check valve and the zone valves has nothing to do with closing the check valve, it's the little spring inside the check valve that closes it then as gravity tries to pull the water down back into the well is where the pressure (vacuum) comes from to help keep the valve closed.

What I would do is move the check valve where the well pipe comes out of the ground to the vertical position so gravity will help close the valve. Use a PVC valve and glue all joints, no unions, right to the pump. When you glue up a PVC check valve be sure that the cement doesn't run down inside the valve. PVC is cheap and if you ever have to remove the pump just cut the PVC. This done all the time here in Florida for irrigation and pool pump installations. This is about the most bulletproof way to go though a good metal check valve should work in any position.

What could be happing is as the water rushes down the well pipe it is stirring up the sediment and the bottom. The next time the pump runs you are removing the loose sediment. With each cycle it removes more and there could now be a pocket at the end of the pipe. The fix to stop the prime from being lost, sediment will not be stirred up and may take care of this issue. Also consider the Valveman's suggestion.


Do you have a picture of your controller or timer? Are you using a start relay? How many zones?
 

LLigetfa

DIYer, not in the trades
Messages
7,507
Reaction score
581
Points
113
Location
NW Ontario, Canada
Your so called head pressure between the check valve and the zone valves has nothing to do with closing the check valve, it's the little spring inside the check valve that closes it then as gravity tries to pull the water down back into the well is where the pressure (vacuum) comes from to help keep the valve closed.
Head pressure helps to improve the seal. That is why when there are multiple check valves, the upstream ones often leak, creating a vacuum in the pipe possibly drawing in contaminated surface water. That is why topside check valves are against code in many states.
 

Yar02169

Member
Messages
81
Reaction score
0
Points
6
Location
Quincy, MA
I like the idea of moving the check valve to vertical, it should function either way, but I get the logic.
Since I'll be doing some mods, I'll make a provision for a potential "head stack". Would a solenoid valve be even better than the cv, or do you think the cv would act faster in closing?
 

WorthFlorida

Clinical Trail 5th session completed 4/24/24.
Messages
5,763
Solutions
1
Reaction score
998
Points
113
Location
Orlando, Florida
I like the idea of moving the check valve to vertical, it should function either way, but I get the logic.
Since I'll be doing some mods, I'll make a provision for a potential "head stack". Would a solenoid valve be even better than the cv, or do you think the cv would act faster in closing?
A solenoid controlled valve cannot work like a check valve. The water pressure from inlet side is what helps keep the valve tight. On a well system the as the water will try go down the well pipe it will create a vacuum and may pull open or unseat the valve seal. On a check valve it will tighten the seal.

15132631175a32900db432e.1189.jpg
 

Yar02169

Member
Messages
81
Reaction score
0
Points
6
Location
Quincy, MA
Looking at the solenoid diagram, it identifies the Valve Inlet/Outlet. I do see a couple flow arrows, but couldn't it be installed so that the diaphragm would mimic a check valve? The vacuum would pull the diaphragm tighter into the seal.
I found no leaks using the shaving cream method, but it doesn't matter now because I did some dismantling. Initially, I saw my pressure gauge at 20 PSI, so I figured the check valve does work, not quite the case. A look at the pictures shows the havoc silt can cause. Time for a new pressure gauge as well.
To answer an earlier question, yes, I'm using a start relay switch instead of a pressure switch. The controller I believe a Rainbird. Running 5 zones, so I can bump them to make a purge zone.
 

Attachments

  • pressure gauge.jpg
    pressure gauge.jpg
    41.4 KB · Views: 189
  • pressure gauge housing.jpg
    pressure gauge housing.jpg
    36.5 KB · Views: 190

Valveman

Cary Austin
Staff member
Messages
14,633
Reaction score
1,304
Points
113
Location
Lubbock, Texas
Website
cyclestopvalves.com
Back pressure does help hold a check closed, but technically the vacuum should also hold it well enough. However, if the well is deep enough the vacuum can cause vapor at the check. Shouldn't be a problem with these systems though. Gravity is not going to make much difference either. If the check isn't holding it is either bad or has something like sand in the seat. A pressure switch/pressure tank type control would give some back pressure to the check as well as possibly wash away sand until the check holds? But 23' of pipe is only 10 PSI stand pipe pressure and is not going to help much. Best to solve the sand problem is possible. If not frequent check valve replacements as well as pump and other components will be common.
 

WorthFlorida

Clinical Trail 5th session completed 4/24/24.
Messages
5,763
Solutions
1
Reaction score
998
Points
113
Location
Orlando, Florida
My take on the vertical position is it to minimize silt from settling on the bottom. In the horizontal position there could be 2 or 3 inches of silt holding the valve open.
 

Yar02169

Member
Messages
81
Reaction score
0
Points
6
Location
Quincy, MA
My well is about 25 feet deep, and the water table is about 7' down, so I see no issue with the vacuum creating any vapor. The water supply is great, it's never come close to running dry.

I've already done some development stirring yesterday, and will do it again before I assemble the new parts. My plan will be to pump out what I can since I have the system apart. Who knows, I might get lucky and create a clear zone down there. I've had that thought before and look where I am. Again.

The check valve had some stuff along what I would say was the bottom side of the valve when horizontal, not a lot at all, but I'm sure enough to be cause me these issues. I cleaned that up, and bought some bits to place the check valve vertically. Hopefully I'll be a happy camper in 24 hours.
 

Yar02169

Member
Messages
81
Reaction score
0
Points
6
Location
Quincy, MA
Well, I have an update. :-|
I relocated the check valve to vertical. Put in a new pressure gauge, which I will replace with a liquid filled one tomorrow. Mixed things up down below, assembled the new set-up and ran it for an hour, hopefully pumping out some silt and creating a clean spot down there. Got home from work today and irrigated the lawn. Initial flow has a little silt in the filter, but nothing much. Did some errands and when I got home, I looked and the pressure gauge was sitting at zero. :-( That doesn't mean the check valve didn't work though, right? Using the relay switch on the pump, the timer is in charge of turning on/off the relay for the pump. I don't know the timing between shutting off a zone, and shutting off the pump. If the pump shuts off first, then the zone gets it's signal and closes, could the 40-ish PSI pumping pressure reach zero? If the check valve has time to close and hold the prime, I'll be very happy. Prime is good, system pressure can be zero, it shouldn't be an issue, correct?
If I do loose the prime, Option 2 will be utilized: Zone 1 becomes a 'Dump Zone" and pump the first 5 minutes or so to a silt accumulation site and then switch over to irrigating Zones, call it a day, and go have a beer (in a Covid-19 safe way).
I will double check all joint with shaving cream, double checking my work.
Is it possible to be at 0 PSI (there could be a PSI or two, didn't look that close as it was dark), and be holding prime? Fingers crossed.
As usual, I thank you guys for either providing solutions, or approving my sanity in what I think might work, you're a good sounding board. It's a forever never ending project, s0me 20 years in the making, but slowly I'm making progress, especially the past 12 years since I discovered this forum. We're in a 7" drought for the year, lawns are brown all over, and I'm still mowing my green carpet at least once a week. Thanks!
Follow up when progress is made.
 

Attachments

  • CHeck valve 081220.jpg
    CHeck valve 081220.jpg
    90.9 KB · Views: 186

Valveman

Cary Austin
Staff member
Messages
14,633
Reaction score
1,304
Points
113
Location
Lubbock, Texas
Website
cyclestopvalves.com
You would need 2.31' of water standing in the pipe after the pump to get 1 PSI against the check valve. Zero pressure doesn't mean the check is not holding. However, I think you may have created a problem at the well head. Those elbow up and back down leave a high spot in the line before the pump. The air in the water will accumulate in the high spot. Then when the pump starts it will get a slug of air and loose prime. The pump needs to be the high spot in the suction line so the air doesn't get trapped.
 

Bannerman

Well-Known Member
Messages
4,847
Reaction score
792
Points
113
Location
Ontario, Canada
I've omitted the pressure switch and went to a timer system. That has eliminated any zone valve leak dropping pressure and turning on the pump.
If the zone valve leakage issue hasn't been addressed, that would explain 0 pressure after the pump timer has shut down the pump.
 

Yar02169

Member
Messages
81
Reaction score
0
Points
6
Location
Quincy, MA
Many thanks Valveman, I understand what you mean.
To be proper, I should have the cv on the well head, and keep the piping below the pump. Would that be accurate?
With the limited space, I'll have to get creative. Maybe rotate the pump to the left, pump facing out (have the input about where the cv is now). The output would exit up, and I could loop it back to the feed pipe. Maybe raise the pump a little bit. Any advice will be utilized.
If I go with the head stack, I'd use a 10' pvc pipe (4.3 PSI), would that be sufficient?

Bannerman - all zone valves are new, replaced this Spring. The timer relay switch I did last year. If I can maintain prime and reduce the silt stir up issue, I'll be a happy camper.

The pic is the silt accumulated in 2.5 hrs of watering. Probably 3/4" of the 1" of silt was from start-up.
 

Attachments

  • 20200814_104522.jpg
    20200814_104522.jpg
    46.7 KB · Views: 188
Last edited:

Ballvalve

General Engineering Contractor
Messages
3,581
Reaction score
45
Points
48
Location
northfork, california
Well, I have an update. :-|
I relocated the check valve to vertical. Put in a new pressure gauge, which I will replace with a liquid filled one tomorrow. Mixed things up down below, assembled the new set-up and ran it for an hour, hopefully pumping out some silt and creating a clean spot down there. Got home from work today and irrigated the lawn. Initial flow has a little silt in the filter, but nothing much. Did some errands and when I got home, I looked and the pressure gauge was sitting at zero. :-( That doesn't mean the check valve didn't work though, right? Using the relay switch on the pump, the timer is in charge of turning on/off the relay for the pump. I don't know the timing between shutting off a zone, and shutting off the pump. If the pump shuts off first, then the zone gets it's signal and closes, could the 40-ish PSI pumping pressure reach zero? If the check valve has time to close and hold the prime, I'll be very happy. Prime is good, system pressure can be zero, it shouldn't be an issue, correct?
If I do loose the prime, Option 2 will be utilized: Zone 1 becomes a 'Dump Zone" and pump the first 5 minutes or so to a silt accumulation site and then switch over to irrigating Zones, call it a day, and go have a beer (in a Covid-19 safe way).
I will double check all joint with shaving cream, double checking my work.
Is it possible to be at 0 PSI (there could be a PSI or two, didn't look that close as it was dark), and be holding prime? Fingers crossed.
As usual, I thank you guys for either providing solutions, or approving my sanity in what I think might work, you're a good sounding board. It's a forever never ending project, s0me 20 years in the making, but slowly I'm making progress, especially the past 12 years since I discovered this forum. We're in a 7" drought for the year, lawns are brown all over, and I'm still mowing my green carpet at least once a week. Thanks!
Follow up when progress is made.

I didn't read the entire thread, but is that SS check valve a Conbraco from Surplus center? Cone ball, spring loaded? Great valve but prone to staying just a crack open with a lot of silt. I have dozens of them, and the ones on radiant heat systems need a ball pein hammer adjustment or disassembly every few years.
 
Top
Hey, wait a minute.

This is awkward, but...

It looks like you're using an ad blocker. We get it, but (1) terrylove.com can't live without ads, and (2) ad blockers can cause issues with videos and comments. If you'd like to support the site, please allow ads.

If any particular ad is your REASON for blocking ads, please let us know. We might be able to do something about it. Thanks.
I've Disabled AdBlock    No Thanks