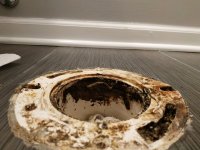
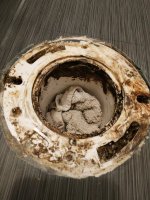
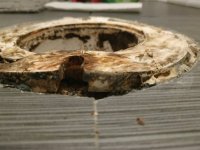
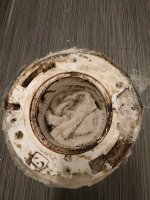
Spacer used for toilet flange repair. Toilet leaks at base. Help!

Users who are viewing this thread

Harold Balls

Member
Messages
34
Reaction score
0
Points
6
Location
Chicago, IL
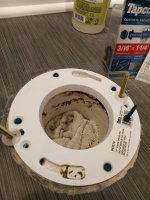
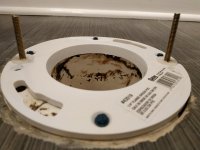
I have limited plumbing experience, gained only by watching tradesmen as well as YouTube. In short, I installed a 1/4 inch spacer to fix a broken PVC flange per suggestion from someone at Home Depot working part time who claimed to be an unemployed union plumber. I'm not sure of his skills, and he responded so lethargically and with odd pauses as if he was on drugs. I questioned three times if I should use a stainless steel flange repair kit and he just shrugged and said I could use either. However, I'm not sure I can squeeze such a piece into that tiny space provided by whoever did the tile job.

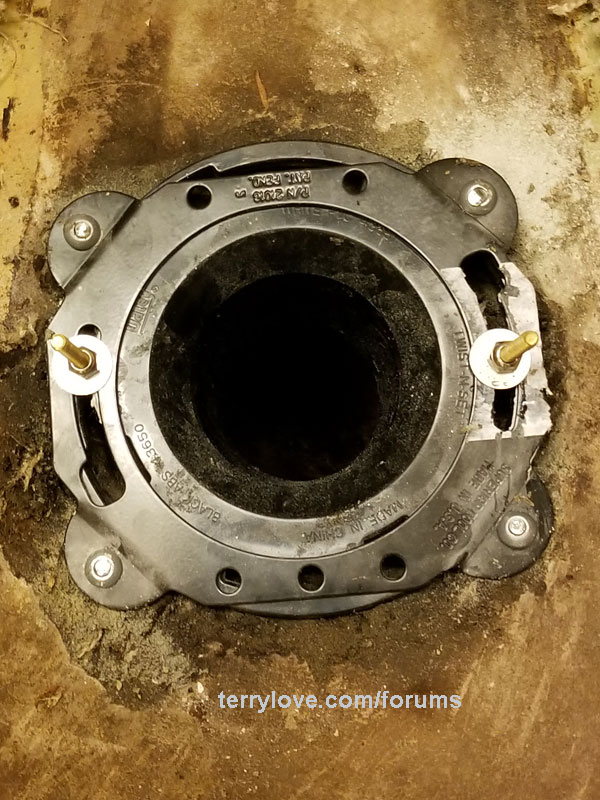
Following his advice, I drilled the concrete under the original flange and affixed the spacer with four Tap-Con concrete screws, drilling straight through the old flange which I left glued in place. Please see photos.

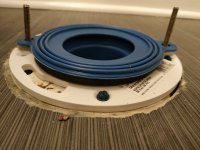
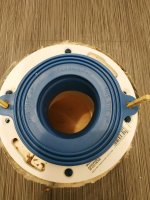
I used a Fluidmaster rubber seal, thinking it was better than wax and since I could reset it if it leaked. Of course, it did, and water came out very slowly from the front part of the toilet base. I then removed the toilet. I tried to remove the sticker on the spacer flange, thinking that might prevent a seal, but it would not come off, leaving gunky residue. I aborted removal of the sticker.

I did not bother to see if the new spacer was level. When I bolted the toilet, it did not move. I did not use any shims. I do not like to caulk the bottoms of toilets because of the look, and did not caulk.

Understanding the problem from the above, coupled with the attached photos, what is wrong? I appreciate your replies.
 

Attachments

  • IMG_20210309_191415.jpg
    IMG_20210309_191415.jpg
    88.3 KB · Views: 282
  • IMG_20210309_191423.jpg
    IMG_20210309_191423.jpg
    116.2 KB · Views: 267
  • IMG_20210309_191433.jpg
    IMG_20210309_191433.jpg
    67.4 KB · Views: 904
  • IMG_20210309_194314.jpg
    IMG_20210309_194314.jpg
    119.2 KB · Views: 270
  • IMG_20210310_005634.jpg
    IMG_20210310_005634.jpg
    120.5 KB · Views: 272
  • IMG_20210310_161832.jpg
    IMG_20210310_161832.jpg
    96.3 KB · Views: 337
  • IMG_20210310_162016.jpg
    IMG_20210310_162016.jpg
    63.3 KB · Views: 291
  • IMG_20210310_164751.jpg
    IMG_20210310_164751.jpg
    74.9 KB · Views: 266
  • IMG_20210310_164813.jpg
    IMG_20210310_164813.jpg
    106.4 KB · Views: 289

Terry

The Plumbing Wizard
Staff member
Messages
29,942
Reaction score
3,465
Points
113
Location
Bothell, Washington
Website
terrylove.com
Well.........one more reason spacers have never worked for me, and wax has been working for me.
If I have to pull a bowl, wax is easy and common to use. I always scrap off and toss the old wax and use a new one(s) out of the box.

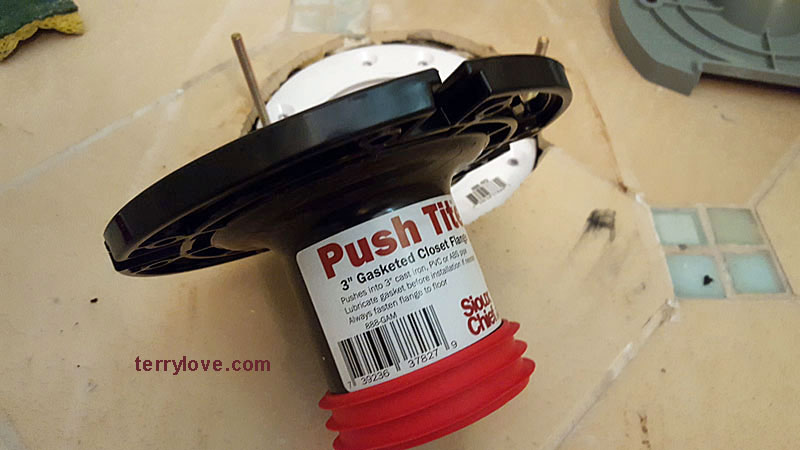
I have used these at times. This one is a bit high, so it won't fit if your flange is already high. If I use spacers, they go below the flange, not on top

neorest-install-03.jpg


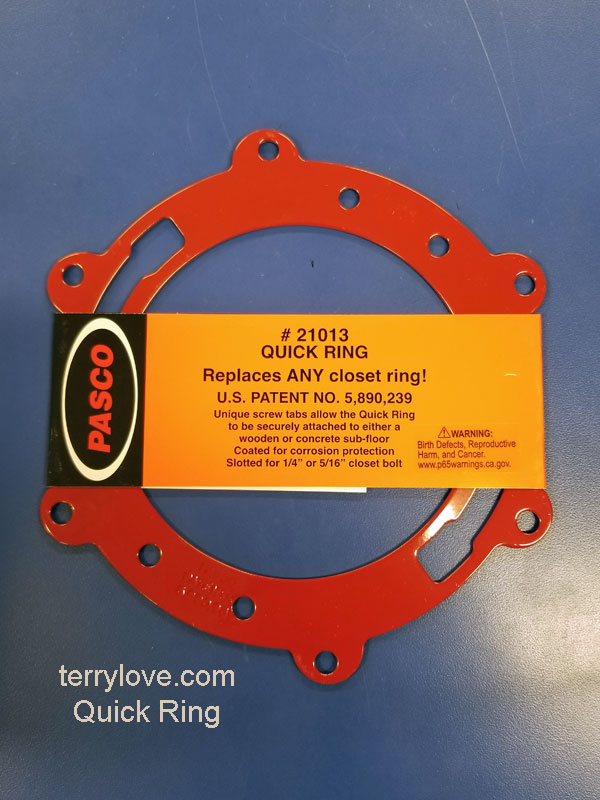
And if I'm just looking to secure bolts, something like this.

quick-ring-terrylove-1.jpg
 

Reach4

Well-Known Member
Messages
39,566
Reaction score
4,607
Points
113
Location
IL
Understanding the problem from the above, coupled with the attached photos, what is wrong?
Your PVC flange is broken. BUT, since you are using notches rather than slots, you will need to cut away part of the ring of the PVC flange before putting the repair ring in place. Then use the slots on the repair ring to hold the closet bolts down.

There is a different kind of repair ring also, but still not one for notches. Can you drill your tile easily enough? If not, hold the repair ring down with screws that don't go thru the ears. The repair rings with ears also have holes in addition to the holes in the ears.

index.php

Sioux Chief 886-MR is not split.
https://www.siouxchief.com/products/drainage/residential/closet-flanges/spacer-repair/ringer
Clearly says stainless now.
 
Last edited:

Harold Balls

Member
Messages
34
Reaction score
0
Points
6
Location
Chicago, IL
Thanks to both of you for the fast replies. I should have added that the original flange install was horrible. The cement underneath the flange was not level. It was sticking up to meet the flange where you can see it broke when someone installed the toilet. It was noticeable when I just recently moved in, because the toilet was wobbly and even the home inspector caught that. So, because the part of the old flange "sticking up" where the one bolt went was cracked because the cement raises underneath it (you can see it in the photo that Reach4 copied and pasted above), there was no way to "tap down" the original flange. As a result, I had to remove the broken piece because there was no way to screw down the spacer on top of it. See, e.g., my third photo in the left column above which shows how I removed the raised/broken part of the flange. In addition, I'm using the notches rather than the slides for the closet bolts because there is no way to effectively use the slides on the spacer because of the damage to the original flange, and because the spacer could not seat the proper way. I don't think that is a problem, though --(?). The bolts sit nicely and still tighten the toilet down just fine. But of course, there is a leak. Why?

As you can see, though, the spacer, being a 1/4 inch, sets itself up slightly higher than I would like, but it seemed to seat the toilet properly. Is there no way to salvage my idea without going back to Home Depot to get something else? It's a kind of moderate-use toilet that gets used about three days of the week and not much, and I know this spacer is a type of jury-rigged solution as it is, but hope the light use makes the solution somehow more "acceptable." I like the Push-Tite product, and I think with something similar I saw a few days ago online, you simply screw three bolts down inside of the product which expands a gasket which seals it. I don't know if that is what the Push-Tite is and will search it after posting this message. But I'm worried it will be too tall, as you said, Terry. More thoughts/suggestions, please, and will be greatly appreciated!
 

Harold Balls

Member
Messages
34
Reaction score
0
Points
6
Location
Chicago, IL
P.S.
Toss the spacer and affix a Pasco Quick repair ring in the same way with Tap-Con screws? I noticed, Terry, your photo depicts the ring with those tabs sticking out. I don't think it will fit.
 

Harold Balls

Member
Messages
34
Reaction score
0
Points
6
Location
Chicago, IL
Your PVC flange is broken. BUT, since you are using notches rather than slots, you will need to cut away part of the ring of the PVC flange before putting the repair ring in place. Then use the slots on the repair ring to hold the closet bolts down.

There is a different kind of repair ring also, but still not one for notches. Can you drill your tile easily enough? If not, hold the repair ring down with screws that don't go thru the ears. The repair rings with ears also have holes in addition to the holes in the ears.

index.php

Sioux Chief 886-MR is not split.
https://www.siouxchief.com/products/drainage/residential/closet-flanges/spacer-repair/ringer
Clearly says stainless now.

My answers:
Q. Can you drill your tile easily enough?
A. Probably. I don't have enough experience with tile, although I drilled through the cement, so the tile cannot be worse than that.

Q. If not, hold the repair ring down with screws that don't go thru the ears.
A. I do not understand what that means.

Q. The repair rings with ears also have holes in addition to the holes in the ears.
A. I do not understand what that means.
 

Reach4

Well-Known Member
Messages
39,566
Reaction score
4,607
Points
113
Location
IL
As you can see, though, the spacer, being a 1/4 inch, sets itself up slightly higher than I would like, but it seemed to seat the toilet properly. Is there no way to salvage my idea without going back to Home Depot to get something else?
If you are keeping the plastic spacer, but want to reduce the height, discard the black part of the Fluidmaster product, and keep the blue. That is how they designed it to fit different gap sizes.
https://images.homedepot-static.com/catalog/pdfImages/a2/a2c84745-37de-4633-9936-e325d9f13a65.pdf
 

Harold Balls

Member
Messages
34
Reaction score
0
Points
6
Location
Chicago, IL
red-ring-repair-love-2.jpg


I've done these before too.
Please advise what this is, Terry. I like it. Looks tough, like something military grade. I see two pieces, but the bottom is made in China and looks broken. Is the USA-made piece on top the repair part, or is this sold as some type of set and the bottom is not broken?
 

Harold Balls

Member
Messages
34
Reaction score
0
Points
6
Location
Chicago, IL
If you are keeping the plastic spacer, but want to reduce the height, discard the black part of the Fluidmaster product, and keep the blue. That is how they designed it to fit different gap sizes.
https://images.homedepot-static.com/catalog/pdfImages/a2/a2c84745-37de-4633-9936-e325d9f13a65.pdf
Thanks, I'm glad you mentioned that. Assume I know little to nothing, which is true. But I did realize that knowledge, and was not using the black part that rises the product. I'm not sure if the photos I used appear to show I am using that part, but I am not.
 

Reach4

Well-Known Member
Messages
39,566
Reaction score
4,607
Points
113
Location
IL
Q. Can you drill your tile easily enough?
A. Probably. I don't have enough experience with tile, although I drilled through the cement, so the tile cannot be worse than that.
Ceramic tile is harder than cement. Porcelain tile is much much harder than cement.
Q. If not, hold the repair ring down with screws that don't go thru the ears.
A. I do not understand what that means.

Q. The repair rings with ears also have holes in addition to the holes in the ears.
A. I do not understand what that means.
I am calling the 4 legs that would spread out over the tile "ears". They each have a hole that could be used to hold the repair ring down. But there are other (alternatives) holes that you could stick screws through. Thus the ears would be over the tile, but screws through the other small holes would only go through plastic to the concrete. So that avoids drilling the tile.

https://www.lowes.com/pd/Superior-Tool-Toilet-Anchor-Flange/1061201
 

Harold Balls

Member
Messages
34
Reaction score
0
Points
6
Location
Chicago, IL
Your PVC flange is broken. BUT, since you are using notches rather than slots, you will need to cut away part of the ring of the PVC flange before putting the repair ring in place. Then use the slots on the repair ring to hold the closet bolts down.

There is a different kind of repair ring also, but still not one for notches. Can you drill your tile easily enough? If not, hold the repair ring down with screws that don't go thru the ears. The repair rings with ears also have holes in addition to the holes in the ears.

index.php

Sioux Chief 886-MR is not split.
https://www.siouxchief.com/products/drainage/residential/closet-flanges/spacer-repair/ringer
Clearly says stainless now.

I just figured out what you meant by ears and holes in the ears. In Terry's last photo, for example, I see the ears which I could not use unless I was drilling the tile. I'd be afraid of cracking it. Maybe I'd get lucky and do a good job without cracking it. But if I were not using the ears on that one, the four other holes might not properly support the two bolts holding the toilet, right?
 

Harold Balls

Member
Messages
34
Reaction score
0
Points
6
Location
Chicago, IL
Ceramic tile is harder than cement. Porcelain tile is much much harder than cement.

I am calling the 4 legs that would spread out over the tile "ears". They each have a hole that could be used to hold the repair ring down. But there are other (alternatives) holes that you could stick screws through. Thus the ears would be over the tile, but screws through the other small holes would only go through plastic to the concrete. So that avoids drilling the tile.

https://www.lowes.com/pd/Superior-Tool-Toilet-Anchor-Flange/1061201
Got it, thank you. See additional discourse from me regarding same (about Terry's last photo).
 

Reach4

Well-Known Member
Messages
39,566
Reaction score
4,607
Points
113
Location
IL
I just figured out what you meant by ears and holes in the ears. In Terry's last photo, for example, I see the ears which I could not use unless I was drilling the tile. I'd be afraid of cracking it. Maybe I'd get lucky and do a good job without cracking it. But if I were not using the ears on that one, the four other holes might not properly support the two bolts holding the toilet, right?
The closet bolts would go thru slots in the repair ring, not round holes.

The screws holding down the repair ring don't have to match up with any other holes. You drill right through smaller round holes in the repair ring, through the plastic and into the concrete.
 

Harold Balls

Member
Messages
34
Reaction score
0
Points
6
Location
Chicago, IL
Got it, thank you. See additional discourse from me regarding same (about Terry's last photo).


You: "Ceramic tile is harder than cement. Porcelain tile is much much harder than cement."
Me: Oh, boy. I did not know that. I already broke one drill bit on the third hole of four, even starting/stopping/cooling the bit with cold water. Had to return to Home Depot just for a bit to drill hole four!
 

Harold Balls

Member
Messages
34
Reaction score
0
Points
6
Location
Chicago, IL
The closet bolts would go thru slots in the repair ring, not round holes.

The screws holding down the repair ring don't have to match up with any other holes. You drill right through smaller round holes in the repair ring, through the plastic and into the concrete.

Understood, but my point was that the four round holes are set in places that may be unsupportive. In other words, think of a really heavy person rocking on the toilet side to side, and a guest could come in to do that, I suppose. The stress points would be at the closet bolts, which have little support. All of the support is at the top and bottom of Terry's repair ring if I elect not to use the "ears." Is this not a foreseeable problem, or am I just being overly-cautious and worried about nothing?
 

Jeff H Young

In the Trades
Messages
9,792
Reaction score
2,470
Points
113
Location
92346
I think your problem Harold is the spacer doesn't get sealed to old flange and water gets between the 2 and leaks out. probably would not have leaked using bowl wax. if your having back ups that plays a part too a toilet might not leak if the drains are clear
 

Reach4

Well-Known Member
Messages
39,566
Reaction score
4,607
Points
113
Location
IL
Understood, but my point was that the four round holes are set in places that may be unsupportive. In other words, think of a really heavy person rocking on the toilet side to side, and a guest could come in to do that, I suppose. The stress points would be at the closet bolts, which have little support. All of the support is at the top and bottom of Terry's repair ring if I elect not to use the "ears." Is this not a foreseeable problem, or am I just being overly-cautious and worried about nothing?
The toilet base deals with downward forces, and the closet bolts handle upwards and some side forces.

The toilet base should be shimmed to prevent rocking. If using wax, then it is important that the shims be in place before dropping the toilet onto the wax. With waxless, you have more latitude to insert shims after you drop the toilet but before you have fully tightened the closet bolts. Shims. They make ones for toilets, but composite window and door shims can be cut to size.

It is not common, but you can use a level, as I did... plus lots of shims. For most, two shims at the aft sides is enough to prevent rocking, which is what is important.
 

Harold Balls

Member
Messages
34
Reaction score
0
Points
6
Location
Chicago, IL
I think your problem harrold is the spacer dosent get sealed to old flange and water gets between the 2 and leaks out. probebly would not have leaked using bowl wax. if your having back ups that plays a part too a toilet might not leak if the drains are clear

Thanks, Jeff. No back-ups. Toilet has sat the better part of three days off of the flange, dry, and just with a rag down the hole.

"[T]he spacer dosent get sealed to old flange and water gets between the 2 and leaks out."
I think that is the only possibility, but wouldn't the rubber Fluidmaster seal work even better than a wax ring because it seats itself below the flange and the spacer, thereby pushing the water all of the way down by gravity? I totally understand I could have a leak if there were back-ups with water flowing up (wrong way) instead of down (gravity). The water flowing up with a back-up is going to look for the path of least resistance, which in this case, would be outside of the Fluidmaster rubber sleeve and through any gaps in between the original flange and the spacer I just installed. Is this correct logic?

Maybe use silicone caulk between the flange and the spacer to prevent any water from coming through? But why/where is it coming through in the first place? I can't think of any other way the water is penetrating to the floor, other that like you said -- between the flange and the spacer.
 

Harold Balls

Member
Messages
34
Reaction score
0
Points
6
Location
Chicago, IL
The toilet base deals with downward forces, and the closet bolts handle upwards and some side forces.

The toilet base should be shimmed to prevent rocking. If using wax, then it is important that the shims be in place before dropping the toilet onto the wax. With waxless, you have more latitude to insert shims after you drop the toilet but before you have fully tightened the closet bolts. Shims. They make ones for toilets, but composite window and door shims can be cut to size.

It is not common, but you can use a level, as I did... plus lots of shims. For most, two shims at the aft sides is enough to prevent rocking, which is what is important.

Thank you, I will definitely shim it this time, regardless of whatever setup I use to jury-rig/jerry-rig the old flange. That will simply remove one potential causation problem.
 
Top
Hey, wait a minute.

This is awkward, but...

It looks like you're using an ad blocker. We get it, but (1) terrylove.com can't live without ads, and (2) ad blockers can cause issues with videos and comments. If you'd like to support the site, please allow ads.

If any particular ad is your REASON for blocking ads, please let us know. We might be able to do something about it. Thanks.
I've Disabled AdBlock    No Thanks