Shower Faucet Installation

Users who are viewing this thread

Ryan1978

New Member
Messages
18
Reaction score
0
Points
0
Hello all! I'm stumped, and I'm hoping someone can help. I didn't find an answer using the search function.

I'm installing the following shower controls in a new shower I'm building.

http://www.pricepfister.com/www/ImageAssets/mirror\model\bath\treviso\tre808-5dk\27889-0700.pdf

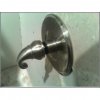
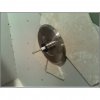
The shower wall is a standard size (2"x4"). The instructions state that piece "6A" should be flush with the finished wall. It also says on a separate instruction sheet (couldn't find it online) that the finished wall has to be between 2 5/8"- 3 1/2" from the center of the valve body inlets & outlets. I'm using standard 1/2 drywall (Kerdi shower), and my membrane, thinset & tile should be around 1/2" thick. The problem is, this only brings me to about 2 3/8" from the center of the valve to the finished wall.

I had a plumber to the rough-in, and he mounted the valve to a piece of 2"x4" turned sideways and mounted between the studs. I'm sure you know what I mean.

I can't figure out what's going on. The obvious answer is that something thinner should've been used instead of 2x lumber to mount the valve to which would put it farther back into the wall. Everything seems so standard with the construction, yet I'm not falling within the parameters. What gives?

Thanks everyone!
 

Ryan1978

New Member
Messages
18
Reaction score
0
Points
0
What you are saying is the valve was mounted too shallow in the wall?

Thanks for the response.

Yeah, it seems that way. How are most valves like this mounted? Against a 1x material instead of 2x?? I would assume that my plumber would've thought about that if it was common for this to happen.

I guess I'm in the denial stage when faced with the thought of taking the wall out to redo the valve mount:mad:
 

Redwood

Master Plumber
Messages
7,335
Reaction score
13
Points
0
Location
Connecticut
Well normally the plumber would take into consideration of how thick the new finished wall is going to be and set the valve at the proper depth so that when the wall is installed the trim and handles fit on properly. Usually there is a specification of about within 1 1/2 - 2" where it fits within the tolerance.

Did your plumber have a discussion with you regarding the finished wall thickness? Was it changed after that discussion?
 

Ryan1978

New Member
Messages
18
Reaction score
0
Points
0
Yeah, we talked about it. I remember him being a little confused when the instructions said the knockout should be flush with the finished wall. I assumed he figured it out.

A 2"x4" wall + 1/2" (drywall or cement board) + 1/8" thinset + 1/4" or 3/8" tile has got to be an extremely common installation, right? I just can't wrap my head around how a fixture could be made today from a major company and not accomodate my setup within it's intended parameters. :confused:

Unless I'm missing something obvious, the valve obviously should be farther back in the wall, which would mean it can't be mounted to a 2x material which seems strange.
 

Ryan1978

New Member
Messages
18
Reaction score
0
Points
0
No, not until I read your post!

It appears the 2 5/8"- 3 1/2" was shown in the instructions for a shower AND tub control instead of the shower only unit instructions. The shower only instructions (as attached) don't have a min. or max. listed.

I did a test installation without the Plasterguard as shown in Step 6 of the link. I'm not sure what it's for, but I proceeded to Step 7 and installed as instructed. In the attached picture, you can see that it does screw on far enough to hold the travertine which is 3/8". It's just barely enough as I have it screwed in as far as it will go. As you can see in the second picture, the black threaded portion is still exposed, but the illustration looks like that's how it's supposed to be. It seems a little unusual from strictly an aesthetic point of view, but oh well.

There's no telling if I'd be in the same predicament had I been installing the shower/tub combo, or if that would've ended up working as well. Either way, it looks like it's going to work out.

Thanks for working me through this Redwood!
 

Attachments

  • 252632799109_0_0.jpg
    252632799109_0_0.jpg
    26.4 KB · Views: 449
  • 252632887301_0_0.jpg
    252632887301_0_0.jpg
    24 KB · Views: 448
Last edited:

Jadnashua

Retired Defense Industry Engineer xxx
Messages
32,770
Reaction score
1,190
Points
113
Location
New England
If you can live with that, it's fine. Personally, I'd prefer it if it didn't stick that far out into the shower, then the trim would cover the black as it's supposed to.
 

Redwood

Master Plumber
Messages
7,335
Reaction score
13
Points
0
Location
Connecticut
Yea I agree it's out pretty far.

How hard is it to open up the wall and reset the depth?
I notice the tile isn't up yet...
 

Ryan1978

New Member
Messages
18
Reaction score
0
Points
0
After both of your comments and my initial reaction that it looked odd, I'm going to redo it so the black threaded portion doesn't show. I guess I'll use 1x material or even 3/4" ply. I guess it shouldn't be too bad.

Thanks for your input guys.
 

Kingsotall

Plunger/TurdPuncher
Messages
1,238
Reaction score
1
Points
0
Location
Flagstaff, AZ
Is that the right stem extension¿ It seems really long from the PP instructions. As well as the retainer sleeve. Judging from the pic posted and it being a 2 x 4 wall I wonder if you even have the depth to flush up the handle. Says you can reverse the retainer sleeve but that doesn't buy you anything with the stem still sticking that far out.
 

Ryan1978

New Member
Messages
18
Reaction score
0
Points
0
Is that the right stem extension¿ It seems really long from the PP instructions. As well as the retainer sleeve. Judging from the pic posted and it being a 2 x 4 wall I wonder if you even have the depth to flush up the handle. Says you can reverse the retainer sleeve but that doesn't buy you anything with the stem still sticking that far out.

It's the one that came sealed with it, so I assume so. You're right though, it seems like the easiest solution would be a shorter stem! And yes, per the instructions, I did reverse the retainer sleeve. It wasn't even close the other way.

Using 3/4" or 1x buys me and extra 1/2 or 3/4" depth which will at least cover the black threaded portion. I'm not exactly sure what you mean by flushing up the handle. It should simply go far enough to cover at least a little of the retainer sleeve, no?
 

Kingsotall

Plunger/TurdPuncher
Messages
1,238
Reaction score
1
Points
0
Location
Flagstaff, AZ
The pics from the manual show the handle flush with the trim flange. I was thinking to get to that you are going to need a fair amount of depth. Wouldn't hurt to call PP and see if there is a shorter stem extender.
 

Ryan1978

New Member
Messages
18
Reaction score
0
Points
0
It's an 1 1/2" from the handle to the flange trim. Even with a shorter stem, it wouldn't go back flush.

I'm assuming that b/c the retainer sleeve is finished it's meant to be exposed. Now, I have no basis for saying that other than that it seems logical. I could be wrong!

I think I can redo it so that the handle at least covers a portion of the retainer sleeve so that it looks "finished" in about an hour or so. As long as that is functionally all that is necessary both now and long-term, that's all I'm worried about.

Thanks.
 

Jadnashua

Retired Defense Industry Engineer xxx
Messages
32,770
Reaction score
1,190
Points
113
Location
New England
Most valves have a range that allows an 'acceptable' installlation. Acceptable is everything fits and is covered by the trim. To account for that range, they provide finished trim parts that will produce a good overall look if you install it in the specified range. Now, personally, I don't like to see it stick out very far, so I've installed mine close to the minimum sticking out. This can be risky, since if things end up thicker than you expected, the trim won't fit at all! Then, you are at the mercy of the manufacturer to see if they have a compatible extension kit so you can attach things, or you have to go in and move the valve out. Symptom here is it is so far in the wall, you can't attach the trim or handle, or if you could, the handle scrapes on the trim.

If it sticks out too far, often you can't screw the trim plate on and get it flush and tight with the wall. No easy fix here. I'm actually surprised you could get the trim screwed down and tight to the wall with it sticking out that far...must have some really long threaded holes in the valve body.

Yours is way outside of the manufacturer's spec - it is not deep enough in the wall.

Normally,
 

Jadnashua

Retired Defense Industry Engineer xxx
Messages
32,770
Reaction score
1,190
Points
113
Location
New England
Most valves have a range that allows an 'acceptable' installlation. Acceptable is everything fits and is covered by the trim. To account for that range, they provide finished trim parts that will produce a good overall look if you install it in the specified range. Now, personally, I don't like to see it stick out very far, so I've installed mine close to the minimum sticking out. This can be risky, since if things end up thicker than you expected, the trim won't fit at all! Then, you are at the mercy of the manufacturer to see if they have a compatible extension kit so you can attach things, or you have to go in and move the valve out. Symptom here is it is so far in the wall, you can't attach the trim or handle, or if you could, the handle scrapes on the trim.

If it sticks out too far, often you can't screw the trim plate on and get it flush and tight with the wall. No easy fix here. I'm actually surprised you could get the trim screwed down and tight to the wall with it sticking out that far...must have some really long threaded holes in the valve body.

Yours is way outside of the manufacturer's spec - it is not deep enough in the wall.

Normally, there
 

Jadnashua

Retired Defense Industry Engineer xxx
Messages
32,770
Reaction score
1,190
Points
113
Location
New England
Most valves have a range that allows an 'acceptable' installlation. Acceptable is everything fits and is covered by the trim. To account for that range, they provide finished trim parts that will produce a good overall look if you install it in the specified range. Now, personally, I don't like to see it stick out very far, so I've installed mine close to the minimum sticking out. This can be risky, since if things end up thicker than you expected, the trim won't fit at all! Then, you are at the mercy of the manufacturer to see if they have a compatible extension kit so you can attach things, or you have to go in and move the valve out. Symptom here is it is so far in the wall, you can't attach the trim or handle, or if you could, the handle scrapes on the trim.

If it sticks out too far, often you can't screw the trim plate on and get it flush and tight with the wall. No easy fix here. I'm actually surprised you could get the trim screwed down and tight to the wall with it sticking out that far...must have some really long threaded holes in the valve body.

Yours is way outside of the manufacturer's spec - it is not deep enough in the wall.

Normally, there are
 

Jadnashua

Retired Defense Industry Engineer xxx
Messages
32,770
Reaction score
1,190
Points
113
Location
New England
Most valves have a range that allows an 'acceptable' installlation. Acceptable is everything fits and is covered by the trim. To account for that range, they provide finished trim parts that will produce a good overall look if you install it in the specified range. Now, personally, I don't like to see it stick out very far, so I've installed mine close to the minimum sticking out. This can be risky, since if things end up thicker than you expected, the trim won't fit at all! Then, you are at the mercy of the manufacturer to see if they have a compatible extension kit so you can attach things, or you have to go in and move the valve out. Symptom here is it is so far in the wall, you can't attach the trim or handle, or if you could, the handle scrapes on the trim.

If it sticks out too far, often you can't screw the trim plate on and get it flush and tight with the wall. No easy fix here. I'm actually surprised you could get the trim screwed down and tight to the wall with it sticking out that far...must have some really long threaded holes in the valve body.

Yours is way outside of the manufacturer's spec - it is not deep enough in the wall.

Normally, there are marks on the plaster guard showing the min/max of the finished wall. If yours is within those limits, the trim will fit.
 
Last edited:
Top
Hey, wait a minute.

This is awkward, but...

It looks like you're using an ad blocker. We get it, but (1) terrylove.com can't live without ads, and (2) ad blockers can cause issues with videos and comments. If you'd like to support the site, please allow ads.

If any particular ad is your REASON for blocking ads, please let us know. We might be able to do something about it. Thanks.
I've Disabled AdBlock    No Thanks