Repair Home Water spigot shutoff gate valve & Soldering Order

Users who are viewing this thread

wr1

New Member
Messages
6
Reaction score
0
Points
1
Location
Oregon
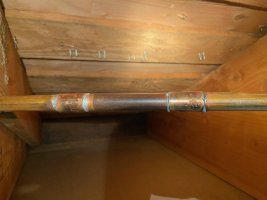
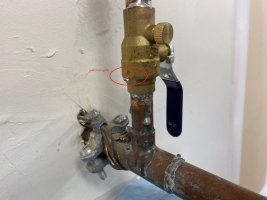
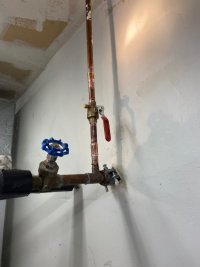
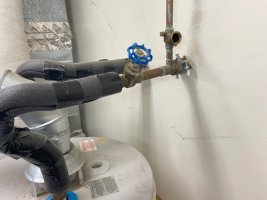
Long Story short: hose bib has internal gate valve shutoff in garage near hot water heater. copper pipe extends to exterior wall in garage. gate valve failed because the professional plumber who apparently built the house seated the top 1/2 pipe to the valve with too much solder and it created an imperfect fit between the valve gate and the valve inside seating ring. So, when you shut off the hose bib, it always had a trickle of water come through. I have been dealing with this forever, but am now getting around to fixing it since the pipe finally burst due to incomplete ability to drain the downstream portion since the gate never fully shut. I have soldered pipes before but am not a plumbing professional.

A few questions:

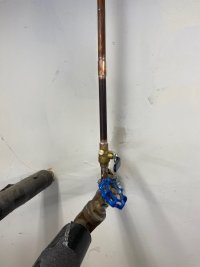
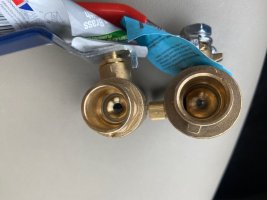
1. the solder is on the top part of the valve. see pictures. i tried to chip at it to remove and test the valve. i made it better but its not perfect, so still "dribbles" a bit when closed. Any ideas before i just say screw it and put in a new valve?
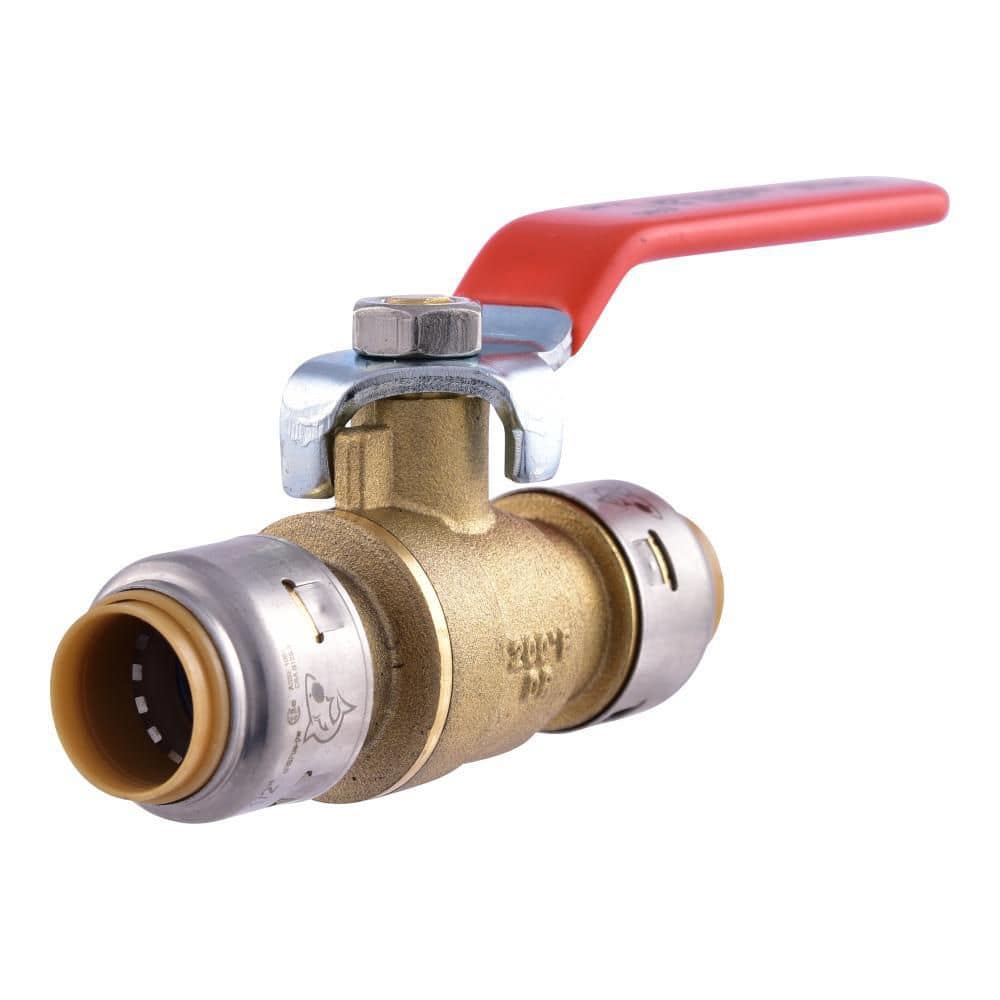
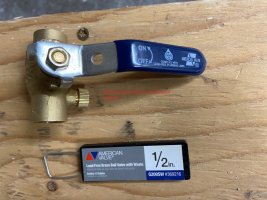
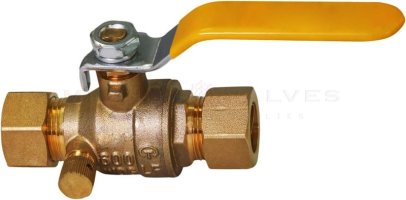
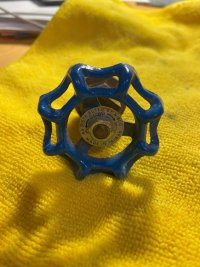
2. the old valve is a 1/2 nibco S1-8 gate valve. if i get a new ball valve, what the best recommendation. I'm probably going to Lowes or HomeDepot for the part.
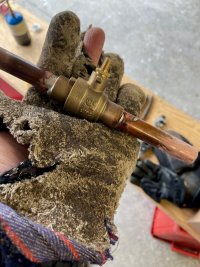
3. How would I perform the valve install considering the pipes are rigid and fixed in place? I'm looking for the order of steps.
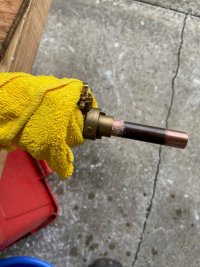
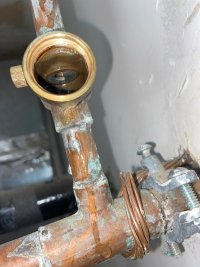
4. the short lower section of pipe under the failing valve has solder dripping all around it. Could i reuse this if i heat and wipe the solder away?
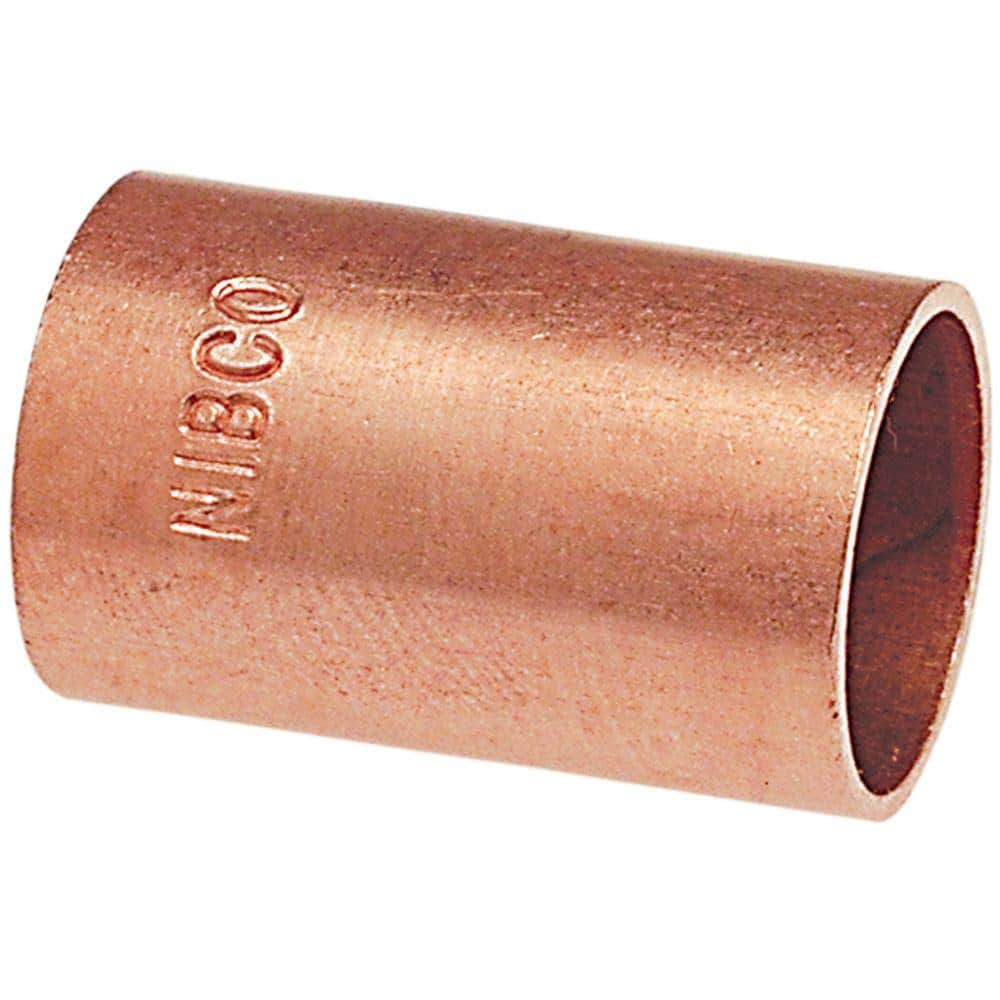
5. If i cannot reuse this little stub, what are my options? Shark bite? Replace with pex of some sort? the current valve is not interior to a wall and easily accessible over time for inspections, etc.

Burst pipe question:
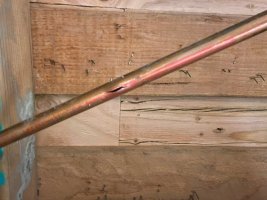
1. the first pic is of the 1/2" burst pipe forcing me to do the repair on the valve. but how to fix the pipe? Are there sleeve type copper couplings without stops, which I can slide around so I can insert a piece of pipe directly in the cut out chunk? My concern is that couplers will have an inside ring/stopper to prevent the pipe from seating more, but that will also prevent me from inserting the new replacement piece. How do i go about that? I know that are special repair pieces, but it would be nice if i could seat in a new chunk somehow, but looking for some expert answers and advice!

many thx in advance! Much appreciated for the advice.
 

Attachments

  • IMG_0139.jpg
    IMG_0139.jpg
    83.9 KB · Views: 76
  • IMG_0142.jpg
    IMG_0142.jpg
    89.5 KB · Views: 60
  • IMG_0143.jpg
    IMG_0143.jpg
    65.4 KB · Views: 78
  • IMG_0148.jpg
    IMG_0148.jpg
    84.6 KB · Views: 67
Last edited:

PepeLePue

Member
Messages
48
Reaction score
6
Points
8
Location
Chicago
You are playing with fire if you're planning to mess with that pipe that close to the spot it comes in the wall. If you mess it up, you're going to have to break the wall open. I'm not sure its worth it to do this yourself if you have no experience. What is on the other side? Is it a brick wall/foundation? What is your plan if you mangle the tee?

If you want to try and fix it, I would avoid touching the connection for the old valve and just add another valve where you need to fix the pipe anyways.

Cut out the broken piece, and use a slip coupling. It doesn't have any internal stops.

Your best bet though, is to cut out just the broken piece of pipe and try to slip this on. You're in and out in 10 minutes max and don't have to solder anything. Just rebuild the old valve and you're done.

Or one of these. Same as above but has a drain so you can drain the line (if its pitched back into the house).
 
  • Like
Reactions: wr1

Jeff H Young

In the Trades
Messages
8,954
Reaction score
2,235
Points
113
Location
92346
I see a threaded port on a tee Id screw a nipple in the port then a ballvalve and go from there . its possible to screw up anything but it dosent look too highly skilled a challenge
 

John Gayewski

In the Trades
Messages
4,363
Reaction score
1,348
Points
113
Location
Iowa
I would cut the old valve as close to the sweat joint as possible and clean up that little section of pipe with a torch first to remove most of the solder, then sand cloth.

Then id just rebuild from there out. No reason to reuse pipe that has been burst. I'm assuming it a short run to the new hose bib.
 

wr1

New Member
Messages
6
Reaction score
0
Points
1
Location
Oregon
Many thx for all the replies. here's an update, as I know you pros will enjoy the comedy of a newbie making mistakes. the burst section is about 20 feet away from the valve and repaired pretty easily. the ball valve near the HWH heater not so much. part of the concern is the small 2" piece above the tee. I think the design intent was to keep this shutoff valve as close to the HWH cold feed line to prevent freezing, as the cold line heats up a bit too when the HWH is running. And then use the drain waste port to remove the vertical column of water above the valve. When open, this port also helps the entire 30' line drain quicker from the outside spigot.

Anyway, that makes that little piece kind of a pain to deal with - it needs to be short - i guess to minimize the vertical column of water. And if I could get it out, I'd have to dremel file out old solder, etc. to make the tee usable - or crack into the wall as the Pepe mentioned. So...

I was able to desolder the old valve, leaving the small 2" vertical pipe. I removed solder and sandclothed it down and then re-used that with a new ball valve from lowes. the job went pretty smoothly, but I either messed up with too much heat on the ball valve or I got a piece of crap valve (blue handle). Im attaching pictures to either warn someone or find the error in my methods. The instructions say to wrap the valve in cold water and solder it while closed. Im not sure how escaping gas, inside the ball after it heats, is supposed to get out, so I left it open. I did let the thing cool after soldering before opening/closing etc.

Anyway, I got the system in as seen in the 2nd pic. but then a pinhole leak, like 1 drop every few minutes formed with the ball housing brass joint, as seen in the pictures. I looked this up on lowes website to notice that several othes had the same problem, and one of them seemed to be a pro. so am I to conclude that the joint and ball/gasket material suck or i did something wrong? or is it that these ball valves are just too difficult to solder, unless a pro has the magic touch?

I'm tempted to try this again with a new same valve but dont trust them now. At this point, im thinking a compression ball valve (yellow handle) is the easiest way out of this mess. those are harder to find though, especially with the waste port.

the shark bite valve that pepe recommened looks appealing, but since both pipe ends are fixed, i need to buy another sharkbit slipend to install the valve easily. So that is more money, more failure points, and generally a hassle too. this guy in the link below shows the install with sharkbite and a slipend sharkbite fitting:

youtu.be/sEsqtSA7HsM?si=EWcr3zcZbRz5aqFv
 

Attachments

  • IMG_0169.jpg
    IMG_0169.jpg
    52.1 KB · Views: 58
  • IMG_0161.jpg
    IMG_0161.jpg
    45.5 KB · Views: 45
  • IMG_0164.jpg
    IMG_0164.jpg
    62.3 KB · Views: 66
  • IMG_0168.jpg
    IMG_0168.jpg
    93.7 KB · Views: 59
  • comrpession_valve.jpg
    comrpession_valve.jpg
    44.3 KB · Views: 51
Last edited:

Jeff H Young

In the Trades
Messages
8,954
Reaction score
2,235
Points
113
Location
92346
I dont get a laugh out of your problem . But I cant read through this whole novel. I think your work looks ok maybe you over heated but I think defective valve. replace the valve is about as deep as I can get on this you could actualy use a tee above the walve if finding a waste port valve is an issue . Frustrating I know and we have all had this type issues before I think its shit materials but I go cheap on stuff and get stuck using what I can find with less issues some of it luck for sure
 
  • Like
Reactions: wr1

wr1

New Member
Messages
6
Reaction score
0
Points
1
Location
Oregon
try #2: got a different brand ball valve from a real plumbing supply shop!
Gave up trying to find the install instructions and just did this:

1. cracked ball open very slightly to relieve pressure during soldering
2. took off valve's handle and waste stop
3. prepared 2 - 4" pipe stubs to attach to the valve
4. performed initial stub-out work on the bench while valve was horizontal and in a safe place.
5. wrapped valve in wet cloth while attaching each 4" stub pipe
6. let valve cool between attaching two stubs
7. installed in final vertical position after entire assembly was cool - using just 2-1/2" couplers to the stubs
8. Wrapped in a wet towel with ball just a open a hair to relieve pressure while attaching in final location
9. let new valve naturally cool to room temperature before operating and filling line with water

This time, things seemed to go better. the new valve was made by "wolverine brass" and had at least 30% more metal to it - was way beefier than my Lowes "experimental" valve. wolverine valve is on the right in the comparison pics below. the Lowes valves are made by a company called "American Valve", but come from china. I think that should be illegal to name your company something aluding to country of origin other than what it is.

thx for everyone's help! hope my trials perhaps help someone else!
 

Attachments

  • IMG_0171.jpg
    IMG_0171.jpg
    74.1 KB · Views: 50
  • IMG_0173.jpg
    IMG_0173.jpg
    61.5 KB · Views: 58
  • IMG_0178.jpg
    IMG_0178.jpg
    86.8 KB · Views: 47
  • IMG_0181.jpg
    IMG_0181.jpg
    117.9 KB · Views: 48
  • IMG_0186.jpg
    IMG_0186.jpg
    51.8 KB · Views: 50
Last edited:

Jeff H Young

In the Trades
Messages
8,954
Reaction score
2,235
Points
113
Location
92346
You are following good practice , I dont think that drip was your fault at all its defective valve. your soldering dont look the greatest but Im sure you just dont get enough chances to solder youll be good this time
 
  • Like
Reactions: wr1

wr1

New Member
Messages
6
Reaction score
0
Points
1
Location
Oregon
You are following good practice , I dont think that drip was your fault at all its defective valve. your soldering dont look the greatest but Im sure you just dont get enough chances to solder youll be good this time
thx jeff, i agree my solder could be better. some of the big blobs in the pics are from the "pros" who originally installed the stuff.
 

PepeLePue

Member
Messages
48
Reaction score
6
Points
8
Location
Chicago
Nice job fixing the issue! I agree that valve probably faulty, no reason it should leak from there.

When I know I'm going to take on a project like this, I usually stock up beforehand on parts from SupplyHouse.com. I can get them delivered to my house pretty quickly. If you have a pro account (free to make) you get free delivery even with small orders. Can help you save multiple trips to the store if you aren't in a rush and can plan ahead. Also browsing the website sometimes gives you ideas of parts you didn't even know existed that can solve a future problem.
 
  • Like
Reactions: wr1
Top
Hey, wait a minute.

This is awkward, but...

It looks like you're using an ad blocker. We get it, but (1) terrylove.com can't live without ads, and (2) ad blockers can cause issues with videos and comments. If you'd like to support the site, please allow ads.

If any particular ad is your REASON for blocking ads, please let us know. We might be able to do something about it. Thanks.
I've Disabled AdBlock    No Thanks