Self-rimming Kohler sink help

Users who are viewing this thread

flyboy718

New Member
Messages
21
Reaction score
0
Points
1
Location
Forney, Texas
Hi,

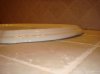
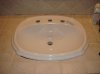
I am installing a Kholer self-rimming sink. My vanity is tiled that the sink will sit on top of. Dry fitting the sink, the sink wiggles a little. What could I do to alleviate the wiggling? The directions only say to run a bead of sealant along the outisde filling the void between sink and counter top. I was thinking of maybe rubbing out some 'thin snakes' of plumbers putter and put them all the way around the cutout for the sink to sit on top of and level it up?

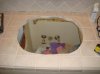
In the middle picture there is a crack, pay no attention to it as I didn't have the sink centered in the cutout...I just put it in real quick for a picture.
 

Attachments

  • DSC03829.jpg
    DSC03829.jpg
    18.3 KB · Views: 865
  • DSC03830.jpg
    DSC03830.jpg
    19.7 KB · Views: 907
  • DSC03831.jpg
    DSC03831.jpg
    27.2 KB · Views: 877

Krow

Plumber
Messages
903
Reaction score
3
Points
16
Location
Ontario, Canada
These sinks are designed to sit in the hole with a bead of silicone chaulking holding it in place. Assemble your faucet and drain assembly first and then run a bead of silicone around your opening. Set the sink inside the hole, square it up and let sit for 24 hours.

The silicone will stop any wiggling
 

Terry

The Plumbing Wizard
Staff member
Messages
29,942
Reaction score
3,459
Points
113
Location
Bothell, Washington
Website
terrylove.com
Don't even think about using plumbers putty under the lav, that would be a huge mistake.

Those get caulked in.
Assemble the faucet, drop it in the hole, hook up the water and p-trap, and when everything is completely done, and only then, caulk the lav to the counter top.
 
Last edited:

hj

Master Plumber
Messages
33,603
Reaction score
1,042
Points
113
Location
Cave Creek, Arizona
Website
www.terrylove.com
A bigger surpise would have been if it DID NOT wiggle. A drop in sink on tile will almost always wiggle. Tthe tile is seldom, if ever, perfect, and often the sink is not either. Either put adhesive caulk on the rim of the sink, center it in the opening, and leave it alone for about 24 hours, the connect it. Or put it in place, connect the sink, then put the caulking around the rim, forcing some of it under the sink. Either way, when the caulk hardens the sink will be solid, and in place, semipermanently.
 
Last edited:

flyboy718

New Member
Messages
21
Reaction score
0
Points
1
Location
Forney, Texas
Great guys! Thanks for the fast reply's, going to tackle it after breakfast. Keep an eye on me, I may need some help with attaching the p-trap and the undercarriage. By the way what is a good brand of White silicone adhesive caulk to use around the sink?
 

Doherty Plumbing

Journeyman & Gas Fitter
Messages
810
Reaction score
5
Points
0
Location
Penticton, BC
Website
www.facebook.com
I DO NOT use silicone caulk, it is too "messy". Use DAP tub and tile adhesive caulking.

+1 on that!!! Dap is the answer for those sinks. It actually adheres and basically glues the sink in place where as silicone caulking will fail over time. And it needs to be replaced!

If the sink has any major gaps between it in and the sink I'd go around the rim of the sink AFTER it's solidly in place and put some silicone in to make it look pleasing to the eye!
 
Top
Hey, wait a minute.

This is awkward, but...

It looks like you're using an ad blocker. We get it, but (1) terrylove.com can't live without ads, and (2) ad blockers can cause issues with videos and comments. If you'd like to support the site, please allow ads.

If any particular ad is your REASON for blocking ads, please let us know. We might be able to do something about it. Thanks.
I've Disabled AdBlock    No Thanks