Moving Closet Flange in Slab 1.5" to Correct Rough-In and Offset

Users who are viewing this thread

CleanSC

Member
Messages
58
Reaction score
2
Points
8
Location
Miami, FL.
Okay fellas. Unfortunately I don't have pictures, I'd have to remove my new toilet again for that. And if necessary, I can.

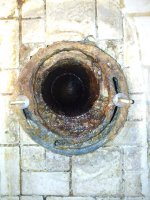
Here's the issue. I replaced a 43 year old toilet yesterday with a TOTO Drake II with 12" rough-in. My house is a 1971 build on a concrete slab in Miami with cast iron DWV. Upon removal of the old toilet, I found the following problems:

Rough in of elbow is 10".
Rough in of flange is 10.5" (yes, they offset the flange right on the pipe, so there's 1/2" of a flat wall right at the flange)
There is open air all around the elbow below the slab. IOW, there isn't dirt up against the pipe. (Maybe due to the old toilet leaking - wax was all but gone)

I managed to get the new toilet installed and sealing, but by pushing every possible limit of the sani seal, the toilet skirt bolt holes, and up against the wall.

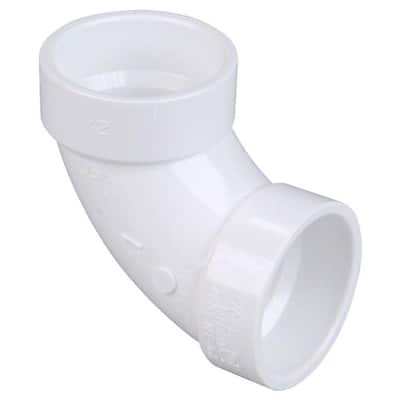
I plan on remodeling this bathroom (new tile) so I have no issue breaking up some slab and moving the elbow 1.5" away from the wall for a proper rough in and to eliminate the partially blocked flange to elbow connection.

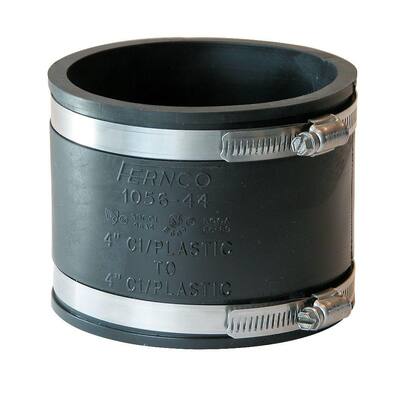
I'm assuming I'd install an new pvc elbow 1.5" out and connect it to the CI waste line with a fernco fitting.

Is it this easy? Or am I missing some caveats?

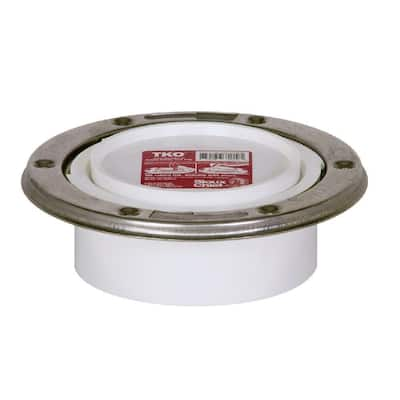
Alternative: Get a 10" rough-in toilet and replace just the flange to properly align it with the elbow. But I like my Drake II. Any similar toilets to the Drake II with a 10" rough in?

What would the pros do here?

Thanks, all!
 

BMWpowere36m3

Member
Messages
91
Reaction score
0
Points
6
Location
CT
I roughed in a toilet at 10.5" (during remodel) otherwise it would have fallen right on a floor joist, which would require boxing, etc... Seems like there are a lot of toilets for a 10" rough-in. Otherwise, break up some concrete, get a new elbow/flange and reposition. Shouldn’t be too bad.
 

CleanSC

Member
Messages
58
Reaction score
2
Points
8
Location
Miami, FL.
Thanks, guys. If I do the 10" toilet, I still have to (well, should) replace the old flange so I have to get dirty here either way. The 4" flange is not centered on the 4" elbow. And then fill around the pipe with dirt to fill the voids under the slab.

I'm a perfectionist tho and the new elbow at 12" just gives me a better feeling. Of course, these things always come with surprises.

Anyone else, please chime in!
 

Reach4

Well-Known Member
Messages
38,898
Reaction score
4,436
Points
113
Location
IL
Rough in of elbow is 10".
Rough in of flange is 10.5" (yes, they offset the flange right on the pipe, so there's 1/2" of a flat wall right at the flange)

What does "there's 1/2" of a flat wall right at the flange" mean?
 

CleanSC

Member
Messages
58
Reaction score
2
Points
8
Location
Miami, FL.
See attach. Basically this was done to increase the 10" rough-in to 10.5".

I don't care for it but hey, it's been there 43 years. This the other issue I'd like to correct.
 

Attachments

  • S4.pdf
    18.8 KB · Views: 299

Asktom

Member
Messages
745
Reaction score
32
Points
18
Location
Victor, MT
Move the flange when you remodel. If that project is happening soon use the toilet you have.
 

FullySprinklered

In the Trades
Messages
1,897
Reaction score
208
Points
63
Location
Georgia
Were it me, I would try to determine the direction of flow of the waste line, going away from the toilet flange. To be clear, if you're standing in front of the toilet, facing the toilet, and the waste line for the toilet passes between your feet under the slab, this would be a best case scenario. You could move the flange away from the wall with a minimum of excavation just by shortening the existing pipe, etc. If the drain flows away from the toilet flange from any other direction, that would increase the amount of demo and put-back, because you would have to open up a larger access to accommodate multiple fittings for the 1.5inch adjustment. Another worry is that you could find yourself without enough space for more fittings between the toilet flange and the trunk line, depending on how things are plumbed down there. You seem interested in going in, so don't let me dissuade you. This is the stuff I like best about plumbing, (except for the concrete part); have fun with it.
 

CleanSC

Member
Messages
58
Reaction score
2
Points
8
Location
Miami, FL.
The drain turns straight back into the wall. So the opposite direction of what you describe. It's CI with screw clamp fittings so I could replace the CI elbow at the bottom and the riser with a PVC elbow and a 1.5" section of horizontal pipe to extend to the proper spot. Backfill, add some concrete and tapcon a new flange. Is that how you kids are doing it these days? ;)

I pulled the toilet and bring pics. I know pics are everything so I just went and did it. See below.

For the record... The toilet is working perfectly as-is. It just pains me to know what's down there and I don't want to be ripping anything out in the future after the remodeling is done.

The wall is "up" in the pic. Pic taken standing in male peeing position. As you can see, elbow is at 10" and the flange is at 10.5" to get that extra bit of room.
 

Attachments

  • 2014-10-03 17.34.12.jpg
    2014-10-03 17.34.12.jpg
    115.3 KB · Views: 428
Last edited:

hj

Master Plumber
Messages
33,603
Reaction score
1,042
Points
113
Location
Cave Creek, Arizona
Website
www.terrylove.com
That is an 'offset' flange, and one of the worst designs at that. The later ones had a slotted "tab" on the rear side so it could be used to offset the toilet sideways, which created additional problems.
 

CleanSC

Member
Messages
58
Reaction score
2
Points
8
Location
Miami, FL.
Thanks, HJ. As I suspected, something to be removed.

So is the shopping list simply some 4" PVC, a DWV 4" elbow, and a 4" Fernco flexible coupling (underground, so no metal band required, correct)?

Would still need advice on the favorite closet flange folks like around here. All plastic or metal ring, etc.

a7089cbe-b611-4df3-a0d4-9514722a9e77_400.jpg


f6d59c58-69eb-4714-ab40-3b80e0a4d38e_400.jpg

Thanks, fellas!
 

Reach4

Well-Known Member
Messages
38,898
Reaction score
4,436
Points
113
Location
IL
Would still need advice on the favorite closet flange folks like around here. All plastic or metal ring, etc.
Nobody here has advocated all-plastic that I have seen.
 

CleanSC

Member
Messages
58
Reaction score
2
Points
8
Location
Miami, FL.
So then one of these tapconned into the new slab then?

EDIT: Do I do an inside fitting and pour concrete right up to the bend? How else do I get proper edge distance on my tapcons?

99358f21-60b9-4e68-90c1-648dafe6852d_400.jpg
 
Last edited:

CleanSC

Member
Messages
58
Reaction score
2
Points
8
Location
Miami, FL.
In this area a Fernco can be used underground OUTSIDE the building. Inside it needs to be a banded coupling.

Perfect. Banded it is. As for my last post that I just edited, do I use an inside closet flange connection and pour new concrete right up to the bend? It's 4" so not an issue, correct? I'd like to have enough meat for the tapcons.
 

Reach4

Well-Known Member
Messages
38,898
Reaction score
4,436
Points
113
Location
IL
Regarding the fittings connecting with the existing plumbing that will remain, I think you will not be sure what you need until you get in there. If you are not an easy drive to the place where you can buy fittings, you may want to buy parts that will deal with each foreseen situation with the understanding that you can return the unused items.

Note variations available: http://www.fernco.com/plumbing/shielded-couplings/proflex-couplings

Also, you may not be able to use such a coupler, and might instead need a doughnut. https://terrylove.com/forums/index....o-donut-gasket-for-cast-iron-soil-pipe.36709/

https://terrylove.com/forums/index.php?threads/closet-flange-problem-on-new-aquia-install.36496/


http://www.engineeringtoolbox.com/cast-iron-soil-pipe-dimensions-d_1751.html
 

CleanSC

Member
Messages
58
Reaction score
2
Points
8
Location
Miami, FL.
Reach:

Thanks for the heads up. Yes, I am close to several supply houses so I'm covered there. As for the donuts, I'm almost positive my entire house is hubless. Of all the DWV plumbing I've seen in this 1971 house, it's all been hubless CI with banded couplings.

Here's a picture of an old broken shower drain I removed from another part of the house:

https://www.dropbox.com/s/tz8jh9um5o78rzl/2013-03-20 18.46.36.jpg?dl=0

Could I be safe in assuming the entire DWV is the same? Even the bigger lines? The closet bend in question seems to have the same connections from inside visual inspection but I suppose from the inside both methods can look the same to the untrained eye?

Perhaps all I've seen have been cut ends?
 
Last edited:
Top
Hey, wait a minute.

This is awkward, but...

It looks like you're using an ad blocker. We get it, but (1) terrylove.com can't live without ads, and (2) ad blockers can cause issues with videos and comments. If you'd like to support the site, please allow ads.

If any particular ad is your REASON for blocking ads, please let us know. We might be able to do something about it. Thanks.
I've Disabled AdBlock    No Thanks