Hi guys, I finally finished the whole thing! I also wrote a brief writeup to document my experience. I always do so after each DIY to remind myself what happened. Useful in the future. Also it might be useful to others. So I copy and paste it here as well. Please let me know if there is anything I did wrong. Thanks!
My original Kenmore water heater (40 gallon gas tank heater, made by AO Smith. 12 year warranty) broke after 8 years. Sears replaced for free. After only 6 years, the replacement WH leaked from top. Most of the time, leaking from top is due to connection, but mine is not. The tank was leaking on top. So I have to replace it.
Lowes sells AO Smith. Since I had terrible experience with AO Smith, I dare not touch it again. So I went with Rheem from Home Depot. Another big brand is Bradford White. But it is not sold around me. On homedepot.com, choose
Water heater, Rheem, Atmospheric (not direct vent, power vent, or power direct vent), Residentical, 40 gallon and Tall, there are only 10 options left. And almost everyone chooses the cheapest one with 6 years warranty (3000+ reviews vs 200 reviews etc). The cheapest one only cost $400. The more expensive models have (1) low NOx (I don't care) (2) brass drain valve (I can put my old brass drain valve back on) (3) heat water faster (I don't care and am happy to save energy bill) (4) longer warranty. (I heard the difference is the number and size of anode rods in the WH.) However, sadly, the cheapest one is not available near me. I have to drive about 120 miles round trip for it. In principle, WH should be transported vertically. Not flat in the trunk of my SUV. So I decided to just buy the cheapest one from local HD. It is a ultra low nox version. Otherwise, it is the same as the $400 WH. Same size and same energy consumption. Just lower emission to be good for environment. I think it is possible that our local government requires this version so the cheapst one is not sold here. Yeah, $170 from me to contribute to environment. Great.
My local HD contracts a local plumbing company for the installation. It will charge about $600+ for the installation and $173 for city permit. Also it would recommend more expensive WH. So the totall bill from it will be $1750+. So it helps a lot to do it yourself.
The key for an easy installation is
1. Use a WH that is very close in shape to your old WH. So there will be minimum modification needed.
2. The water lines and gas lines are flex hoses instead of soldered brass pipes. That is very important. Makes life a lot easier. I did not have to sweat solder any pipes.
Next are the detailed steps.
1. Use a 1/4 socket to remove the screws from old WH vent hood. Don't try a flat head screwdriver. Hard.
2. Use a big Crescent wrench to remove old cold & hot water lines. I actually need a 15 inch big wrench. A 12 inch wrench is actually not enough. These lines are sealed by a plastic/rubber washer inside. So we do not need to use pipe tape or sealant. Most people will replace the flex lines. But I am cheap. I reused them. Works for now. Shut off water first, of course. Also drain the tank.
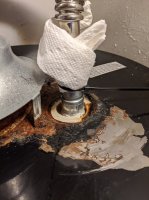
3. I also removed the good dielectric nipple in case I need it in the future.
4. I then removed the T&P valve in case I need it in the future. (I removed a brass union and a brass pipe with threads first.)
5. I shut off gas and removed the flex gas line, a union, the deposit trap with a cap. So finally, I can remove the t-pipe that supplies WH with gas. To remove the flex gas line, I need to hold the union with a second wrench. The flex gas line seems to be sealed with a compression ring. No need for pipe tape or sealant.
6. Then I removed my brass drain valve (full port valve) with garden hose adapter and cap, and a nipple into the tank. I installed them to the old WH myself. They can be re-used later.
7. Next I removed the bolts and nuts for earthquake strap. A ratcheting 11/16 wrench made this a lot easier.
8. Next is the most difficult job. I need to remove the old WH from the steel stand and put the new one onto it. I have limited space and the thing is round. Nowhere to put hands on. It bothered me quite a while. Finally, I figured out the trick. I used a floor jack for car repair to do it. I raised the jack tray and slowly moved the WH onto the jack tray. This is quite hard. I manipulated the WH while my wife pushed and pulled the floor jack. It is actually a two-person job here. With some after-thought, it will be a good idea if someone can borrow a dolly that has a hydraulic system to raise/lower the dolly floor. Your knees will thank you. I remember seeing some plumbers use a big belt to attach the WH to their belly and raise WH that way. Man, you need to be quite strong for that.
9. Then I have to put everything back. Quite straight forward. I got a little bit of water leak from cold intake initially. But I tightened the nut a bit and everything is fine. Then I first drilled two holes on the vent hood so that I can put screws in. (I initially tried to use screwdrivers to drive them in, too hard.)
10. Finally, I just need to spray some soapy water onto the gas joints to make sure no bubbles show up. And that is it! If I made any mistakes or missed anything, please let me know. Thanks!