90 degree side outlet elbow in corner?

Users who are viewing this thread

Messages
224
Reaction score
14
Points
18
Location
Huntington Station, NY
Website
www.howardemerson.com
Hello all,
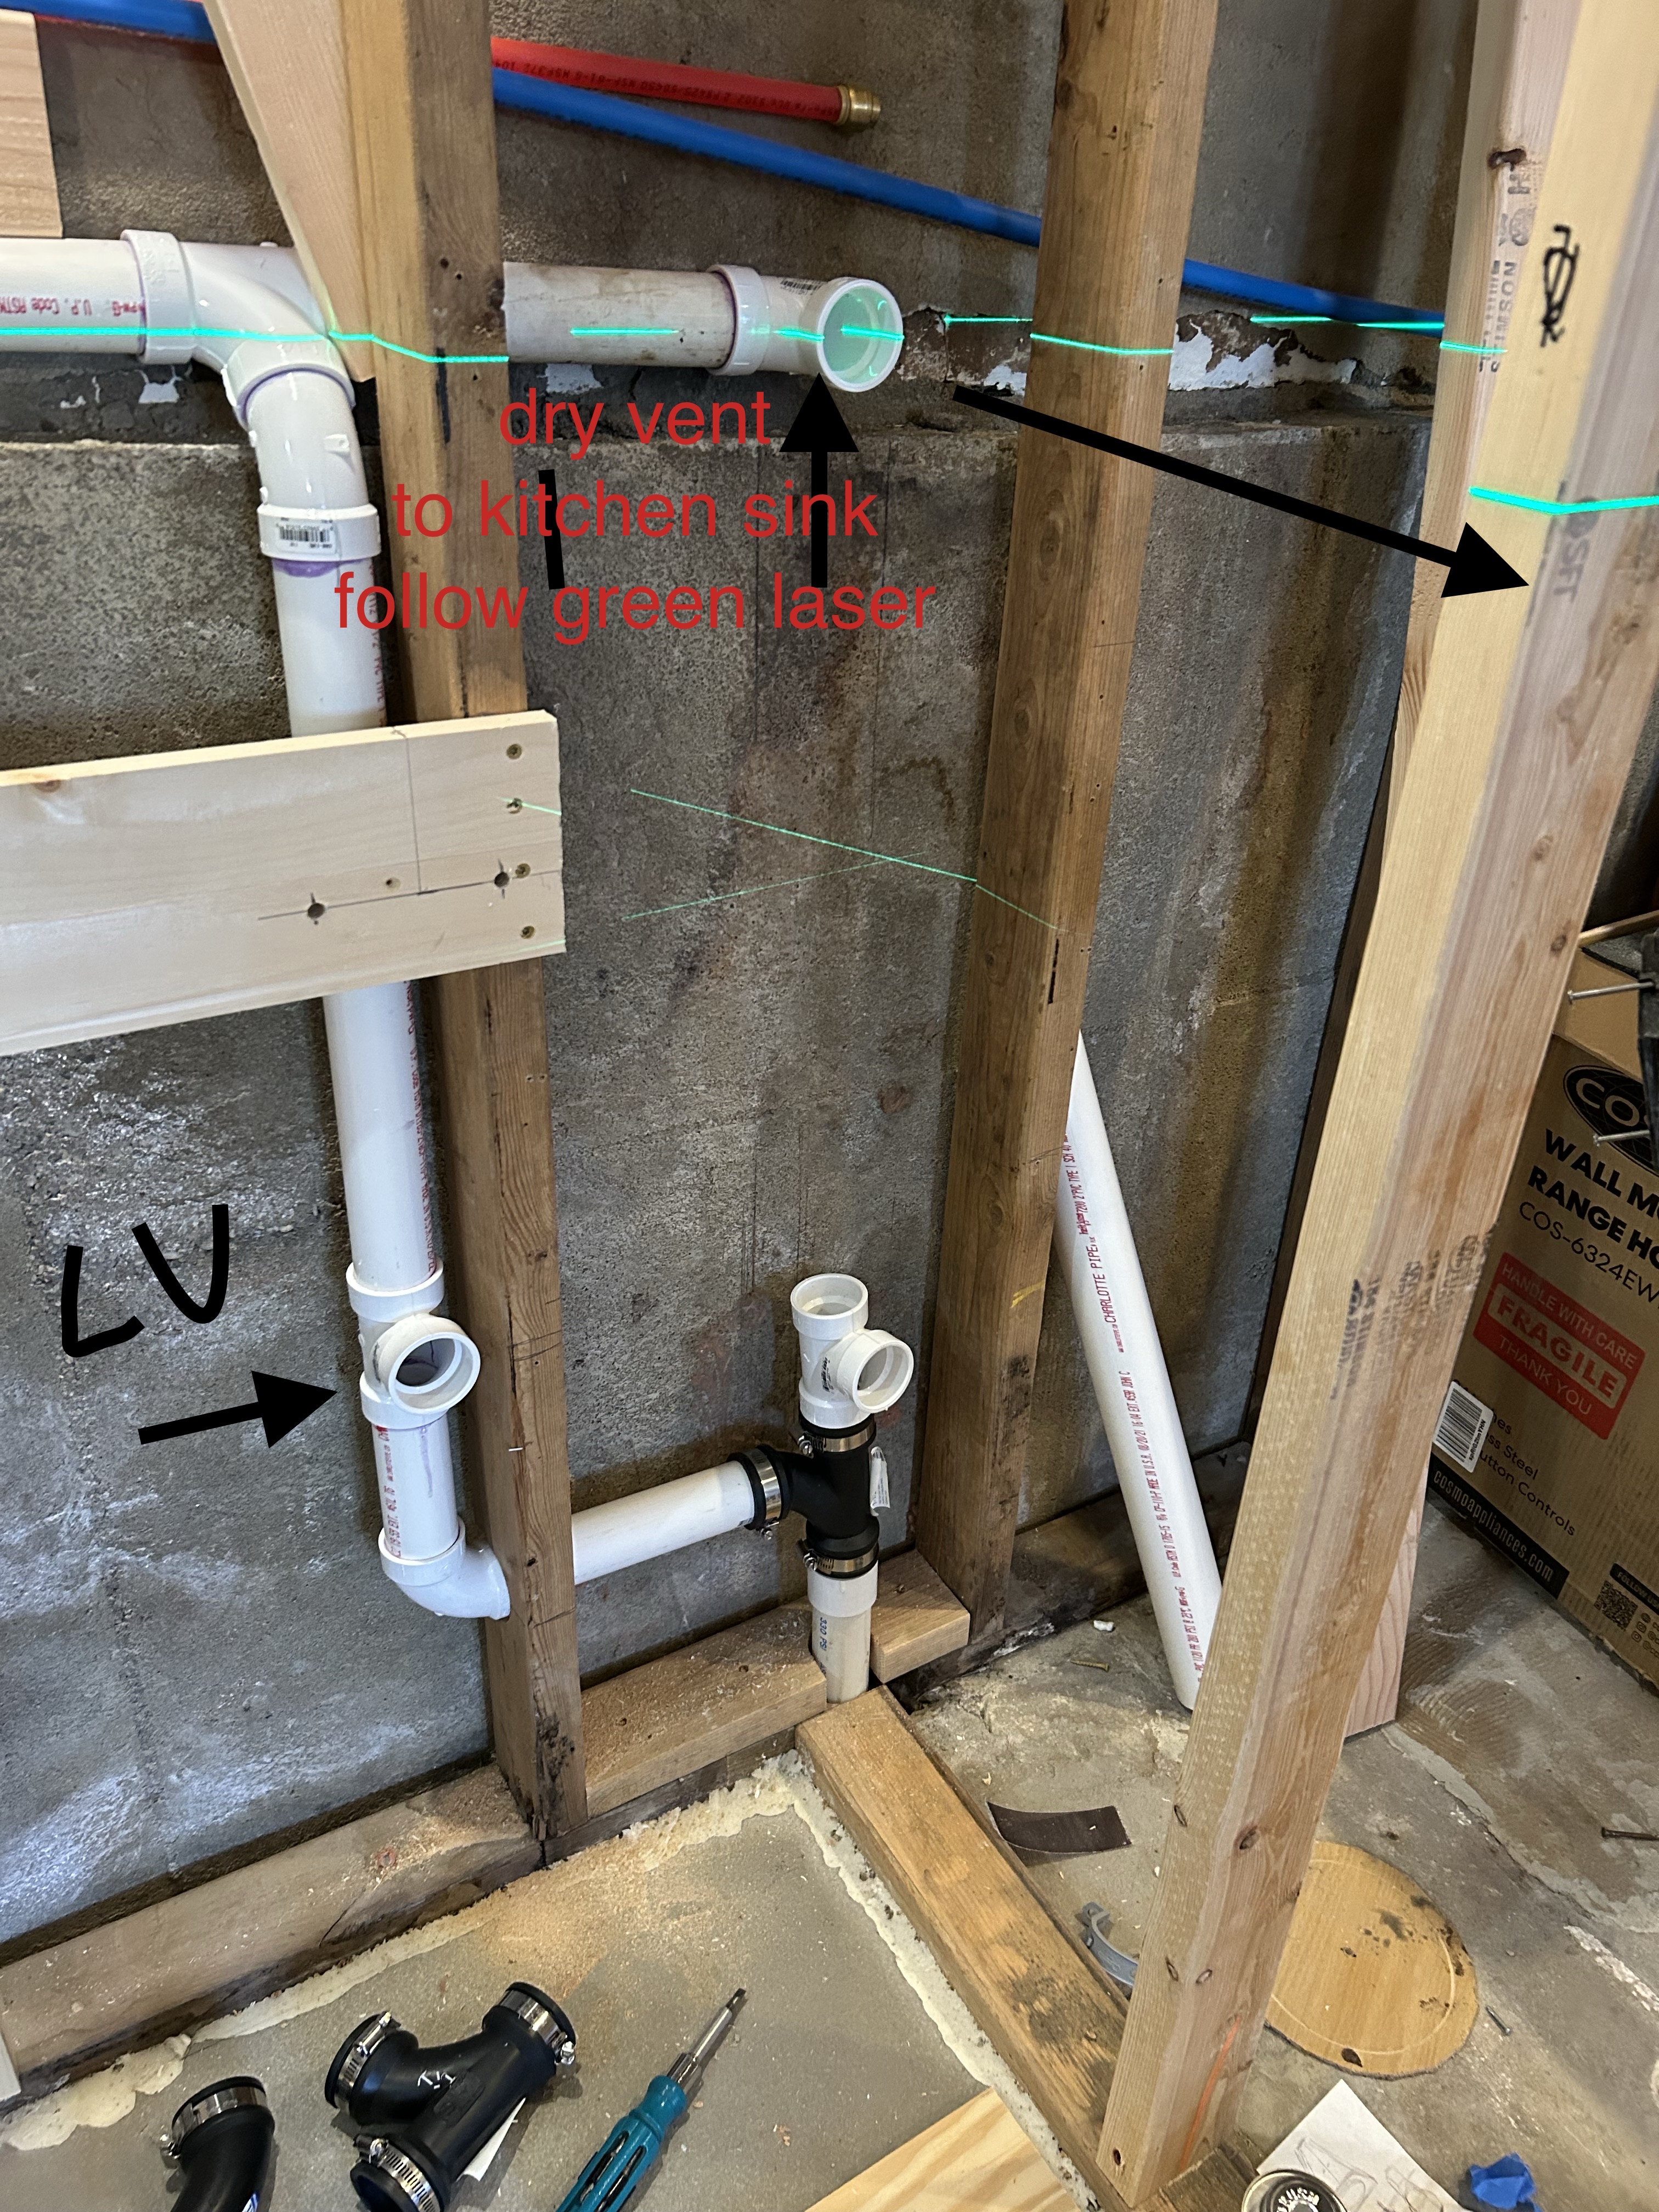
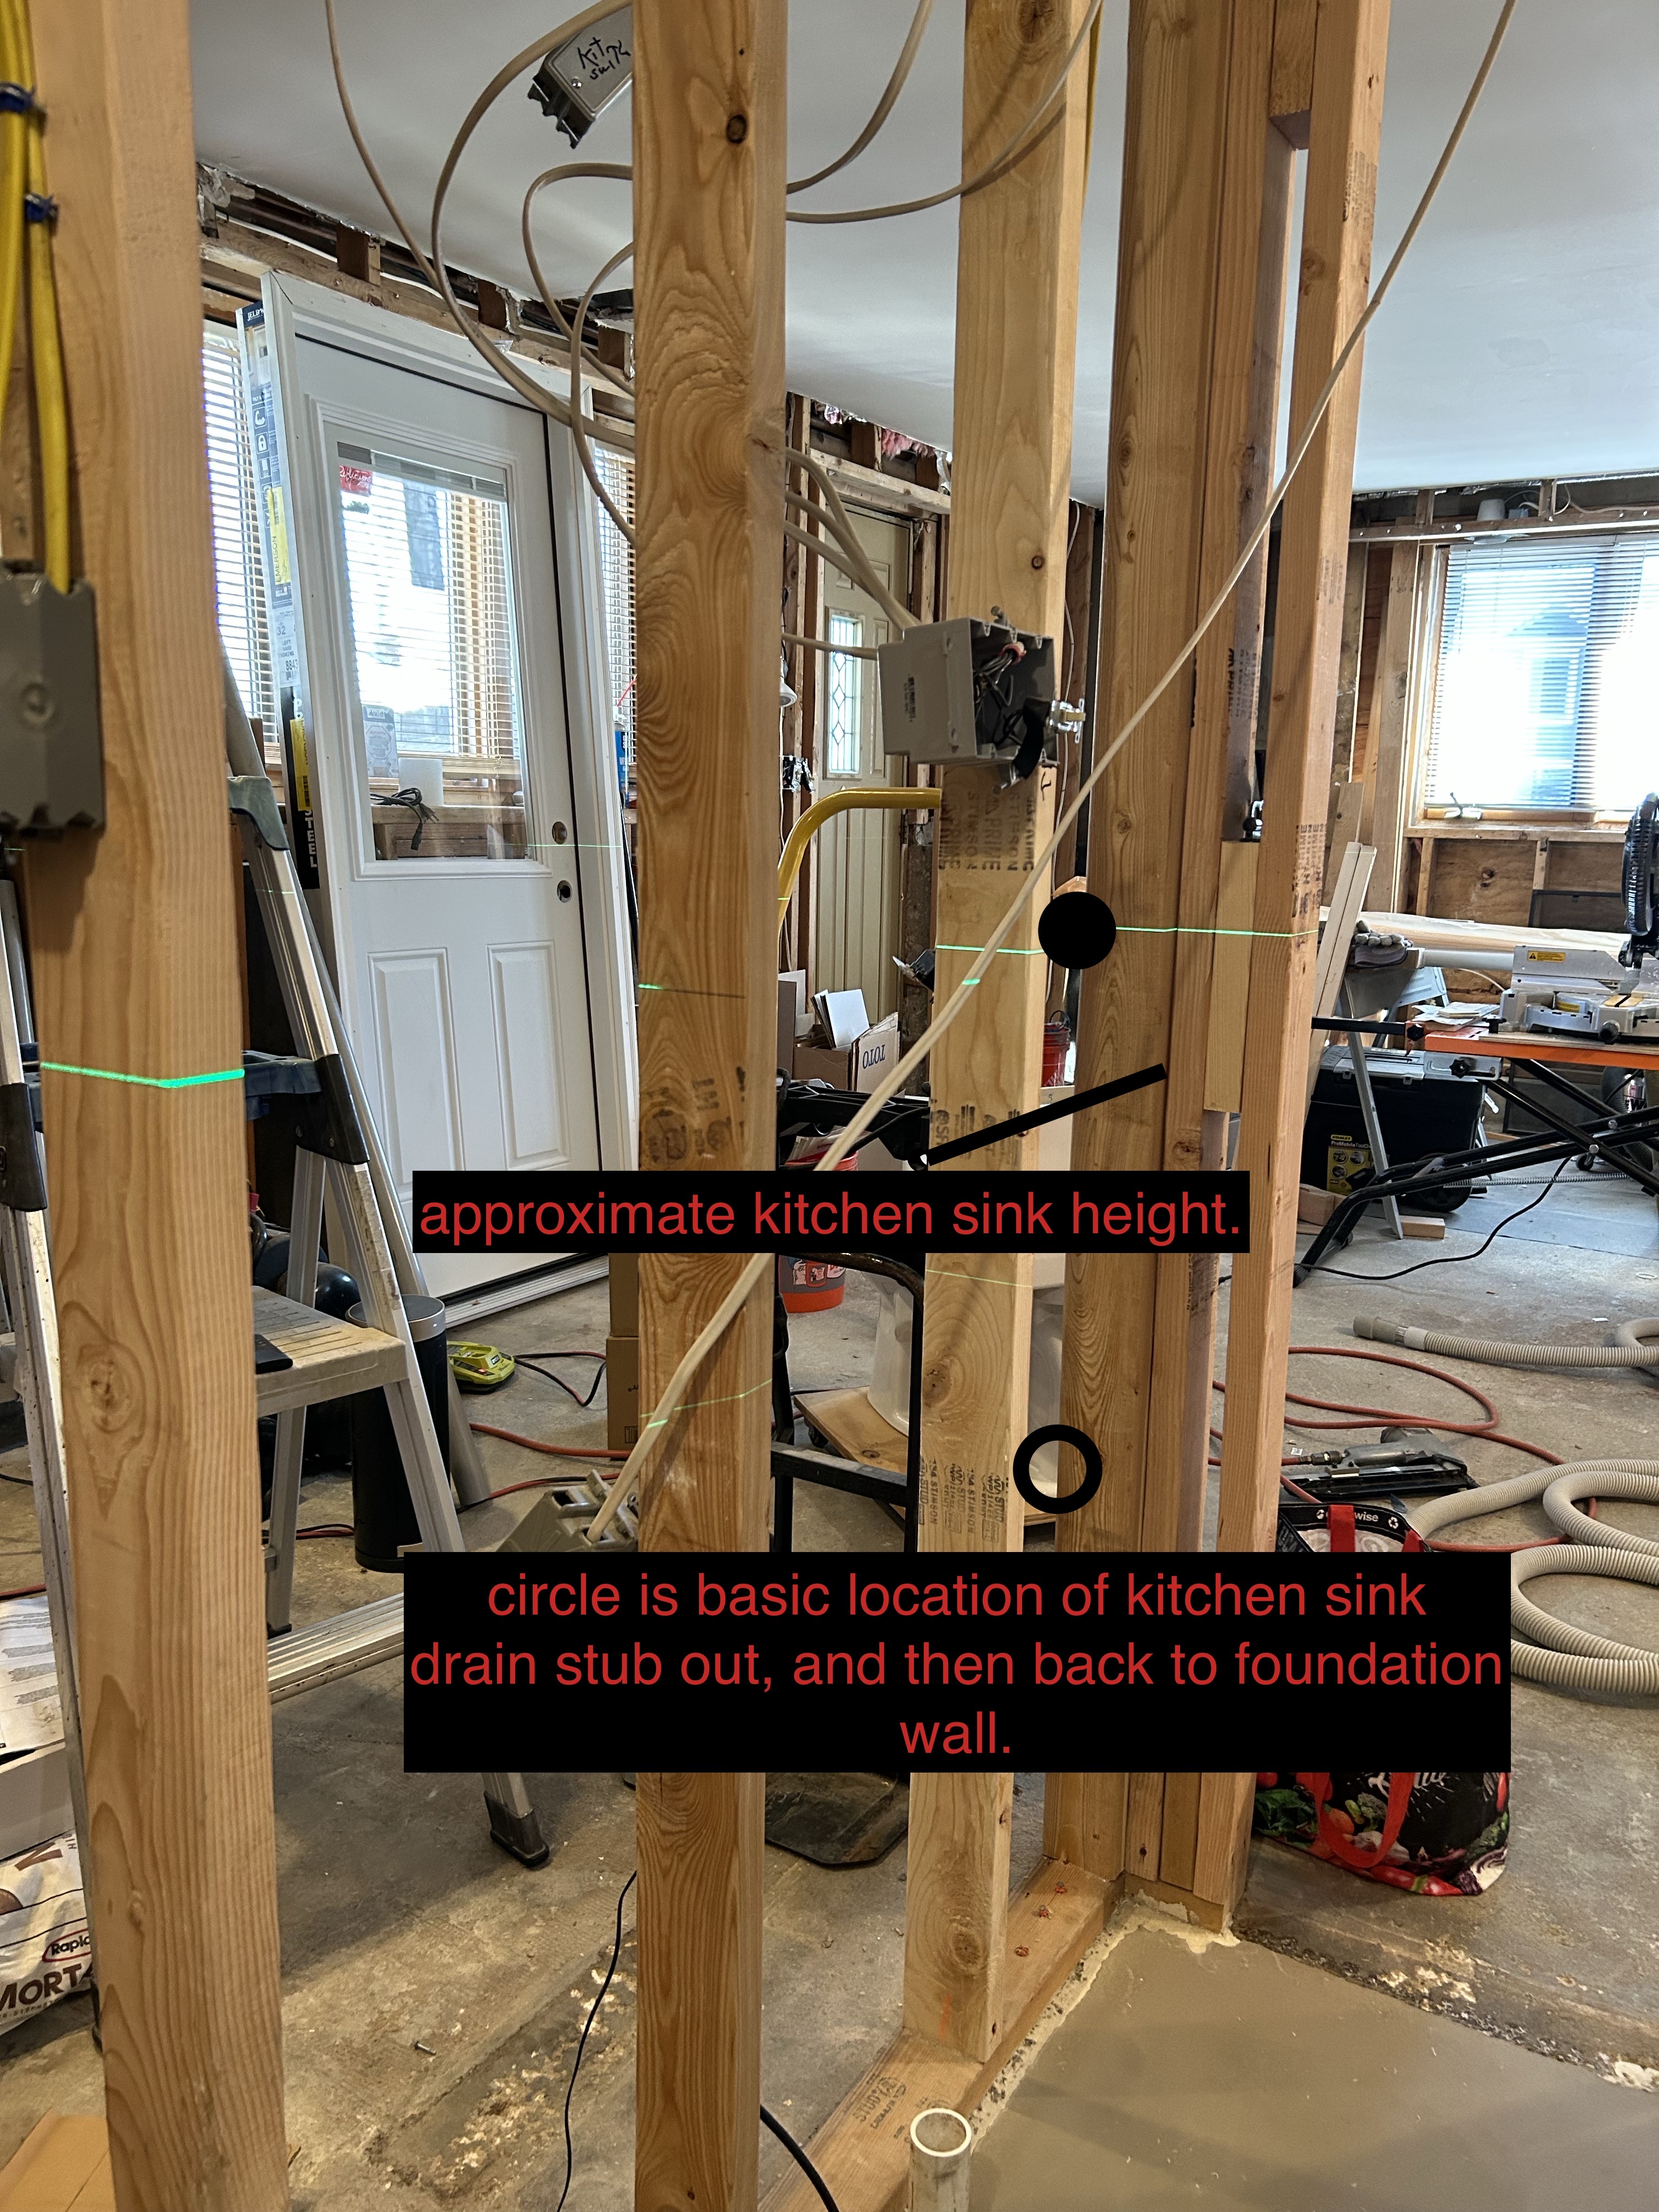
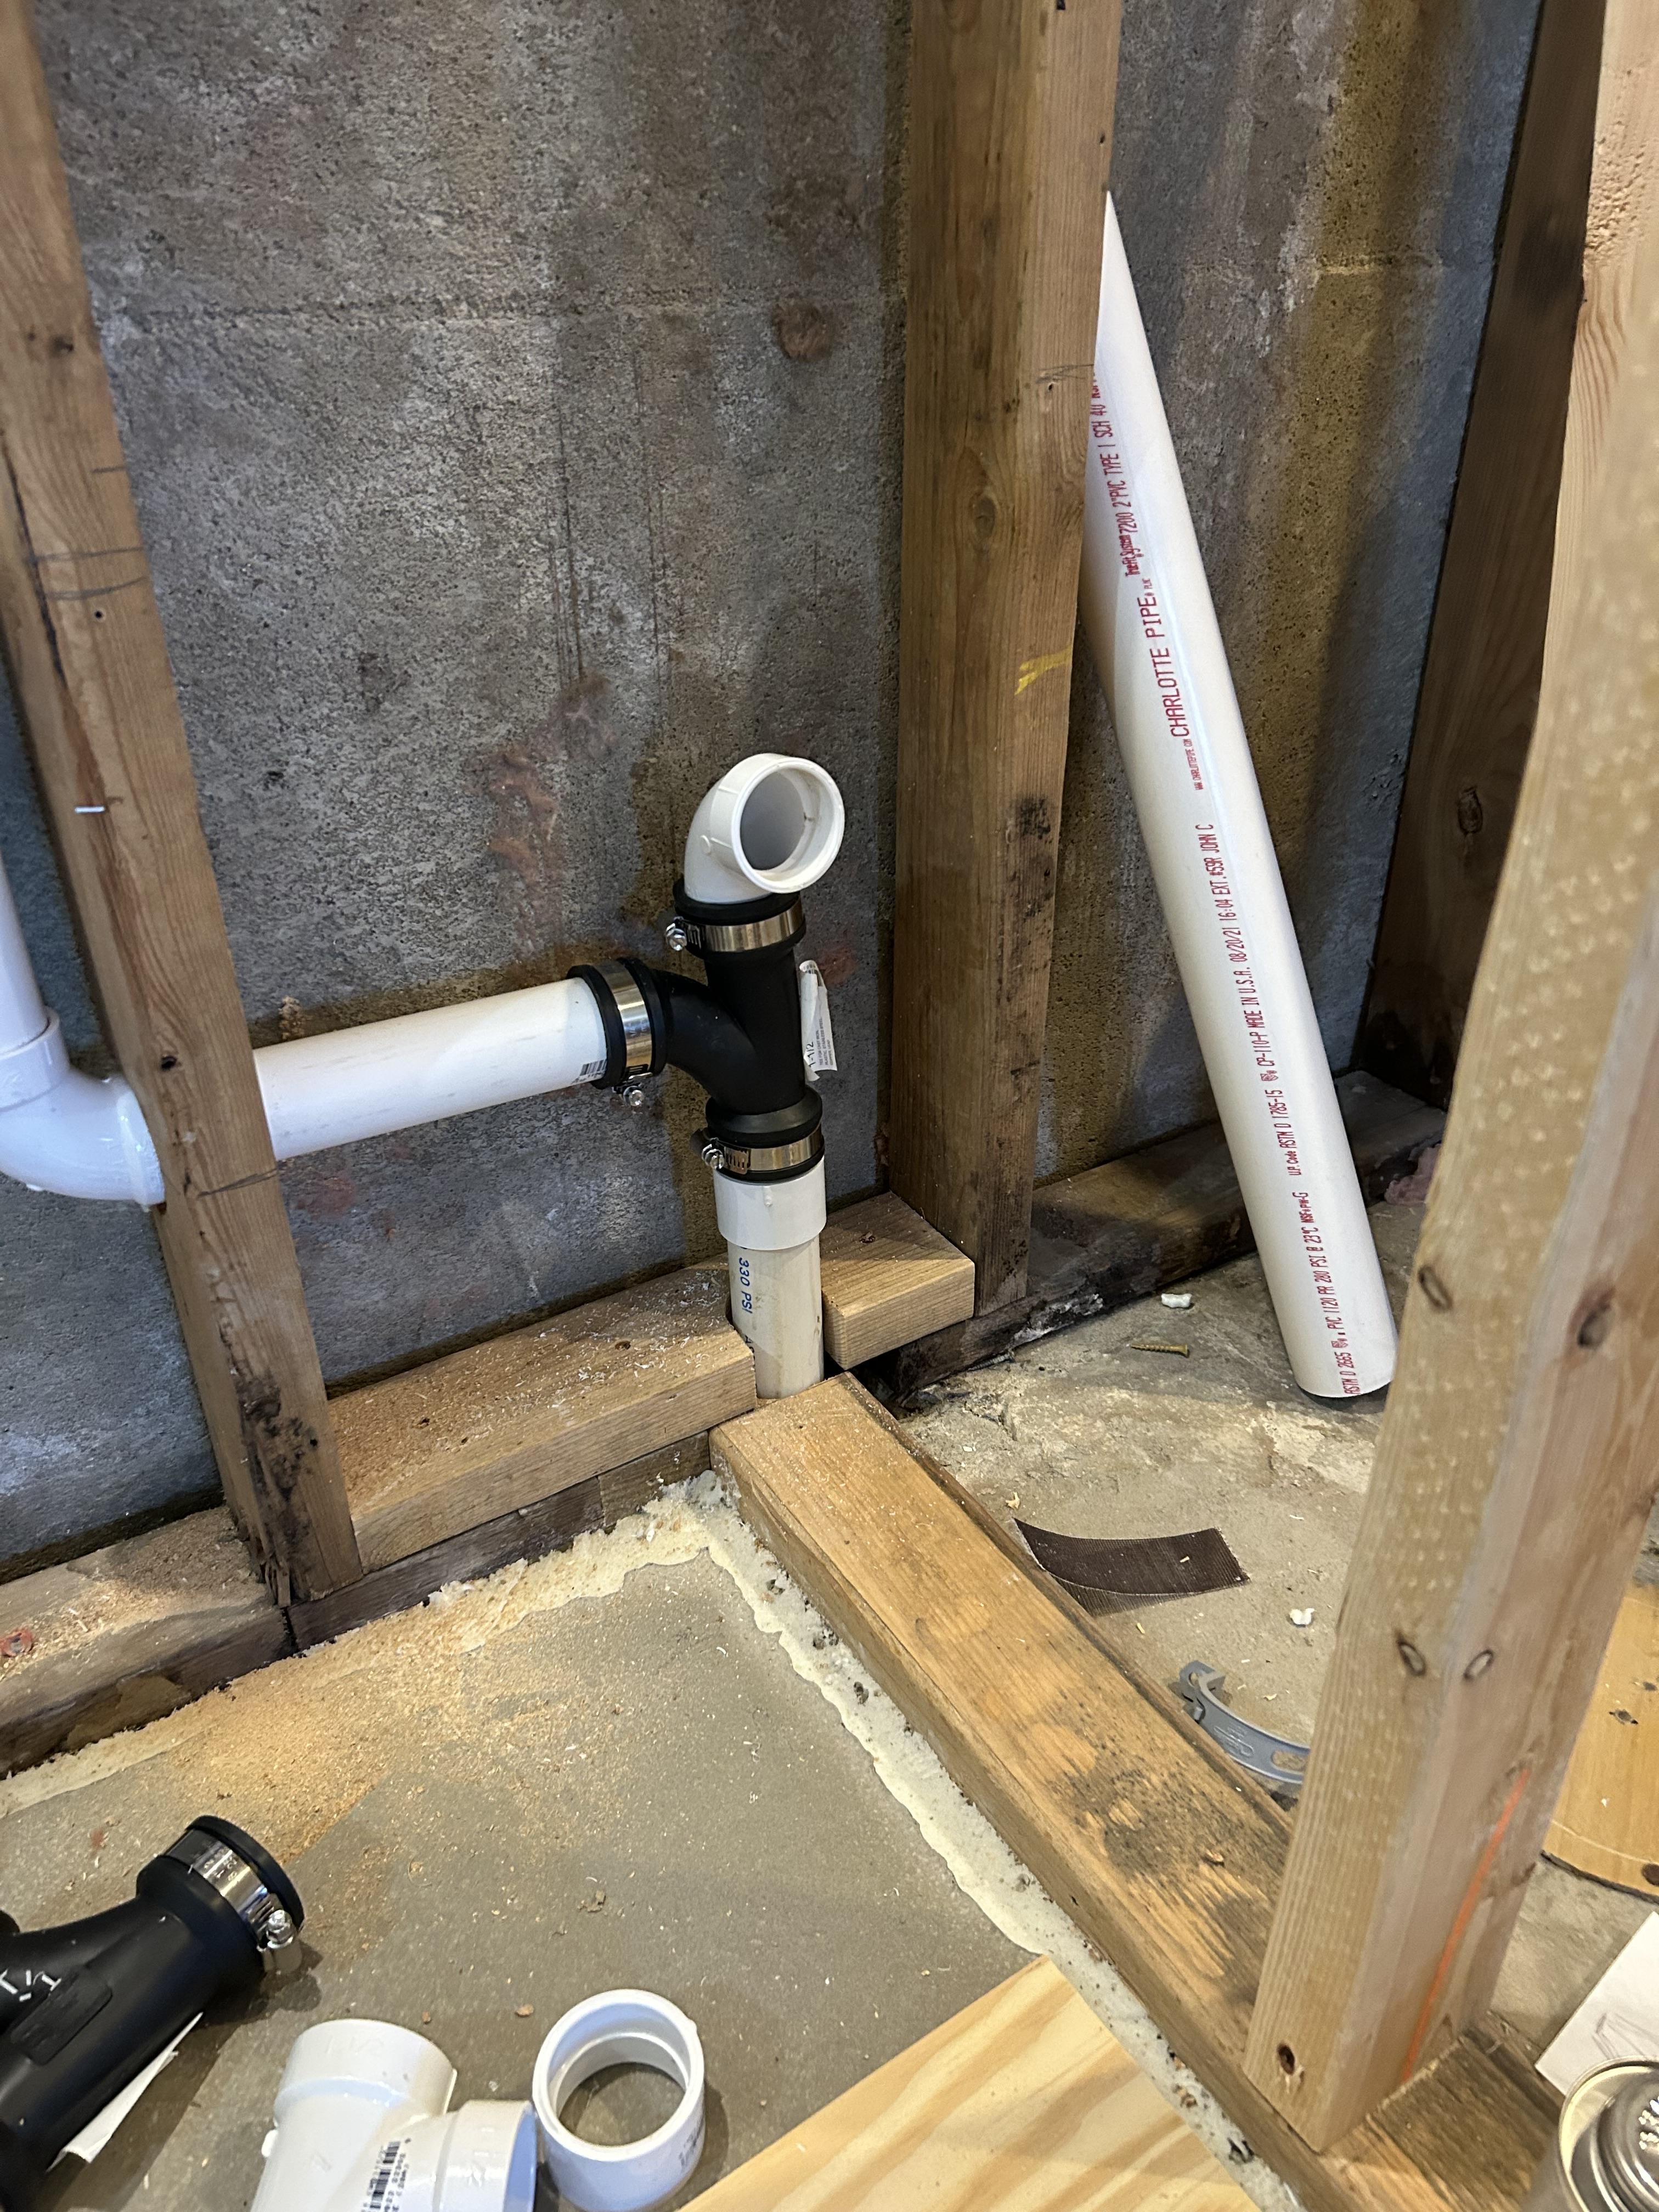
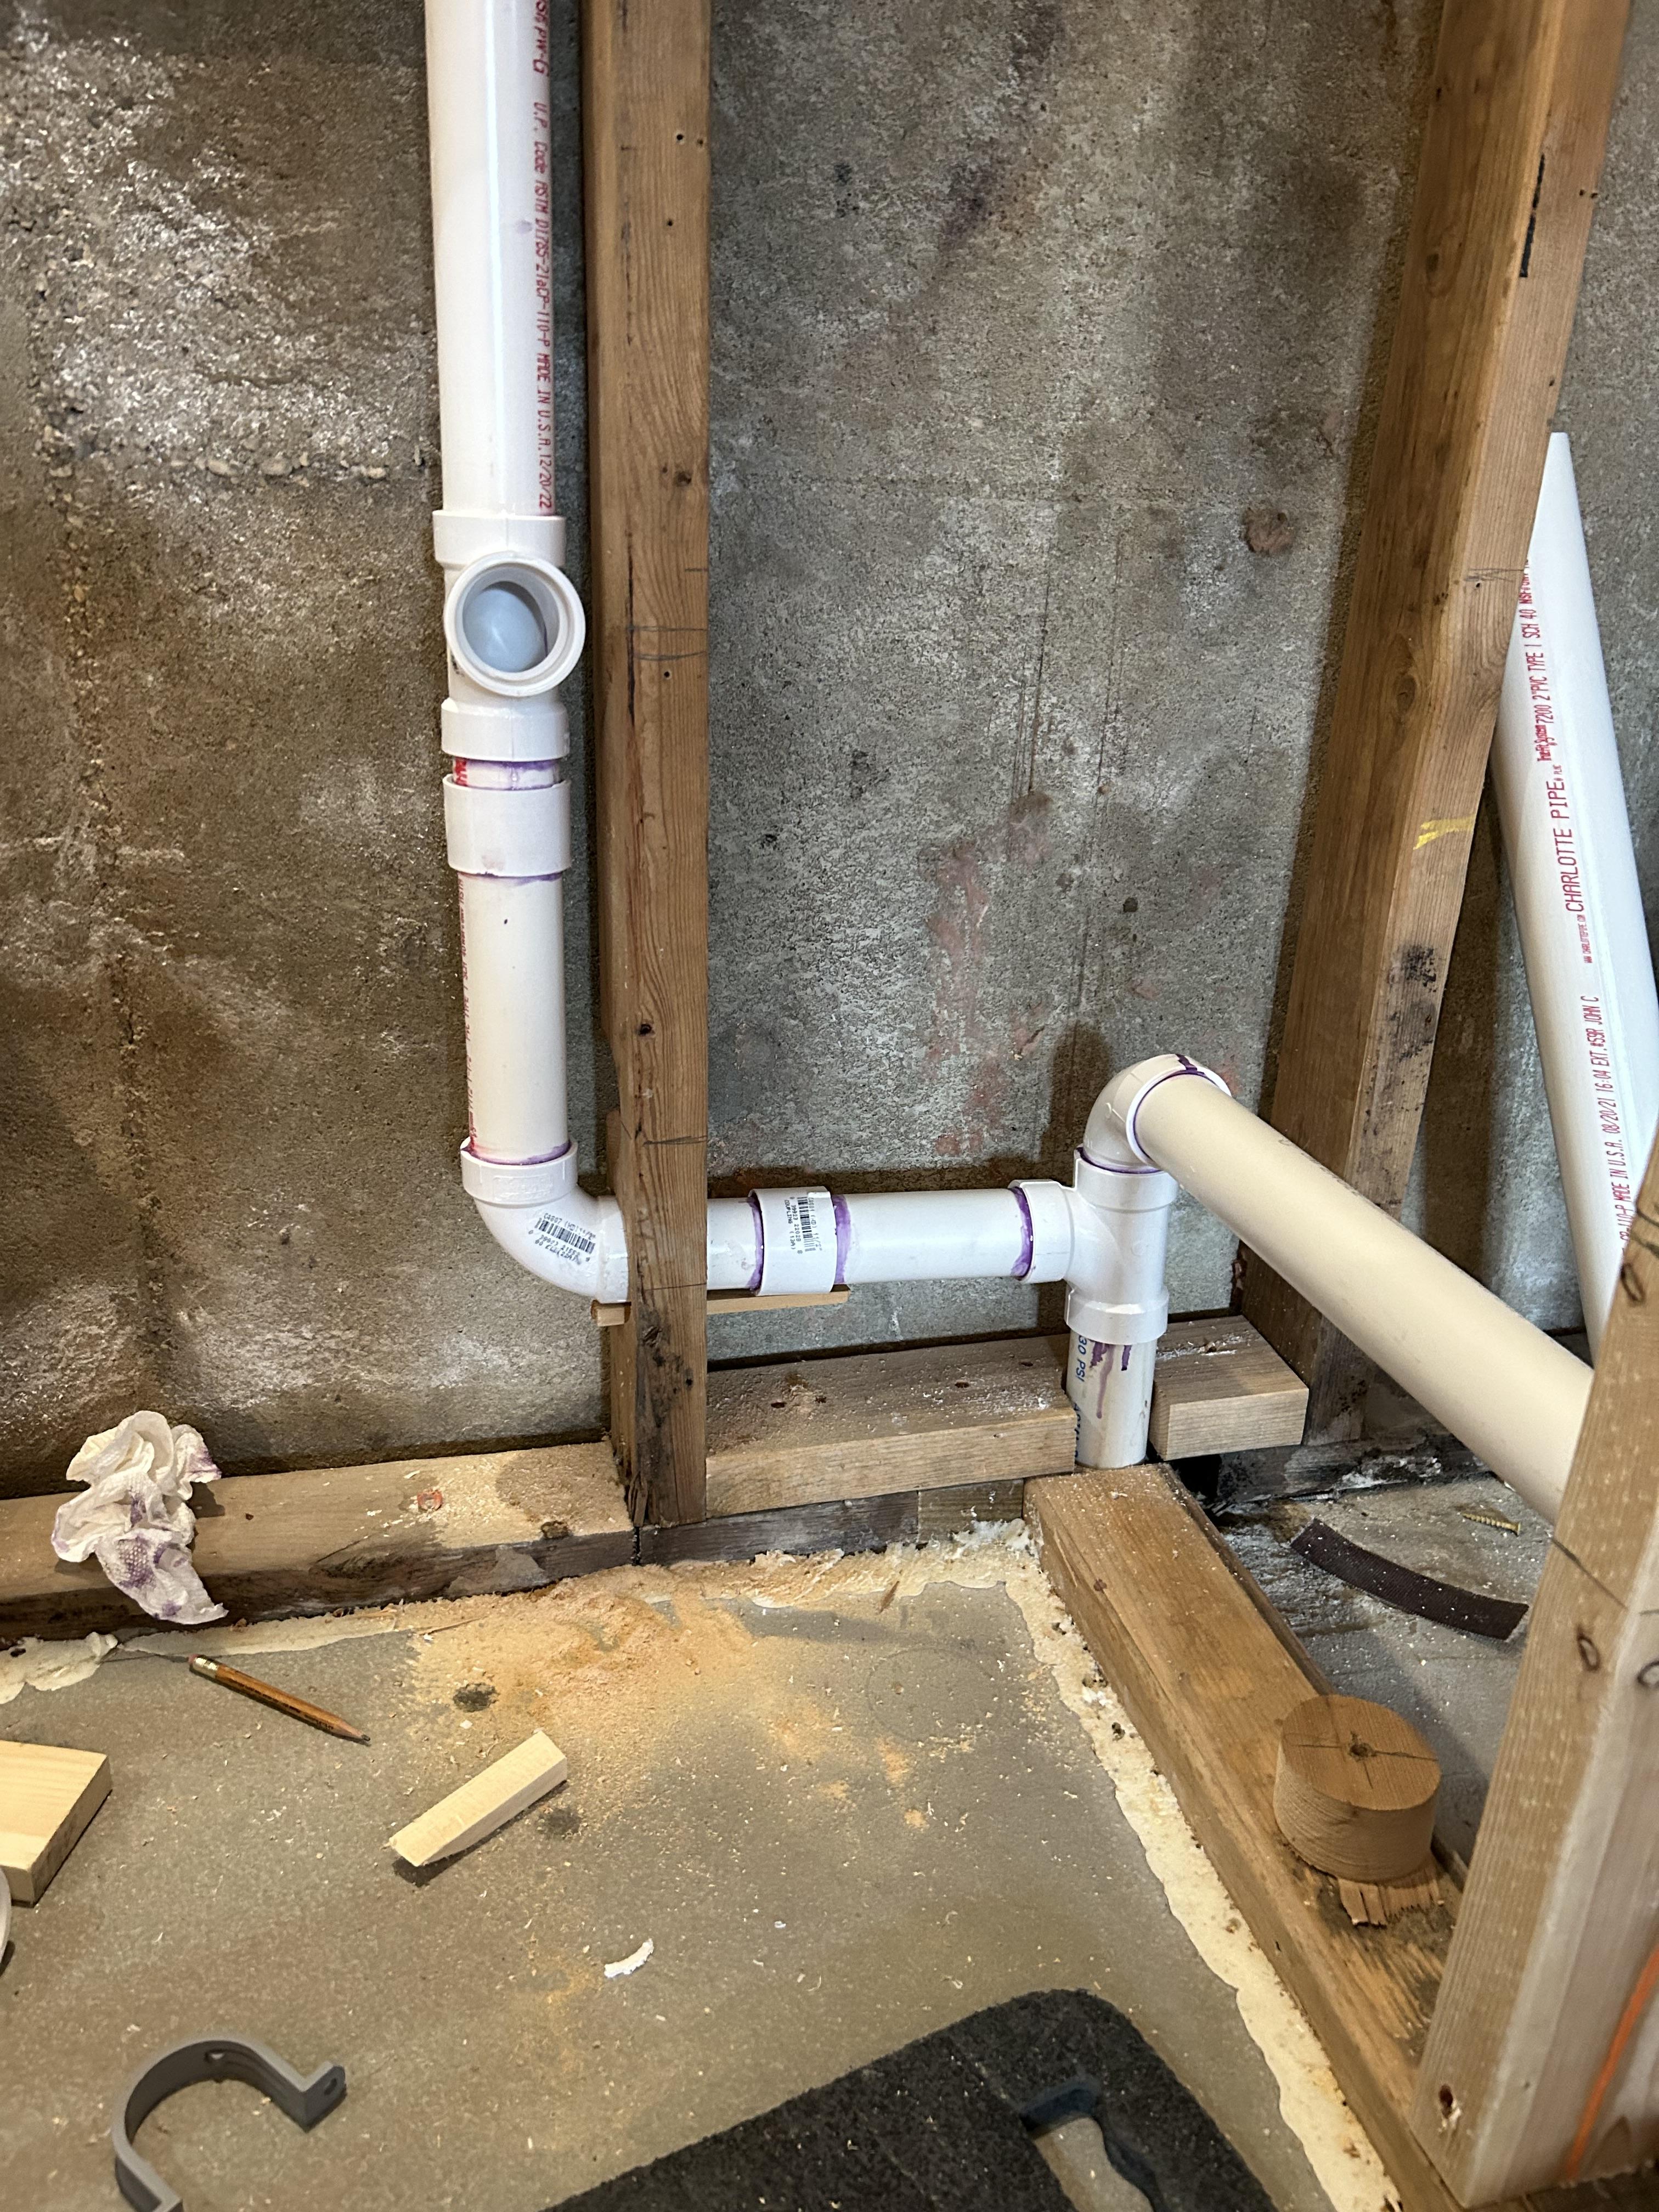
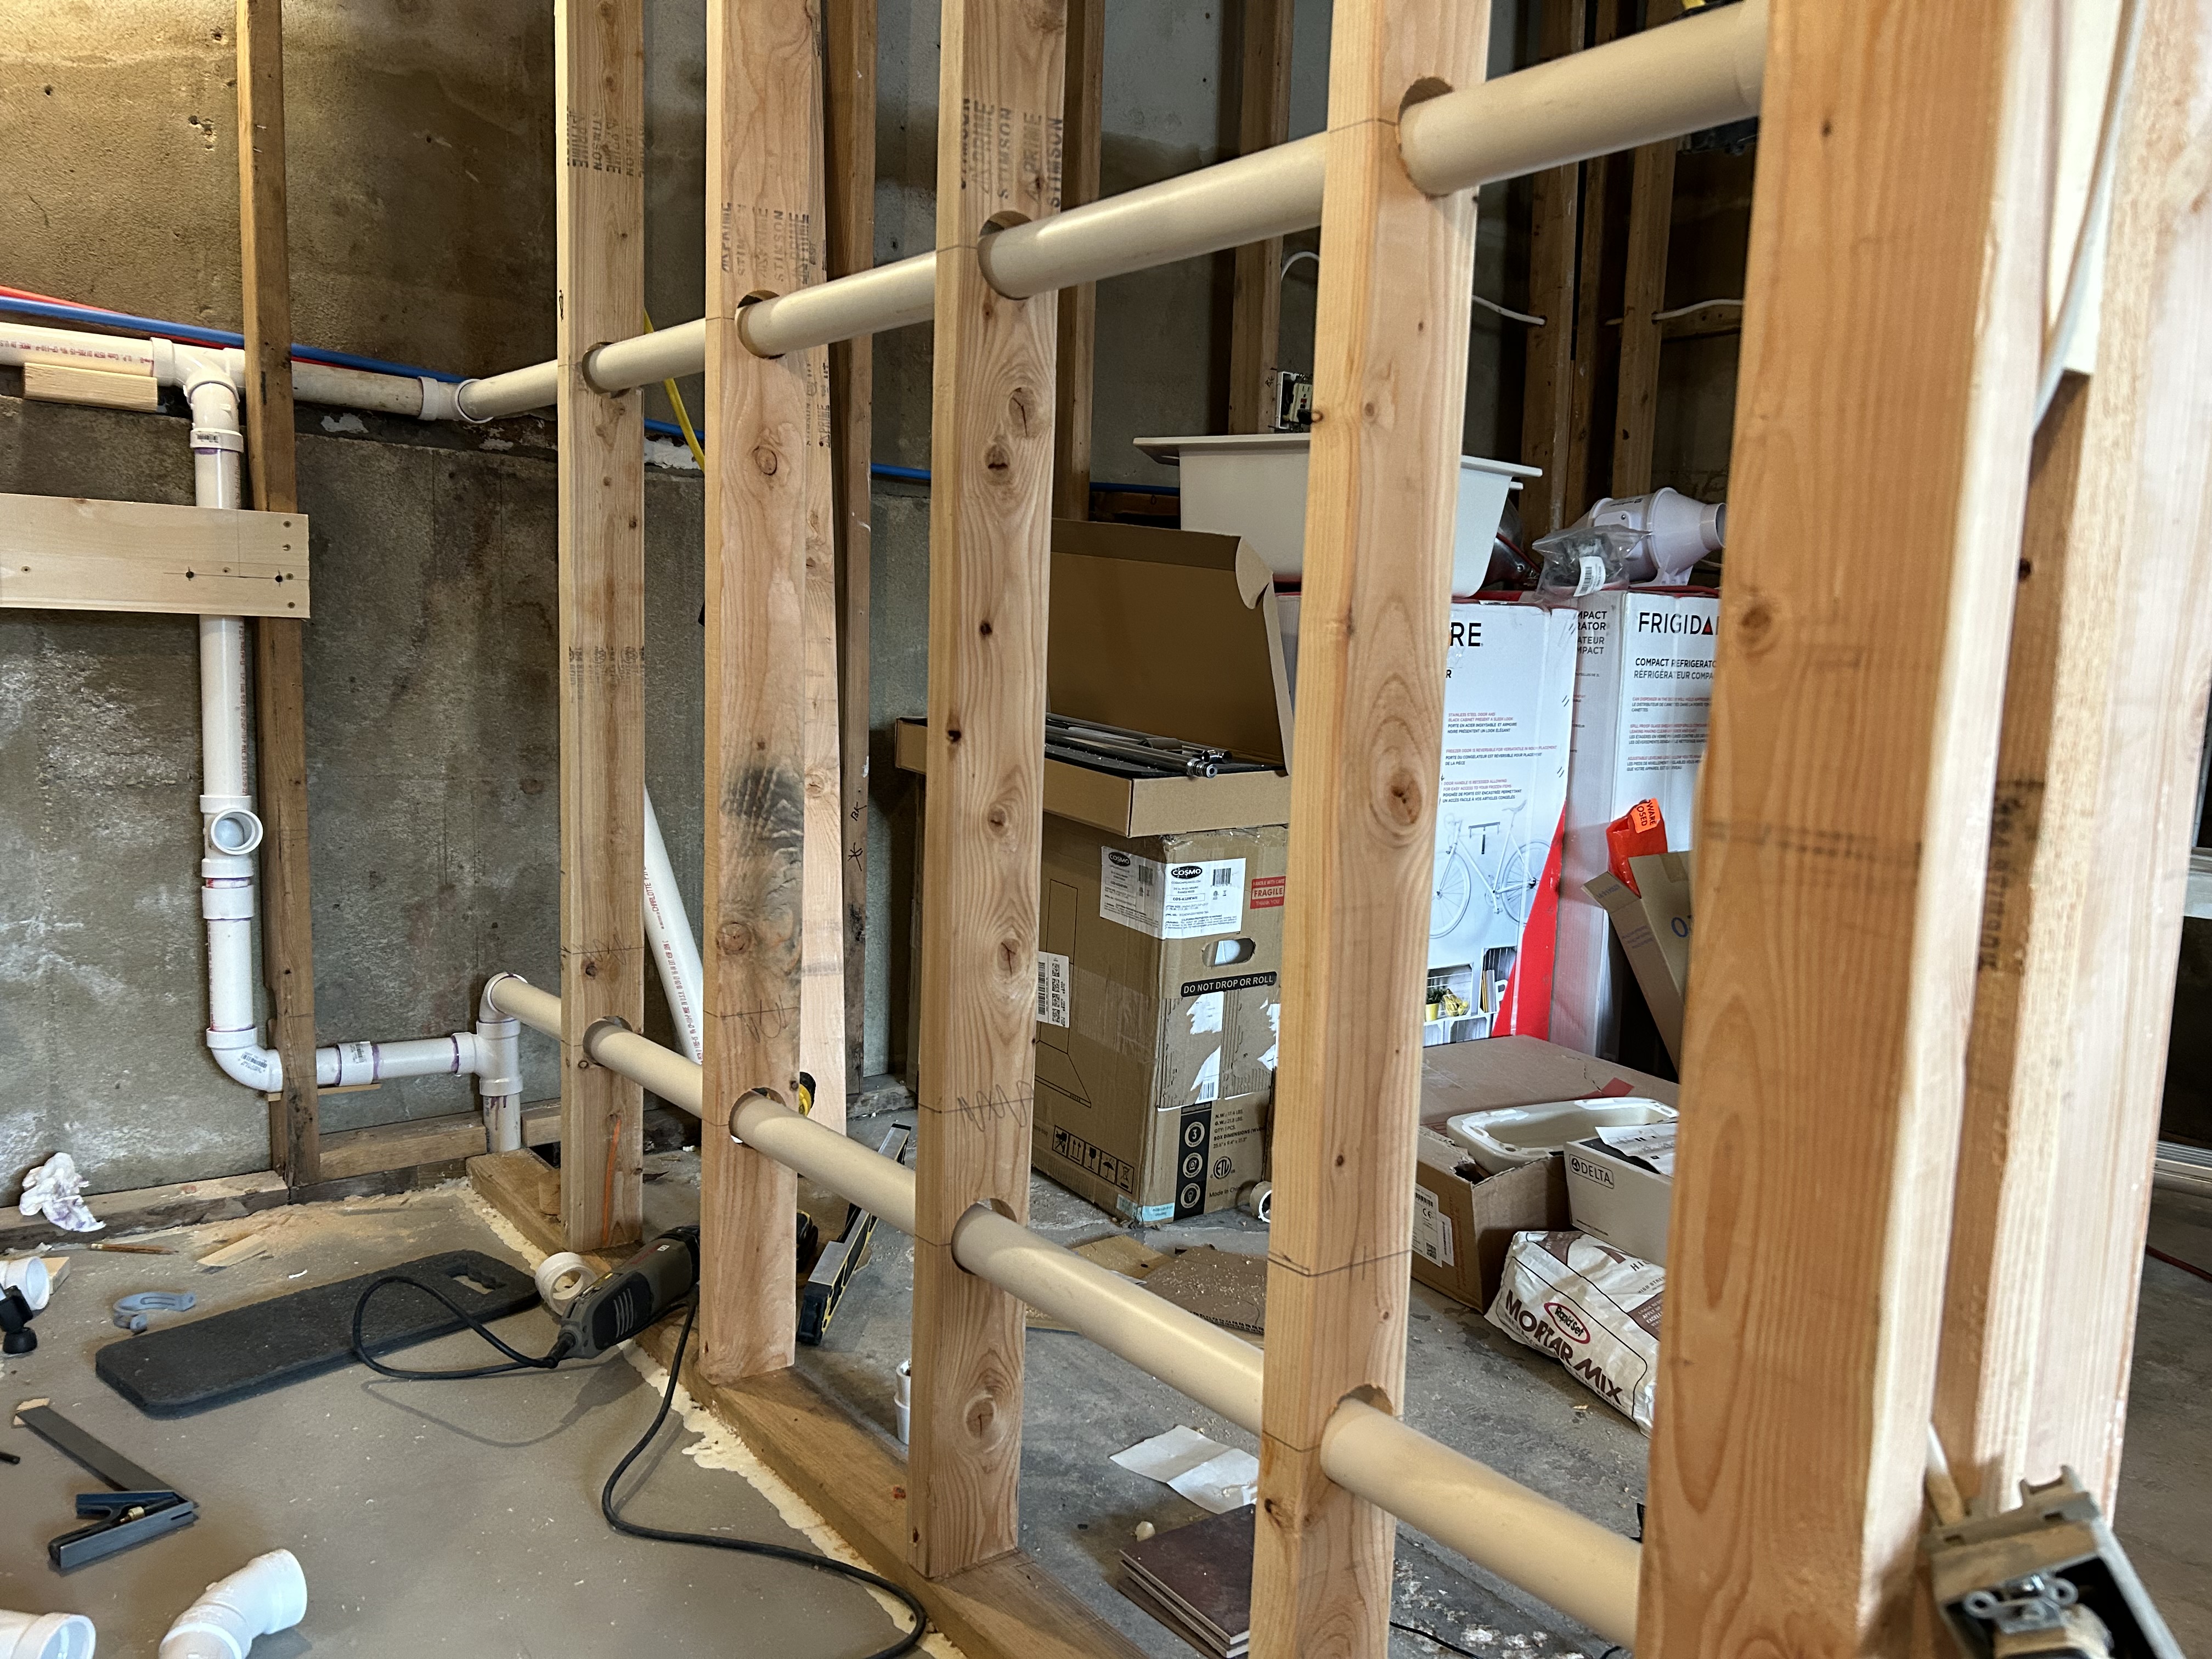
Can I use one of these schedule 40, 90degree side outlet elbows where a lavatory drain & kitchen drain meet at a corner? Here's my badly 'marked up' picture showing where I'd like to drop the level of the existing vent pipe (to give wall-depth for a cabinet), and at the arrow is where the side outlet piece would go. This bathroom & kitchen existed long before we bought the house in 1995 and everything functioned fine in terms of draining, no gurgling, etc. The copper, though, had to go......too many pin hole leaks. The kitchen sink will basically be where I'm shooting the picture from, but on the other side of the wall, hence those circles I drew to show the drain pipe in the wall.

LACY3LDs.jpg

TfrJ3cI.jpg


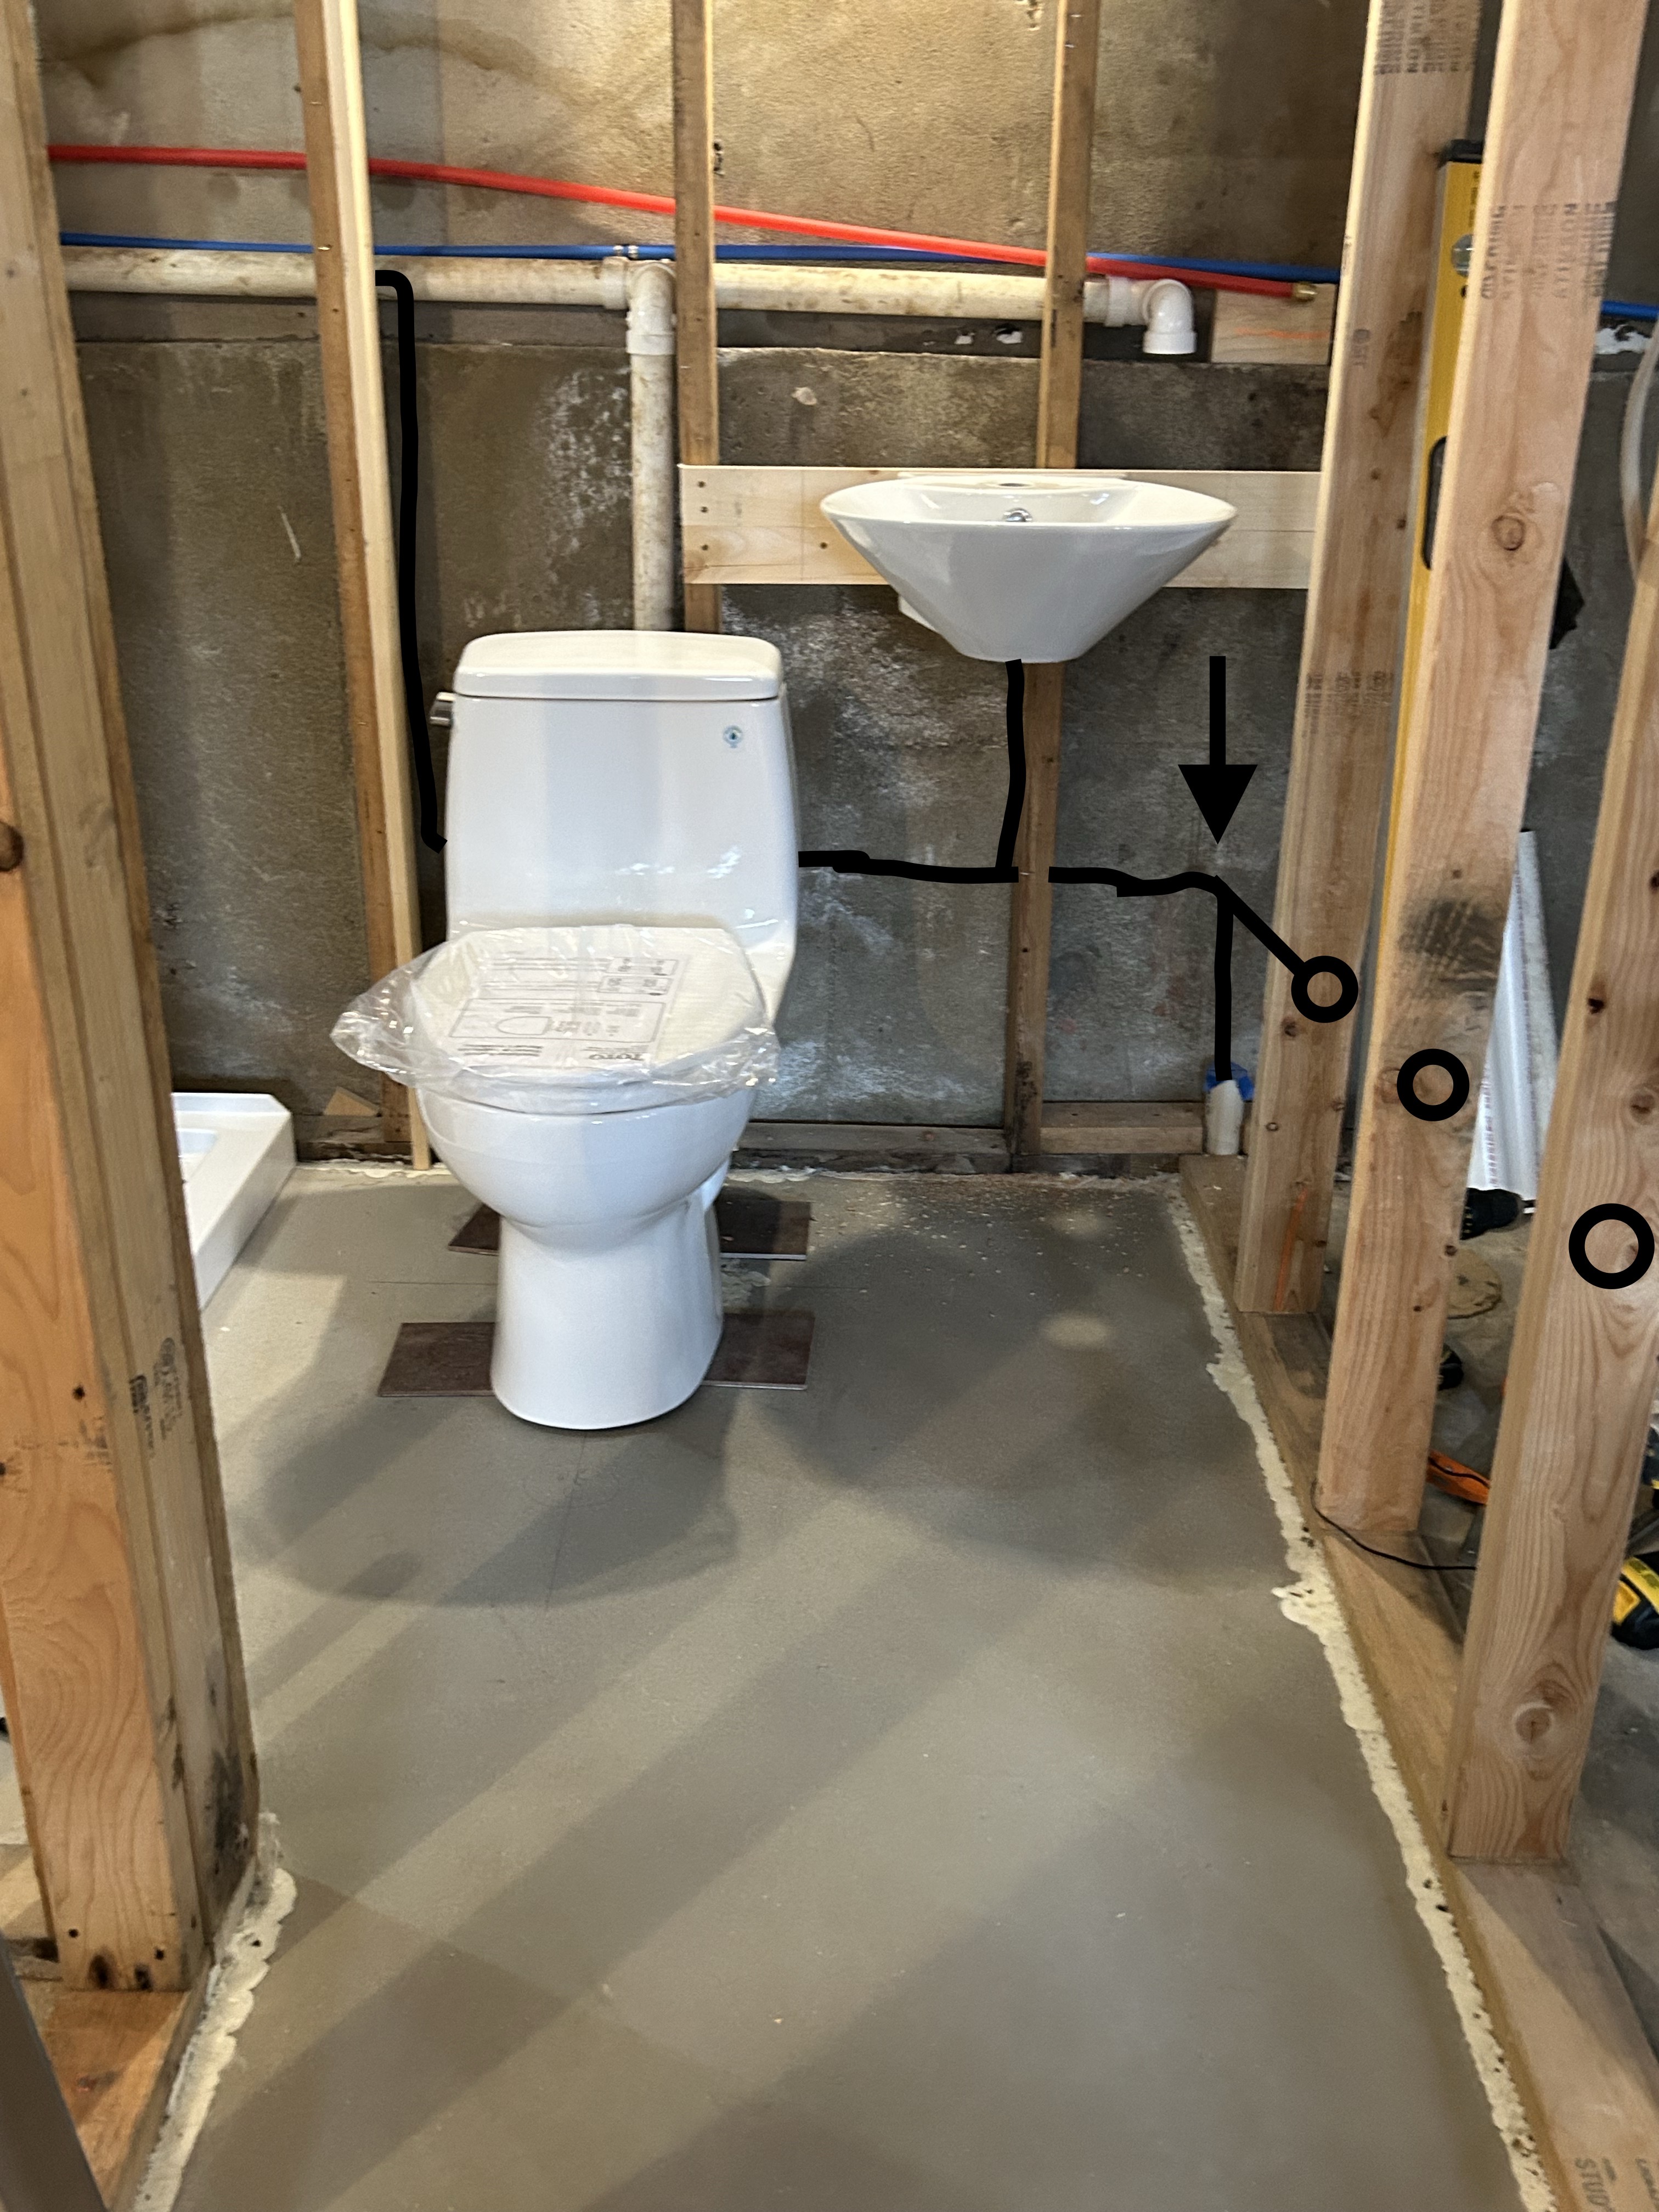
I have the Toto toilet and a wall sink in place for my own spacial conceptualization problems, ie: I can't draw:)

Thank you in advance for any guidance you have to offer. It has always been very helpful in the past!

Best,
Howard Emerson
 

wwhitney

In the Trades
Messages
6,567
Reaction score
1,847
Points
113
Location
Berkeley, CA
No. The fitting you show has no radius to the side entry, so that side entry can't be used for drainage.

If you need to combine two vented drains like that, it would be simplest to bring them in at different elevations, and then use a quarter bend for the upper drain and a san-tee or combo for the lower drain. But in a pinch you could use a san-tee with side entry for the two drains at the same elevation, and just plug the top entry.

How are you venting the lav and the kitchen sink? Is the riser behind the WC a dry vent for the WC? How is the shower vented?

Cheers, Wayne
 
Messages
224
Reaction score
14
Points
18
Location
Huntington Station, NY
Website
www.howardemerson.com
No. The fitting you show has no radius to the side entry, so that side entry can't be used for drainage.

If you need to combine two vented drains like that, it would be simplest to bring them in at different elevations, and then use a quarter bend for the upper drain and a san-tee or combo for the lower drain. But in a pinch you could use a san-tee with side entry for the two drains at the same elevation, and just plug the top entry.

How are you venting the lav and the kitchen sink? Is the riser behind the WC a dry vent for the WC? How is the shower vented?

Cheers, Wayne
Hello Wayne,
First of all I'd like to express my profound sadness hearing of Terry's illness, that I only read about after I made my post........<sigh>......
(T)His forum and its members have been a tremendous source of accurate, thoughtful & practical knowledge that I, personally, have made use of many, many times......

Anyway.........Wayne, to answer your questions: The riser behind the WC is a dry vent.

The existing horizontal pipe on the foundation ledge is all dry vent. The shower is to the left of the WC. The elbow at the right end was the vent to the old bathroom sink, and that is what I intend on tying into at the corner.

The distance from the kitchen sink to the corner is 6', if that matters. The sink, by the way, actually has an overflow tube built in that I'll have to tie into tailpiece like you'd attach a dish washer. We will NOT be having a dish washer. This had been an apartment in our house for my sister in law with MS, now in a nursing home. It will be our place to use when the kids come to visit, or I'm in the dog house when my wife is cross with me, or an AirBnB unit if we feel comfortable enough......

Thanks for anything else you can add, Wayne!

Again my thoughts are with Terry and his family.......

HE
 

wwhitney

In the Trades
Messages
6,567
Reaction score
1,847
Points
113
Location
Berkeley, CA
OK, I'm going to assume the stub up with the blue tape is an available drain connection, and that the WC and shower are separately vented. Then there's no problem connecting the kitchen sink drain with the lav drain. They will each need to be dry vented.

So you'll want to use the connectivity shown in the drawing below, where green is drain and purple is vent. [The green circle is the stub out of the wall for the lav.] The exact locations can vary a bit as you like, the horizontal dry vent just needs to be at least 6" about the flood rim of the sinks.

Cheers, Wayne
TfrJ3cI.jpg
 
Messages
224
Reaction score
14
Points
18
Location
Huntington Station, NY
Website
www.howardemerson.com
OK, I'm going to assume the stub up with the blue tape is an available drain connection, and that the WC and shower are separately vented. Then there's no problem connecting the kitchen sink drain with the lav drain. They will each need to be dry vented.

So you'll want to use the connectivity shown in the drawing below, where green is drain and purple is vent. [The green circle is the stub out of the wall for the lav.] The exact locations can vary a bit as you like, the horizontal dry vent just needs to be at least 6" about the flood rim of the sinks.

Cheers, Wayne
View attachment 91574
Hi Wayne,
Thank you so much for taking the time to talk me through this!

My initial response to your reply was total despair, but after looking at everything I'll just move the vertical WC vent to the right so that it clears up an area behind the toilet. I'll have to move the stud as well with a box frame, but every wall in this room (that was a garage) is non-bearing, so I don't worry about structure for the most part.

The stub out for the wall hung sink has to be exactly in line with the tailpipe, so I'll go sideways first and come out exactly where I need to be. Unlike my Toto Wall Hung sink upstair, there's no available shroud, so it'll have to be chrome and really neat. These oddball P-traps they're touting lately are nice looking, but they go dry after a couple of days, so I'm leery of them.

Here's the upstairs sink area I did with Toto products:

1XiVPyt.jpg


Thanks again!

Howard
 

wwhitney

In the Trades
Messages
6,567
Reaction score
1,847
Points
113
Location
Berkeley, CA
My initial response to your reply was total despair, but after looking at everything I'll just move the vertical WC vent to the right so that it clears up an area behind the toilet.
I'm not understanding what issue you see with the vertical WC vent, based on my response.

The stub out for the wall hung sink has to be exactly in line with the tailpipe, so I'll go sideways first and come out exactly where I need to be.
You can put the san-tee directly in line with the tailpiece if you like, and jog the drain to the right, bringing the vent straight up. Or you can put the san-tee to the right above the drain, and have the san-tee inlet face to the left, with a quarter bend to poke out of the wall where you need it to be.

Cheers, Wayne
 
Messages
224
Reaction score
14
Points
18
Location
Huntington Station, NY
Website
www.howardemerson.com
I'm not understanding what issue you see with the vertical WC vent, based on my response.


You can put the san-tee directly in line with the tailpiece if you like, and jog the drain to the right, bringing the vent straight up. Or you can put the san-tee to the right above the drain, and have the san-tee inlet face to the left, with a quarter bend to poke out of the wall where you need it to be.

Cheers, Wayne
Hi Wayne,
My “not seeing the forest for the trees” is the issue, so don’t mind me!

I already had enough depth with the horizontal pipe in the way, but I never checked! I’ll just move the WC riser over to the stud to the left, and angle back to it.

HE
 

wwhitney

In the Trades
Messages
6,567
Reaction score
1,847
Points
113
Location
Berkeley, CA
Still not following the issue. Why do you have to touch the vertical dry vent behind the WC?

Just to be clear, the green and purple I drew in are in lieu of the black you drew in. I don't understand why you originally had a horizontal black line to the left of the sink centerline. If it's meant to be a dry vent, then those can't be horizontal until at least 6" above the fixture flood rim.

Cheers, Wayne
 
Messages
224
Reaction score
14
Points
18
Location
Huntington Station, NY
Website
www.howardemerson.com
Still not following the issue. Why do you have to touch the vertical dry vent behind the WC?

Just to be clear, the green and purple I drew in are in lieu of the black you drew in. I don't understand why you originally had a horizontal black line to the left of the sink centerline. If it's meant to be a dry vent, then those can't be horizontal until at least 6" above the fixture flood rim.

Cheers, Wayne
So sorry for the late reply, Wayne.

As it turns out I can build an in-wall cabinet in another area, but to answer your question: The vertical dry vent was in my way where it was, but I've determined that I can leave it where it is, but re-do the pipe so that the San-tee is rotated tighter to the wall so that I can use more wall depth for a recessed mirror. At the moment there's more than 2" behind the pipe at the top, but it's against the wall at the bottom.

Again, my thanks for your assistance!

HE
 
Messages
224
Reaction score
14
Points
18
Location
Huntington Station, NY
Website
www.howardemerson.com
OK, I'm going to assume the stub up with the blue tape is an available drain connection, and that the WC and shower are separately vented. Then there's no problem connecting the kitchen sink drain with the lav drain. They will each need to be dry vented.

So you'll want to use the connectivity shown in the drawing below, where green is drain and purple is vent. [The green circle is the stub out of the wall for the lav.] The exact locations can vary a bit as you like, the horizontal dry vent just needs to be at least 6" about the flood rim of the sinks.

Cheers, Wayne
View attachment 91574
Hi Wayne,
Sorry to bother you again. I'm about to drill the wall studs for the dry vent & drain pipe from the kitchen sink. I assumed that I would connect the dry vent to the drain pipe at the sink location, and that I wouldn't have to do that at the foundation wall. Here is the present state of affairs:
baHvrZq.jpg


And following the laser to the opposite end of the wall where the sink will reside (on the opposite side)....is this:

MkRQaQh.jpg

The black dot is the dry vent terminus, that I would loop down to the drain pipe terminus. Forgive my crude mark ups.

So what happens at the foundation wall? I just stuck a San-tee in there, but shouldn't the sink end set up with dry vent looped to drain pipe suffice?

Thanks for your patience.

Howard Emerson
 
Last edited:

wwhitney

In the Trades
Messages
6,567
Reaction score
1,847
Points
113
Location
Berkeley, CA
First, those rubber fittings are not usable. You need to use PVC fittings. If you have a slight alignment issue, or difficulty with the order of assembly, you could use a shielded rubber coupling or two to make up some of the joints. E.g. for 1-1/2" plastic to 1-1/2" plastic, Fernco 3000-150 or Mission CP-150.

If your kitchen sink were closer to the corner, you could put the plastic san-tee in the corner in the first picture in your last post at the proper height, and then just run a single pipe through the wood framed wall perpendicular to the foundation wall. That pipe would be your kitchen sink trap arm, and it could fall no more than one pipe diameter from the trap under the sink to that san-tee, while falling at least 1/4" per foot.

But at 6', the kitchen sink is too far away for that to work, the trap arm would fall more than 1-1/2". So the san-tee goes behind the sink at whatever elevation you want the stub-out. The sink drain and vent run separately through the wood framed wall perpendicular to the foundation, with the vent connecting as you show. The drain just hits a quarter bend to enter the top of the currently rubber (but needs to be changed to plastic) san-tee.

Cheers, Wayne
 
Messages
224
Reaction score
14
Points
18
Location
Huntington Station, NY
Website
www.howardemerson.com
First, those rubber fittings are not usable. You need to use PVC fittings. If you have a slight alignment issue, or difficulty with the order of assembly, you could use a shielded rubber coupling or two to make up some of the joints. E.g. for 1-1/2" plastic to 1-1/2" plastic, Fernco 3000-150 or Mission CP-150.

If your kitchen sink were closer to the corner, you could put the plastic san-tee in the corner in the first picture in your last post at the proper height, and then just run a single pipe through the wood framed wall perpendicular to the foundation wall. That pipe would be your kitchen sink trap arm, and it could fall no more than one pipe diameter from the trap under the sink to that san-tee, while falling at least 1/4" per foot.

But at 6', the kitchen sink is too far away for that to work, the trap arm would fall more than 1-1/2". So the san-tee goes behind the sink at whatever elevation you want the stub-out. The sink drain and vent run separately through the wood framed wall perpendicular to the foundation, with the vent connecting as you show. The drain just hits a quarter bend to enter the top of the currently rubber (but needs to be changed to plastic) san-tee.

Cheers, Wayne
Hello Wayne,
How does the dry vent above the kitchen sink terminate? No vertical pipe connection to the drain pipe below?

Ignoring the Fernco san-tee, I assume this is what you're describing, all in PVC with shielded couplings as needed?


9EOnMXv.jpg


Thank you!
Howard
 

wwhitney

In the Trades
Messages
6,567
Reaction score
1,847
Points
113
Location
Berkeley, CA
On that last picture, if the rubber san-tee becomes plastic, yes, that's how you can combine your vented lav drain on the left with your vented kitchen sink drain coming from the right and send them both into the stub up from below.

[Is that stub up 1-1/2" or 2"? IPC actually does allow a kitchen sink (2 DFUS, even with garbage disposer and dishwasher) and a lav (1 DFU) on a 1-1/2" horizontal or vertical drain (max 3 DFUs), but I'm sure most would prefer to see 2".]

As for the vent side of things, there's no vertical pipe in the corner connecting vent and drain. The vents just connect at the top of the corner with an elbow as in your first picture of the day. If you look at your lav san-tee on the left, the piping behind the kitchen sink will be the same, with a san-tee and a drain out the bottom and the vent out the top. The drain goes to a LT90 and the vent goes to a 90 above, rather than the san-tee you have at the lav sink.

Also, check your desired elevations for the kitchen trap arm stub out and the lav stub out. Usually the kitchen sink stub out would be quite a bit lower than the lav stub out, to allow for a garbage disposal and deep kitchen sink. So in the corner the lav drain might come in above the kitchen sink, rather than below it as you have now. You can put a street LT90 into the bottom outlet of the kitchen sink san-tee if you want to get the kitchen sink drain as high as possible; you just need to be sure that's high enough given where your lav drain is.

Cheers, Wayne
 
Messages
224
Reaction score
14
Points
18
Location
Huntington Station, NY
Website
www.howardemerson.com
Hi Wayne,
Yes, the stub up out of the concrete floor is 1 & 1/2". The prior owners had the garage converted to an apartment for mom, and they spared no cost cutting technique.....

I now understand all that you're telling me, and it makes me realize how some of my guitar students must feel when I'm teaching them a whole new piece in a different tuning!

You have the patience of a saint.

HE
 
Top
Hey, wait a minute.

This is awkward, but...

It looks like you're using an ad blocker. We get it, but (1) terrylove.com can't live without ads, and (2) ad blockers can cause issues with videos and comments. If you'd like to support the site, please allow ads.

If any particular ad is your REASON for blocking ads, please let us know. We might be able to do something about it. Thanks.
I've Disabled AdBlock    No Thanks