My kingdom for another 1/2" from the wall

Users who are viewing this thread

Messages
224
Reaction score
14
Points
18
Location
Huntington Station, NY
Website
www.howardemerson.com
Hello all,
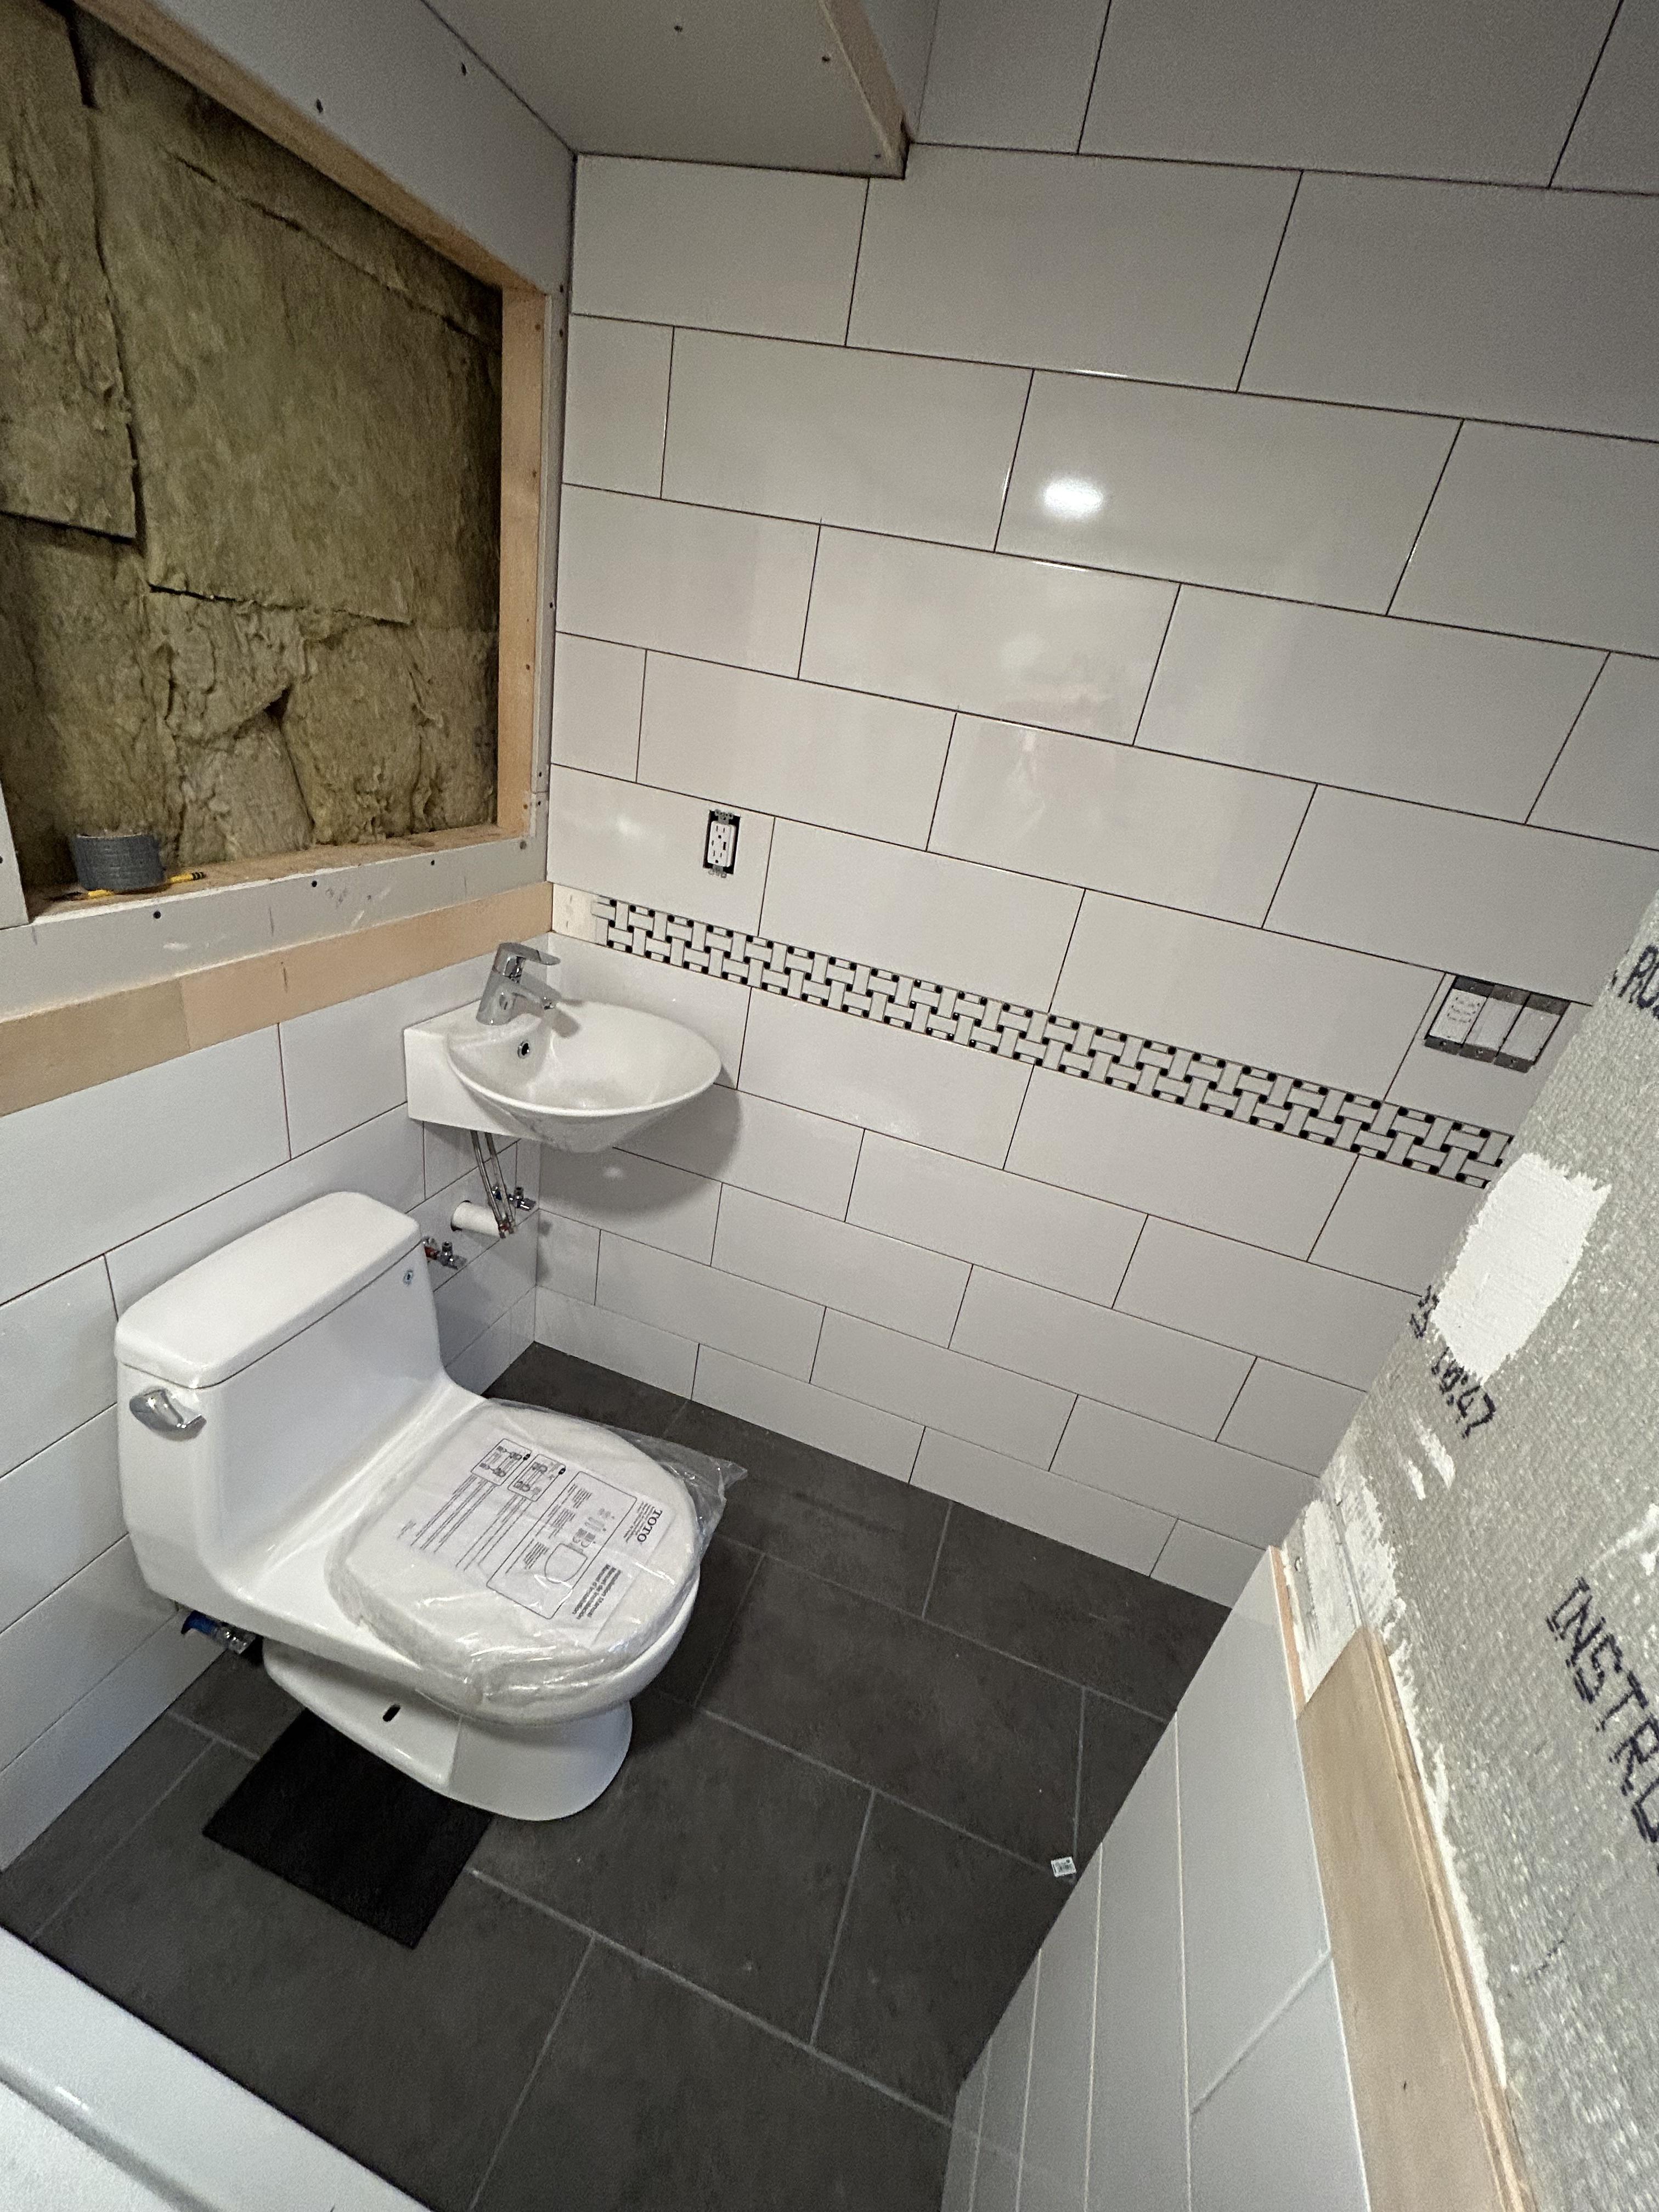
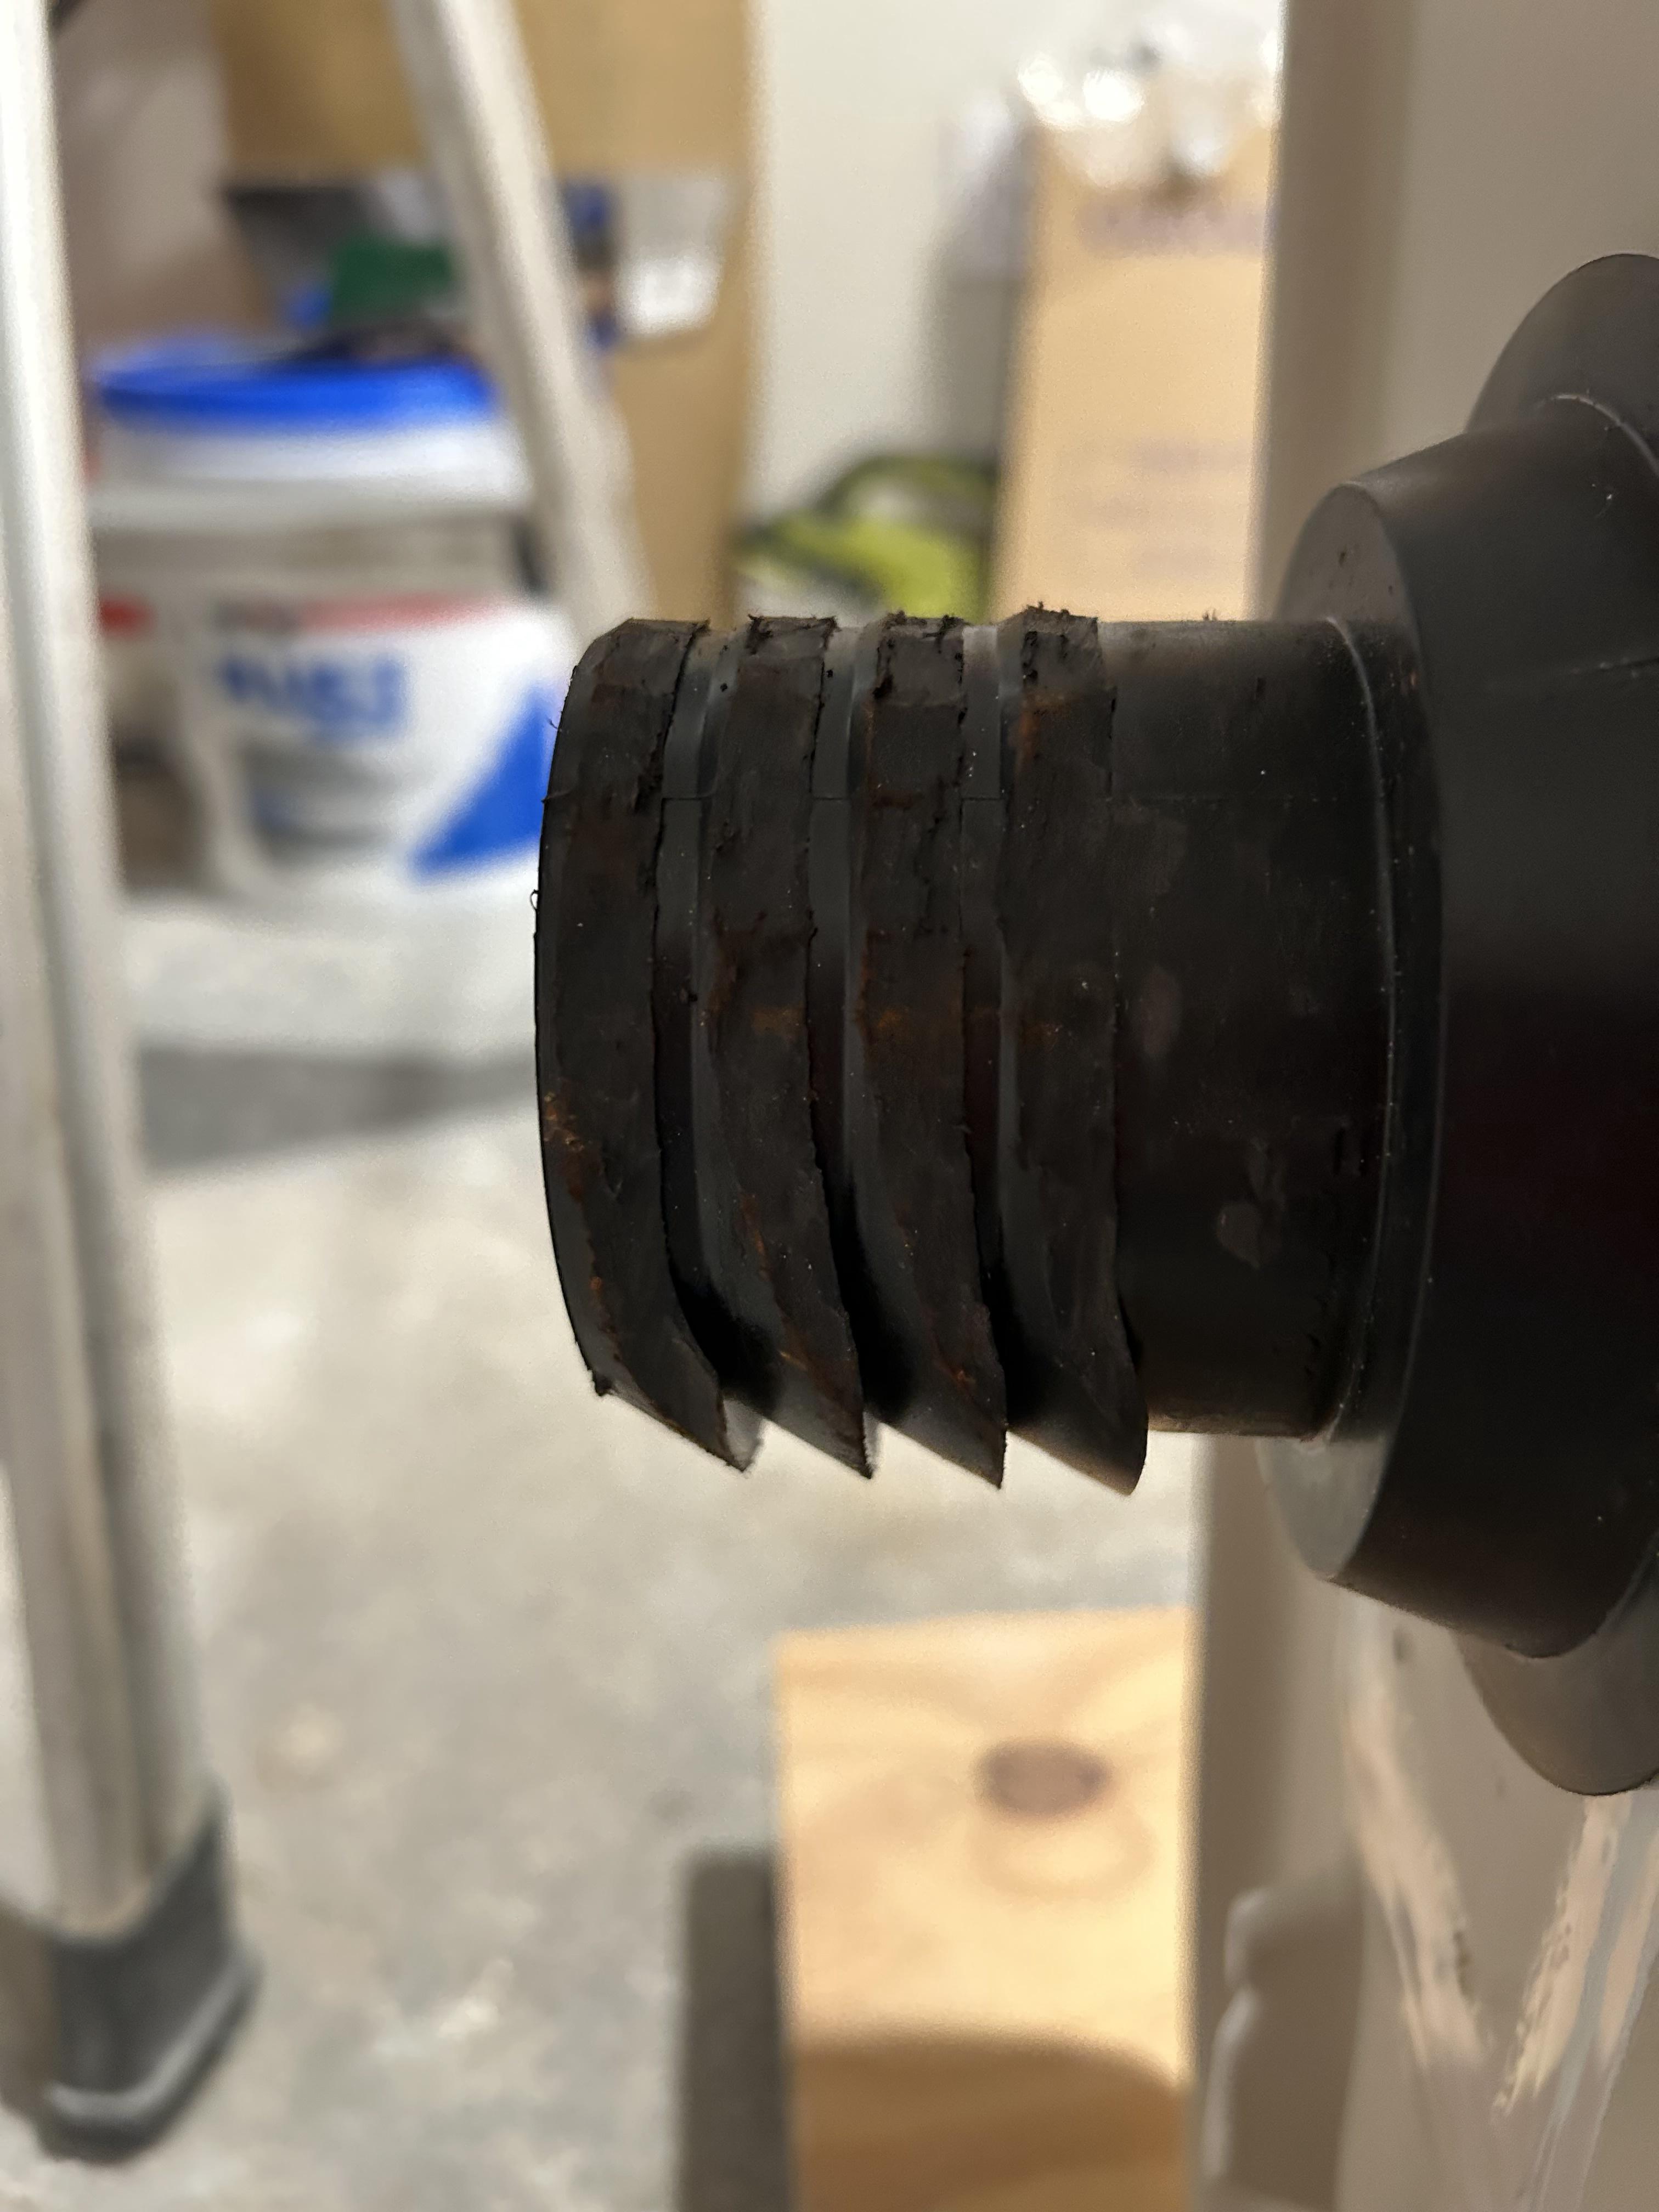
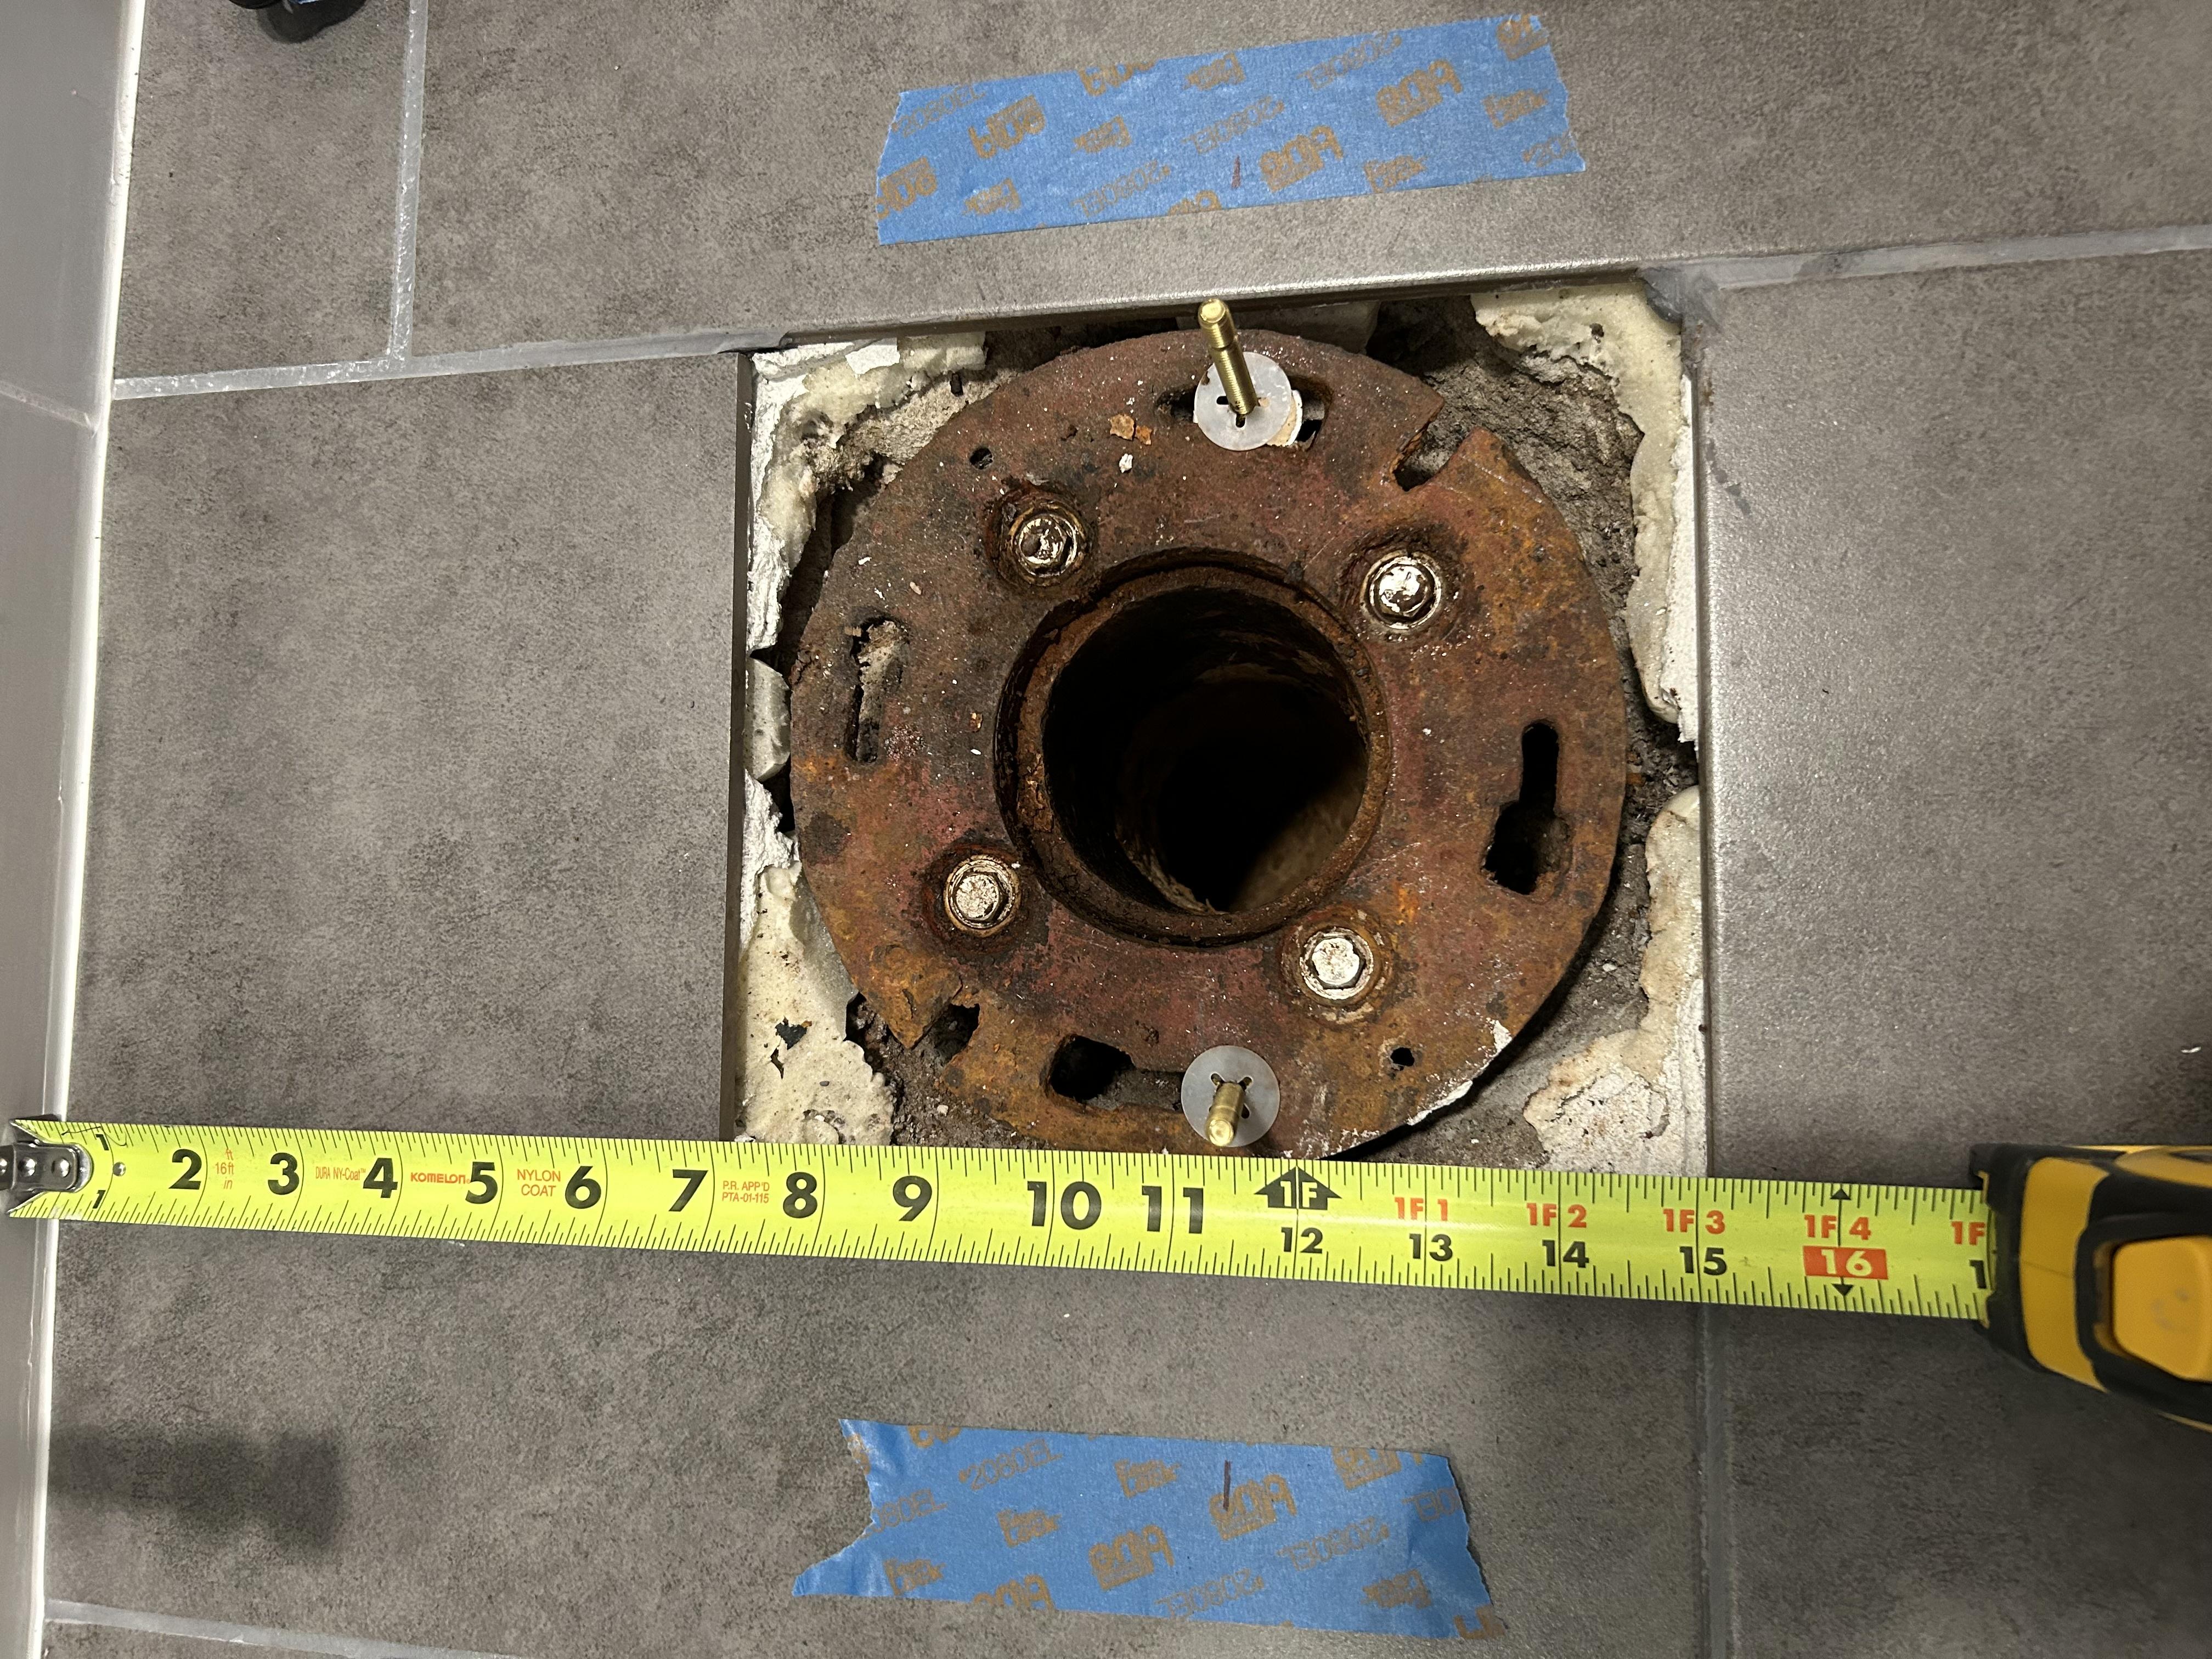
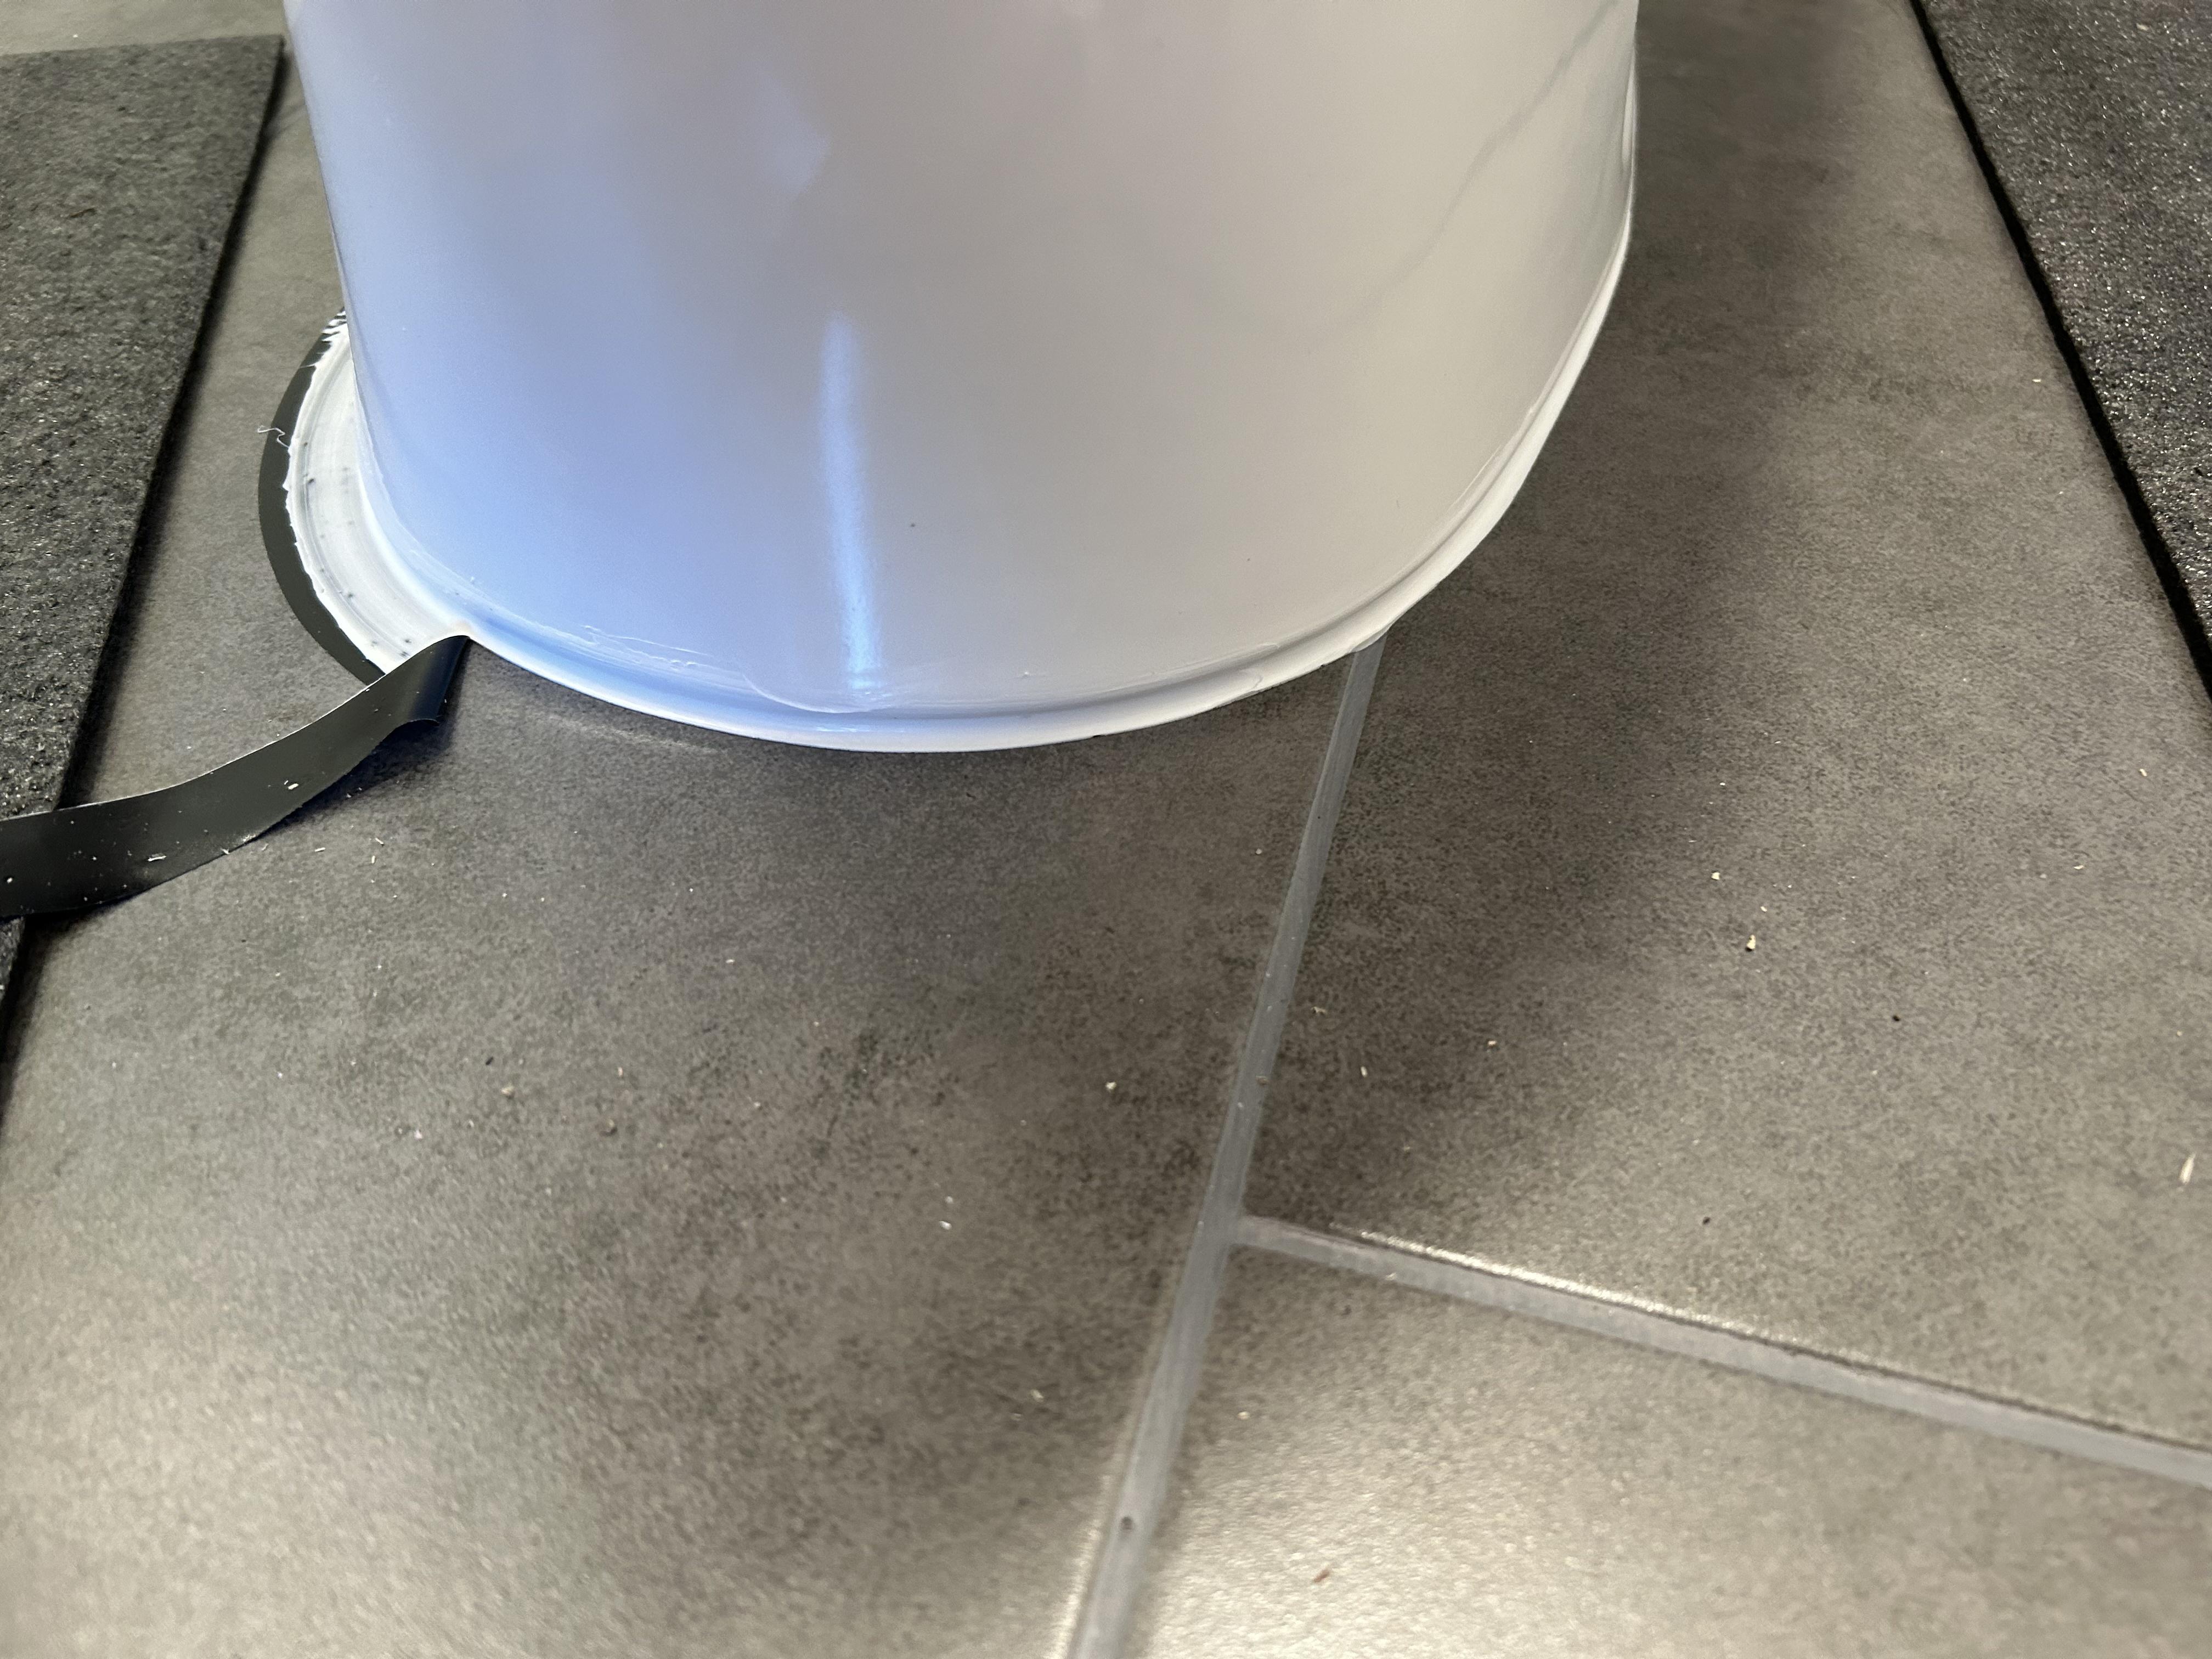
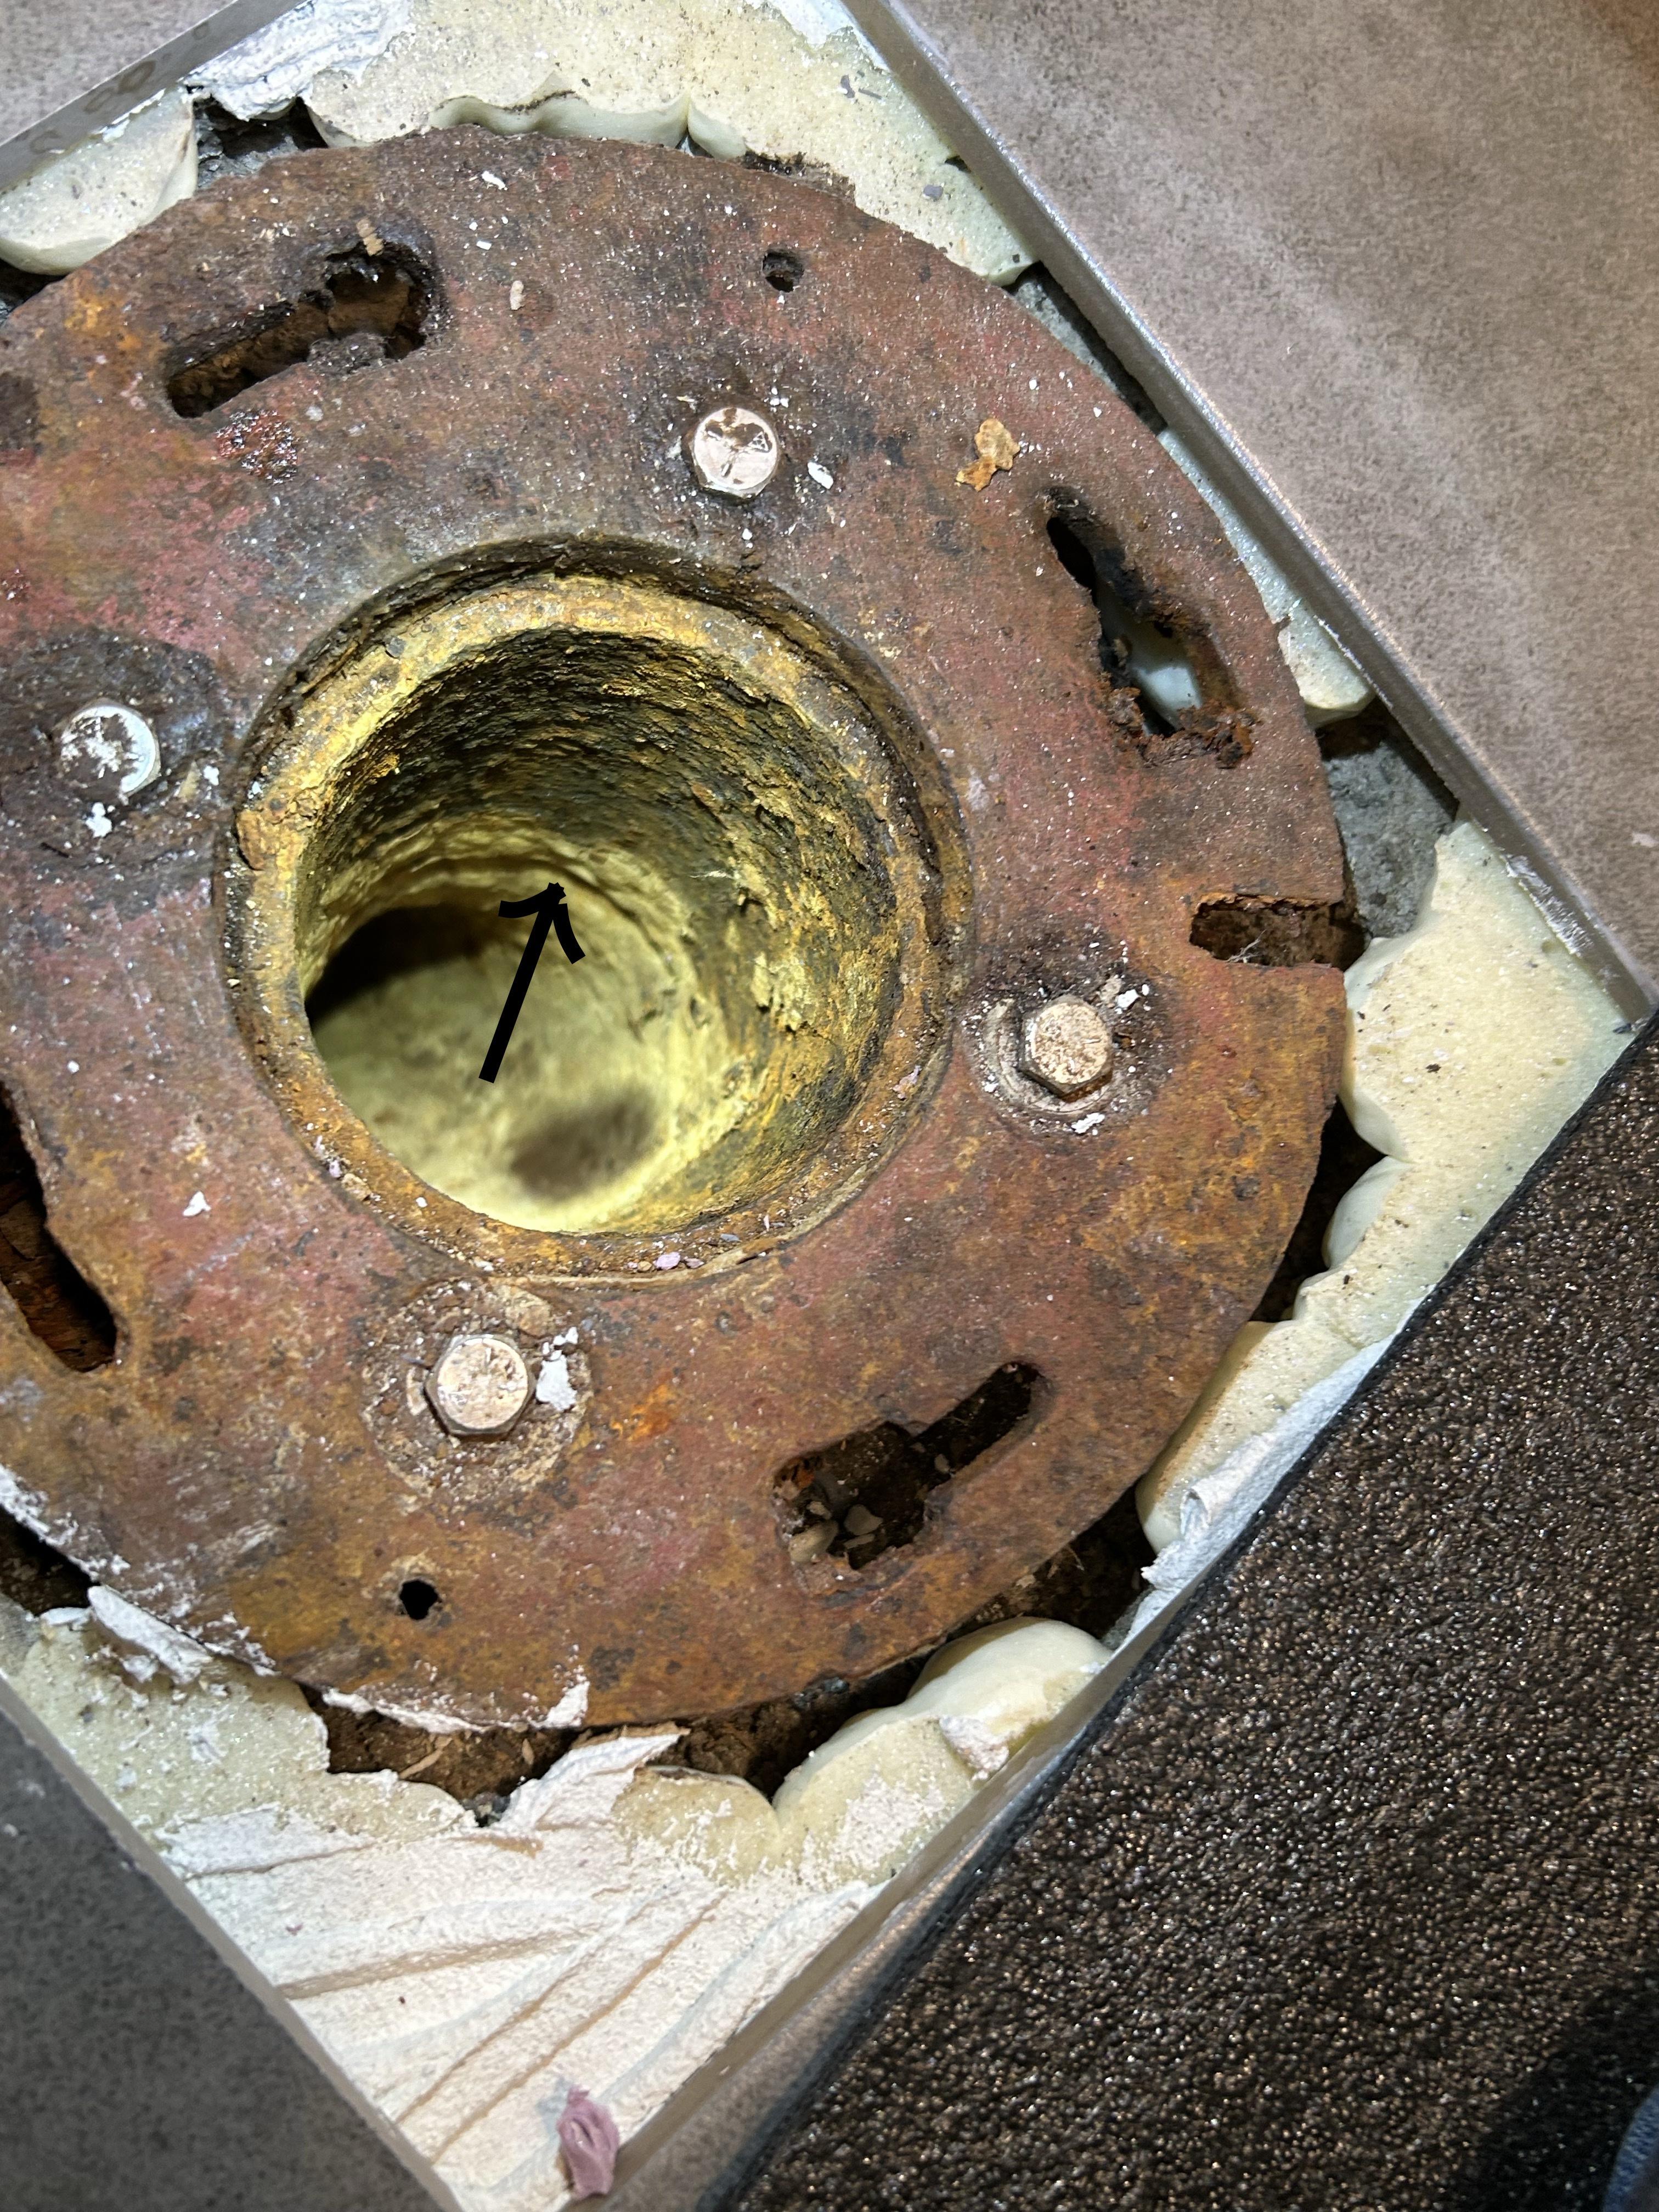
Long story short: Almost 30 years ago I had a plumber turn a toilet sideways to allow shower chair access for my paralyzed sister-in-law. Here's a picture of the cast iron flange/pipe that is 11 & 1/8" from the wall.
Fyf7uXA.jpg

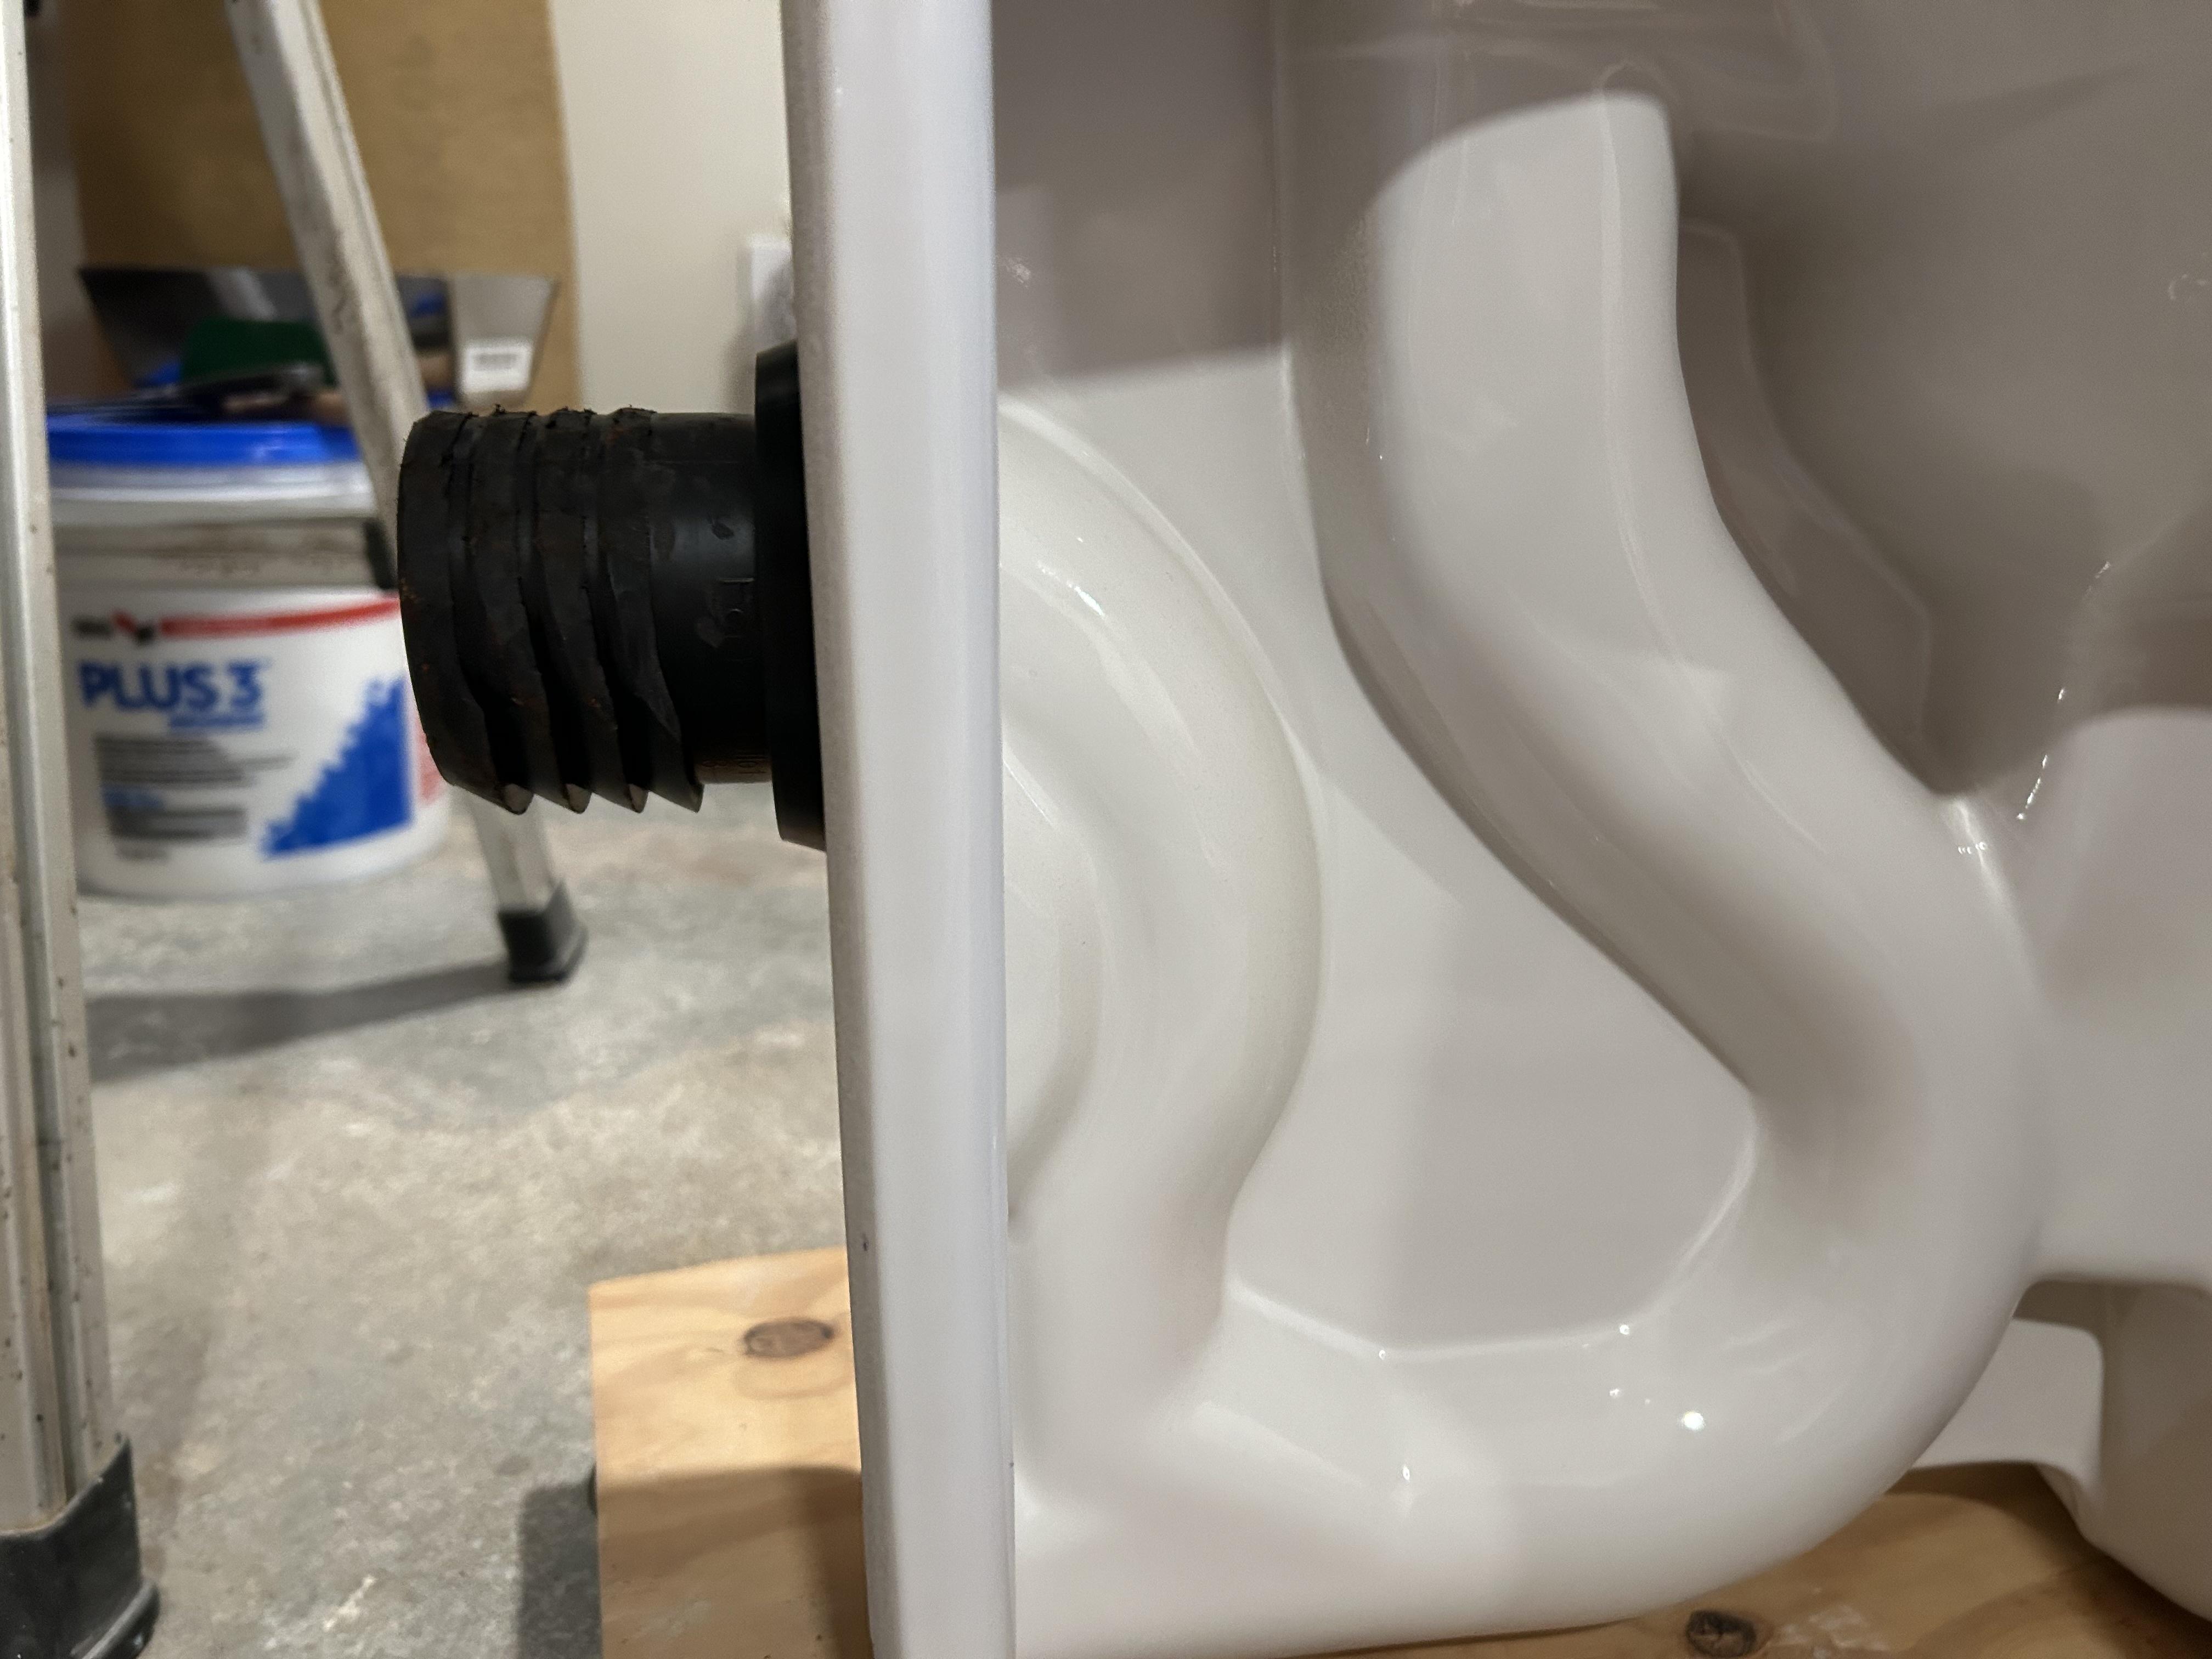
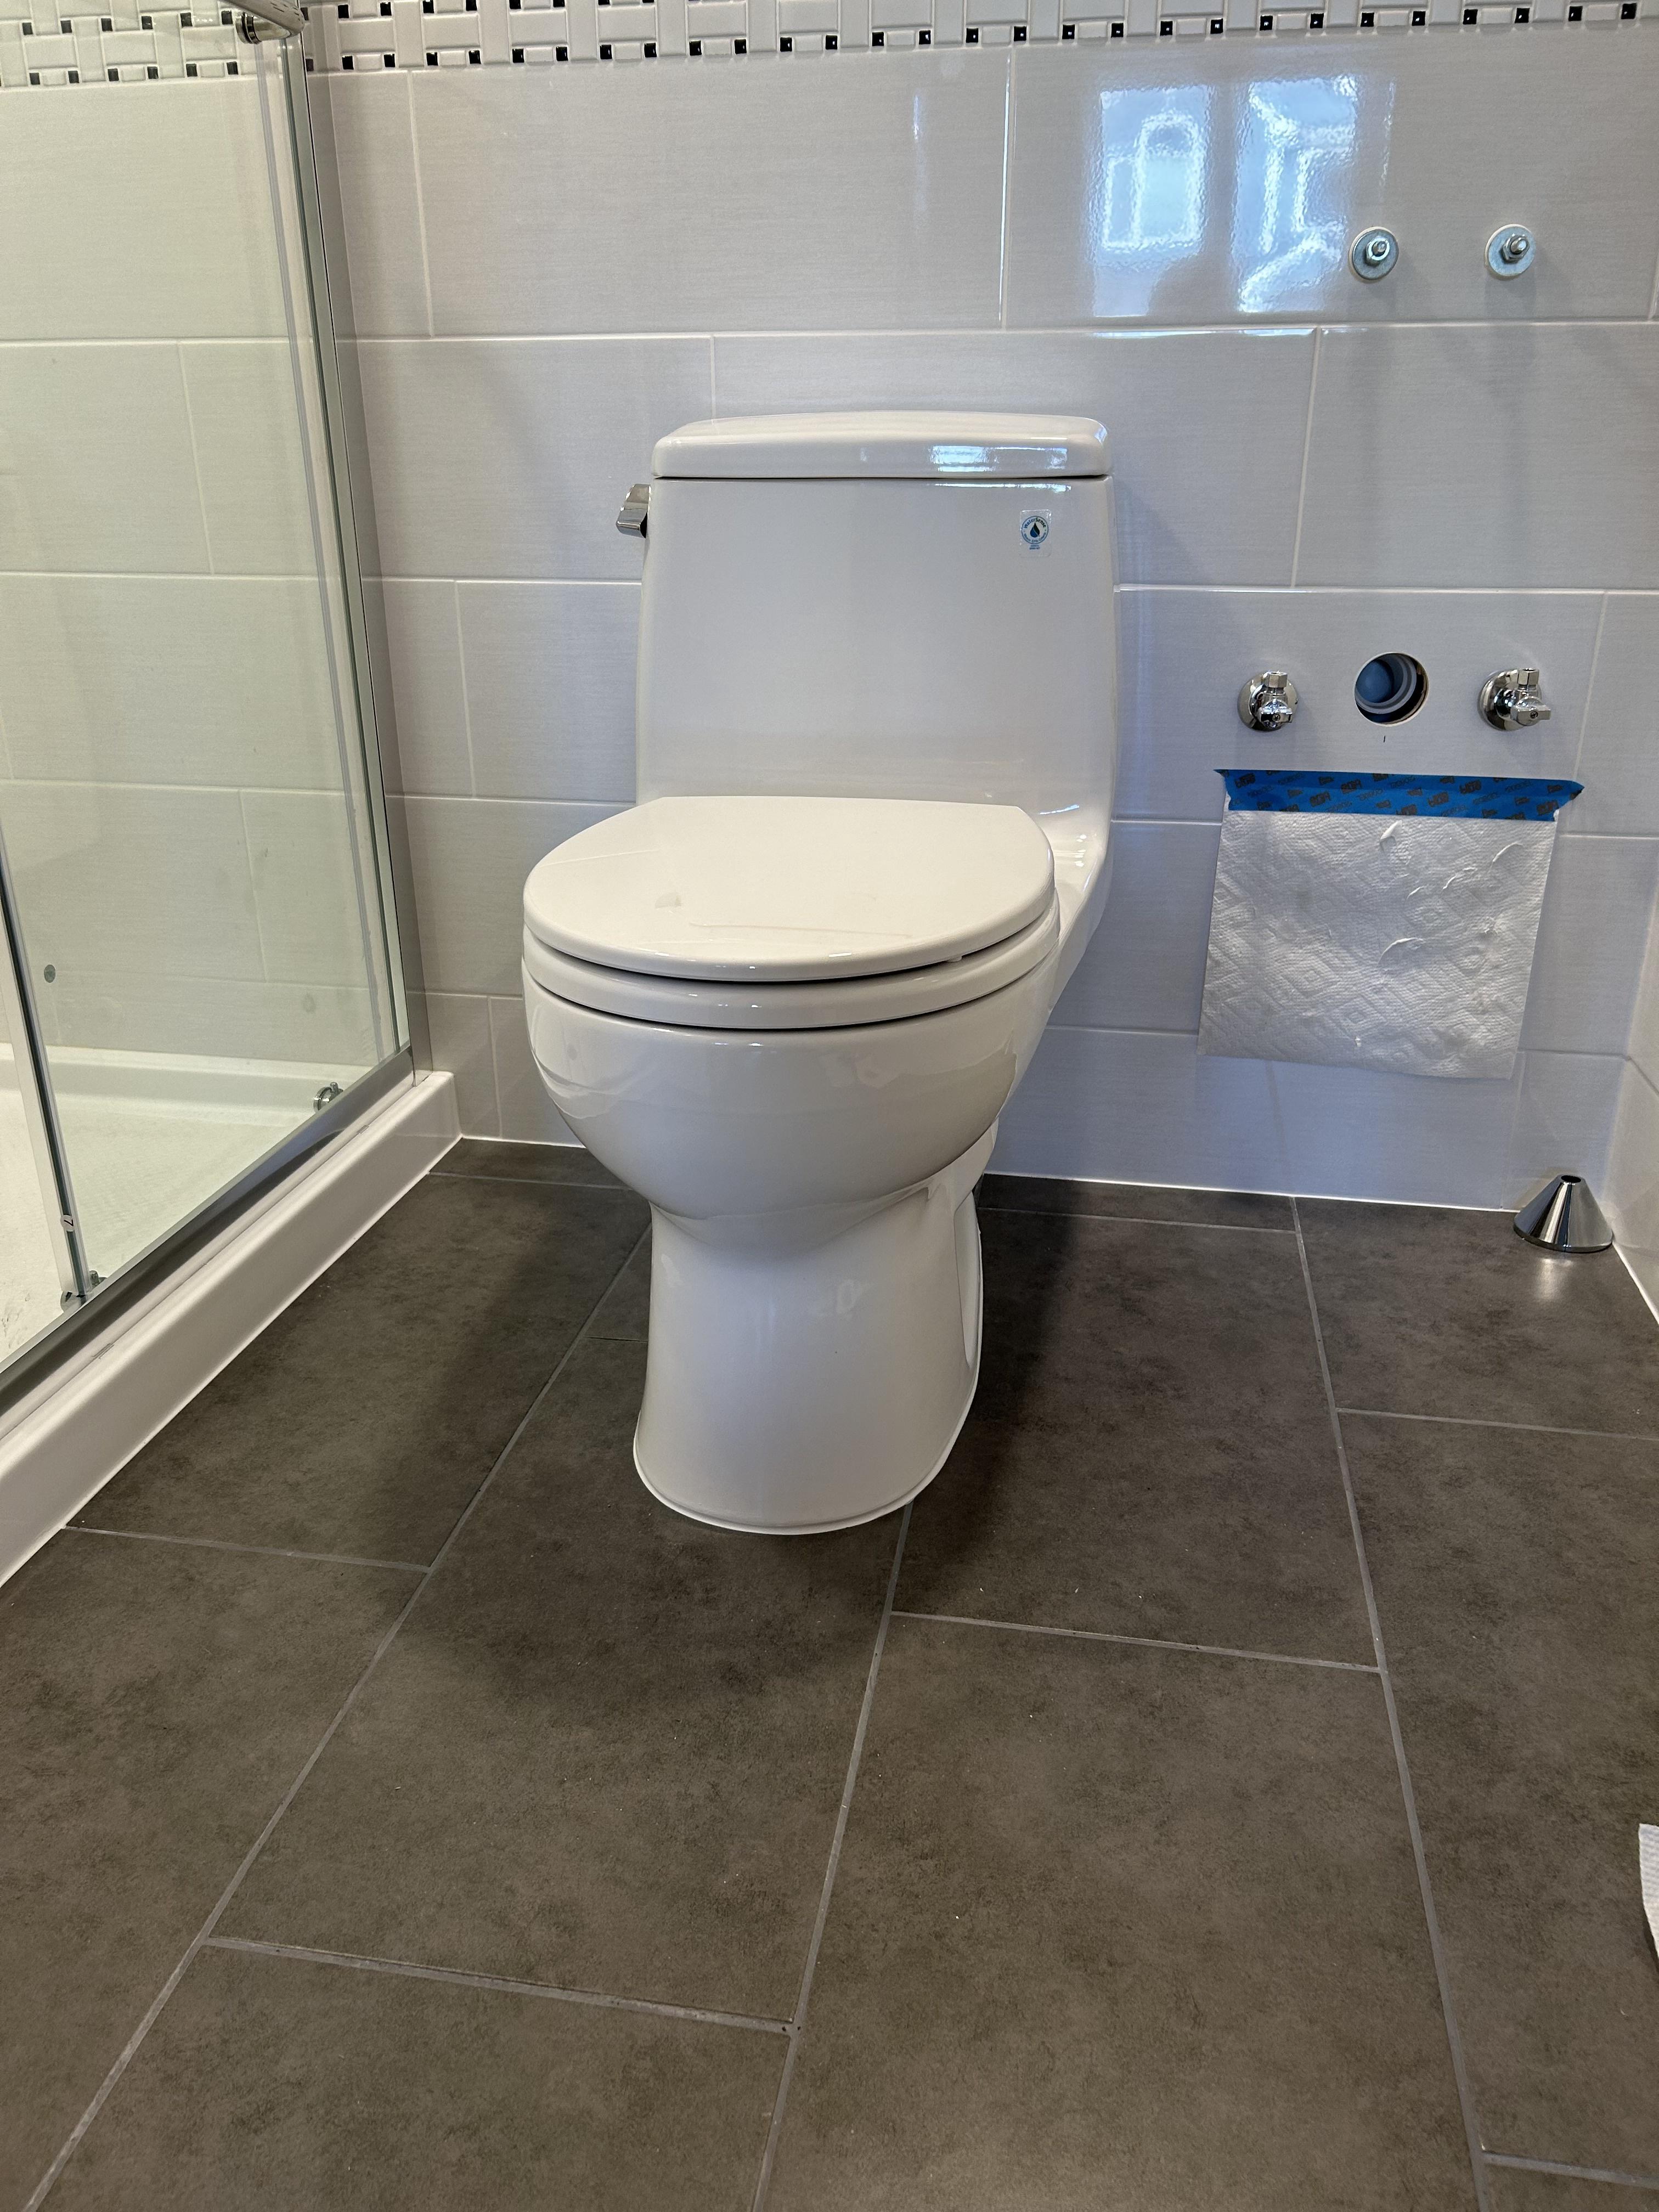
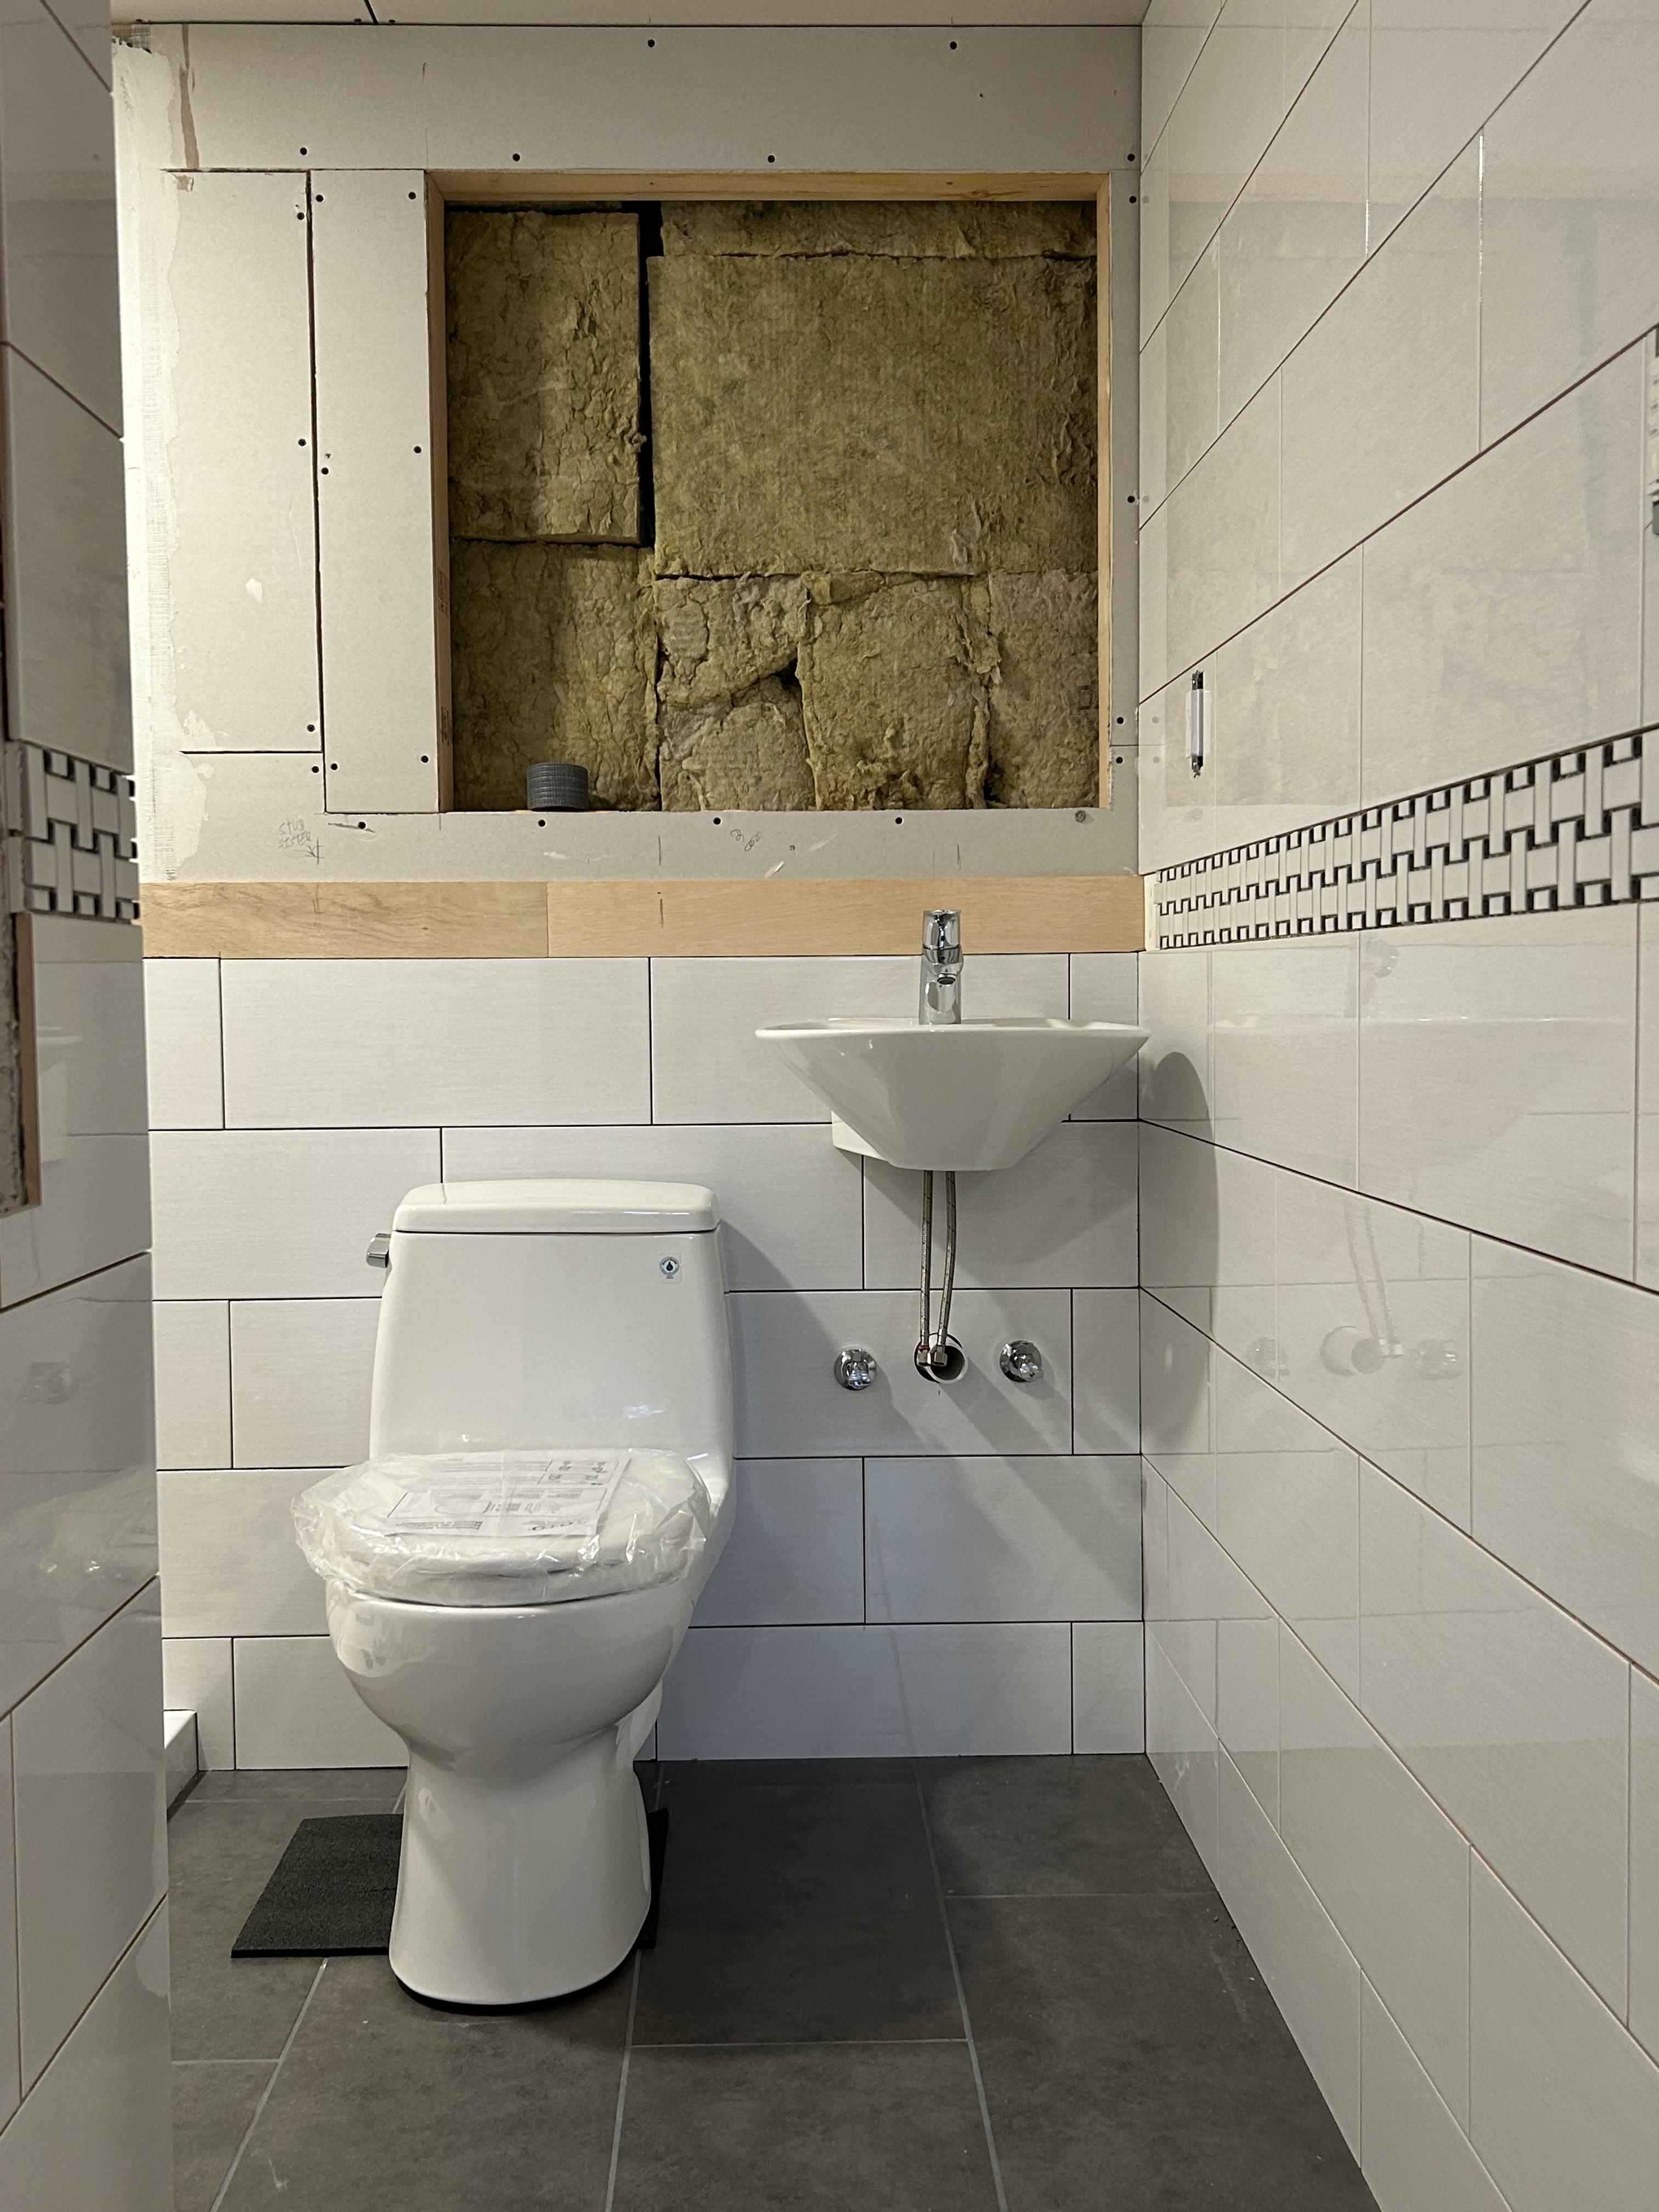
Here is the overall picture for context:
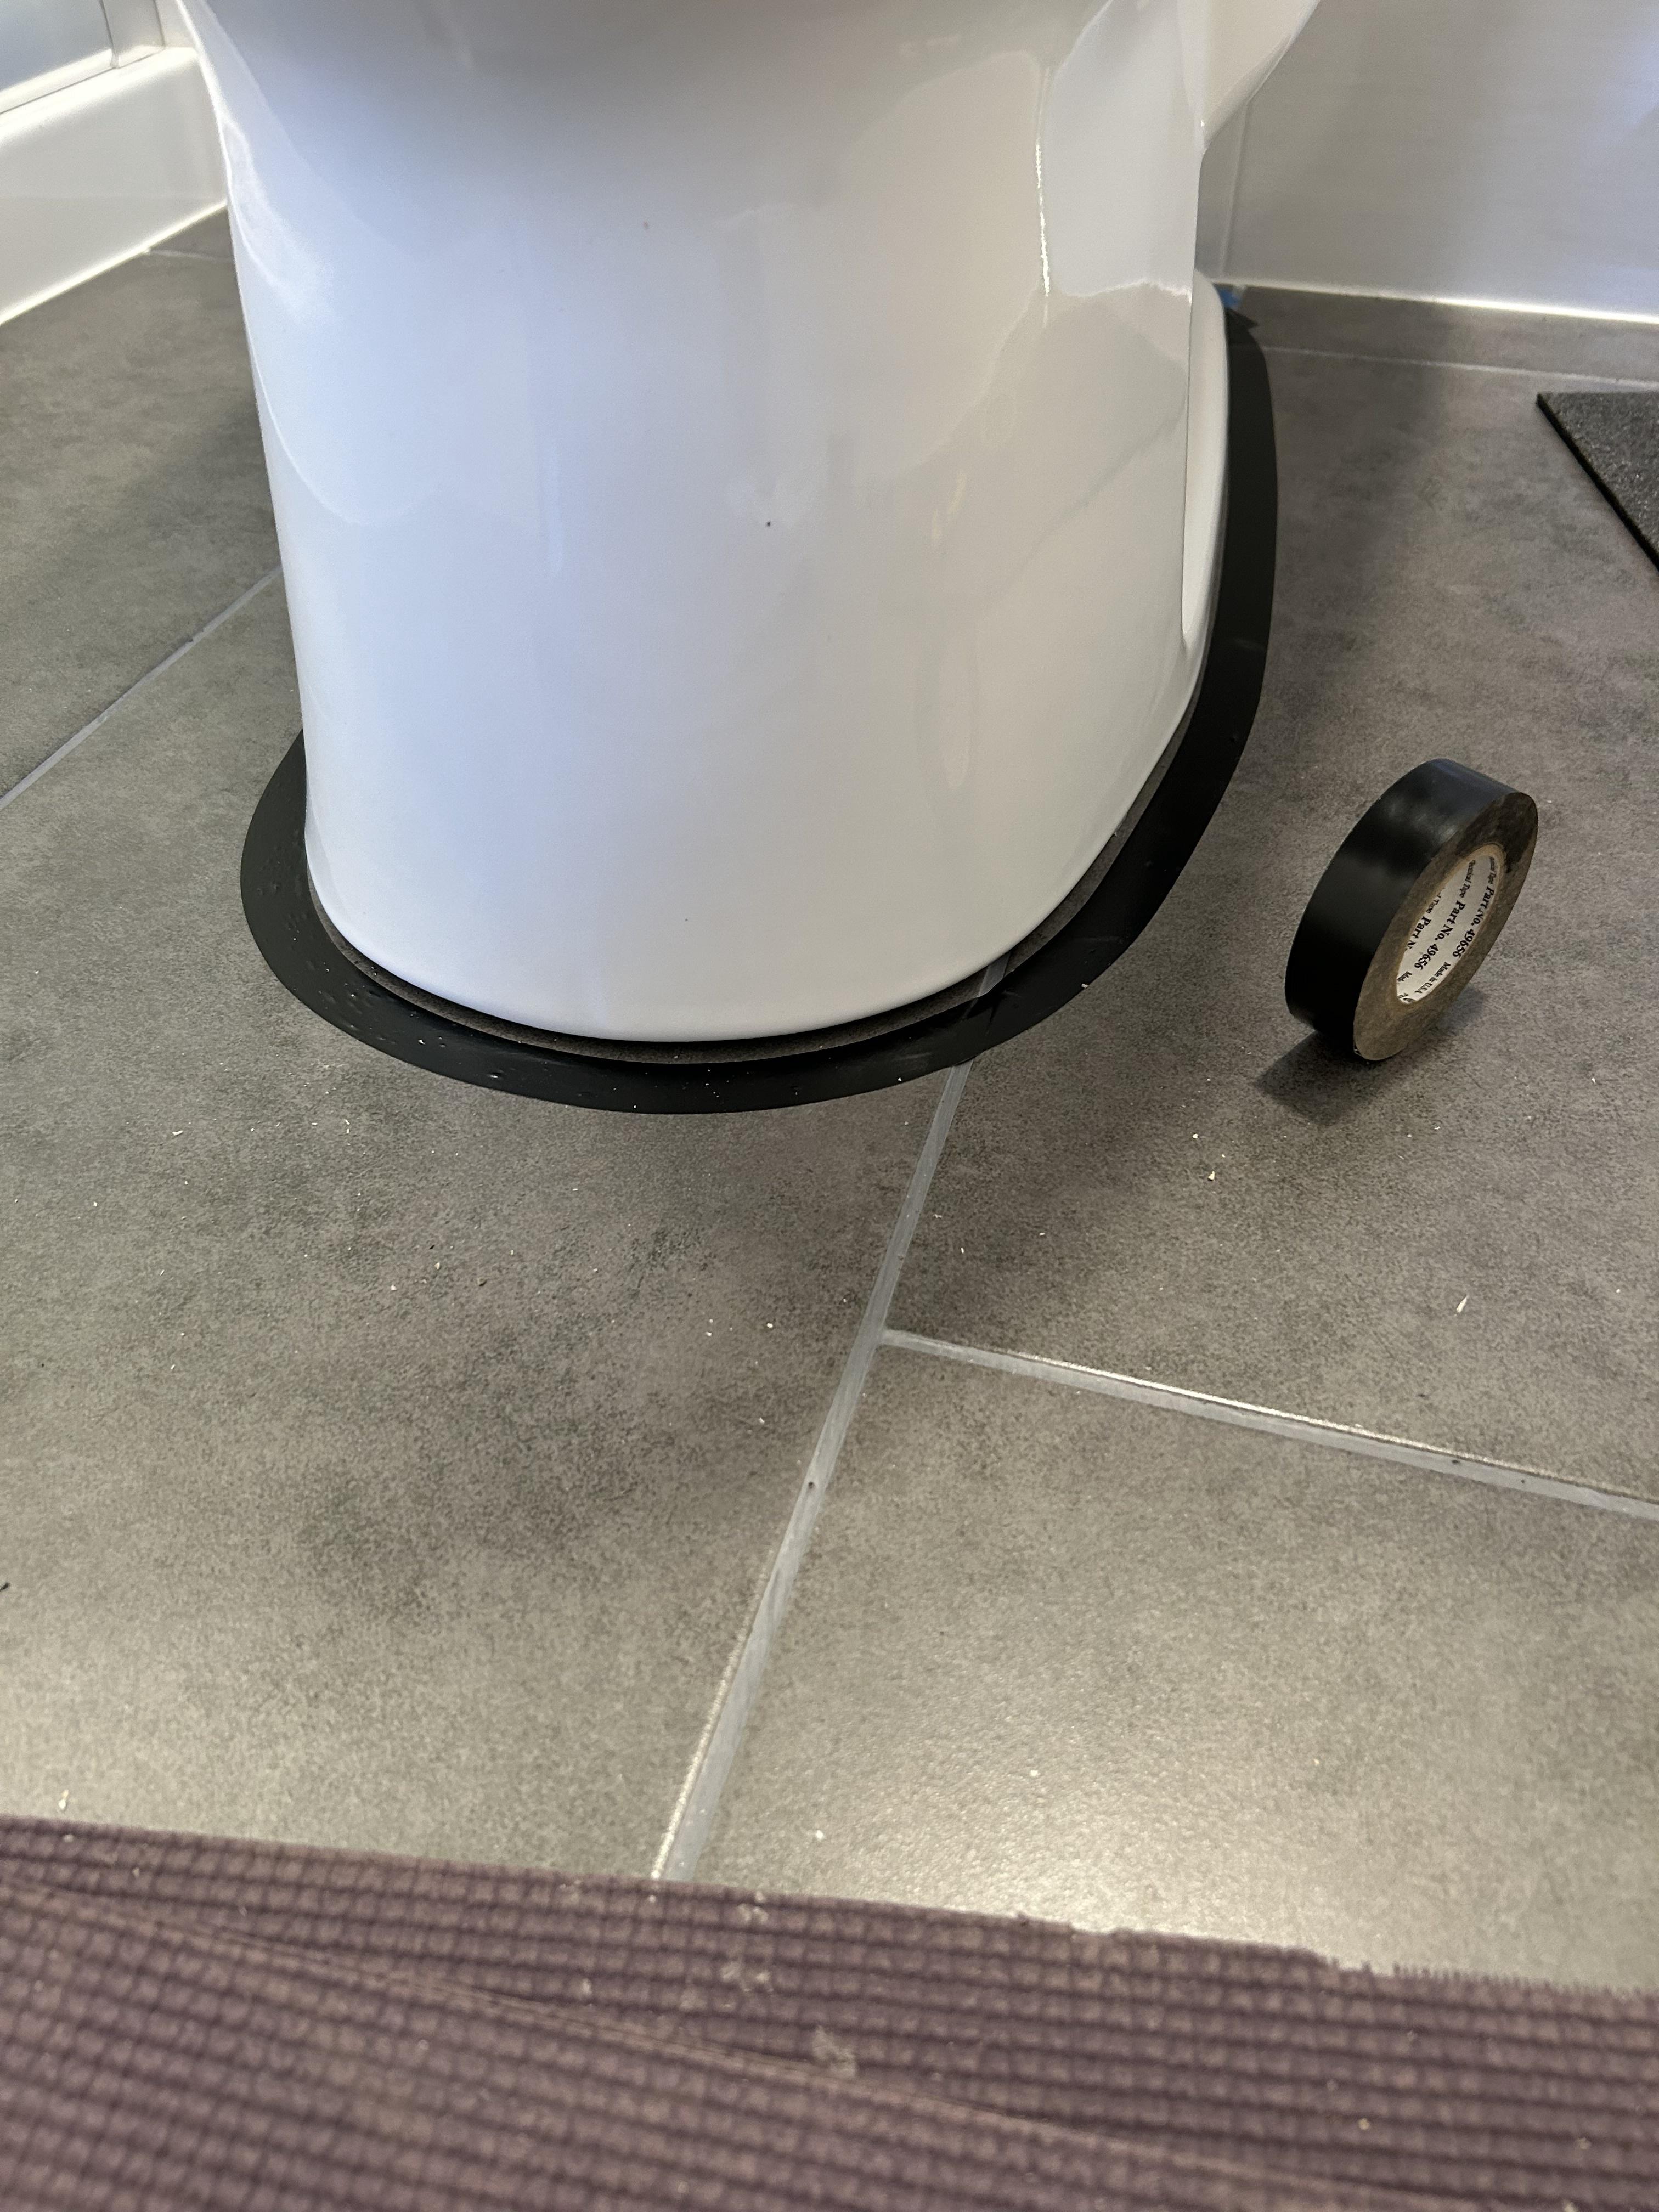
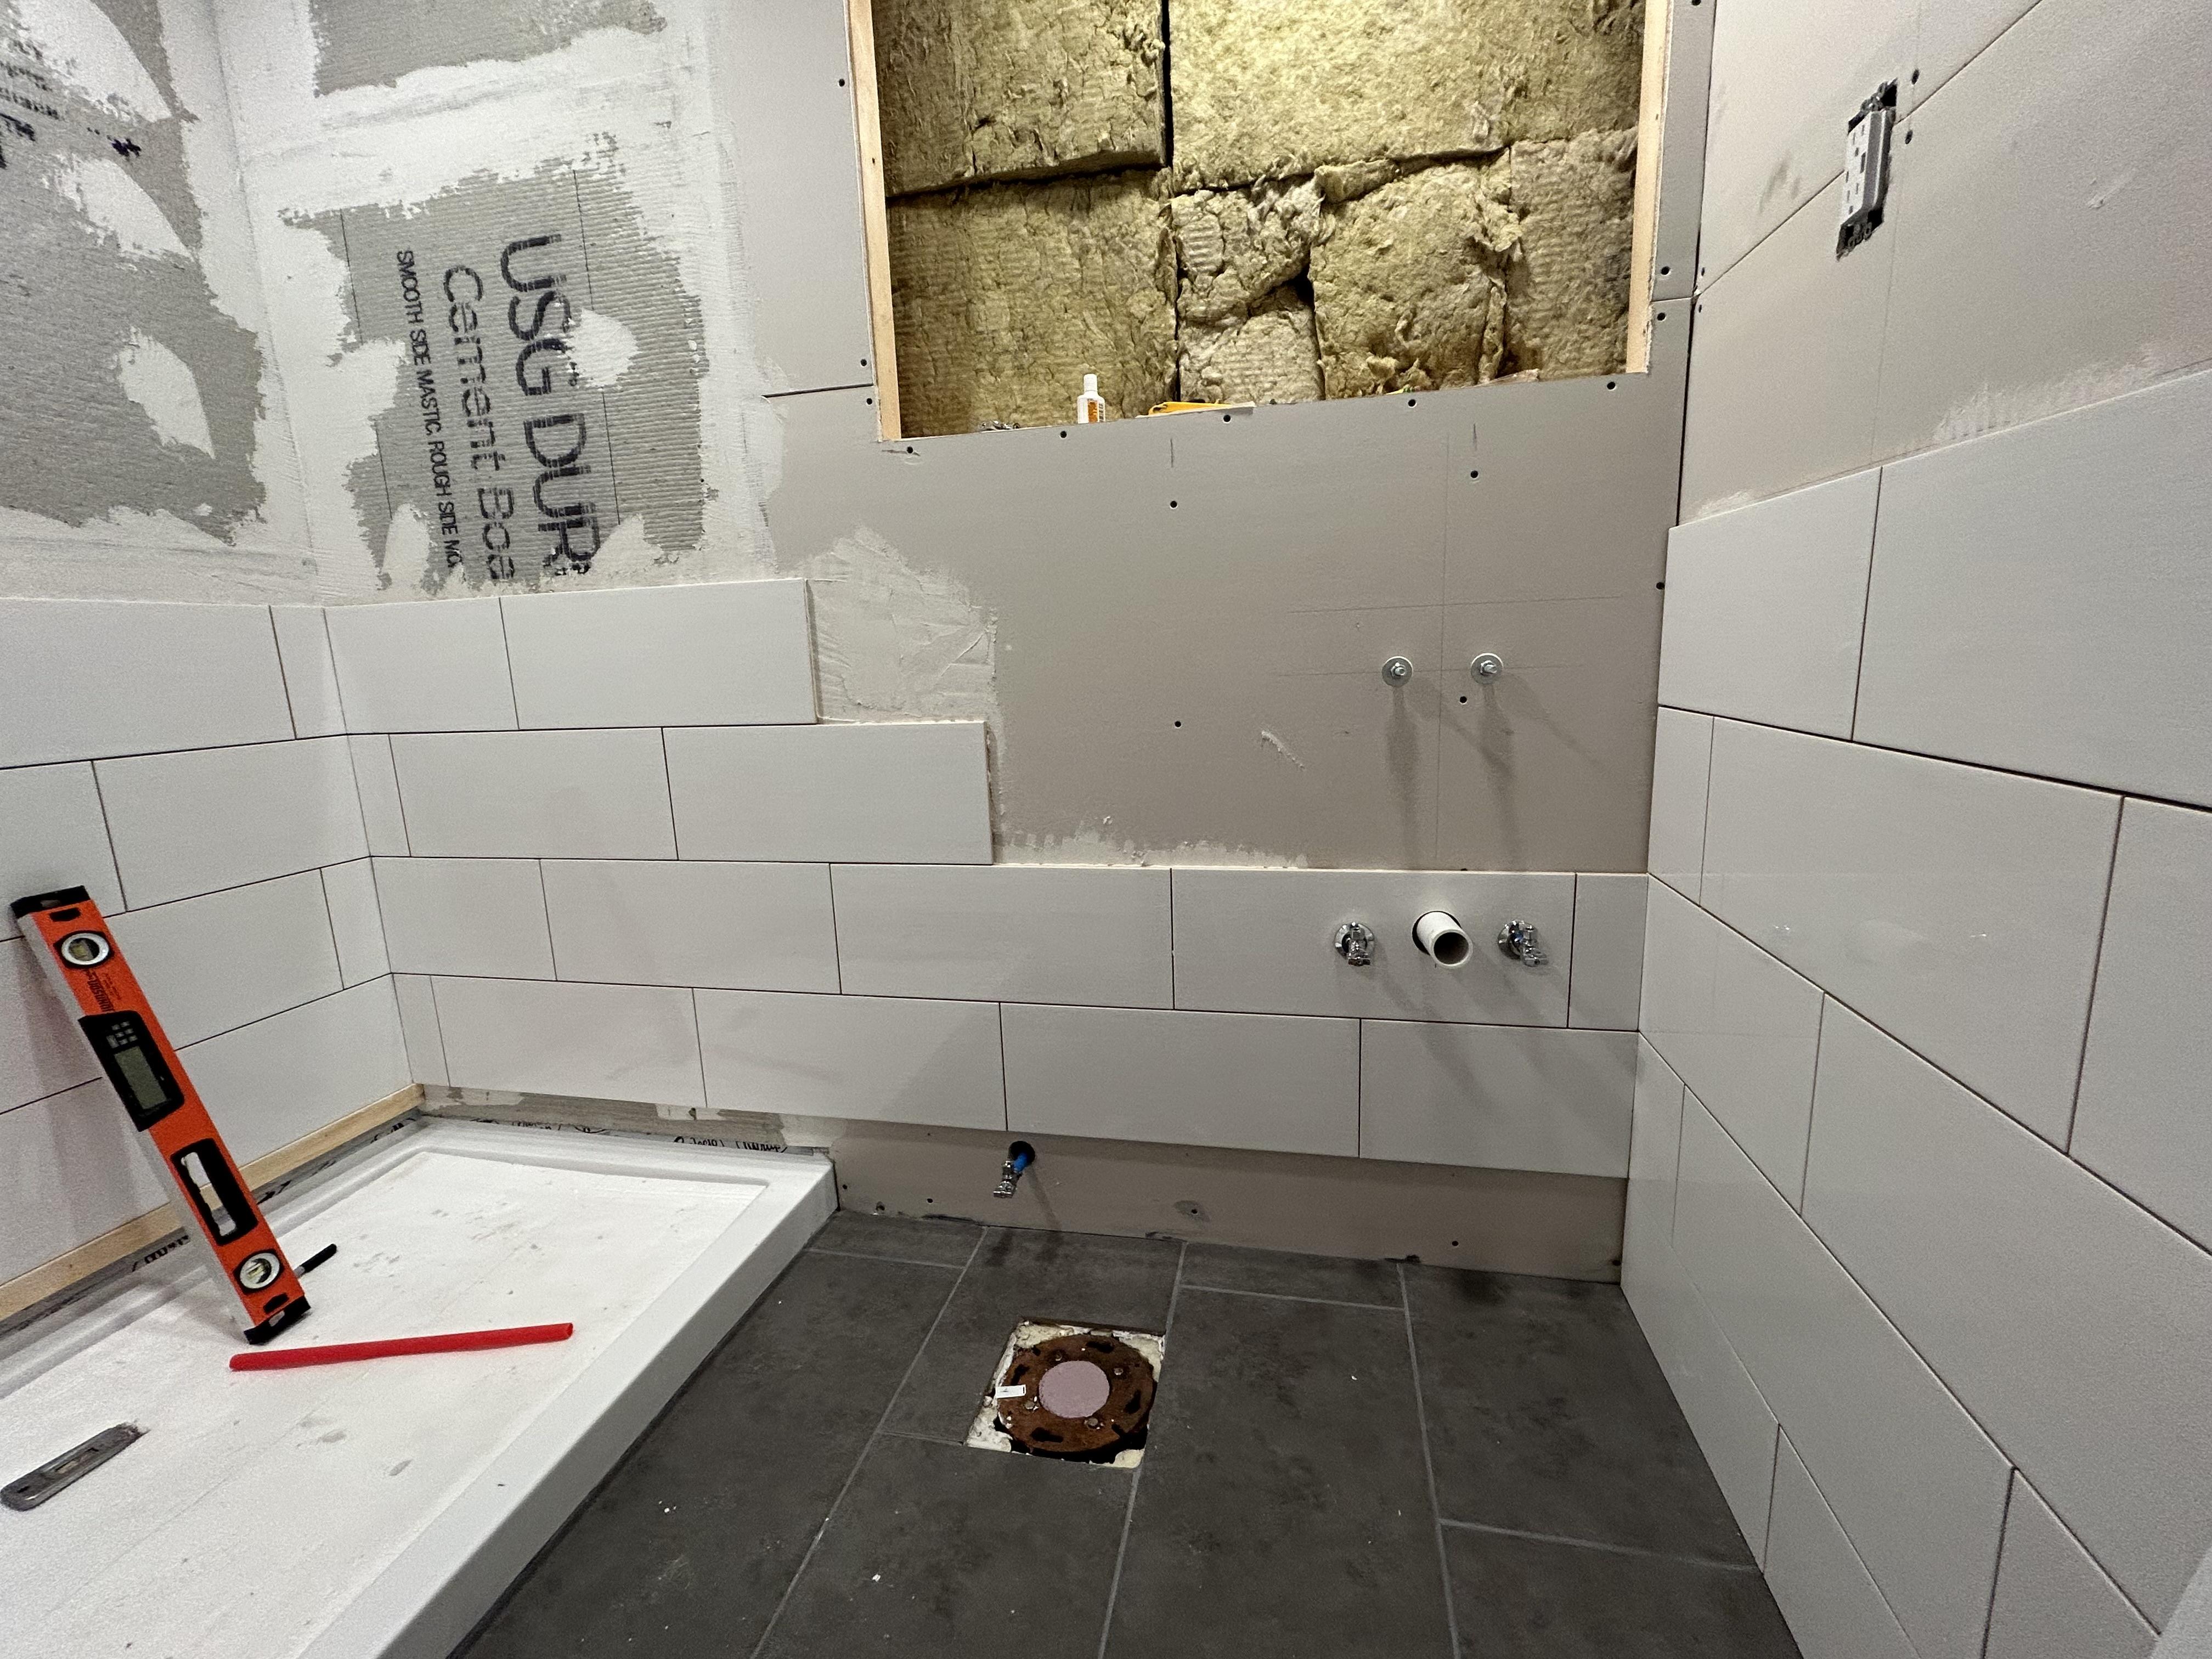
bCQIRp7.jpg


Another shot:
yALPGGb.jpg

The toilet is a Toto Eco Ultramax. I also installed one in my master bathroom, and it's wonderful! It stops at nothing:)

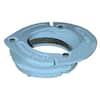
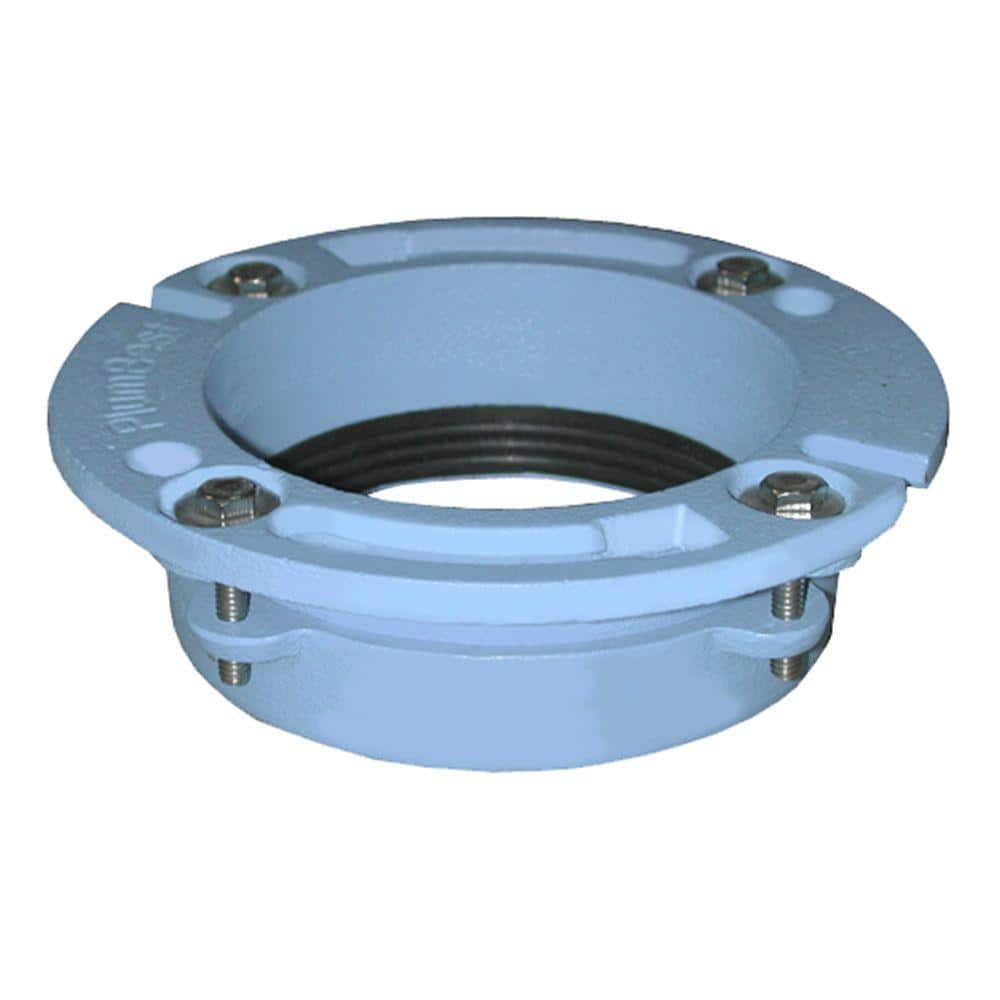
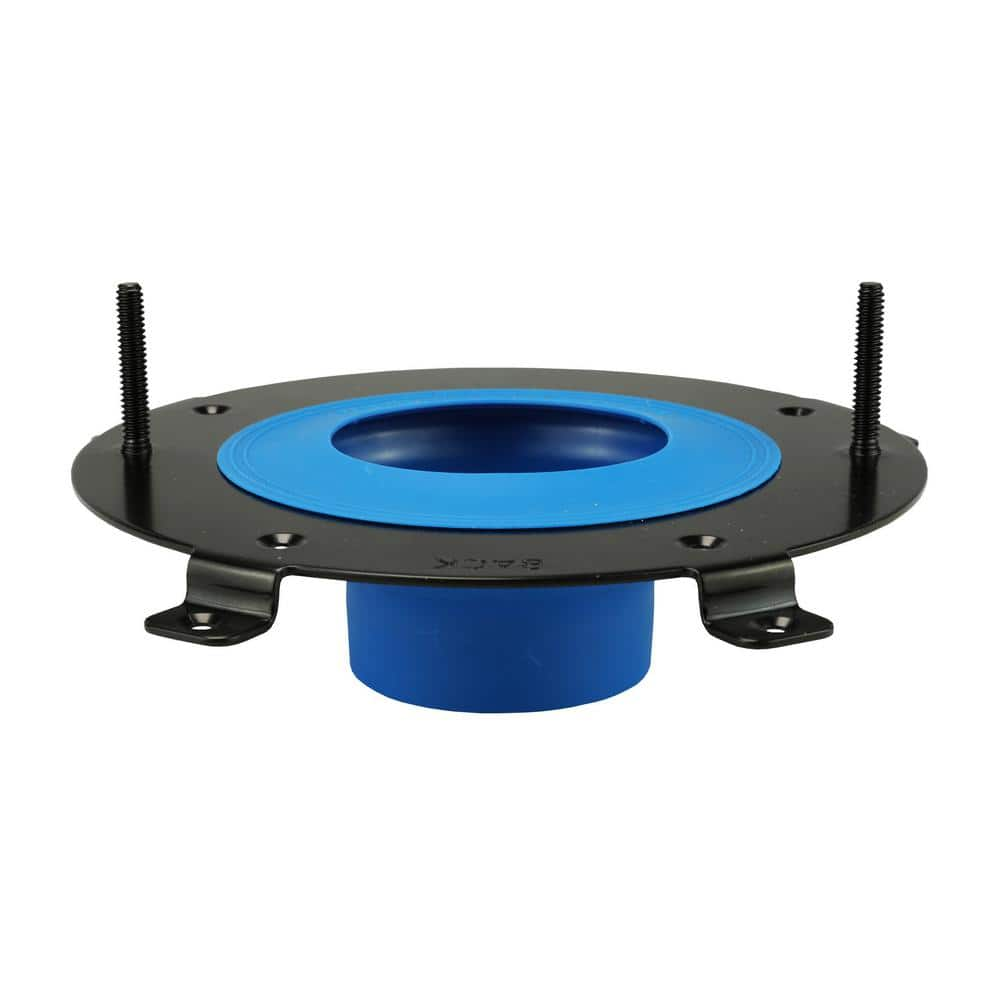
The problem here, previously a concrete garage floor, is that I only have 11 & 1/8" to the flange bolt centers, so I need to install an offset flange. Upstairs I installed it with 11 & 1/2" from the wall, and it still has room behind the tank, but this ain't happening this time. By the way, I know exactly how and why this happened, and knew this might occur. I will not remove wall tile behind the toilet, so cutting cast iron is how I'm proceeding.

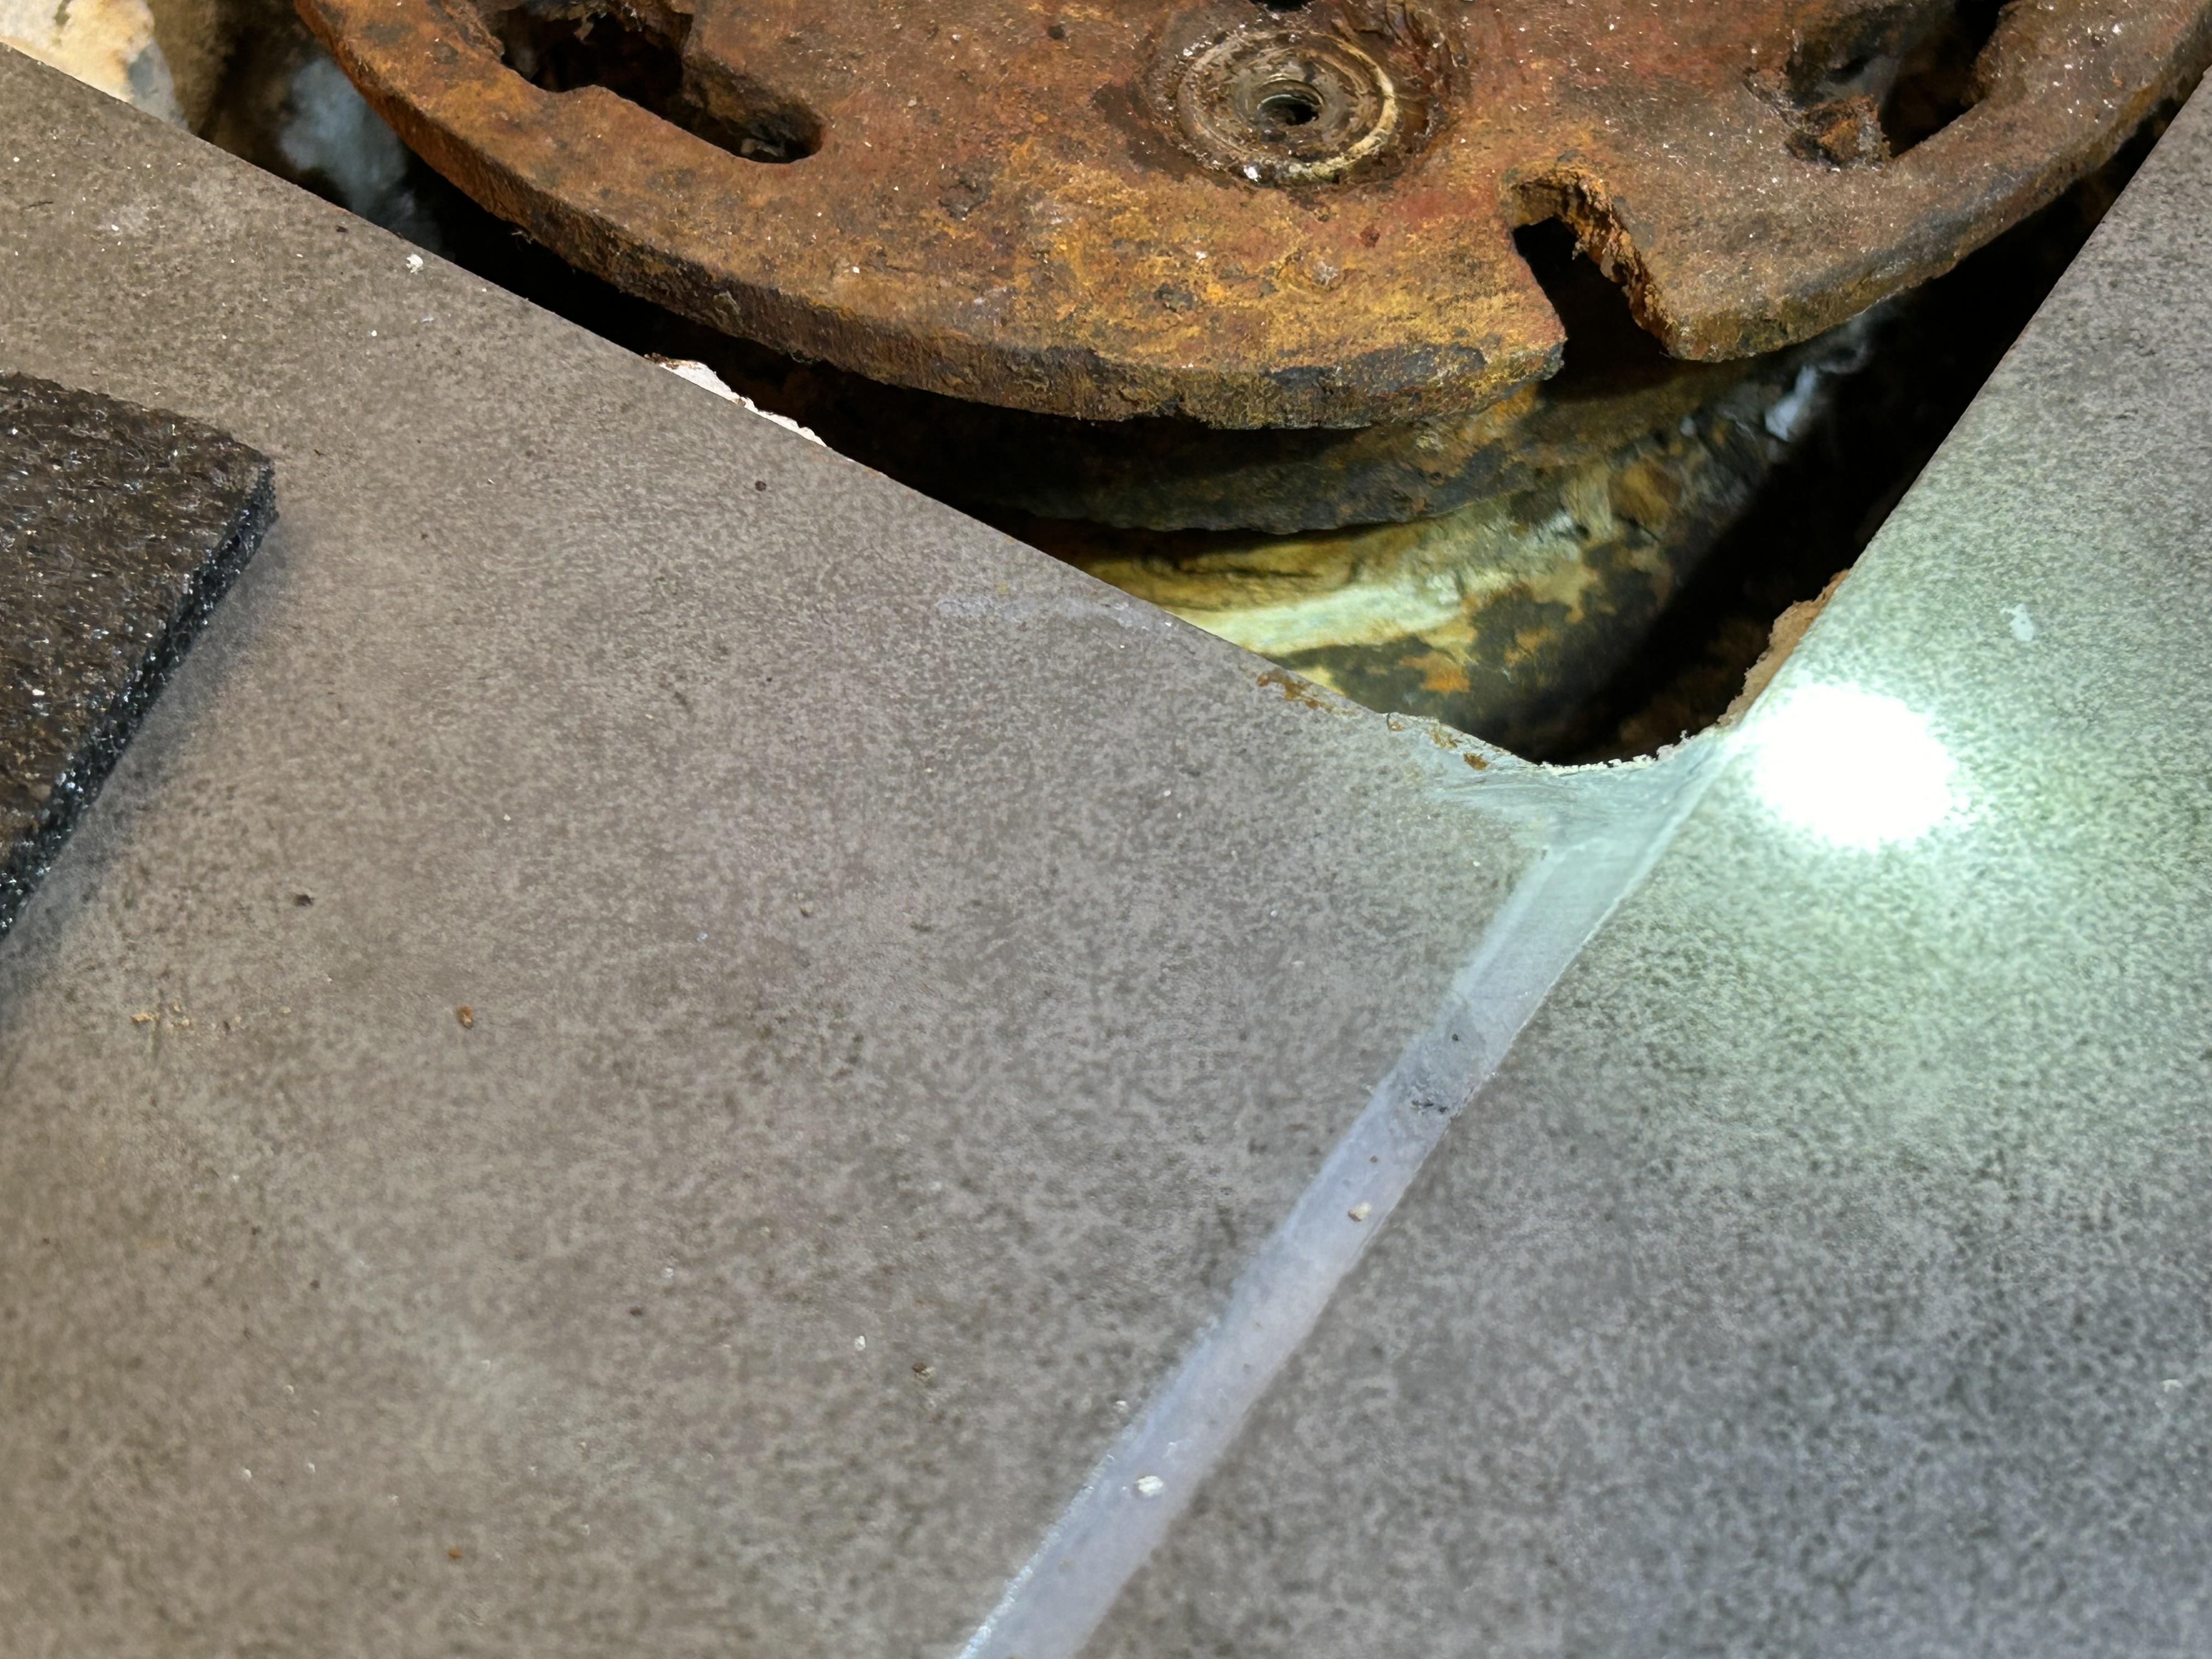
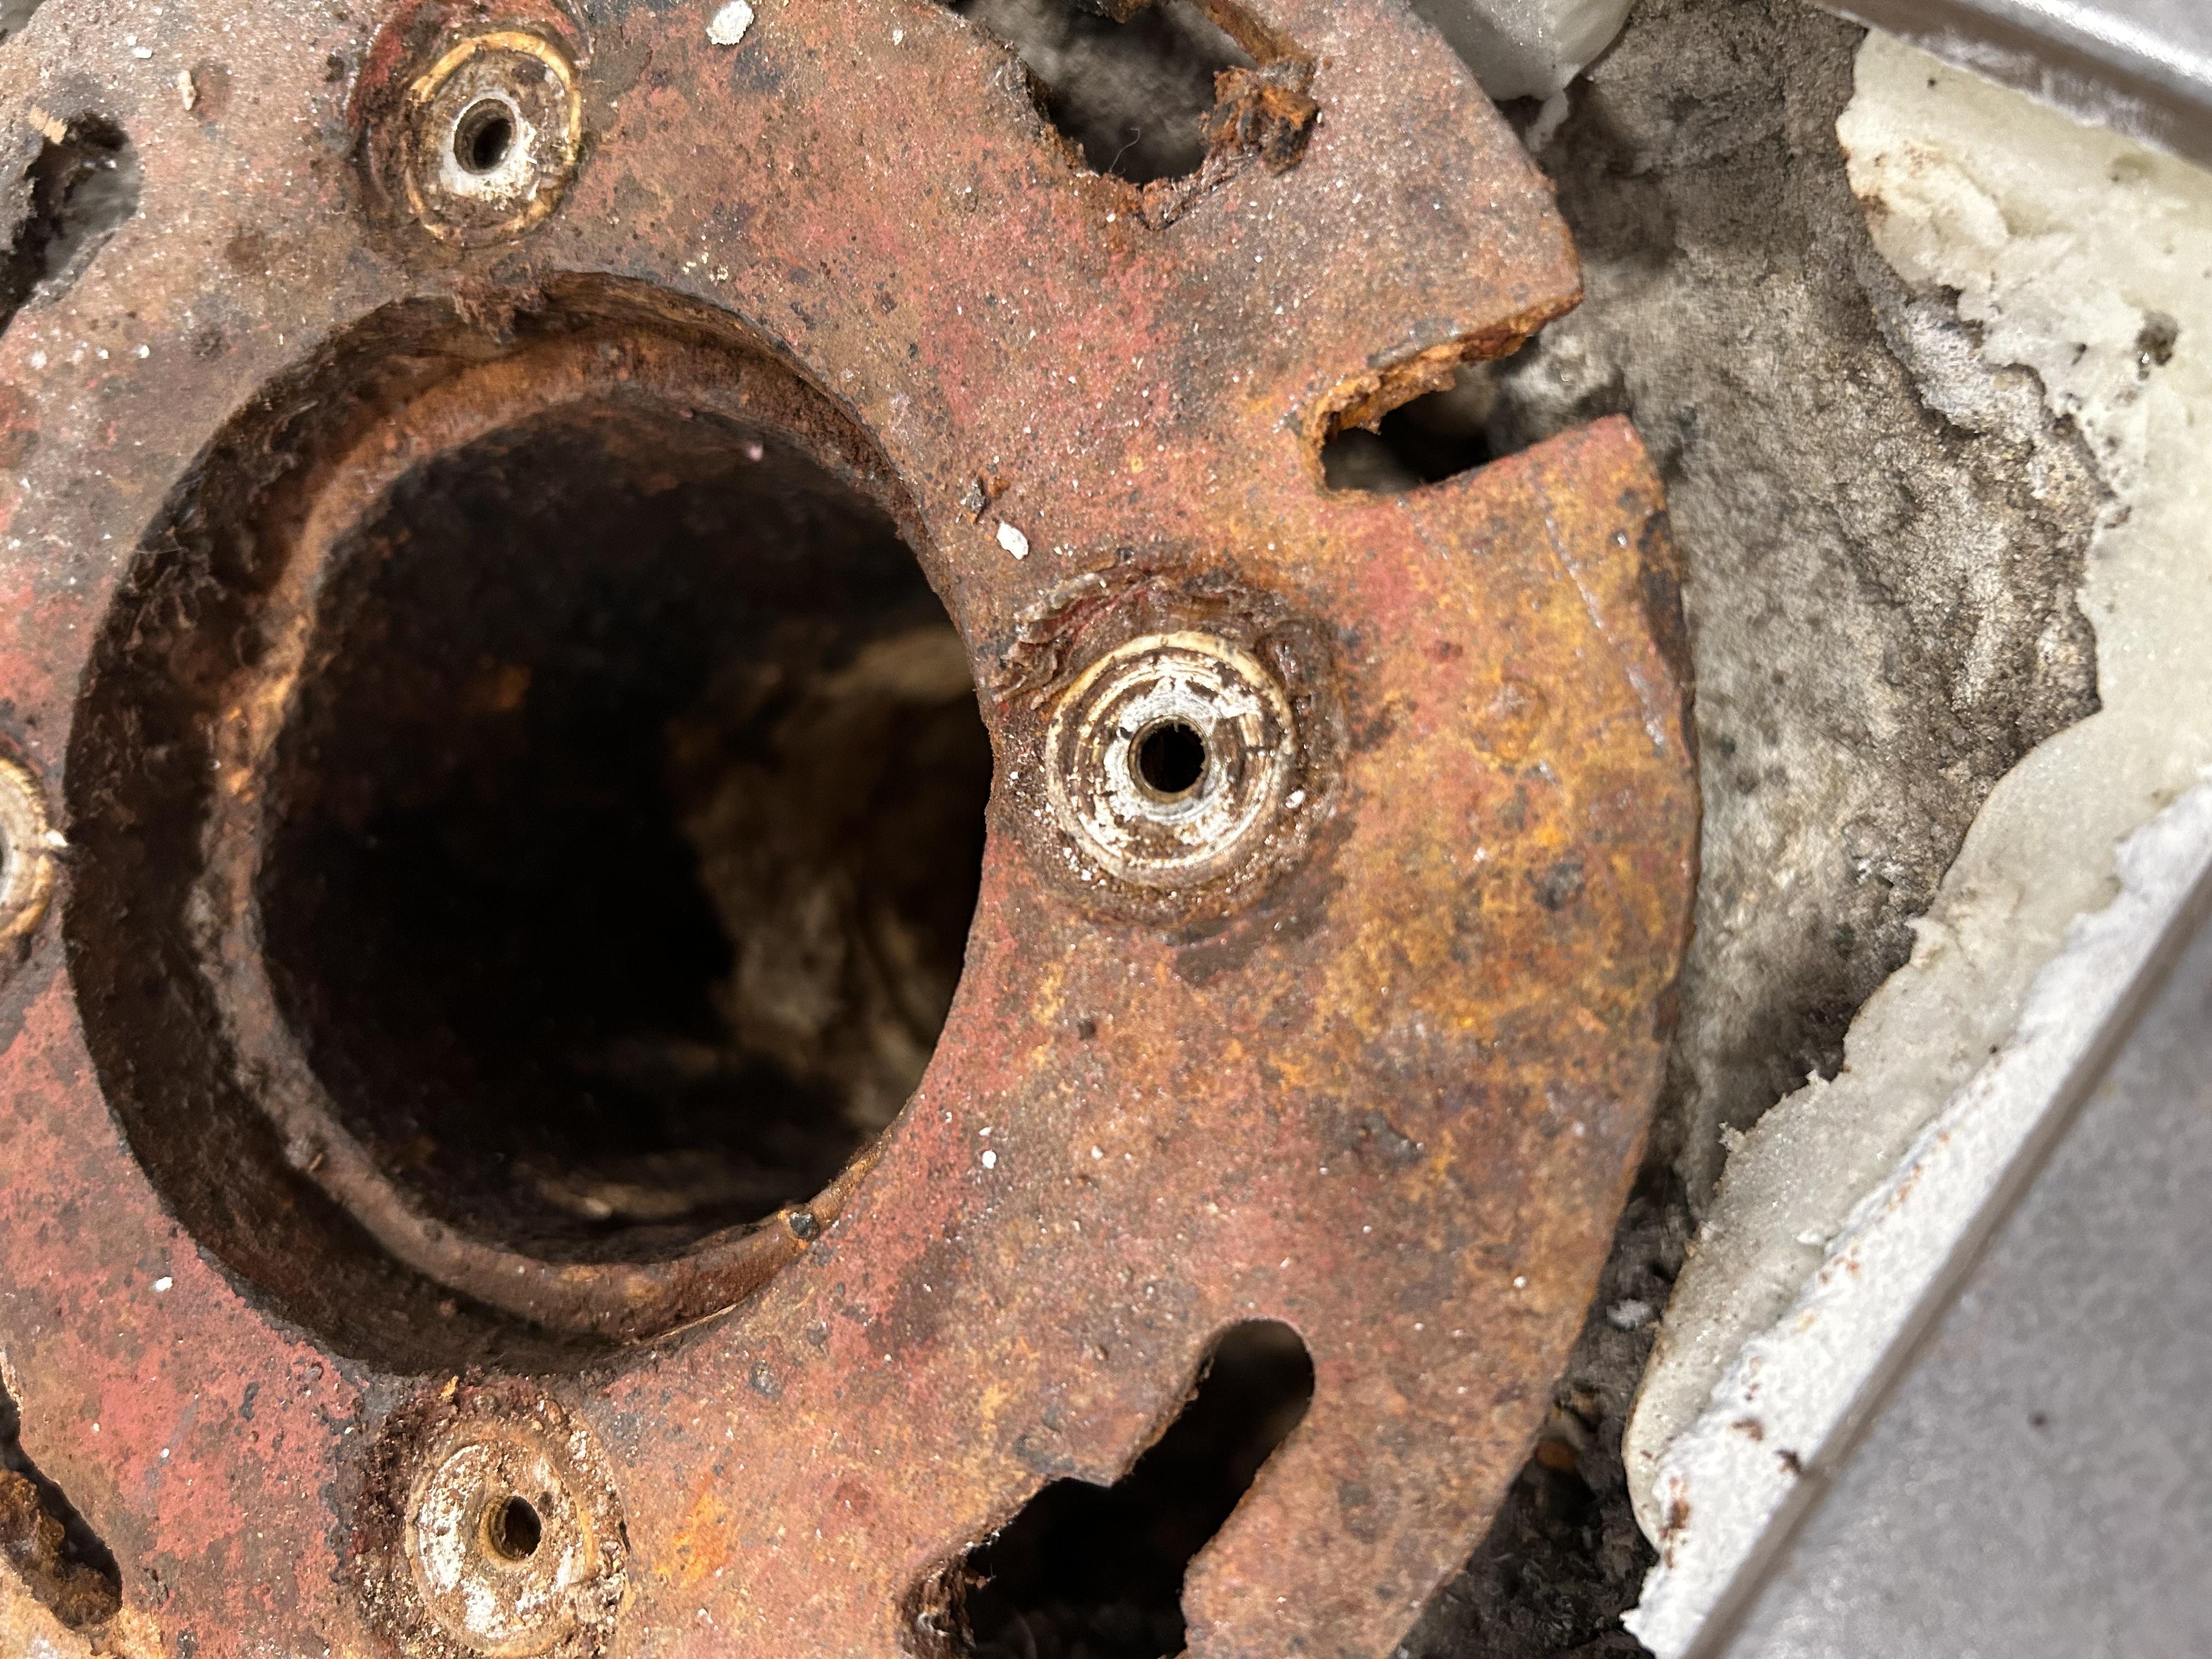
I'll be removing the stainless steel hex bolts later this morning, and I do not know what they're screwed into. The black arrow I drew shows what appears to be where a piece of cast iron pipe was inserted into the CI sweep elbow, but again it was almost 30 years ago, so I don't remember what that plumber did to facilitate the 90 degree turning of the toilet sideways. Anyway....

Given what you see in picture do any of you have a clue what is there? The collective knowledge on this forum always amazes me, so I am hopeful that what I'm showing will give some clues.

Best regards,
Howard Emerson
HUNTINGTON STATION, NY
 

Reach4

Well-Known Member
Messages
38,899
Reaction score
4,436
Points
113
Location
IL
1. There are 12 inch rough toilets that have enough clearance to fit when centered on the flange.

2. You can add shims to the back part of the toilet to tilt the toilet tank away from the wall. This would raise the water level in the bowl slightly, so if you have clearance problems for that, that could be a downside.

3, I installed a Vespin that had a rough about 13.25 from the wall using the 12 inch Unifit that came with the toilet. Not cheap, but not a kingdom. My vespin uni-fit story :

http://www.terrylove.com/forums/ind...baseboard-and-shoe-molding.58080/#post-428138 my unifit mod post
http://www.terrylove.com/forums/ind...nifit-or-stick-with-the-12.59681/#post-442544 picture with ruler.
http://www.terrylove.com/forums/ind...rance-with-14-unifit-and-offset-flange.66596/ has marked-up unifit photo.

4. It looks like you could benefit from moving the toilet to the right a bit, but maybe not. You need 15 inches of clearance from the centerline of the toilet to the side wall.
 
Messages
224
Reaction score
14
Points
18
Location
Huntington Station, NY
Website
www.howardemerson.com
1. There are 12 inch rough toilets that have enough clearance to fit when centered on the flange.

2. You can add shims to the back part of the toilet to tilt the toilet tank away from the wall. This would raise the water level in the bowl slightly, so if you have clearance problems for that, that could be a downside.

3, I installed a Vespin that had a rough about 13.25 from the wall using the 12 inch Unifit that came with the toilet. Not cheap, but not a kingdom. My vespin uni-fit story :

http://www.terrylove.com/forums/ind...baseboard-and-shoe-molding.58080/#post-428138 my unifit mod post
http://www.terrylove.com/forums/ind...nifit-or-stick-with-the-12.59681/#post-442544 picture with ruler.
http://www.terrylove.com/forums/ind...rance-with-14-unifit-and-offset-flange.66596/ has marked-up unifit photo.

4. It looks like you could benefit from moving the toilet to the right a bit, but maybe not. You need 15 inches of clearance from the centerline of the toilet to the side wall.
Reach,
Thank you for the reply. I believe the 'side wall' you're seeing is not near the toilet, actually. Here's another view:

EqLrPWR.jpg


In any case....by all indications I should be able to do with with a Fernco Wax Free Seal for 3" pipe. The existing flange is actually 1/4" below the tile, and with a grinder, etc, I should be able to grind an 'offset' scoop towards the front of the cast iron. I took the stainless steel bolts out, and nothing is going to get loose, it appears. I tried a pry bar and there's absolutely no movement. The bolts are machine bolts, so they went into a cut thread in the hub (?) below. In fact there appears to be stainless steel 'washers' still there under where the bolt head seated, so it's a particular fitting.

The horn on the Fernco is quite long, and the glue that attaches it to the underside horn of the toilet is incredible strong, so the 1/4" I'm needing, I believe I can make work, but you best believe that prior to tightening the nuts on the toilet bolt flange I will pour a 5 gallon bucket of water down, then lift the toilet and inspect for any indication of water outside the pipe.

HE
 

Reach4

Well-Known Member
Messages
38,899
Reaction score
4,436
Points
113
Location
IL
I am not clear on what your proposed grinding is about. Are you talking about grinding new slots for the closet bolts?

The Danco Hydroseat could be of interest. That would go over wax, and would give new closet bolts.
 

Tuttles Revenge

In the Trades
Messages
4,205
Reaction score
1,459
Points
113
Very likely that is a compression closet flange and the bolts were threaded into a cast iron ring that sandwiched a rubber gasket
 

Reach4

Well-Known Member
Messages
38,899
Reaction score
4,436
Points
113
Location
IL
Very likely that is a compression closet flange and the bolts were threaded into a cast iron ring that sandwiched a rubber gasket
Interesting theory.

What is the ID of that pipe?

They have offset outside compression outside closet flanges. They offset by 1 inch.
jones-stephens-toilet-flanges-c40640-64_100.jpg


Offsetting fully away from the wall would be too much, but offsetting at an angle would let you adjust the rough.
 
Messages
224
Reaction score
14
Points
18
Location
Huntington Station, NY
Website
www.howardemerson.com
Very likely that is a compression closet flange and the bolts were threaded into a cast iron ring that sandwiched a rubber gasket
Hi TR,
Here's a better picture showing the hub at the end of the sweep L (pardon my terminology if I get it wrong). You can see the 'cement' (which I would assume would be lead & oakum) holding the short piece of pipe. and then the item I believe you're thinking may be a compression closet flange. The ID of the pipe is 2.75", by the way. For what it's worth, those threaded fittings have 'gaskets' under the head, and they scratch fairly easily a la aluminum. I don't know if they're the equivalent of a Molly, but whatever. Here's some shots.

g3dSORo.jpg

XIrDkK2.jpg


g3dSORo.jpg

I have no issues getting out my Sawzall to cut the compression flange off via vertical slicing. I would try to avoid the pipe itself, and then put on the light-blue adjustable offset flange that Reach pictured. However I'm going to try the Fernco Wax Free unit, and a little ingenuity first.

By the way: A closer inspection showed threaded holes in the hub underneath the flange, plus I note that the top of the pipe has been 'chamfered', my assumption being that when the bolts were tightened, it drew the flange tighter onto the pipe. If that's a compression cast iron flange (from back in the day), then so be it.

I thank you both for your knowledge!

Best,
Howard Emerson
 
Last edited:

Tuttles Revenge

In the Trades
Messages
4,205
Reaction score
1,459
Points
113
That ID of 2.75 is worrisome.. I wouldn't cut it til I had a really good plan of how to attach a new flange. My typical go to for a flange too close to a wall or a side, is just to fudge the toilet over as far as it can on the bolts, ensuring that I still have a wax seal coverage and the toilet discharge and drain still align. Butt with that smaller diameter drain, you lose a bit of that target.
 
Messages
224
Reaction score
14
Points
18
Location
Huntington Station, NY
Website
www.howardemerson.com
That ID of 2.75 is worrisome.. I wouldn't cut it til I had a really good plan of how to attach a new flange. My typical go to for a flange too close to a wall or a side, is just to fudge the toilet over as far as it can on the bolts, ensuring that I still have a wax seal coverage and the toilet discharge and drain still align. Butt with that smaller diameter drain, you lose a bit of that target.
Understood. I don't need much, but it has to work perfectly, and I won't use wax anymore.

Onward,
Howard
 

Reach4

Well-Known Member
Messages
38,899
Reaction score
4,436
Points
113
Location
IL
That ID of 2.75 is worrisome..
I agree. That might be hard to measure with a measuring tape.

I just measured a can of chili. It would not fit into a 2-3/4 inch hole, but would clear 3 inch. Maybe using some item as a gauge would help. Don't drop stuff down the hole.

Trouble with wax can come from two common sources.
1. If the toilet is rocked, or lifted to insert shims, that can separate the wax and cause a leak.
2. If the pipe below the toilet becomes blocked, forceful plunging can blow out the wax.

I am envisioning some kind of puller could be rigged up where a cylinder is pressed down on top of that pipe, and bolts pull a bar down that pushes down on the cylinder.

Instead of a cylinder, there could be a piece of wood that is thick enough. So depending on what you have available, you could rig up something.

Is that inner pipe steel? A magnet could test for that.

That easy-to-scratch metal could be brass.
 
Messages
224
Reaction score
14
Points
18
Location
Huntington Station, NY
Website
www.howardemerson.com
That ID of 2.75 is worrisome.. I wouldn't cut it til I had a really good plan of how to attach a new flange. My typical go to for a flange too close to a wall or a side, is just to fudge the toilet over as far as it can on the bolts, ensuring that I still have a wax seal coverage and the toilet discharge and drain still align. Butt with that smaller diameter drain, you lose a bit of that target.
I did a better job of measuring it and it's basically 2 & 7/8". I'm quite certain it's cast iron, in fact I have a magnet handy.......Yep, absolutely cast iron.

HE
I agree. That might be hard to measure with a measuring tape.

I just measured a can of chili. It would not fit into a 2-3/4 inch hole, but would clear 3 inch. Maybe using some item as a gauge would help. Don't drop stuff down the hole.

Trouble with wax can come from two common sources.
1. If the toilet is rocked, or lifted to insert shims, that can separate the wax and cause a leak.
2. If the pipe below the toilet becomes blocked, forceful plunging can blow out the wax.

I am envisioning some kind of puller could be rigged up where a cylinder is pressed down on top of that pipe, and bolts pull a bar down that pushes down on the cylinder.

Instead of a cylinder, there could be a piece of wood that is thick enough. So depending on what you have available, you could rig up something.

Is that inner pipe steel? A magnet could test for that.

That easy-to-scratch metal could be brass.
The pipe is absolutely cast iron, as a magnet grabbed it. It's actually 2 & 7/8" ID.

I think what you're describing is a gear puller, and they make them in all different sizes, but I'm very well versed in power tools, so if I have to cut it off with a Sawzall, it'll get done carefully. I have a Ryobi that is very tame, straight reciprocating with variable speed, unlike my Rockwell that literally could take down a house. Attaching another flange has to be addressed before scroon da pooch, though, so I'm being cautious.

HE
 

Reach4

Well-Known Member
Messages
38,899
Reaction score
4,436
Points
113
Location
IL
Before you cut, also check the pipe OD vs what the replacement flange can handle.

There are cast iron compression flanges available. Searching for "code blue" can find some.
plumbest C40-320 3inch pipe outside. 2 inch deep.


http://images.salsify.com/image/upload/s--YGwa6wbK--/sttrtzp8tgflhsrw2dfg.pdf

I wonder if the Danco Hydroseat would extend down your pipe. Replace the existing flange at the height you want. That is intended to be used over wax, but I think it could be used over waxless. If you did use wax, it prevents some of the problems that can come with wax.

On the other hand, a new Code Blue 3-inch cast iron compression flange may fit over the OD of your pipe just fine.
 
Last edited:
Messages
224
Reaction score
14
Points
18
Location
Huntington Station, NY
Website
www.howardemerson.com
Before you cut, also check the pipe OD vs what the replacement flange can handle.

There are cast iron compression flanges available. Searching for "code blue" can find some.
plumbest C40-320 3inch pipe outside. 2 inch deep.


http://images.salsify.com/image/upload/s--YGwa6wbK--/sttrtzp8tgflhsrw2dfg.pdf

I wonder if the Danco Hydroseat would extend down your pipe. Replace the existing flange at the height you want. That is intended to be used over wax, but I think it could be used over waxless. If you did use wax, it prevents some of the problems that can come with wax.

On the other hand, a new Code Blue 3-inch cast iron compression flange may fit over the OD of your pipe just fine.
Hi Reach,
I believe I have a good shot at fixing this tomorrow, thanks to a Fernco Wax-Free unit that I spent some time modifying.

The way it mounts on the horn of the toilet allows almost 1/2" forwards, or backwards, placement. Prior to setting it on the horn (with its tenacious glue coating), I spent some time with my jig saw knife blade, and I cut of most of the 'splines' that the unit comes with.

Here is a picture showing the ribs that I cut off most of the way around, except towards the back. Not only does it slip in the pipe snuggly, but the remaining ribs in back force it forward, moving the center outward.

wMOkM1A.jpg


Here's a side view showing the Fernco back-of-center from from the horn of the Toto toilet.

iNLLVVh.jpg


To help matters along I made sure the toilet bolts were moved forward as well. It's amazing how easy cast iron drills!

YHvww1Q.jpg


So tomorrow I'll rig up my dolly with some tall spacers to move it into position, and give a good view from the side. If my calculations are correct the angled area of the Fernco (where it attaches to the porcelain) is going to make good contact with the flange face, which is basically 1/4" below the tile surface. This should provide good pressure on the Fernco, thus insuring the glue joint won't go anywhere.

As I mentioned I saw someone, apparently, lift a toilet with the Fernco horn glue being the only attachment........I remain unconvinced, but it's really is tenacious.

Thanks again for the suggestions. Here's how the rest of it is coming along, by the way.....

ufDjLZv.jpg


8edB3My.jpg


Now I have to set the toilet, hang the sink and make the cabinets, etc.

HE
 

Jeff H Young

In the Trades
Messages
8,954
Reaction score
2,235
Points
113
Location
92346
put nuts on those bolts to hold in place then nuts on top when you set toilet as well . you dont want the bolts sloppy like that
 
Messages
224
Reaction score
14
Points
18
Location
Huntington Station, NY
Website
www.howardemerson.com
My idea for using the Ferco Wax-Free worked like a charm! The offset it allowed gave a straight down drop in, and I still have a gap in back of the toilet!

It ended up with an 11.5” center to the bolts despite the flange being 11.125” center.

I left the bolt loose because I wasn’t sure what was going to be the final outcome. I just use a thin wrench while holding the top with cutting pliers so they don’t turn while tightening.

Thanks again for all the suggestions!

Howard
 
Top
Hey, wait a minute.

This is awkward, but...

It looks like you're using an ad blocker. We get it, but (1) terrylove.com can't live without ads, and (2) ad blockers can cause issues with videos and comments. If you'd like to support the site, please allow ads.

If any particular ad is your REASON for blocking ads, please let us know. We might be able to do something about it. Thanks.
I've Disabled AdBlock    No Thanks