1963 copper remodel to ABS-layout help needed

Users who are viewing this thread

Oilhammer

Member
Messages
35
Reaction score
1
Points
8
Location
Denver
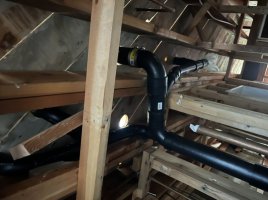
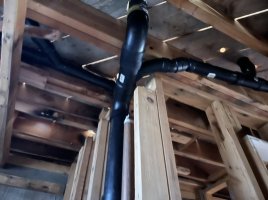
Here's a framing picture that may help. Basement view, standing under the washer/dryer and looking up and towards the powder lav.
You can see the 3" black pipe for the toilet popping down. You can see drilled 2" holes for laundry and lav drains. Copper toilet and vent obviously not demo'd yet. Romex on far right is where the kitchen sink would come from if I don't run it to the other drain.
Framing running left/right is furring.

basement view2.jpg


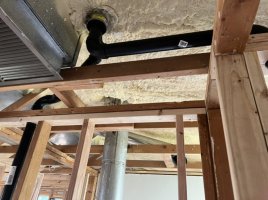
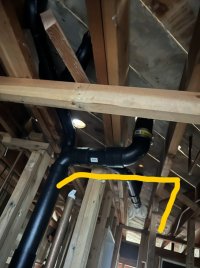
Upstairs view. Laundry hole is on the left, toilet installed, lav drain hole far right. Copper all still in the way.

upper view.jpg
 
Last edited:

Oilhammer

Member
Messages
35
Reaction score
1
Points
8
Location
Denver
Confirmed that the "variant" above with the laundry sink on the left is the only way I can make the drains fit. I might be able to fit the WC within a framed wall below but the fitting clearance will be tight. Working on a sketch.
1651687250431.png

Difficult to see, but if I join lav (light blue) to the WC up high, I might be able to street elbow over to the basement wall before dropping below the floor joist. It's tight. Putting a wye in the vertical 3" stack also means I orphan the basement bath vent (red). Maybe a studor there is in order.
Laundry sink (brown) ties to washer drain and drops to original 3" stack. Still struggling with whether there's a possibility of tying the kitchen into this. It's a mess, so unless I can come directly in line with the light blue, I don't think so.
 
Last edited:

Oilhammer

Member
Messages
35
Reaction score
1
Points
8
Location
Denver
It mostly laid out that like the sketch. Nothing glud yet. Lav ties to WC on the flat, which is not ideal. Can the kitchen tie to lab line? (Pics have to be resized)
 

Attachments

  • A934BF8B-1787-4FA7-ACFC-BDF873677A5A.jpeg
    A934BF8B-1787-4FA7-ACFC-BDF873677A5A.jpeg
    73.9 KB · Views: 115
  • E9DF5AC7-0F29-42E5-B2FE-EA7F9463F055.jpeg
    E9DF5AC7-0F29-42E5-B2FE-EA7F9463F055.jpeg
    74.3 KB · Views: 113
  • AF56F11C-9DB3-4B3B-86A8-EE95487A70C5.jpeg
    AF56F11C-9DB3-4B3B-86A8-EE95487A70C5.jpeg
    100 KB · Views: 110
Last edited:

wwhitney

In the Trades
Messages
6,567
Reaction score
1,847
Points
113
Location
Berkeley, CA
Just responding to the text of the last post, without reviewing the earlier thread:

If the wye where the WC and lav join has both inlets horizontal, that is normal for horizontal wet venting and fine or slightly preferred.

Any non-bathroom fixture must join downstream of all wet vented fixtures.

Cheers, Wayne
 

Oilhammer

Member
Messages
35
Reaction score
1
Points
8
Location
Denver
Thanks!
Yes, the wye on the WC/lav is flat. What I'd like to do is change those two street 22's on the lav to something a little more aggressive and get up into the joist bay faster.

Kitchen, Ok so that sounds like it's not possible the way I was thinking then. I really can't get over to that joist bay where I could access the stack. Even jogging the stack over with 45's doesn't solve as much as it complicates others.

I can maybe do this and hide the drain in the bath wall. (add a wye below the 3" 90 and run the kitchen drain parallel to the WC until it gets to the right joist bay) That or I'll just run the kitchen to the other side of the basement and hit the original stack for it.
 

Attachments

  • Inkedkitchen drain_LI.jpg
    Inkedkitchen drain_LI.jpg
    718.3 KB · Views: 106

wwhitney

In the Trades
Messages
6,567
Reaction score
1,847
Points
113
Location
Berkeley, CA
Yes, the wye on the WC/lav is flat. What I'd like to do is change those two street 22's on the lav to something a little more aggressive and get up into the joist bay faster.
I assume you're talking about the picture whose name ends in F055, and the combo with the two 22.5s on the side inlet. You obviously can't roll the combo without butchering the joists, but you could use 45s for the offset if preferred.

I take it in that picture you can't move the wall on the right towards the camera about 9"? That would let you put the upper portion of the stack under the joist bay with the WC and lav.

Here's a possibility, not sure if it would fit better, just want to throw it out there. You could eliminate the horizontal combo on the WC drain, and replace the LT90 where the vertical WC drain goes horizontal with a 45 - santee on a 45 angle - 45, using street fittings to get it as compact as possible. Then the lav drain can come into the san-tee side inlet, which is horizontal (2% slope). That only works if the barrel of the combo (in the current configuration) and the lav drain coming in are perpendicular as seen from above.

Cheers, Wayne
 

Oilhammer

Member
Messages
35
Reaction score
1
Points
8
Location
Denver
Picture F055 yes. Yeah, that's what I was thinking, swap those for 45's to get height faster once it clears the joist.

I assume you are referring to the basement bath walls right next to the WC 90. The wall going to the right parallel to the joists comes out. The wall perpendicular to the joists will move closer to camera by at least a foot.

My limiting factor on choosing a connection to the 3" WC drain was overall length. I'm joint to joint all the way to the stack to make this work.
 

wwhitney

In the Trades
Messages
6,567
Reaction score
1,847
Points
113
Location
Berkeley, CA
I assume you are referring to the basement bath walls right next to the WC 90. The wall going to the right parallel to the joists comes out. The wall perpendicular to the joists will move closer to camera by at least a foot.
So if the wall perpendicular to the joists is extended by at least a foot, doesn't that let you put the upper part of the stack under the joist bay with the WC, and wouldn't that simplify your drain arrangement above?

That was my idea from a while ago, perhaps I've not paid adequate attention to the recent details to see that wouldn't work.

Cheers, Wayne
 

Oilhammer

Member
Messages
35
Reaction score
1
Points
8
Location
Denver
That's essentially what this plan was.
1652478351127.png

I tried really hard to find a street 3x3x2 tee with the TOP the street end, not the bottom. If I could have found that, I would have assembled it more closely to the sketch. Without that street, I wind up being about 3" too long in the first assembly to really optimize doing this for in wall/floor concealment.
This is the only real configuration I could find. Whenever I thought I found the inverse, the CAD files show otherwise.
1652478559571.png
 

Oilhammer

Member
Messages
35
Reaction score
1
Points
8
Location
Denver
Sorry, why would you need the top end street?

Cheers, Wayne
The geberit toilet drain won’t fit a standard 3” socket. They provide an adapter coupling that mates to street or 3” pipe. The coupling is also greater than 3.5” in diameter so it needs to stay below floor. That means the closest you can trim the toilet drain is about 2” below subfloor. (By the way, if anyone wants advice on these toilets I can share plenty now. All three have arrived with various internal parts dislodged so I’ve had to rebuild them through the slot)
 

wwhitney

In the Trades
Messages
6,567
Reaction score
1,847
Points
113
Location
Berkeley, CA
Seems like if you're willing to notch the backside of the wallboard on one or both sides, you should be able to put the coupling above the floor. What's the OD of the waste elbow outlet? Is the coupling any different from a Fernco 3005-33 3" plastic to 3" plastic?

Cheers, Wayne
 

Oilhammer

Member
Messages
35
Reaction score
1
Points
8
Location
Denver
It's got to be metric and just a few mm larger than the 3" pipe. It's not a special coupling, but it is difficult to install because you are stretching it to fit on the toilet discharge. The easy way is to remove the band clamp and get the rubber around it first, then slide the metal up. Fitting the standard ABS to the adapter once its on the toilet is easy. If I had planned it better, the 6" wall version of the toilet will allow the drain to angle either direction. I could have easily angled the drain over starting above floor and it would have aligned with the lower wall easily. And true, you could put the coupling above floor if you notch the drywall.....however, that pushes the nail guard plate out too. I'll noodle on it a bit more and see if I can tidy it up.
 

Oilhammer

Member
Messages
35
Reaction score
1
Points
8
Location
Denver
Passed all plumbing rough inspections. Thanks to all for the help! I have more questions about boilers, but I'll start a new thread for that.
 
Top
Hey, wait a minute.

This is awkward, but...

It looks like you're using an ad blocker. We get it, but (1) terrylove.com can't live without ads, and (2) ad blockers can cause issues with videos and comments. If you'd like to support the site, please allow ads.

If any particular ad is your REASON for blocking ads, please let us know. We might be able to do something about it. Thanks.
I've Disabled AdBlock    No Thanks