So...need to confirm a few things in this:
1) A single 1.5" dry vent is adequate for this end ( I still have another dry vent on the far end for the master vanity)
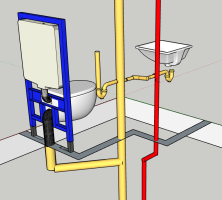
2) Need for a cleanout (ideally below floor) on Bath 2 drain right where it turns 90 to connect to the 3" wet vent.
3) Bath 2 lav drain connection to the 3" flat, or rolled up at least 45 so that the 1.5" part of the wye is about water line.
4) How the heck to connect to a 3" copper pipe. None of the adapters I have found fit copper to ABS.
The most easy way to do this is with a simple 3 inch fernco rubber gasket coupling.... grease it up good with
pipe dope and it chould last 30 years or more... They also make a no hub fitting that adapts from old 3 inch copper to 3 inch pvc....
either one will probably last forever... just be sure to secure both sides to the rafters with strapping so they dont
move
also I got dozens of those double cross ideals that you had in your original picture....
With the distance that the toilets are apart and not back to back
, I feel that this cross would have probably would have worked fine...
but its too late now...... lol
View attachment 81878 These fittings were called ideal crosses and were perfect for most installs we did back in the 80s and 90s.... With the newer toilets they caused trouble when the toilets were literally back to back making one toilet bowls water bob up anddown..
Good luck with your fun project