Damaged oval offset flange

Users who are viewing this thread

spiffus

New Member
Messages
6
Reaction score
0
Points
0
Location
Texas
Let me preface this by stating that this is my first toilet replacement, so please forgive me if I'm unclear or skip some important details. :)

About a year ago, our toilet in the kids' bathroom started leaking out of the bottom, so we called a plumber, who came out with an assistant, and he replaced the wax ring. He also told us that the toilet (original to the house, now 30 years old) needed to be replaced in the not-too-distant future. Plus, one of our kids tends to "withhold" and then clogs the toilet when she finally goes, so it was time to replace it.

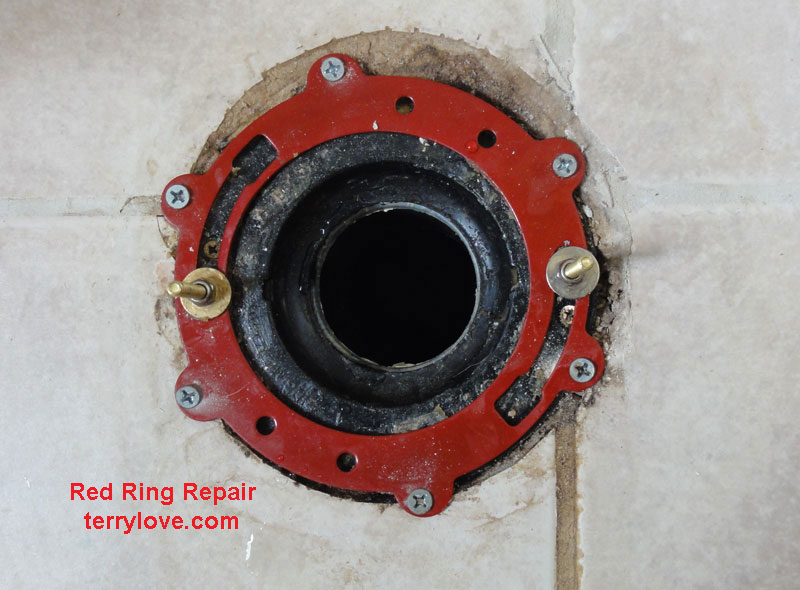
I was able to remove the old toilet without a hitch. It's in a small room, so it has a 10" rough in. After I removed the toilet, and then removed the t-bolts and wax ring, I saw that it was a weird, oval offset flange. (I had never seen anything like it, but I understand from various comments that these are pretty awful in general). This is looking straight down, where the pipe opening is at the back wall near the water supply, and the "bottom" of the picture is where the front of the toilet bowl goes.

WP_20140111_001.jpg

My problem came when I tried to place the new t-bolts that came with the new toilet - they would not stay in place. Apparently, somehow, the outer "edges" of where the t-bolts slide in are actually raised up, so that they are not level with the rest of the flange. I suspect that someone, somewhere along the line (perhaps the most recent plumbers - I have no idea) may have cranked down too hard on the bolts when screwing the toilet nuts in. Or, it's just a junky old flange. The picture below (if I've done it right) shows the flange from the floor itself, where you can see just how badly the right outer edge is raised from the floor. The left outer edge doesn't look as bad, but it is.

WP_20140111_005.jpg

When I tried to tighten the t-bolts (not too hard, but enough to keep them from moving), they would angle inward at about 20 degrees or so. The two pictures below are the right edge, followed by the left edge.

WP_20140111_002.jpg

WP_20140111_003.jpg

And, finally, this last picture is at a side angle. The red marks on the tile are 10 inches from the wall, where the rough in for the bolt locations would be. Also, the pipe has a 3" diameter.

WP_20140111_004.jpg

My problem is, as y'all have probably surmised, I cannot get the new toilet to sit on the flange with the edges flared up the way they are. This bathroom is in a one story house with a concrete subfloor. When we bought the house in 1997, it had linoleum flooring, and we paid a flooring company to install the tiles around 2001 or so.

I've had various bits of advice from different people at the hardware store, as well as friends who are somewhat familiar with plumbing. One suggestion was to get a flange replacement ring, and affix it on top of my current flange without removing the current flange ring. However, I'm concerned that by doing so, I'll still have the "bump" which would prevent the replacement ring from affixing correctly. Another suggestion is to remove the flange entirely and install a new, round offset flange, but I have no idea how tight of a space it is or how much concrete I'd have to chip away to do this. Plus, I'm really not looking forward to that big of a job.

And, finally, resources are very tight and I really can't afford to have a plumber come in and fix this (unless I wait for tax refund time). If I have no choice, well, then that's what I'll do, but I'd really like to know if there is a way I can fix this without turning it into an expensive nightmare! :confused:

I appreciate your time in reading this, and any suggestions y'all might have!

Thanks,

Jeff
 

WJcandee

Wise One
Messages
3,181
Reaction score
170
Points
63
Location
New York, NY
I will try to help with a couple of thoughts and observations, but I will absolutely defer to, and you should totally ignore what I say if it's contradicted by, anything said by our resident expert plumbers.

Thought 1: You say the toilet won't sit level on the floor with the edge of the flange flared up like that. Remember that the toilet doesn't sit on the flange. It sits on the floor outside of the flange and the outflow spigot from the toilet will be raised up a bit from the floor level when the toilets outer parts sit on the floor. Particularly with this flange more or less level with the floor, the toilet shouldn't be touching it at all. (Technically, the flange should sit on top of the finished floor and be anchored to the subfloor, so you are going to have at least a half-inch of protrusion of the flange above the floor level. That said, flanges level with the floor are not uncommon, due to how the plumbing and tiling trades interact on a construction site.) That protrusion upwards shouldn't affect anything, except perhaps the angle of the bolts as you mention. (It is a good example of why we like flanges with stainless steel rings rather than just plastic.) Try dry-fitting the toilet above the flange without the closet bolts installed. Does it sit level? If it rocks, the floor is probably a little unlevel, and you can shim it so it doesn't rock with plastic window shims, available at any hardware store or HD. Terry's son, in his excellent guide on installing a 2-piece Toto toilet, says that they like to shim from the rear, pinning the toilet forward a bit. Once you see how you will need to shim it, you should be set.

Thought 2: The damage to this flange, while not extensive, does appear to be the reason your bolts would angle in when tightened. I'm thinking that if you double-nut the closet bolts, as the better plumbers do, this may solve your problem. Double-nutting means that you put the T portion of the bolt in the slot, then use one washer and one nut to secure it in place. The washer on the top of the flange may help compress the bolt in the slot so it sits straighter. It doesn't have to be perfectly-vertical. It just has to hold the toilet to the floor. Then, when you position the toilet, you use a second washer and nut to secure the toilet to the bolt that you have secured to the flange. Here's the kind of closet bolt set you want -- two washers and two nuts for each bolt. You don't have to buy a set this expensive, but I just wanted you to see what the set would look like.

Thought 3: A repair ring would also probably do it for you, but I don't see that it's absolutely-necessary. You would secure it and it would press down on the existing flange and maybe push that lip a bit back into place so it would be more or less level. However, the flange doesn't have to be absolutely-level, because you aren't attaching any part of the toilet to the surface of the flange. There will be a gap between the top of the flange and any part of the toilet. Your wax ring is going to sit on the flange and fill the gap, and when you smush the toilet down on the wax, it will smush a little more out of the way on one side than the other. The toilet's level will be determined by its position on the floor, not the flange. In other words, the wax in the seal will be a little deeper on one side than the other, which makes no difference whatsoever.

Thought 4: You probably need either an extra-thick wax ring or two regular wax rings (either two with no plastic funnel insert in them or one with and one without; never two stacked funnels. If you have one with a funnel, it goes on top. And you always put the wax down on the floor then carefully set the toilet on top, then smush it straight down with no rocking, regardless of what the instructions for the toilet say. That's how the better plumbers do it.) This is what we recommend when the top of the flange is level with the floor or below the finished floor.

Come back with any other questions.
 
Last edited by a moderator:

Terry

The Plumbing Wizard
Staff member
Messages
29,942
Reaction score
3,458
Points
113
Location
Bothell, Washington
Website
terrylove.com
red_ring_repair_1.jpg


I would use a repair ring like this to help hold the bolts on that flange.
It's not wonder you've been having troubles plugging that bowl with that offset flange though. I wouldn't be giving her too much grief after seeing this closet flange.

If you need an offset flange, I prefer something like this.

closet_flange_offset.jpg
 
Last edited:

hj

Master Plumber
Messages
33,602
Reaction score
1,040
Points
113
Location
Cave Creek, Arizona
Website
www.terrylove.com
A "round" repair ring will NOT fit an "oval" offset collar, any more than a standard round wax seal will. There is NO cure except to replace the flange, because the plastic on the sides is distorted and will NOT revert to its original location. They are probably about to crack anyway, which is usually what happens with that style of flange. That design creates a "shelf" under the toilet's outlet which can be the cause of clogging, but the good one, such as Terry's photo, need much more "length" which you probably do not have.
 

JerryR

Active Member
Messages
584
Reaction score
41
Points
28
Location
Florida
I had the same oval flange with the "shelf" and where plastic was bowed. The center of the drain was 9" from the wall.

I had a plumber remove the flange and replace it with an offset one without a shelf like in Terry's picture. They needed to chip out some concrete to get it to fit properly. Even then I needed to install a 10" rough in Drake toilet. It works very well.

JR
 
Last edited:

JerryR

Active Member
Messages
584
Reaction score
41
Points
28
Location
Florida
I had the same oval flange with the "shelf" and where plastic was bowed. The center of the drain was 9" from the wall.

I had a plumber remove the flange and replace it with an offset one without a shelf like in Terry's picture. They needed to chip out some concrete to get it to fit properly. Even then I needed to install a 10" rough in Drake toilet. It works very well.

JR


Here is a link to my solution

https://terrylove.com/forums/showthread.php?43517-Oval-Offset-Flange&p=313009&highlight=#post313009

JR
 

Jadnashua

Retired Defense Industry Engineer xxx
Messages
32,770
Reaction score
1,190
Points
113
Location
New England
My guess, when they installed the walls, they were off a bit, thus, the rough-in was changed to that offset because it probably didn't require cracking as much concrete as doing it right in the first place! Without retiling (wouldn't be bad if you have a couple spare tile, though), the offset flange shown with the metal ring may be your best bet. But, being on a slab, there's probably no reason why, if you were going to crack the concrete, that you couldn't put a new, non-offset flange on at the standard 12". That would give you a MUCH bigger selection of toilets that would fit when you decide to replace that old water guzzler. The selection of 10" rough-in toilets is limited, the selection of 12" toilets is almost unlimited (and sometimes less expensive).

Course, there could be a reason why they used an offset under your slab, but right now, I'm not thinking of any.
 

WJcandee

Wise One
Messages
3,181
Reaction score
170
Points
63
Location
New York, NY
My guess, when they installed the walls, they were off a bit, thus, the rough-in was changed to that offset because it probably didn't require cracking as much concrete as doing it right in the first place! Without retiling (wouldn't be bad if you have a couple spare tile, though), the offset flange shown with the metal ring may be your best bet. But, being on a slab, there's probably no reason why, if you were going to crack the concrete, that you couldn't put a new, non-offset flange on at the standard 12". That would give you a MUCH bigger selection of toilets that would fit when you decide to replace that old water guzzler. The selection of 10" rough-in toilets is limited, the selection of 12" toilets is almost unlimited (and sometimes less expensive).

Course, there could be a reason why they used an offset under your slab, but right now, I'm not thinking of any.

I think he has the toilet already, but it's true that your solution will pay dividends down the road...
 

Reach4

Well-Known Member
Messages
38,796
Reaction score
4,412
Points
113
Location
IL
This is looking straight down, where the pipe opening is at the back wall near the water supply, and the "bottom" of the picture is where the front of the toilet bowl goes.

Do you have something stuffed into the flange opening in your first and 5th picture, or is that the way the flange really looks inside?
 

spiffus

New Member
Messages
6
Reaction score
0
Points
0
Location
Texas
Firstly, thanks to all of you for your responses! I appreciate the insight. It seems the consensus is that the best thing to do is to replace the flange with a new offset flange (as pictured in Terry's post). I'll reply to some of the questions in y'all's posts below.

wjcandee: Thanks for all of your thoughts and explanations. I appreciate your input and suggestions on how to go forward!

Terry and hj: Thanks for the tips and information. I actually bought a white offset flange just like the one showed in Terry's post, which was the one the store personnel recommended. Even after removing the toilet, it didn't occur to me until I read both of your replies that this could be part of the clogging problem.

JerryR: I actually saw your original post when I searched for "oval offset flange" :) and wondered if I would have to do the same. It's nice to see an original and an "after" picture to get an idea of how much chipping may have to be done.

jadnashua: I think your guess sounds right. We've found various things in the house which, when doing DIY repairs, get funny looks at the local hardware stores when I explain the situations. It took a while to explain the oval offset flange, and I think the original builders probably took a lot of "shortcuts" when they built our house, including being off on the measurements. :) But, as wjcandee noted, I did already buy a toilet with a 10" rough in, and was able to get it (surprisingly) for the same price as that model with a 12" rough in. It's a pretty tight bathroom as it is, so that extra 2" would make the room feel even smaller. I believe I have some extra tile in the attic if we end up having to retile anything.

Reach4: I had some toilet paper stuffed into the flange to reduce the sewer gases from entering the room. Once I realized that I was in for more repair issues than I thought, I put a thicker rag in the flange and covered the flange as well. :)
 

spiffus

New Member
Messages
6
Reaction score
0
Points
0
Location
Texas
Question on setting the new offset flange

Okay, time for an update and a question on how to proceed.

It's taken a little while (and admittedly, I haven't been able to devote a lot of time to it until this week), but I have finally removed the junky old offset flange. I used a hacksaw, a chisel, and a hammer to remove the main flange, as well as the part of the flange which connected it to the sewer pipe in the foundation. After removing it, I saw that the diameter of the sewer pipe is 4", so the 4" x 3" offset flange I bought will slide inside the pipe (yay!). Below is a picture of the hole with the flange removed (I will use my shopvac to vacuum out the loose debris tomorrow after the kids are up, and clean up around the rag I stuffed in the pipe to prevent the sewer gases from escaping).

Hole with flange removed.jpg

To make sure that the flange will "sit" in the pipe correctly, I've placed it where it will go without gluing it in or pressing it down too far (see below).

Hole with new flange from top.jpg

One of my questions is, how should I get the new flange to "sit" better in the pipe and remove the gap between the flange ring and the tile? Should I remove about an inch or so of the sewer PVC pipe, or should I use a mallet (gently!) to push the flange into the pipe? (See pictures from the right and left side below).

Another question is, when you look at the pictures, you will see a "gap" between the flange and the concrete floor. (I don't mean the current gap you see because the flange isn't all the way seated; I mean that once the flange is seated, I can tell that there will still be some space between the concrete and the new flange, due to the differences in the flanges themselves.) Do I need to fill this in with anything, like kwikcrete concrete, or one of those door and window gap foam products? Or should I just leave it as is? It is my understanding that I should try to bolt at least two or three of the six bolt holes on the new flange's ring to the floor, so that it is more secured to the floor. Is this correct? And if so, the bolts would need something to drill into, which is why I'm wondering if I need to fill in the gap with something. (Pictures below are from the right and the left of the flange).

Hole with new flange right side gap.jpg

Hole with new flange left side gap.jpg

I appreciate any insight y'all can provide! And again, I appreciate all the help everyone gave on this thread earlier. It gave me the confidence to be able to remove the old offset flange and not feel like I had to call a plumber and somehow find several hundred dollars to pay them. Plus, there's something therapeutic about breaking up and removing that rotten old flange! :D

Thanks,

Jeff
 

Smooky

In the Trades
Messages
2,299
Reaction score
152
Points
63
Location
North Carolina

spiffus

New Member
Messages
6
Reaction score
0
Points
0
Location
Texas
Smooky,

Thanks for your reply! It turns out that I didn't need to make any more room outside of the flange after all. However, I had bought an internal pipe cutter drill bit when I started this project, which is good, because I had to shave off about an inch of the sewer pipe to make the flange fit correctly. I was able to do so, and successfully primed and glued the new flange to the sewer pipe. After I let it cure for a couple of hours, I put the t-bolts in the flange ring and placed the toilet on them (without the wax ring) to check how it sat and to see if it was level. After that, I put the wax ring down, placed the toilet, had to use a small shim to stabilize and level the toilet, and finished assembling it. It took longer than I originally planned with that bizarre oval offset flange, but with everyone's help on this forum and thread, I was confident enough to complete it and save myself several hundred dollars!

Thanks again to everyone for all of your help! :)
 

WJcandee

Wise One
Messages
3,181
Reaction score
170
Points
63
Location
New York, NY
Awesome! Hearing about success stories is one thing that makes this forum so fun!

Did you do anything to attach the flange to the floor other than gluing it to the pipe? Just curious; not saying you need to pull the whole thing up or anything.

Let us know how the thing is working after you have had a chance to use it. I'm guessing that the combination of the new toilet and the better-design offset flange will go a long way towards reducing or eliminating clogs!
 
Last edited:

spiffus

New Member
Messages
6
Reaction score
0
Points
0
Location
Texas
wjcandee,

I ended up not doing anything additional to attach the flange to the floor. I was thinking I might have needed to fill in the gaps with concrete or some sort of quick-hardening foam, but when I showed my pictures to the gentleman in the plumbing department of the home repair store I visited, he said that I did not need to fill in the gap with anything. I did buy a concrete drill bit and some Tapcon concrete anchors, which I was going to use to secure the flange ring to the concrete subfloor, but after placing the flange, the anchors were not long enough to reach the concrete subfloor. Additionally, the flange ring was generally stationary and only rotated when I applied a decent amount of torque to it, so I let it be.

The only thing I haven't done yet is to caulk the edges, but that's because my old tube of silicone caulk had hardened beyond use. I bought a new tube of caulk, but my paranoia is causing me to hold off on caulking until this weekend, just to make sure it isn't leaking (and also because my weeknights tend to be busier than I expect!).

My daughter was particularly pleased with the new toilet, which is a good thing. I'm also hoping, as you, that the new toilet and better offset flange will help reduce the clogs, and remove my daughter's fear of using the toilet because it might leak! :)
 

WJcandee

Wise One
Messages
3,181
Reaction score
170
Points
63
Location
New York, NY
wjcandee,
but when I showed my pictures to the gentleman in the plumbing department of the home repair store I visited, he said that I did not need to fill in the gap with anything.

my old tube of silicone caulk had hardened beyond use. I bought a new tube of caulk, but my paranoia is causing me to hold off on caulking until this weekend,

Cool.

FWIW: (1) There's a reason these guys are wearing an orange apron rather than going out there and working. And it's not because their knowledge and expertise is so highly valued. You're as likely to get an idiotic answer as a correct one.

(2) If you need a recommendation in the future, Polyseamseal is easier to clean up when you do pull the toilet from the floor in the future. But your stuff will work fine.

loctite-tub-tile.jpg
 
Last edited by a moderator:

spiffus

New Member
Messages
6
Reaction score
0
Points
0
Location
Texas
Cool.

FWIW: (1) There's a reason these guys are wearing an orange apron rather than going out there and working. And it's not because their knowledge and expertise is so highly valued. You're as likely to get an idiotic answer as a correct one.

(2) If you need a recommendation in the future, Polyseamseal is easier to clean up when you do pull the toilet from the floor in the future. But your stuff will work fine.

Thanks for the heads-up on both items. I've actually found myself looking for the older guys at the home improvement stores, because I'm hoping that they're there because they've retired from "active service," but want to work somewhere that they can be helpful in their trade. It's probably wishful thinking, but I did get a helpful older gentleman there when I was in the process of buying the toilet itself. I had no idea about the difference between a 10" and 12" rough in, and he pointed it out to my wife and me, so that we didn't buy a toilet off the shelf with an incompatible rough in. :)

Also, on the Polyseamseal - I haven't actually started caulking yet, so I'm open to buying it and returning the caulk. I see they have several different sealants available (http://www.loctiteproducts.com/sealants.shtml#polyseamsealpremium-application). I was also planning on recaulking one of my bathtubs in the coming months, so do you have a suggestion on which product would be best for both the toilet and the tub?

Thanks again for all your help!
 

WJcandee

Wise One
Messages
3,181
Reaction score
170
Points
63
Location
New York, NY
Terry seems to recommend the clear version of the Tub and Tile Polyseamseal, but you can certainly use white, and then you'd have it for both applications. It also comes in a little tube; you don't necessarily need to get the big container for your caulking gun.

The blue store and the orange store (and Ace, for that matter) attempt to market the idea of buying from them because of the knowledgeable aprons who will help you, and sometimes they do, but I have heard so many dumb answers from them that I don't think that one can consider them to be a generally-reliable source, and the problem is you really have no way of knowing whether what the guy is saying is spot on or complete rubbish. Until the thing leaks or doesn't work or doesn't pass code. OTOH, if they raise an issue like the rough-in distance, one can do one's own research to verify what they are telling you.

I'm a positive-enough person to say something like "And at least it's better than nothing." The problem is that sometimes it isn't.
 

Jadnashua

Retired Defense Industry Engineer xxx
Messages
32,770
Reaction score
1,190
Points
113
Location
New England
If you have gaps underneath the flange that you can access, I'd get some hydraulic cement, mix it up, and stuff some under there to provide support. Hydraulic cement cures quickly - read the instructions carefully before use, you don't have much time once you add the water. Then, I'd either use some Tapcons or something similar to anchor the ring in place. You might be able to press them in there, then pack the hydraulic cement around. The metal ring needs to be anchored to provide some strength otherwise, if the thing were knocked hard (say someone fell against it), it may break the ring off of the plastic flange.

Sealing the toilet to the floor with the Polyseamseal will help not only to prevent crud from accumulating underneath, but also to help hold it in place, but the ring has less chance of problems if you fasten it well to the floor. They do put those holes in it for a reason...
 
Top
Hey, wait a minute.

This is awkward, but...

It looks like you're using an ad blocker. We get it, but (1) terrylove.com can't live without ads, and (2) ad blockers can cause issues with videos and comments. If you'd like to support the site, please allow ads.

If any particular ad is your REASON for blocking ads, please let us know. We might be able to do something about it. Thanks.
I've Disabled AdBlock    No Thanks