Water Hammer Issue

Users who are viewing this thread

Tenaya

New Member
Messages
15
Reaction score
0
Points
1
Location
Texas Panhandle
Hi,

I have a well and water system suffering from what seems to me to be a substantial water hammer. The well was drilled and the motor/pump installed in mid-2015. The house plumbing was completed in late 2016.

Here are some specifics:

  • The well was drilled 9" to 287', cased 5" PVC solid to 222', 5" perforated PVC to 282' and cemented to 22'. I'm told this is pretty standard for a single family residence in my area (Texas Panhandle)
  • The static water level is 200' and the yield was reported to be 18gpm with 0 drawdown after 1hr.
  • The pump is a "J-Class" submersible from Franklin Electric. I haven't been able to determine the precise model number because none of the numbers on the installation record seem to match model numbers on the Franklin website.
  • The installation record mentions a check valve at the wellhead, but doesn't specify its rating. I haven't opened it to lay eyes on it.
  • The motor is 220v single phase, wired with 265' of 10/4.
  • In the garage utility closet, the pump wiring was brought to a Franklin Electric well control box.
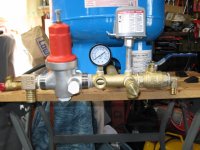
  • The control box is wired to a Square D PumpTrol pressure switch, set to 55/65 psi.
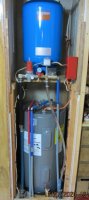
  • The well is plumbed to a FlexLite FL30 90 gallon pressure tank through a brass well tee.
  • The well tee is then plumbed to the house through a TwistIIClean particulate filter with a 100 mesh (150 micron) screen.
  • Additionally, the well tee has a hose bib for draining the tank and a 75psi check valve.
  • The entire house is plumbed with PEX (crimp rings, not SharkBite), including the 1" run from the wellhead to the well tee, with brass valves and fittings.
The entire system works quite well; we never have never seen pressure or flow issues and the water is clean/clear and tastes pretty good (I'm overdue to test the water).

The problem I have is a substantial water hammer when the pump starts, followed by another hammer when the pump stops. I retrofitted the well control box with indicator lights for power and pump running. If I put my hand on the exposed PEX from the well, I can feel a sizeable jolt and loud thump when the pressure switch clicks and the pump running light illuminates. When the pressure hits the upper limit and switch clicks again, the pump running light goes out and I feel an equal sized jolt. If I do this with my hand on the PEX that runs from the well tee to the filter or the filter into the house, the thumps sound, but there are essentially no jolts.

We noticed this issue after we moved in (late 2018), but life got in the way of dealing with it before now. Since we don't want the driller and/or plumbing contractor coming to the house during the pandemic (we're in our 70's). I'd like to see if I can remedy the issue myself.

Despite the good reputations of the driller and plumber, I suspect a system design problem, especially with the relative newness of the various components. I've read that having check valves at BOTH the wellhead and the pressure tank can sometimes cause water hammer. I've also read about installing a soft start control. I've read about cycle stop valves, but I don't really understand them.

Can anyone suggest a solution to this issue, preferably one a fairly handy non-professional can implement at a reasonable cost?

Thank you in advance,

Tenaya
 

Sarg

Enjoy Learning
Messages
228
Reaction score
51
Points
28
Location
Upstate New York
You say:
The installation record mentions a check valve at the wellhead

That implies you have two check valves ( or is it three ? at pump.. at well head and at tank ? ) ... one on the pump and one at the top. I would guess the bottom valve in the well is leaking.

Below I will paste an article by Valveman ( Mr. Cary Austin ) about multiple check valves. He is a Staff Member on this forum. He's in Texas and is probably very busy with the freezing temps they had. Mr. Austin is also an "Expert". It is long but well worth the read.


Bob Pelican writes some very good stuff. However, on the issue of check valves, he has taken the engineers view, which is not a practical stand point. As long as all the check valves are new and working perfectly, you can get away with using multiple check valves. There are only two kinds of valves in existence, those that leak and those that will leak. The minute one of them starts dragging or leaking, which they will, many problems arise.

This is just one of those things that works on paper, and not so good in reality. A check valve is designed to stop water from going backwards. You don't want water to go backwards when the pump shuts off, so if one check valve is a good thing, then a hundred check valves should be better.

However, the more check valves you have the more friction loss you have. A bigger pump is needed if you have much friction loss. Other than that, you would still think an extra check valve or two would still be a good idea for backup.

Many times, multiple check valves do work OK when everything is new and working perfectly. The problem comes when any check valve leaks a little bit, or doesn't close quite as fast as the check valve above it. Then a negative pressure is created below the top check valve.

If the top check valve is above ground, the vacuum can draw contaminates into the line. No matter if the top check valve is above ground or in the drop pipe, the negative pressure will allow the pump to start to the right of it's curve. (In other words "wide open") The pressure above the pump will change from negative pressure to positive pressure in a fraction of a second. The effect is, the column of water below the top check will "punch" the top check. This is much like a Boxer "punching" you in the face. It creates a shock wave that travels throughout the water lines. At every outlet valve, elbow, tee, and dead end in the pipe, the shock wave turns into water hammer. Water hammer causes everything in the pipe system to experience pressure 10 times what you see on the gauge. On larger pumps it usually causes the pressure switch to bounce on and off like a telegraph.

You can remove the upper check valve when they start causing problems, or you can install only one check valve at the pump and not have the problems.

I have installed systems as deep as 2200' with only one check valve. You just need a good check valve, and to start and stop the pump at "almost" deadhead pressure conditions.

The only check valve you should have on a submersible pump system is the one on the pump itself. Another check valve anywhere else can cause a vacuum or negative pressure before the second check valve. If that second check valve is above ground, the potential of drawing in contaminates because of the vacuum conditions is probable. If the second check valve is below the pitless, on anywhere on the drop pipe, the potential of a water hammer event happening at each pump start is very real.

Using a second check valve just in case the one on the pump fails is never a good idea. If the check on the pump fails, it must be replaced. Having a second check valve will only mask the problem of the first check valve, and cause water hammer and possible contamination in the process.
Cycling the pump on and off is what destroys check valves and most other equipment in a pump system. The check valve slamming shut from a full open position when the pump is cycling repeatedly is the main cause of check valve failure. Using a Cycle Stop Valve on your pump system dramatically reduces the number of times your pump cycles, which will increase the life of the check valve and all other components in the system. The Cycle Stop Valve is also in the 1 GPM position, not fully open, when the pump shuts off. This means that the check valve is also only open to 1 GPM, which is only the width of a piece of paper, not fully open, when the pump shuts off. This means that the few times that the Cycle Stop Valve allows the pump to cycle, the check valve does a nice gentle close, which eliminates water hammer and check valve failure.

Multiple check valves work good on paper but, cause multiple problems in the real world.
 
Last edited:

Sarg

Enjoy Learning
Messages
228
Reaction score
51
Points
28
Location
Upstate New York
And to follow up .... I experienced a similar situation and replaced the check valve at the pressure tank with a cycle stop valve. I then realized my check valve at the pump was leaking which caused my system to cycle every thirty minutes ... So I replaced the 28 year old Franklin that was about 170 feet down. The pump still worked fine but the check valve leaked.
Today all works as it should.
 

Attachments

  • CSV1A.JPG
    CSV1A.JPG
    120.5 KB · Views: 232

LLigetfa

DIYer, not in the trades
Messages
7,507
Reaction score
581
Points
113
Location
NW Ontario, Canada
Can anyone suggest a solution to this issue, preferably one a fairly handy non-professional can implement at a reasonable cost?
I doubt you can pull 275 feet of pipe to replace the check valve on the pump. There is a small chance that removing the check valve at the well head might restore the one on the pump to working order but if the well head check valve is inline between the pump and a pitless, there is no easy DIY way to remove it.
 

Tenaya

New Member
Messages
15
Reaction score
0
Points
1
Location
Texas Panhandle
That implies you have two check valves ... one on the pump and one at the top.

Thanks for the quick reply.

There is probably one at the pump and there could be another one at the wellhead (haven't looked). The Installation Record isn't clear to me. I know FOR SURE there's one on the well tee (I can SEE it). Thus, there are AT LEAST two. Maybe three (depending on interpretation of the record).

index.php
I would guess the bottom valve in the well is leaking.

Hmmm. I wouldn't expect that check valve to fail this soon; it's only been down there since mid-2015 and it was designed to be installed down where it would be hard to replace.

From your information and that from Valveman, perhaps I should replace the check valve on the well tee with a brass plug (or gut it). If there's another one at the wellhead causing problems and/or the one down the well has failed, it won't help, but it's an easy and cheap thing to try.

BTW, I really envy the kind of access shown in your picture. My pressure tank, plumbing, well tee, pressure switch, filter, etc. are all in the same utility closet as my 75 gallon water heater.

Tenaya
 

Attachments

  • Well Installation Report.JPG
    Well Installation Report.JPG
    164.6 KB · Views: 213

Tenaya

New Member
Messages
15
Reaction score
0
Points
1
Location
Texas Panhandle
Can anyone interpret the clipped image of the Installation Report better than I can? Does it say there's a check valve at the pitless?

Tenaya
 

Reach4

Well-Known Member
Messages
38,881
Reaction score
4,433
Points
113
Location
IL
Can anyone interpret the clipped image of the Installation Report better than I can? Does it say there's a check valve at the pitless?

Tenaya
Kinda seems like that. That is normally not a good idea.
 

LLigetfa

DIYer, not in the trades
Messages
7,507
Reaction score
581
Points
113
Location
NW Ontario, Canada
Additionally, the well tee has a hose bib for draining the tank and a 75psi check valve.
A check valve is not normally described with a PSI number so my guess is that is not a check valve but rather a relief valve.

A check valve seals better if it has pressure pushing against it but the topside check valve does not allow pressure from the tank to hold closed the one on the pump. The one on the pump only has the weight of gravity pushing against it now. When the column of water leaks down, it creates a partial vacuum under the topside check valve. The column of water on pump start slams into the topside check valve creating the water hammer.
 

Tenaya

New Member
Messages
15
Reaction score
0
Points
1
Location
Texas Panhandle
Kinda seems like that. That is normally not a good idea.

Hmm, I was afraid that might be the case.

I think what I'm going to do is eliminate the check valve at the well tee and see if that helps. If that doesn't fix the water hammer, I may open the top of the wellhead and peer in (annoying, but not that hard). If I can't see a check valve (i.e. it's below the pitless), or if I see one, but can't see a way to replace it myself, I'll probably have to call in the driller.

Thanks,

Tenaya
 

Tenaya

New Member
Messages
15
Reaction score
0
Points
1
Location
Texas Panhandle
my guess is that is not a check valve but rather a relief valve.

You're probably right. I went out and took another look at it and what I mistook as a check valve has a short length of PEX to the drain in the closet - exactly what I should have expected for a relieve valve.

Having eliminated the relief valve, there's nothing that even remotely looks like a check valve anywhere in the closet.

Thanks for catching my rookie mistake.

When it gets a little dryer in the yard, I'll pull off the top of the well casing.

Is there any other way to resolve this issue that doesn't involve eliminating one of the check valves? Maybe some form of soft start?

Tenaya
 

Sarg

Enjoy Learning
Messages
228
Reaction score
51
Points
28
Location
Upstate New York
BTW, I really envy the kind of access shown in your picture. My pressure tank, plumbing, well tee, pressure switch, filter, etc. are all in the same utility closet as my 75 gallon water heater.

Just a FYI regarding my system ........ I have to empty & remove a sideboard and then take paneling down to get to it .......... The picture was in my garage before installation.

And I interpret your well report as showing three check valves --- at the pump ... at twenty feet and at the pitless adapter ......... Hope I'm wrong.

Also hoping that Valveman stops in and reads your thread ....... he's a valuable asset for "informed" information with decades of pump & valve experience.
 

Attachments

  • IMG_0178.JPG
    IMG_0178.JPG
    74.2 KB · Views: 224
Last edited:

Tenaya

New Member
Messages
15
Reaction score
0
Points
1
Location
Texas Panhandle
Just a FYI regarding my system ........ I have to empty & remove a sideboard and then take paneling down to get to it .......... The picture was in my garage before installation.

When we built this house, I was able to control an amazing number of tiny details that affect us on a regular basis, but this is one that got by us. My utility closet has a double door (that's good) that is narrower than the cabinet itself (that's not so good). I wish I had a sideboard and paneling I could remove when I need to do something in there. Fortunately I haven't had to do much thus far. When it eventually comes time to replace the water heater, it's gonna be a b1tch.

And I interpret your well report as showing three check valves --- at the pump ... at twenty feet and at the pitless adapter ......... Hope I'm wrong.

Me, too.

Also hoping that Valveman stops in and reads your thread ....... he's a valuable asset for "informed" information with decades of pump & valve experience.

Me, too.

Tenaya
 

LLigetfa

DIYer, not in the trades
Messages
7,507
Reaction score
581
Points
113
Location
NW Ontario, Canada
And I interpret your well report as showing three check valves --- at the pump ... at twenty feet and at the pitless adapter ......... Hope I'm wrong.
It depends on what they mean with "at 20 feet" If measured up from the pump, it would be fine but measured down from the top, not so good.
 

Boycedrilling

In the Trades
Messages
837
Reaction score
185
Points
43
Location
Royal City, WA
Good chance that the 1" pex from the well to the house is the culprit. Water velocity is too high.. 1" pex has approximately the same inside diameter as 3/4" pvc or poly pipe.
 

Boycedrilling

In the Trades
Messages
837
Reaction score
185
Points
43
Location
Royal City, WA
You want to keep your water velocity in a pipe, 5 feet per second or less. In one inch pex that means a maximum flow of about 8 gpm.
 

Tenaya

New Member
Messages
15
Reaction score
0
Points
1
Location
Texas Panhandle
Good chance that the 1" pex from the well to the house is the culprit. Water velocity is too high.. 1" pex has approximately the same inside diameter as 3/4" pvc or poly pipe.
You want to keep your water velocity in a pipe, 5 feet per second or less. In one inch pex that means a maximum flow of about 8 gpm.

OK, I'm confused (and a little scared).

  1. I was under the impression that fast up/down pressure ramps are what causes water hammer, not the absolute velocity of the water. Disclaimer: IANAPOD*
  2. If I understand the check valve issue correctly, and I'm not pretending that I do, multiple check valves interfere with the normal, somewhat gentle pressure ramp up/down as the pump starts and stops. The water hammer is actually caused by the resulting, momentarily higher pressure wave. I can't seem to connect that to operating water velocity/flow.
  3. It's also not at all clear that my system ever actually flows that much water. When the Inspection Report says 18gpm, I'm pretty sure that was with an open pipe - essentially zero pressure. The drilling crew most likely measured the flow by timing how long it took to fill a 5 gallon bucket.
  4. Under normal pressure (55/65 psi in my system), wouldn't the flow/velocity be lower? If so, by how much?
  5. When the pump starts filling the pressure tank (causing the first hammer), wouldn't the back pressure of the bladder (~55psi) suppress the flow/velocity? If so, by how much?
  6. The PVC drop pipe from the wellhead down to the pump is also 1". Is the velocity in that pipe also a problem?
  7. If too-high operating velocity actually IS my problem, how the heck could that possibly be fixed? Replace the 2hp 1" outlet pump with something smaller? Replace all the 1" pipe with some other size? Do I go larger or smaller? What should be done to the drop pipe?
Surely there must be a way of fixing this without spending thousands of dollars.

Tenaya

*(I Am Not A Plumber Or Driller)
 

Boycedrilling

In the Trades
Messages
837
Reaction score
185
Points
43
Location
Royal City, WA
I'm out of town, but I just looked at franklin pump curves online. If you do have a 2 hp franklin pump of ANY of any gpm rating, your pipe is grossly undersized. Even an 2 hp 8 gpm pump will flow 11 gpm or more at 50 psi, from your water depth. Your pump and your water lines were mismatched from the beginning.

Remember, when your pump turns on it is ALWAYS running at full flow. What water you are not using is going into the pressure tank. And it is just screaming down that little 1" pex line.

Best solution? Install a Cycle Stop Valve at the top of the drop pipe, inside the well. This valve will reduce the flow of water to whatever you are actually using. Velocity will drop to a fraction of what it is now.
 

Boycedrilling

In the Trades
Messages
837
Reaction score
185
Points
43
Location
Royal City, WA
Compare water velocity to driving a car. Your driving down the road at 30 mph. You hit the brakes, how far does it take to stop? Now the same thing at 90 mph. It takes a lot more than 3 times the distance to stop.
 
Top
Hey, wait a minute.

This is awkward, but...

It looks like you're using an ad blocker. We get it, but (1) terrylove.com can't live without ads, and (2) ad blockers can cause issues with videos and comments. If you'd like to support the site, please allow ads.

If any particular ad is your REASON for blocking ads, please let us know. We might be able to do something about it. Thanks.
I've Disabled AdBlock    No Thanks