unexpected toilet flange waste pipe connection

Users who are viewing this thread

Plumbledon

New Member
Messages
18
Reaction score
0
Points
1
Location
Maryland
DIY'er here, PVC toilet flange in basement was in very bad shape and could see it was a 4in flange with an inside coupling to waste line, at least that's what it looked like. Chipped out the flange and coupling hoping to duplicate the setup with a new parts. But what's down there is some kind of double walled PVC joint fitting? I guess a 5in to 4in reducer bushing? Unfortunately even with some heat to soften things, the fitting was brittle and chipped pretty bad in a few places. Would love some guidance...

Is this a 5 to 4 reducer bushing? Should I try to remove THAT also and replace it? If I have to chip out some concrete I will.

Or work with what's left there? The bushing has about 1.5in to insert a new coupling, where it's chipped-damaged its got about 3/4 of an inch left.

Other ideas? I'm all ears, thanks in advance
 

Attachments

  • Flange1web.jpg
    Flange1web.jpg
    135.7 KB · Views: 101
  • flange2web.jpg
    flange2web.jpg
    139.1 KB · Views: 108
Last edited:

Tuttles Revenge

In the Trades
Messages
4,205
Reaction score
1,459
Points
113
Definitely looks like a bushing in there. 5" isn't really a DWV plumbing fitting size so maybe 6x4? What is the depth to the horizontal? If its 5" pipe then maybe its made from pressure fitting? Which would be a tight 90.. so maybe they had a really shallow install and didn't realize they could use a closet ell fitting..

I would check with an inspection mirror, what the fitting looks like downstream. If it has a huge shelf where a large fitting reduces in size again. If that looks funky, then I'd consider opening the floor. If it looks regular and smooth, then maybe figuring a way to adapt to what you have.
 

Plumbledon

New Member
Messages
18
Reaction score
0
Points
1
Location
Maryland
Thanks for the input - yeah the bushing goes immediately to a 90deg elbow into the horizontal. There's a bit of a shelf at that joint (bushing to elbow) about 3/8in but there's a bit of a beveled lip on the bushing down there so dimensionally it's less than 3/8. You can just barely see the edge of the elbow fitting up top where some of concrete isn't filled in where the flange was, and if I take a tape measure to it, looks much closer to 5in OD than 6inOD.

If i try to work with what's there, is 3/4in enough in the spot where it's busted up from my work to seal a new fitting? i'll tapcon the flange in at the end for security.

also, if it is a 5in elbo, maybe I could remove the 4in inner wall of the coupling and get a piece of "street" 5in as a bushing (if it got that name right) and get down to 4 for the flange that way? I'm sure I'd have to get a few pieces and see up close what could work there.
 

Plumbledon

New Member
Messages
18
Reaction score
0
Points
1
Location
Maryland
OK having done some poking around it looks like what's down there is one of these:

flushbushing.JPG

...a 4-3 flush bushing, then they used a piece of 3in as a interior coupling to one of those inside/outside hub flanges over the 3in piece of pipe:
oatey.jpg


Must have gone that way because of the shallow depth of the drain? Seems like there would have been simpler options, like a piece of 4in pipe in the elbow and then a 4in Hub flange??

Still debating whether to chip some concrete, and remove that bushing and redo it. Or, if 3/4 in left on the damaged part of the old bushing is good enough, just clean things up and use what's there.... votes? Thanks again for any feedback!
 
Last edited:

Tuttles Revenge

In the Trades
Messages
4,205
Reaction score
1,459
Points
113
There is an option for any 3 or 4 configuration. Maybe the simplest cheapest might be to purchase an expensive Reem pipe reemer tool for 3" and clean up the bushing and glue in a new 3" flange
 

Plumbledon

New Member
Messages
18
Reaction score
0
Points
1
Location
Maryland
There is an option for any 3 or 4 configuration. Maybe the simplest cheapest might be to purchase an expensive Reem pipe reemer tool for 3" and clean up the bushing and glue in a new 3" flange
Thanks for the feeback, so would you say that 3/4in of surface (where the bushing is damaged in picture above, everywhere else there's still 1.5in) is ok to glue a new piece of pipe?
 

Tuttles Revenge

In the Trades
Messages
4,205
Reaction score
1,459
Points
113
If it has another 1" or more of gluing surface I'd be fine with it. No major gouges or other defects. You're going to bolt the flange to the floor so the bolts holding the toilet in place are tranfering load through those. We often cut flanges down for really shallow retrofits.
 

Plumbledon

New Member
Messages
18
Reaction score
0
Points
1
Location
Maryland
Getting there...was able to spend some more time on it this this weekend, I decided to get down to the 4in fitting and do it proper. Had to remove just a little bit of concrete to get clearance around the fitting. I chipped out the 3in part of the bushing (pic1), got a 4in "socket saver" (pic2) and tried that, but about 3/4in down stopped - looked to be taking too much material off hub fitting. So used a heat gun just enough to make the 4in pipe more forgiving and chipped out the rest (pic3). That worked pretty good, there's a full inch of pretty smooth surface to work with. I would have started with that but was spooked by the first try with the heat where it still broke the 3in part of the bushing and the fumes were pretty bad...this is a small space.

What's the word, think I'm in good shape here to proceed? any recommendations to get the most bite on this hub connection? Maybe just a thicker application of cement will give some bite on the area above from the socket saver?
 

Attachments

  • pic1-3inchout.jpeg
    pic1-3inchout.jpeg
    98.8 KB · Views: 76
  • pic2-socketsaver.jpeg
    pic2-socketsaver.jpeg
    39.4 KB · Views: 84
  • pic3-4inchout.jpeg
    pic3-4inchout.jpeg
    100.3 KB · Views: 80
Last edited:

Tuttles Revenge

In the Trades
Messages
4,205
Reaction score
1,459
Points
113
Good work! Those style of "socket savers" can be brutal. The one I linked will leave the hub factory fresh.. But.. for a flange I think you have enough material to work with so long as the riser and flange are firmly supported by the slab that you will fill in around with some form of mortar. Since you have the ability for 4" pipe coming up out of the ground now you can buy a closet flange that glues to the Inside of the pipe. you will be able to get mortar all around the pipe without worrying about getting a hub flange Over the pipe.
 

Reach4

Well-Known Member
Messages
38,899
Reaction score
4,436
Points
113
Location
IL
I would think about using 2-part epoxy instead of PVC cement, if you think you have to fill gaps. If you have a good surface for PVC cement even a quarter inch all of the way around, I would think PVC cement would be good. I am not a plumber, and I have little relevant experience.

Another idea strikes me: suppose you put in another 4 to 3 reducer using PVC glue. Then you drizzle 1-hour epoxy over the joint and it drops in to fill any actual leaks. Into that reducer you glue a piece of 3 inch PVC. You then use a 3 inch Push-Tite flange into that pipe. But before considering this, you would need to consider things. That flange needs a pretty long straight section. https://terrylove.com/forums/index....drain-pipe-on-3-steel-pipe.60569/#post-449676 are dimensions I took back when they sold a 3 inch Push-Tite that had a stainless steel ring. I have not tried seeking dimensions on the new all-plastic rings. You would need to be sure that a 3 inch pipe sticking down would not hurt the flow thru the elbow down there. From the photo it looks like that could be a problem.

Here is a similar idea, and this may be better: no adapter, but you glue in a 4 inch pipe. You use a 4inch pushtite or a 4 inch inside compression flange.
https://www.siouxchief.com/docs/def...nge-with-swivel-ring---pushtite.pdf?sfvrsn=10 (that looks shallower)

https://www.oatey.com/products/oatey-twistnset-replacement-closet-flange-1098867162 I did not find dimensions, but it looks longer. It is up to you to check out dimensions before going with one of these ideas.

In any case, if you glued in a 4 inch pipe, you could still apply epoxy. But could you get the 4-inch pipe deep enough?
 

wwhitney

In the Trades
Messages
6,567
Reaction score
1,847
Points
113
Location
Berkeley, CA
I chipped out the 3in part of the bushing (pic1), got a 4in "socket saver" (pic2) and tried that, but about 3/4in down stopped - looked to be taking too much material off hub fitting.
A comment on why your procedure didn't work, in case you or someone else is faced with a similar situation in the future.

A socket saver (even the expensive kind Tuttle recommended) has a guide bushing/plate at the front, with a cutting tool behind it. The guide bushing is sized to match the ID of a piece of pipe, and the cutting tool is sized to match the OD of a piece of pipe. The guide bushing keeps the tool concentric within a stub of pipe, and the cutting tool cleans out a hub. This should work when you have pipe going into a hub.

But in your application you had a 4x3 bushing going into a 4" hub, with a 3" pipe inside. The bushing was apparently hollow in the middle, and you chipped away the inner 3" portion of the bushing, leaving just the outer wall of the bushing.

Now if the outer wall of the bushing was the same thickness as a 4" piece of pipe, the socket saver tool should work as normally. But there's no reason to expect that to be true. Judging from the picture and that the tool took away too much from the hub, the ID of the outer wall of the bushing was a bit larger than the ID of a 4" pipe. So the guide bushing moved around inside the outer wall of the bushing, making the effective cutting diameter larger than the OD of a 4" pipe.

A possible solution to removing a bushing from a hub would be to use the style of tool that you did, that has interchangeable guide plates at the front, and use the 4" cutter with the 3" guide plate, attempting to cut out both the 3" pipe and the bushing all at once. That might require modification of the 4" cutter to increase the cutting portion inwards to the ID of a 3" pipe. And it would be taxing on the tool to remove all that material at once. But it might work.

Alternatively, if you could find or make a guide plate with the exact diameter of the ID of the outer wall of the bushing (assuming the part casting tolerances did yield a constant thickness wall), then your procedure would have worked with that guide plate.

Cheers, Wayne
 
Last edited:

Plumbledon

New Member
Messages
18
Reaction score
0
Points
1
Location
Maryland
.. for a flange I think you have enough material to work with so long as the riser and flange are firmly supported by the slab that you will fill in around with some form of mortar. Since you have the ability for 4" pipe coming up out of the ground now you can buy a closet flange that glues to the Inside of the pipe. you will be able to get mortar all around the pipe without worrying about getting a hub flange Over the pipe.
Thanks, yeah this is exactly the plan, fill it in and tapcon a proper stainless 4in flange.

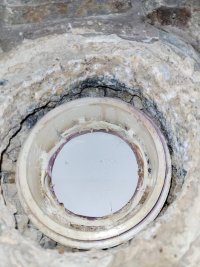
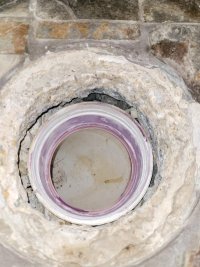
[Now if the outer wall of the bushing was the same thickness as a 4" piece of pipe, the socket saver tool should work as normally. But there's no reason to expect that to be true. Judging from the picture and that the tool took away too much from the hub, the ID of the outer wall of the bushing was a bit larger than the ID of a 4" pipe. So the guide bushing moved around inside the outer wall of the bushing, making the effective cutting diameter larger than the OD of a 4" pipe.]
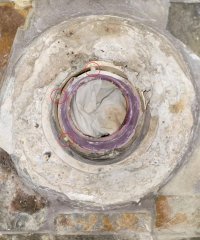
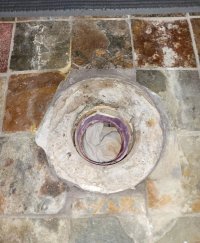
I think this is exactly the reason it didn't work for this particular fitting. I could see the play and was suspicious - visually the difference between this bushing wall thickness and standard 4 pipe is extremely small, so started and looked ok but it got progressively worse so I stopped, luckily with what I gather is still enough material to secure a new piece of pipe, it's very snug at that point.

A few observations/questions:

1. Reach4's suggestion of using 2-part epoxy - taking that in a slightly different direction. Use plastic epoxy (jb plastic weld or similar) to fill in the area's torn up from the socket saver before adding the new bit of 4in riser? It will be short, about 4.25in long, but enough to insert the closet flange.

2. I only mention the following because of the forces applied during the socket saver work and hammering with a chisel - This pipe run feels pretty solid under the slab, but it's short run, less than 3ft away from the main house septic drain. Taking a look, it's the elbow you see in the photo, to a short 1ft lateral run, then another fitting with a bend that probably connects it to the drain. There's is a tiny bit of vertical movement in this assembly at the elbo fitting i've been working on, maybe a 1/16in at most. Nothing lateral. I'm assuming not much to worry about regarding stresses on the pipe/fitting with so little movement in the pipe?

3. Seems like getting some drop in this pipe would have been a challenge with so little room to move up or down. Things obviously flow out of the pipe but there's a little bit of standing water left sitting on the bottom of the lateral run, maybe an 1/8, is this normal?

Really appreciate the feedback here, helps a lot!
 
Last edited:

Jeff H Young

In the Trades
Messages
8,954
Reaction score
2,235
Points
113
Location
92346
Id primer it and glue in a new ring heavy on the glue not like finger nail polish. 1/8 inch of water in the bottom? I wouldnt get too excited about it. Set it and forget it
 

Plumbledon

New Member
Messages
18
Reaction score
0
Points
1
Location
Maryland
Here is a similar idea, and this may be better: no adapter, but you glue in a 4 inch pipe. You use a 4inch pushtite or a 4 inch inside compression flange.
https://www.siouxchief.com/docs/def...nge-with-swivel-ring---pushtite.pdf?sfvrsn=10 (that looks shallower)

I really like the looks of these (from Reach4's post):
1674005886119.png

Since it often seems to be the failure point, and the reason I had to go to some much "trouble" here, after installing the 4in riser pipe I'm inclined to get one of these to put in it.. Any opinions from the seasoned folks here? That gasket hold up? Obviously still going to level the floor and tapcon it in.
 
Last edited:

Tuttles Revenge

In the Trades
Messages
4,205
Reaction score
1,459
Points
113
I haven't used any push fit gasketed flanges. So long as its into smooth pipe it should work.
 
Top
Hey, wait a minute.

This is awkward, but...

It looks like you're using an ad blocker. We get it, but (1) terrylove.com can't live without ads, and (2) ad blockers can cause issues with videos and comments. If you'd like to support the site, please allow ads.

If any particular ad is your REASON for blocking ads, please let us know. We might be able to do something about it. Thanks.
I've Disabled AdBlock    No Thanks