Tub to shower conversion drain/vent

Users who are viewing this thread

Messages
6
Reaction score
0
Points
1
Location
Ohio
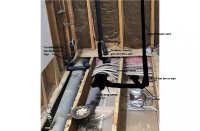
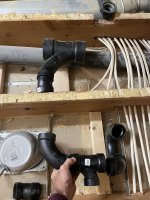
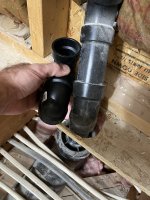
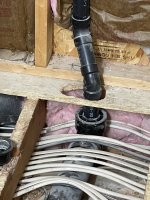
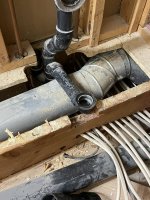
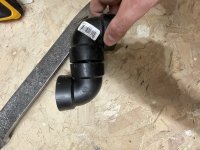
Does anyone see issues with the proposed plan of running 2” shower drain to toilet drain? This is a 2nd floor bathroom. I will have to move the toilet vent to go through the sole plate of the outside wall. The only way to get this to fit is to use 2 short 90’s to get the vent to line up under the wall stud. I will be adding a vent also coming off the shower drain with a sanitary tee turned backwards. This will go to the same outside wall and go up above flood and tie into the same vent. Attached are some photos to better describe my issues. once I figure out this out, I then to figure out how to cap the tub p-trap. Can I cut before the trap and cap off without issues or do you have to remove the trap? Its goes to the next room before going downward /upward to attic. Will the short 90’s be an issue with airflow? No issues draining before the wife embarked this task on me.
 

Attachments

  • 6F516BEC-3CB2-4BD3-89B8-B1983CE0ADDD.jpeg
    6F516BEC-3CB2-4BD3-89B8-B1983CE0ADDD.jpeg
    117.3 KB · Views: 138
  • 760B8764-0CD2-47AE-9172-505A7BC6A84B.jpeg
    760B8764-0CD2-47AE-9172-505A7BC6A84B.jpeg
    116.4 KB · Views: 127
  • 44049BFA-04ED-4DAF-94F6-F84448BCA9C0.jpeg
    44049BFA-04ED-4DAF-94F6-F84448BCA9C0.jpeg
    124.6 KB · Views: 135
  • EE9CAD64-7883-4B72-845E-C6F145B3B929.jpeg
    EE9CAD64-7883-4B72-845E-C6F145B3B929.jpeg
    137 KB · Views: 124
  • 22BFE180-FC76-45A1-9556-233FD3BD129D.jpeg
    22BFE180-FC76-45A1-9556-233FD3BD129D.jpeg
    105.6 KB · Views: 140

WorthFlorida

Clinical Trail 5th session completed 4/24/24.
Messages
5,763
Solutions
1
Reaction score
998
Points
113
Location
Orlando, Florida
Use this document especially for tees and wye's. The p trap will have to be removed if not used. A back up could place solids & water in the trap.

https://www.co.lincoln.or.us/sites/..._-_helpful_hints_residential_construction.pdf

BTW, too many holes for the wires and the floor joist strength maybe compromised. It most likely will fail an inspection. Were these already in place or part of the remodel?

What is code for drilling holes in floor joists?
Holes bored in joists shall not be within 2 inches (51 mm) of the top or bottom of the joist, and the diameter of any such hole shall not exceed one-third the depth of the joist. Notches in the top or bottom of joists shall not exceed one-sixth the depth and shall not be located in the middle third of the span.


    • Don't make any holes with a diameter greater than 1/3 the depth of a joist. ...
    • No holes closer than 2 inches to the top or bottom edge.
    • No holes closer than 2 inches to any other hole or notch.
    • No notches in the middle 1/3 of the joist, but holes are permitted here.

Screen Shot 2021-11-30 at 11.07.05 PM.jpg
Screen Shot 2021-11-30 at 11.09.16 PM.jpg
 
Messages
6
Reaction score
0
Points
1
Location
Ohio
Use this document especially for tees and wye's. The p trap will have to be removed if not used. A back up could place solids & water in the trap.

https://www.co.lincoln.or.us/sites/..._-_helpful_hints_residential_construction.pdf

BTW, too many holes for the wires and the floor joist strength maybe compromised. It most likely will fail an inspection. Were these already in place or part of the remodel?

What is code for drilling holes in floor joists?
Holes bored in joists shall not be within 2 inches (51 mm) of the top or bottom of the joist, and the diameter of any such hole shall not exceed one-third the depth of the joist. Notches in the top or bottom of joists shall not exceed one-sixth the depth and shall not be located in the middle third of the span.


    • Don't make any holes with a diameter greater than 1/3 the depth of a joist. ...
    • No holes closer than 2 inches to the top or bottom edge.
    • No holes closer than 2 inches to any other hole or notch.
    • No notches in the middle 1/3 of the joist, but holes are permitted here.

View attachment 79006 View attachment 79007

The wires were there from when the house was built in 1992. Everything in the house is original. I thought the same thing when I saw that.

Do you think I should try using 2 short 90’s back to back to get the vent to go up thru the sole plate? I don’t believe I have enough room to use 45’s.

also should the San tee I’m showing coming off the shower drain be a wye? I didn’t see any 1 1/2 vent wye at lowes. Plumbing supply store near me doesn’t stock ABS any longer.
 
Last edited:

Tuttles Revenge

In the Trades
Messages
4,205
Reaction score
1,459
Points
113
Anywhere the vent is below the flood level of the fixture its serving, it should be installed as though it were a drain (tho I did see an example in the reference that wayne linked to where they have a santee on its back as a toilet vent, which we do commonly in seattle, but still doesn't meet code technically) in this instance the vent fitting should be a 2x1.5" wye and the branch of the wye should be oriented as to take air off above the invert/top half of the horizontal so that its not getting flooded.

Showers have several complicating factors when trying to get them into joists. 1 the drain needs to be low enough in the joist to accommodate the vent taking off the top of the horizontal pipe.. 2 the drain needs to be high enough to not have the bottom of the trap sticking through the ceiling... and where you're drilling joists, as wayne pointed out you don't want to be drilling through the wrong spots of the joists.
 

wwhitney

In the Trades
Messages
6,567
Reaction score
1,847
Points
113
Location
Berkeley, CA
MSK do you think I should try using 2 short 90’s back to back to get the vent to go up thru the sole plate? I don’t believe I have enough room to use 45’s.
Short 90s would not be allowed, primarily because the vent can't go horizontal below the flood rim of the fixture. It needs to stay at least 45 degrees above horizontal. So two 45s would be your only option.

also should the San tee I’m showing coming off the shower drain be a wye?
What do you intend for the side entry on that san-tee? If that's the vent takeoff, the san-tee has to be rolled up 45 degrees above horizontal, minimum, and the san-tee is OK.

How about an overall view of the existing plumbing, with the location of the shower outlined (mark up the picture), as well as the location for the shower drain (typically the center)? Or a diagram showing the same information.

Cheers, Wayne
 

Tuttles Revenge

In the Trades
Messages
4,205
Reaction score
1,459
Points
113
Either you've managed to see the partial response I composed to the OP and subsequently skipped when I saw your response, or you are referring to a different thread. : - )

Cheers, Wayne

errr.. meant Worth...*Jeeesh*... I blame it on a lack of coffee

I seriously have a brain impediment this morning... 4th edit
 
Last edited:

Tuttles Revenge

In the Trades
Messages
4,205
Reaction score
1,459
Points
113
Short 90s would not be allowed, primarily because the vent can't go horizontal below the flood rim of the fixture. It needs to stay at least 45 degrees above horizontal. So two 45s would be your only option.

Drilling out the pipe from the bushing and using a street 45 might gain enough space too
 

wwhitney

In the Trades
Messages
6,567
Reaction score
1,847
Points
113
Location
Berkeley, CA
Drilling out the pipe from the bushing and using a street 45 might gain enough space too
That would be about the only option, and if the goal is to get the vent jog in picture #3 in the thread to be entirely in the floor/wall framing, it's easy to check if that would work: measure the height from the top of the bushing to almost the top of the lower hub on the 45, and then measure the highest point on the existing vent where it breaks the plane of the face of the wall framing, down to the top of the subfloor. If the second measurement is less than the first, it will work.

Cheers, Wayne
 
Messages
6
Reaction score
0
Points
1
Location
Ohio
Short 90s would not be allowed, primarily because the vent can't go horizontal below the flood rim of the fixture. It needs to stay at least 45 degrees above horizontal. So two 45s would be your only option.


What do you intend for the side entry on that san-tee? If that's the vent takeoff, the san-tee has to be rolled up 45 degrees above horizontal, minimum, and the san-tee is OK.

How about an overall view of the existing plumbing, with the location of the shower outlined (mark up the picture), as well as the location for the shower drain (typically the center)? Or a diagram showing the same information.

Cheers, Wayne

Here is a photo of the what I was trying to explain with the photos. The shower is 60" wide and I will like to to be as wide as possible. Plans are to make the finished curb 15" from the toilet flange. I haven't starting cutting yet, but its getting close.
 

Attachments

  • bath.jpg
    bath.jpg
    69.5 KB · Views: 133
Messages
6
Reaction score
0
Points
1
Location
Ohio
That would be about the only option, and if the goal is to get the vent jog in picture #3 in the thread to be entirely in the floor/wall framing, it's easy to check if that would work: measure the height from the top of the bushing to almost the top of the lower hub on the 45, and then measure the highest point on the existing vent where it breaks the plane of the face of the wall framing, down to the top of the subfloor. If the second measurement is less than the first, it will work.

Cheers, Wayne

Thanks for the response. I'm not sure I follow you on the measuring portion. Good description but I'm I'm just not understanding it.
 
Messages
6
Reaction score
0
Points
1
Location
Ohio
Drilling out the pipe from the bushing and using a street 45 might gain enough space too


I thought about this, but I don't have the drill bit. I will purchase if I can confirm it will work and its not a million bucks. The problem is if I screw up the 3" tee the vent is currently in, I'm screwed. I can't get to that tee from the floor side. I would have to cut into some walls down stairs in the family room and my wife would love that this time of year. LOL

Can anyone point me to a nice 1 1/2 bit that works and is not going to drill off center causing issues?
 
Last edited:

wwhitney

In the Trades
Messages
6,567
Reaction score
1,847
Points
113
Location
Berkeley, CA
As far as getting the current vent through the sole plate, another way of putting it is this: you can't change to 90s, you have to stick with the 45s. Tuttle's suggestion would have the effect of lowering both fittings until the bottom hub on the lower 45 is almost completely submerged into the bushing (because a street 45 has a spigot end that goes into the bushing instead of a hub). So that tells you how much you can lower the double 45 offset, and you can check if that is enough lowering to move it all into the floor system and wall framing, or if it would still stick out.

And if you measure and find that lowering the double 45 jog 1" less than that would still work, then you should be able to avoid drilling out the bushing and just install a new regular 45 tight to the bushing. One last way to improve things a little if necessary is to point your 45 directly at the wall, that gets you into the wall faster. Then once you're vertical in the wall, you'd need to use another pair of 45s to jog back to line up with the current vent.

As to the shower venting, you can't do what you've drawn. A dry vent has to take off at least 45 degrees above horizontal, and stay at 45 degrees above horizontal until 6" above the flood rim level of the fixture. (That's why the current vent jog has to stay with 45s instead of 90s).

The easy solution which the IPC allows but my code (UPC) doesn't is just to omit the vent. The IPC lets you join two trap arms and then provide a single dry vent, as long as each trap arm is separately within the length and fall limits. So if your shower trap arm can fall at 1/4" per foot, and you can get the centerline of the trap outlet no more than 2" above the center line of the 3" drain as it enters that san-tee with the bushing, that would be allowed by the IPC. I don't have any info on whether it would work well, as far as protecting the shower trap when you flush the toilet.

The possibly better option that would be required by the UPC would be to send the shower trap arm down the joist bay towards the wall with the current vent, put a san-tee under the wall with the vent rising up into the wall and joining your existing vent at least 6" above the WC flood rim, and open the wall below to join the shower drain to the existing 3" stack with a wye.

If it weren't for the wires there, there might be an option that involves sending the shower trap arm towards the wall and taking a vent off the horizontal trap arm near the wall, and then drilling the joist to cross over and connect to the san-tee or the 3" line just before the san-tee somehow. But I can't see drilling that joist above those wires, the joist is already overdrilled.

Cheers, Wayne
 
Messages
6
Reaction score
0
Points
1
Location
Ohio
My city does allow a 1 1/2 drain for a remodel with 1 shower head based on gmp of the shower head. This would be the easiest way to go if that stupid heating pipe wasn't there. I can't fit a new p-trap where the old tub one is and set the drain on the end of the shower for a linear drain due to the heating pipe.

I can set the p-trap at the center like I want and use a reducer at the drain to 1 1/2, but I don't want to that because if I go over the heating pipe, I wont not have the proper slop.

I'm still moving water line from vertical floor to routing them the the wall since the vanity has drawers on the bottom. I have a few days to try and figure out a plan before I'm ready to move to the shower.
 

WorthFlorida

Clinical Trail 5th session completed 4/24/24.
Messages
5,763
Solutions
1
Reaction score
998
Points
113
Location
Orlando, Florida
wwhitney may have a good suggestion about eliminating the vent. Another possibility is can you build out the back wall and lose 4.5"? 3.5" studs $ floor plate + 1/2" drywall + tile?

Vents can be 2" if you're having problems getting fittings for 1.5". For the floor joist, with 3/4" plywood rip lengths ~3" wide, then glue and screw them to the joist above or below the cables. A showers and tubs distribute the load differently and you want zero give or bounce under the shower.
 

wwhitney

In the Trades
Messages
6,567
Reaction score
1,847
Points
113
Location
Berkeley, CA
For the floor joist, with 3/4" plywood rip lengths ~3" wide, then glue and screw them to the joist above or below the cables.
This is a common suggestion, but I don't see why one would use plywood. A 1x would be stronger in bending as the grain goes the correct way. So as far as I can see using a 1x or 2x would be much better.

Cheers, Wayne
 
Top
Hey, wait a minute.

This is awkward, but...

It looks like you're using an ad blocker. We get it, but (1) terrylove.com can't live without ads, and (2) ad blockers can cause issues with videos and comments. If you'd like to support the site, please allow ads.

If any particular ad is your REASON for blocking ads, please let us know. We might be able to do something about it. Thanks.
I've Disabled AdBlock    No Thanks