Toto Fill Valve and Flapper change - and now a leak - maybe

Users who are viewing this thread

bls

New Member
Messages
22
Reaction score
0
Points
1
Location
Chicago, Illinois
First thanks to everyone on this forum. It is the best!

I spent the better part of today doing a "simple" change-out of a Toto fill valve and flapper.

I am not handy.

Everything went together eventually. However two things are not quite right.

In the picture attached, where the water shut off is, when all was back together, it leaked. I had to move the connector, so I figured that the nut (not sure if that is what it is called) loosened. I carefully tightened it and... it seems to have stopped leaking. I cannot pronounce the patient cured because event the slightest leak there is bad news.

May I ask if there is a DIY to determine, absolutely, that the connection does not leak? If a cell phone is dropped in water there is a piece of paper or something that changes color. Is there something similar out
there to ease my mind or is there another way?
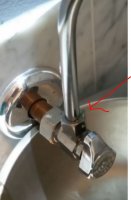
connector i tightened that was leaking but appears not to be - Copy.JPG

The Toto part also is behaving strangely, leaking from, the fill adjustment area as it fills. It stops when the
fill stops. Just in case anyone knows, I am attaching a picture of that as well.
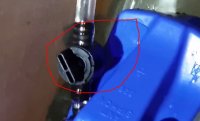
water comes from the circled area but stops when the fill valve shuts off - Copy.JPG

Other than that. Perfect.

I cannot thank everyone enough for reading this. Have a great weekend.
 

Terry

The Plumbing Wizard
Staff member
Messages
29,942
Reaction score
3,459
Points
113
Location
Bothell, Washington
Website
terrylove.com
If you snugged the compression nut on the stop and it quit leaking, you're fine. I sometimes lay a paper towel under it to see if any water drops down later.
The fill valve will leak about during refill. It's common and I don't worry about that. The water goes in the tank anyway.
 

WJcandee

Wise One
Messages
3,181
Reaction score
170
Points
63
Location
New York, NY
Yeah, I would say you did a good job! Putting half a sheet of paper towel under the wall valve will tell you whether it's continuing to leak. And if Terry says it should be fine, it should be fine. As to the refill thingy and drips, it looks like you have the hose pushed well onto the outlet of and inlet to the little adjuster, so a few drips are no big deal. The 528 has a few places where water will run off of it during refill, and that's usually normal because it's part of its anti-siphon construction. As long as it stops after the water shuts off, you're fine.

And Bravo on getting it together attaching the valve to a hard line. These days, most installations use a braided hose connector, which has a screw-on connector at each end and is easy to just...well...screw on. The plumber who installed the toilet used a hardline because most people think it looks a little better, particularly in a schwanky bathroom. (In NYC, it's actually required because it is a tad less prone to puncturing or bursting, and a water leak in a 500-unit building is going to cause a lot of damage.) (I know that a plumber installed your toilet because DIY people and handymen always use the braided hose because it's idiot-proof; installing a hardline properly takes some skill, but to an experienced licensed plumber, bending and positioning a hardline is nothing.) The hardline connection to the bottom of that valve is definitely-more-difficult for a DIY person to attach in a way that it doesn't leak. It's easier if (as here) you haven't taken off and reset the tank or toilet, but it's still often a bit of a challenge. Most DIY-ers who are changing a tank or toilet just unscrew the hardline at both ends and replace it with a braided steel hose, because doing so will save them quite a bit of time. Anyway, congrat's on making that work!
 
Last edited:

bls

New Member
Messages
22
Reaction score
0
Points
1
Location
Chicago, Illinois
I thank you both for the kind words and for the peace of mind.

It is funny that there seems to be no real source of detection, e.g., paper that permanently changes color, for very slow water leak.

So I made my own. Lightweight clumping cat litter in a pan. Just enough to cover the bottom.

The fitting is dry, so this is probably not needed. However, one tiny drop and you will know. I tested it. :)

Thank you again!
 

bls

New Member
Messages
22
Reaction score
0
Points
1
Location
Chicago, Illinois
Now I am answering my own post. That's never good.

I have a few more questions, however... I am not a plumber. I am not really handy. But first, If there is a way to reciprocate to this site, Terry, anyone who answers, please let me know. This is free advice from experts and I want to contribute if I can.

Here are the questions based on the other exactly the same Toto in my apartment. Same symptom, at shut off it screeches. So, this time, I'd like to be prepared better than I was yesterday.

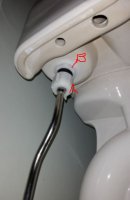
under - Copy.JPG
This picture above shows the underside of my next victim. Connector A comes off easily and is the one that connects the sold pipe to the toilet. Connector B, is locked. Toto says loosen with wrench and unscrew. I have no doubt that would work, but I sure messed up yesterday because I did not have a "wrench." May I ask, what kind of wrench to purchase? Man am I dumb.

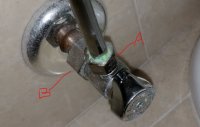
This picture below shows the compressing fitting (thank you for giving me the right name for this) and another connector. It has green mess on it. I am sure that is normal, but not that sure. This is Chicago municipal water. The real question is, about tools. May I ask what is used to turn the two connectors so I may purchase these tools as well?
green growth fittings - Copy.JPG

Finally... and this may be beyond the scope of this forum, but, maybe not. In my first attempt I turned the water on while the overflow hose was outside of the tank. So... it sprayed water for a few seconds on my painted drywall and pooled to the floor. I shut off the supply, wiped it up and ran a fan all night. I worry about mold. I have heard horror stories where an upstairs person has a flood and thanks to the way gravity works, one or two floors below, they have to tear out drywall. By floods I mean a complete water heater failure, and apparently someone left their water running in a sink, and left the house. This did not happen in my case. The water hit the outside of the drywall, made it wet, and then pooled on the floor. Question is... should I be worried about my drywall.

Thank you all. And you are helping someone who really needs it!

And seriously if there is some way to help the site, I am there. Thanks again.
 

Reach4

Well-Known Member
Messages
38,896
Reaction score
4,436
Points
113
Location
IL
I am not a pro.

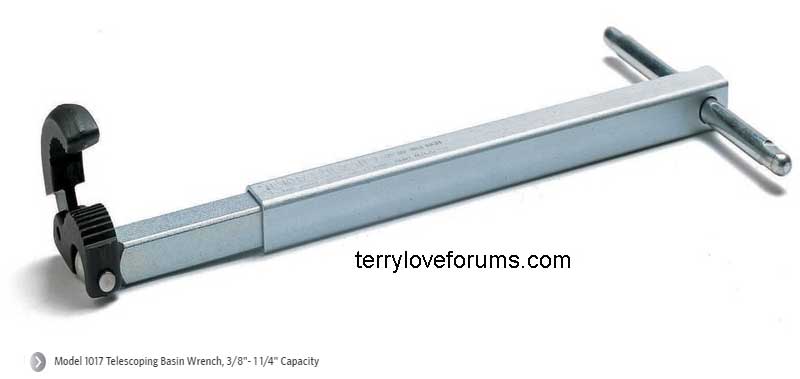
I would get a Milwaukee 9 in. Torque Lock Long Nose Locking Pliers for that white thing to unscrew. Others would prefer a "basin wrench".

The flex lines wjcandee discussed makes things easier.

On the bottom, the wrench you would usually use is a 5/8 open end wrench.

basin-wrench-ridgid.jpg
 
Last edited by a moderator:

bls

New Member
Messages
22
Reaction score
0
Points
1
Location
Chicago, Illinois
Thank you! I was a renter all my life. And I am ancient. But now I have a condo and... it's an asset I can provide to family. Hence learning these things help so much.

When I was a kid, and that is eon's ago, I rebuilt a carburetor. And it worked though I believe I had a part left over. No one knows what that is now.

But, this home stuff is similar to me and is good therapy. I think I'd draw the line on a wax ring.

Thanks again.
 

bls

New Member
Messages
22
Reaction score
0
Points
1
Location
Chicago, Illinois
Well this is moot. I just found it already kind of answered! Although the OP does not identify the tool (and it is a doozy), at least I am not the only one with this issue...

Sorry for the bother!
 

Jadnashua

Retired Defense Industry Engineer xxx
Messages
32,770
Reaction score
1,190
Points
113
Location
New England
The green gunk implies that there was a slow leak...over time, the mineral deposits can seal it if it isn't fast, but clean it off, and it will start leaking again. May have needed another 1/16th turn of the compression nut to make the seal.

If you are going to replace the fill valve, grab it and turn a little, if you also are trying to loosen the nut on the bottom, you'll probably get it to come loose. Otherwise, a slip joint pair of pliers usually works. It doesn't need to be super tight. If you have strong fingers and hand muscles, you may not need a pair of pliers to make a good seal. That nut doesn't usually actually have flat sides, and has nubs so you can grab it by those to tighten or loosen it. A new fill valve may or may not be exactly the same length, and the solid riser pipe may no longer fit. One reason why most people use flexible hoses. But, a solid connection is stronger.
 

WJcandee

Wise One
Messages
3,181
Reaction score
170
Points
63
Location
New York, NY
And I think Chicago, like NYC, technically requires hard lines. At least it used to. Delta had a toilet a few years ago with kind of a weird fill valve setup where the lines extended outside the tank (rather than just connecting at the tank), and they did a version for Chicago and NYC only that had hardlines. If you went to an HD in the city of Chicago, they would only sell you the version with hardlines; same with NYC.
 
Top
Hey, wait a minute.

This is awkward, but...

It looks like you're using an ad blocker. We get it, but (1) terrylove.com can't live without ads, and (2) ad blockers can cause issues with videos and comments. If you'd like to support the site, please allow ads.

If any particular ad is your REASON for blocking ads, please let us know. We might be able to do something about it. Thanks.
I've Disabled AdBlock    No Thanks