Replacing leaking shower supply pipe without opening wall

Users who are viewing this thread

tonyttt

New Member
Messages
12
Reaction score
0
Points
1
Location
Philadelphia, PA
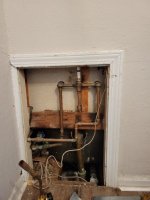
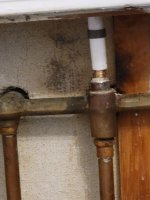
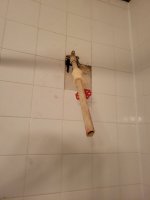
Does anyone have any tips on how to run a replacement shower supply pipe without opening the wall? I have access to the rear of the valve. I was thinking I would remove the copper supply line going to the shower from the valve, and install a pex adapter, run pex straight up the wall replacing the copper. I would attempt to remove the copper by dropping it a bit at a time and cutting sections as I go. The elbow does not appear to be tied in as the head moves front and back quite a bit. I would first cut the elbow off through the shower head hole and attach some line (to assist in snaking the pex) before trying to drop the pipe down. With the pex in place, I would tie in a new elbow, maybe trying to tie it to a cross member if there is one there. If there is no way to secure it, perhaps blow in foam to hold it in place.
Are there better ways to replace the line??
Thanks
 

tonyttt

New Member
Messages
12
Reaction score
0
Points
1
Location
Philadelphia, PA
Could not get the PEX run without opening the wall. need to replace a few tiles and figure out a way to secure the elbow at the top. The prior copper tube and elbow were not secured to any framing. The gadget in the picture threaded into the elbow is a section of scrap I had with a valve being used to pressure test the repairs, I didn't have a 1/2 plug available for the test. I should have opened the back wall but I try to avoid dealing with plaster.
 

Attachments

  • 20210914_134310_resized.jpg
    20210914_134310_resized.jpg
    77.5 KB · Views: 188
  • 20210914_134326_resized.jpg
    20210914_134326_resized.jpg
    76.6 KB · Views: 189
  • 20210914_134346_resized.jpg
    20210914_134346_resized.jpg
    51.4 KB · Views: 176
  • 20210914_134355_resized.jpg
    20210914_134355_resized.jpg
    35.8 KB · Views: 180

Dj2

In the Trades
Messages
2,611
Reaction score
258
Points
83
Location
California
From the pictures, I see that you have created a big mess.
How are you going to finish the tile work?
 

tonyttt

New Member
Messages
12
Reaction score
0
Points
1
Location
Philadelphia, PA
The tiles I used originally are standard white so it was not difficult to replace the backing, waterproof and replace the tiles. Its all back together. My one mistake was not checking the condition of the valves. I may have replaced the entire valve had I checked and found that the diverter and hot stem needed replacement. I purchased and installed a Danco kit which included stems, handles, trim and seats so this old Central Brass valve is good to go for a number of years.

My initial dream of disconnecting the copper shower supply riser from the valve, pushing it up and out of the way and running pex up to the existing shower head hole (without opening the wall) was a pipe dream but it all worked out.

I am happy that I went in through the tile side as opposed to the back wall since that wall faces the entry of the apartment and it would have been difficult to match the custom paint that was used on the wall.
 
Top
Hey, wait a minute.

This is awkward, but...

It looks like you're using an ad blocker. We get it, but (1) terrylove.com can't live without ads, and (2) ad blockers can cause issues with videos and comments. If you'd like to support the site, please allow ads.

If any particular ad is your REASON for blocking ads, please let us know. We might be able to do something about it. Thanks.
I've Disabled AdBlock    No Thanks