Plumbing layout of gutted Victorian for comment.

Users who are viewing this thread

Maine Way

Member
Messages
50
Reaction score
1
Points
8
Location
Maine
Hello All,

I've designed and drawn a sanitary drainage plumbing layout for a gutted Victorian which includes 4 bathrooms and a kitchen with prep sink. The PDF is a large format and if printed to scale is 1/4"=1'-0" scale. It won't fit on small paper so you will just need to zoom in on the computer screen. We follow UPC 2015 in my community.

Please provide comments as to possible code violations or general improvements in to design layout.

Additionally I have some specific questions which I could not clearly resolve by interpreting the code.

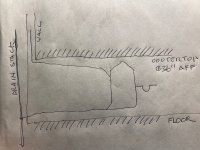
1. Kitchen sink has a loop vent whereas the drain and vent travel horizontally behind the cabinet and then to drain stack and up the wall respectively. Is there any issue to be aware of here, since most loop vents tie in directly below the floor?
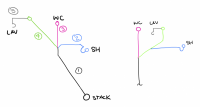
2. Do all 4 wet-vented bathrooms work? I was little unclear about the toilet being the last fixture to be vented and how that works. Bathroom Gr. 1 seems like the vent is downstream of toilet. But, I found examples on line of similar arrangements, so I am not sure if I understand the concept. Bathroom Gr. 4 uses a double tee fitting, also an example I found on line.
3. I believe I need a 4" horizontal drain to collect a number of smaller drains in the basement. Is it allowed to transition from 4" horizontal drain to 4" vertical? It seems like there may be a requirement to upsize pipe from horizontal to vertical in this case (which is not possible with existing sewer connection.)
4. When it comes to the spacing of santees on a vertical stack being fed by multiple horizontal drains, what is the rule for spacing and arrangement? (my drawing has this case feeding the main sewer connection).
5. Likewise for multiple wyes along a horizontal drain (also in my drawing).

Thank you in advance for your help!

Shawn
 

Attachments

  • PLUMB_PLAN.pdf
    81.4 KB · Views: 135

wwhitney

In the Trades
Messages
6,567
Reaction score
1,847
Points
113
Location
Berkeley, CA
As to the specific questions:

1) That wall behind the kitchen sink, it's all glass with no room in the mullions to run a 1.5" vent up? And what is the window sill height compared to the counter height? I wouldn't call what you need to do there a loop vent, since as you say that's for the further deviations from typical required by an island sink.

If you have enough space between the countertop and the window sills, then you can turn your vent horizontal at 6" above the sink flood rim, and that's perfectly normal. If can't get it up that high, then the UPC allows you turn horizontal lower where the usual minimum height is "prohibited due to structural conditions." That just requires that you plumb the portion lower than normal as a drain: make sure the horizontal section is pitched at 1/4" per foot back towards the drain, and use a LT90 when the vent turns up to vertical again.

2) The "toilet is last" rule means that if you are water draining down the lav drain/wet vent, the order in which the other fixture trap arms join in has the toilet as the last one. The length of those trap arms isn't relevant for the "toilet is last" rule, but they are limited as normal based on their size. In particular the toilet trap arm is limited to 6'.

3) I've never heard of needing to upsize when turning from horizontal to vertical or vice versa. A 3" drain line is limited to 3 toilets under the UPC, so at the point the 4th one comes in, the line needs to upsize to 4".

4) No rules, could be directly stacked with street san tees. There are rules for vertical wet venting, which means limits on the san-tees other than the top most one being use for the venting of a trap arm, but if the drains coming in are already vented, that wouldn't matter.

5) Likewise, no rules, could be one street wye connected to another wye directly.

Comments:

1) BR GRP 2, for the double sink, are you using separate san-tees behind each sink, with the drains joining in the floor system, and the vents joining each other at a height at least 6" above the sink flood rims? That would be fine. If that shower has two shower heads, then it counts as 3 DFUs, and with 2 DFUs coming in from the double lav, you could need to upsize the horizontal wet vent to 3", starting at the point the shower drain is connected.

2) BR GRP 3 feels a bit awkward, would you be able to move the vertical 3" drain through the story below to the other side of the doorway into BR GRP 1, and would that help? Even with the current location, I think you could eliminate one or two bends on the shower drain, let me know if you'd like me to sketch something out.

3) BR GRP 1, is the WC trap arm under 6'?

4) BR GRP 4, I don't quite grok what you have drawn. If that's a flat double wye, there's some controversy around them. The branch inlet slope will be at best 70% of the slope of the barrel, if you have carefully ensured the two inlets are at the same elevation. So to me, that means you can use them if and only if the barrel slope is at least 3/8" per foot. But others have other interpretations, you should check with your building department. Because of the "toilet is last" rule, you don't have the option to use two separate wyes, which would be the usual alternative, at that lets you adjust each branch inlet slope independently. But you do have other options.

5) What's happening with the PREP SINK? Is the side of that stair case solid? If so, it seems to me you may need to do a conventional vent, as it's not really an island sink.

Cheers, Wayne
 

Maine Way

Member
Messages
50
Reaction score
1
Points
8
Location
Maine
Hello Wayne,


You really slogged through my whole list and then some! Thank you!

I’m going to mirror comments off your item numbers.


As to specific questions:


1. The mullions are solid. There is a sill shelf only a few inches higher than the countertop with a backsplash, but outlets are planned there. I had pictured doing a loop vent, but instead of running down below the floor from the loop, run the drain and vent horizontally until they could discharge or vent. See figure 1.


2. This is a good way to think of the rule. Most confusing to me was the symmetrical fitting (such as BR GR 4) where they seem to enter all at the same time. So, simultaneous or last seems to be more the rule in this case, but as you say, controversial. I found this on line (see figure 2)

3. I went and reread the portion that confused me. 706.2 describes symmetrical fittings used for horizontal to vertical transition of flow require change of 2 pipe sizes. You are correct; this does not apply to my case.

4. Roger that.

5. Roger that.

Comments:

1. Yes. Drains will run in floor, and each vent will join to the drain at 6” above sink rim. Each vent will be joined in attic. I’ve decided on independent vents running up the wall to avoid drilling through most of the 2x3 stud wall horizontally and to open up the wall more surgically. I can feed the pipe from the ground floor and slide it up the wall to the attic. Shower has one head. I counted DFU wrong. We should be at 7 DFU for the group. SO the 2” will handle the 2 lavs and the shower then…


2. I went through so many layouts for this room! The stack is located in a doorway that is being closed off, and the wall can be built out at that location. The other side of the door is closed already, and only a 2x3 wall (true 2x3 but still won’t fit pipe). If you have a sketch to reduce fittings please send along!


3. Good call! In counting the horizontal length it is just at 6’. If I count the closet bend vertically it is over. Although the width of the pipe would reduce the length compared to the line drawing? Or always counted to centerline? I will study carefully on site. I may have some wiggle room, such as moving the toilet from the exterior wall. I have extra room there with 25 inches from CL of toilet to shower.

4. This technical advice is helpful. The arrangement includes several tricky slope considerations, and no sure thing that the code guy is on board. Additionally, there is the difficulty of getting everything to come together at the same spot. I’ll think this through again.

5. I was looking at a loop vent there. The drain will vent back up through the stair wall. The drawing I submitted in confusing since it is a flat plan. The curved and of stair wall will take the vent up to the roof.


Another question:

Because the toilet is so close to the basement wall in BR GR 1, I have added the wye for cleanout AFTER the closet bend. Does that work both from a functional standpoint and code standpoint? I guess you could not rod the bend.
 

Attachments

  • FIGURE1.jpg
    FIGURE1.jpg
    101.6 KB · Views: 122
  • FIGURE 2.png
    FIGURE 2.png
    129.4 KB · Views: 123

Jeff H Young

In the Trades
Messages
8,953
Reaction score
2,234
Points
113
Location
92346
on w/c vent length is measured from inner edge of vent along centerline of pipe following around the 90 to top of flange. or you could just say top of flange to edge of vent
Sketch in post 3 figure 1 I dont think is a proper island sink vent BTW dont forget clean out on foot vent.
 

Jeff H Young

In the Trades
Messages
8,953
Reaction score
2,234
Points
113
Location
92346
Maine way, You mentioned something about w/c on 3 inch line . 4 w/c on a vertical 3 inch stack and on the horizontal you are allowed only 3 w/c Some provisions allow 4 w/c on a horizontal 3 inch line if this is something you are interested in we can find out about your area. But Im talking general UPC code
 

wwhitney

In the Trades
Messages
6,567
Reaction score
1,847
Points
113
Location
Berkeley, CA
Q1) I'd say it's only a loop vent if the vent has to physically turn downwards at some point. Like on a true island sink, where the vent can't emerge into the aisle from the side of a cabinet. I don't see any need to do that for the Kitchen Sink or the Prep Sink. You just need to comply with the rules for turning horizontal at an elevation below 6" above the flood rim:

https://up.codes/viewer/california/ca-plumbing-code-2019/chapter/9/vents#905.3
[Linking to CA version of UPC as up.codes doesn't have the ME version of the UPC.]

So you don't need the loop like in your drawing, it can be loop-free.

C1) Minor terminology point, the vent starts at the top of the san-tee behind the sink, not at 6" above sink rim. The latter is the lowest elevation at which vents can combine or go horizontal.

C2) What is the size of the joists and which way do they run? Drilling through joists for a 3" drain line is prescriptively limited to 2x12s and larger, although there are reinforcement products for drilling through 2x10s or 2x8s. And drilling through at a 45 is probably to be avoided.

C3) See Note 2 to Table 1002.2. You start measuring at the closet flange.

https://up.codes/viewer/california/ca-plumbing-code-2019/chapter/10/traps-and-interceptors#1002.2

AQ) I'm not knowledgeable about cleanouts, maybe Jeff can answer.

Cheers, Wayne
 

Jeff H Young

In the Trades
Messages
8,953
Reaction score
2,234
Points
113
Location
92346
AQ about the clean out in regard to w/c If you get a c/o close to end withen a few feet generaly 5 foot is alowable a closet auger will handle the closet bend. shouldnt be any issue
 

Maine Way

Member
Messages
50
Reaction score
1
Points
8
Location
Maine
AQ about the clean out in regard to w/c If you get a c/o close to end withen a few feet generaly 5 foot is alowable a closet auger will handle the closet bend. shouldnt be any issue
Think you! That's important to know it will work.
 

Maine Way

Member
Messages
50
Reaction score
1
Points
8
Location
Maine
Q1) I'd say it's only a loop vent if the vent has to physically turn downwards at some point. Like on a true island sink, where the vent can't emerge into the aisle from the side of a cabinet. I don't see any need to do that for the Kitchen Sink or the Prep Sink. You just need to comply with the rules for turning horizontal at an elevation below 6" above the flood rim:

https://up.codes/viewer/california/ca-plumbing-code-2019/chapter/9/vents#905.3
[Linking to CA version of UPC as up.codes doesn't have the ME version of the UPC.]

So you don't need the loop like in your drawing, it can be loop-free.

C1) Minor terminology point, the vent starts at the top of the san-tee behind the sink, not at 6" above sink rim. The latter is the lowest elevation at which vents can combine or go horizontal.

C2) What is the size of the joists and which way do they run? Drilling through joists for a 3" drain line is prescriptively limited to 2x12s and larger, although there are reinforcement products for drilling through 2x10s or 2x8s. And drilling through at a 45 is probably to be avoided.

C3) See Note 2 to Table 1002.2. You start measuring at the closet flange.

https://up.codes/viewer/california/ca-plumbing-code-2019/chapter/10/traps-and-interceptors#1002.2

AQ) I'm not knowledgeable about cleanouts, maybe Jeff can answer.

Cheers, Wayne
Q1. Ah. OK! That is clear now. Thanks!
C1. That's an important clarification.
C2. I should have clarified: there is a 9' ceiling blow, so I will make my run under that ceiling and bring the height down to 8'-0" in the small bathroom. So I have carte blanche on the runs there.
C3. Roger that.
AQ. Jeff did help!
Thanks!
 

wwhitney

In the Trades
Messages
6,567
Reaction score
1,847
Points
113
Location
Berkeley, CA
On bathroom group 3, you could try something like this, I think it uses a couple fewer bends than what you've drawn. I drew the LT90 as a pair of 45s. And the trap is just drawn as a line, the right angle near the shower drain is just meant to be the swivel joint of the trap between the u-bend and the outlet elbow.

Cheers, Wayne

BR3.jpg
 
Top
Hey, wait a minute.

This is awkward, but...

It looks like you're using an ad blocker. We get it, but (1) terrylove.com can't live without ads, and (2) ad blockers can cause issues with videos and comments. If you'd like to support the site, please allow ads.

If any particular ad is your REASON for blocking ads, please let us know. We might be able to do something about it. Thanks.
I've Disabled AdBlock    No Thanks