Need to replace part of cast iron vent stack in my attic bathroom

Users who are viewing this thread

jak85

New Member
Messages
29
Reaction score
0
Points
1
Location
Florida
I noticed some rusting on the undersides of both waste lines and decided to replace them with PVC, unfortunately they ended up breaking under the torque of my pipe wrench. The male thread is broke off inside the female thread of the drain T, but I'm not sure that there's even much thread left on that drain T to make it worth my while trying to get the broken piece out of there...they have a decent amount of rust build up.

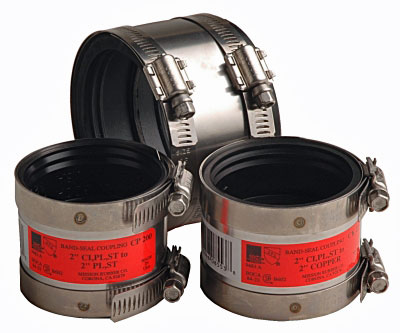
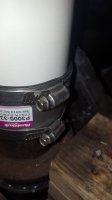
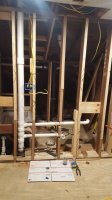
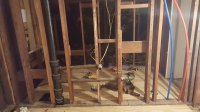
I'm thinking my best option is to cut the stack off at some point below the lowest T and convert it over to PVC. I've never worked on cast iron before, so I was hoping you guys might give me some pointers on how you might approach this. I've noticed there are rubber fittings that fit inside the cast iron pipes as well as the rubber couples with hose clamps. Looking at the picture, where would you make your cut at and what fittings would you use to convert over to PVC?

If the picture doesn't show enough, starting from the bottom, there is a 4" piece of extension pipe, that then connects into the lower drain T, that then connects to the upper T and then I've got another 5ft of cast iron pipe up to the roof.

EDIT: Also, I just read that I might be able to just bust out the lead/oakum joint of the hubs instead of cutting the pipe, does that sound possible in my situation?
 

Attachments

  • 20161117_191041.jpg
    20161117_191041.jpg
    70.5 KB · Views: 1,377
Last edited:

Dj2

In the Trades
Messages
2,611
Reaction score
258
Points
83
Location
California
You can rent a Ridgid cast iron cutting chain tool at HD for the day or for the hour.
A grinder w/steel wheel works well too.
Cut your 4" pipe just below the lower T.
Use Fernco style connector from CI to PVC.
 

Terry

The Plumbing Wizard
Staff member
Messages
29,942
Reaction score
3,459
Points
113
Location
Bothell, Washington
Website
terrylove.com
mission_bandseal.jpg


Measure the old cast iron. New cast is 4-3/8" OD. Some old cast will be 4-1/8" OD, which is considered a copper size.
So for the copper sized cast, I use a Mission CK44 or a PK44 coupling.
 

jak85

New Member
Messages
29
Reaction score
0
Points
1
Location
Florida
I've removed the old cast iron from the area dj2 suggested, couldn't get the chain around the pipe without removing the framing so I just used a diamond saws-all blade. The cut is pretty smooth, but a little uneven. The CI pipe is a little uneven at the seams, it appears shifted about 1/16" in both directions at the seams, you can see that in the new pictures I posted. I'm thinking I should try and grind the two little "ears" flat to make for a smoother surface for the rubber coupling?

The CI is about 3-1/4" diameter and the Fernco PlumbQwik P3000-33 I bought earlier is 3-1/2" diameter, same as 3" PVC (I assume my CI pipe is the copper size?). I'm not sure if Home Depot sells the copper sized CI couplings, I'll have to do some research. Actually, one of the local plumbing supply stores might have that, but I'd have to wait until Monday.

Would a 4 band mission coupling be preferable over a 2 band? I'm just a little worried about the outside of the pipe not being smooth enough for a tight fit, I've seen some people use silicone caulking to help make a tight seal, any thoughts on that?

I looked at the CK33 and PK33 and one is for 3" copper to 3" plastic and the other 3" copper to 3" CI, are these actually the same sizes just labeled differently?

Edit: OK I'm thinking the actual diameter of this CI pipe is 3-3/8", it just varies a little due to the shift of the cast seam.

20161204_152543.jpg

20161204_152610.jpg
 
Last edited:

jak85

New Member
Messages
29
Reaction score
0
Points
1
Location
Florida
How vital is it that the inner middle lip of the no hub coupling sit flat on the top of the CI pipe? my cut is off level by about 3/16" and so the lip does not touch all of the CI pipe.
 

jak85

New Member
Messages
29
Reaction score
0
Points
1
Location
Florida
Is there a preferred method of testing these fittings for leaks other than "wait and see"? I was thinking I might get one of those inflatable pipe plugs so that I can have a small pool of water sitting on the fitting and see if any leaks out, however the inside of my CI pipe is rough and I don't see it making a good seal to hold the water in.
 

Terry

The Plumbing Wizard
Staff member
Messages
29,942
Reaction score
3,459
Points
113
Location
Bothell, Washington
Website
terrylove.com
No hub couplings will hold ten feet and a little more of head. In multi story buildings we tested no more than two floors at a time.
The balloon would test the fitting above that. You don't need it for more time that it takes to check the joints.
 

Terry

The Plumbing Wizard
Staff member
Messages
29,942
Reaction score
3,459
Points
113
Location
Bothell, Washington
Website
terrylove.com
The question would be where would it be placed. It can get messy when the balloons are pulled out. And you want to make sure the change and ring are being held onto. When the air is released, water starts going everywhere. They do make some that use a cleanout fitting that work well at containing that.
 

jak85

New Member
Messages
29
Reaction score
0
Points
1
Location
Florida
The 4 inches of pipe I have in that picture above is sticking out of the hub of an elbow. I figure I just need to get the plug at least a few inches down the pipe, enough to hold some water above it to check for leaks. I am mainly concerned with testing the CI side of the coupling, so I intend to test the connection before doing any PVC plumbing above the cut. I'll test it again after I connect the PVC to the coupling if possible with this plug.
 

jak85

New Member
Messages
29
Reaction score
0
Points
1
Location
Florida
I'm back at it this weekend. I've installed the coupling and am getting ready to leak test it, but I'm a little concerned about overtightening. I used my torque wrench set a 60ftlbs but the bolt/screw portion if the hose clamp started to lean outwards once I got close to the 60# mark. The tops are leaning away from the coupling and the bottoms are digging in a bit. Is this normal? I can still hand tighten the hose clamps a little with just a screw driver, so it leads me to believe it can't be that tight.
 

Attachments

  • 20161210_113422.jpg
    20161210_113422.jpg
    39.2 KB · Views: 909

jak85

New Member
Messages
29
Reaction score
0
Points
1
Location
Florida
I'm off to a good start this morning. Looks like I'm off to buy another coupling. Thanks for the quick reply.
 

jak85

New Member
Messages
29
Reaction score
0
Points
1
Location
Florida
The special fernco wrench is like $80, so I think I'm going to try a DIY torque wrench, measure 1ft down the wrench from the head and apply a 5lb weight hanging from a string at the one foot mark. we'll see how that works. Thanks for the tip.

pasco-torque-wrench.jpg
 
Last edited by a moderator:

Terry

The Plumbing Wizard
Staff member
Messages
29,942
Reaction score
3,459
Points
113
Location
Bothell, Washington
Website
terrylove.com
I've done miles of no-hub cast. I used to use the torque wrenches, but after a while I found that any handheld nut driver was working fine for me.
You don't need to overthink this.
 

jak85

New Member
Messages
29
Reaction score
0
Points
1
Location
Florida
Yeah it seems a little ridiculous, I just want to reduce the chances of a leak as much as possible. I was able to still hand tighten the bolt even at 60 foot lbs, so that's what has me a little worried.
 

jak85

New Member
Messages
29
Reaction score
0
Points
1
Location
Florida
So what would take a pro less than an hour I have finally finished (I hope). It's actually a good thing that this happened because I got to lower the kitchen waste line to 15" and raise the bathroom waste line to 23". I didn't realize earlier that I would have never gotten a disposal under my kitchen sink if I left the waste line as high as it was.

I put about a 1/4" per foot slope on the waste lines, bathroom line has a bit more of a slope, but since there won't be much solids going through that line I don't think it will matter. I used the long sweep elbows, but the female ends will end up sticking out past the drywall about 1/2", hopefully that's not an issue. I also ended up pitching the elbows very slightly upwards because I wasn't sure if making them level was code or not and couldn't find any info on it (if it even really matters).
 

Attachments

  • 20161210_200619.jpg
    20161210_200619.jpg
    73.7 KB · Views: 1,005
Top
Hey, wait a minute.

This is awkward, but...

It looks like you're using an ad blocker. We get it, but (1) terrylove.com can't live without ads, and (2) ad blockers can cause issues with videos and comments. If you'd like to support the site, please allow ads.

If any particular ad is your REASON for blocking ads, please let us know. We might be able to do something about it. Thanks.
I've Disabled AdBlock    No Thanks