Kitchen remodel, new sink backs up & drains very slow

Users who are viewing this thread

Randall Herron

New Member
Messages
29
Reaction score
2
Points
3
Location
Virginia
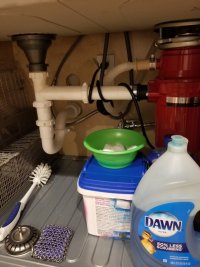
We're on the tail end of a full kitchen remodel and just had a new sink installed with a new garbage disposal this weekend. The old set-up never had draining issues but the new set-up is backing and drains very slowly. The main drain (in the wall) was disconnected for several weeks but capped so there shouldn't have been anything introduced into the line to cause a clog. Below is a list of differences in the new set-up plus a photo. The one thing that I'm not sure about

-new sink is several inches deeper than the old one
-new GD is on the right side, old was on the left
-new American Standard GD - old one (very old) was Emerson
-basically the same plumbing layout was used just reversed, except new drain from GD is straight out. The old one used the turn down.
-new set-up has about a 3" long vertical extension added in between the trap and the elbow that goes into the wall. (I'm thinking this is the source of the issue)

20220821_203549-1.jpg
 

Tuttles Revenge

In the Trades
Messages
4,193
Reaction score
1,449
Points
113
The drain is stubbed out of the wall too high to drain the disposal. Someone either didn't let the plumber know the depth of the sink in relation to the counter or they didn't measure.

However, that in itself shouldn't cause the sink to drain slowly. There may be some other obstruction downstream causing a slow drain.

sink_dw.jpg
 

All Fug Duck

Member
Messages
35
Reaction score
1
Points
8
Location
Florida
Yup, drain is too high. that will cause you issues down the road too. once you make sure the line isn't restricted, you'll need to maybe forget the disposal altogether. then find two shallow basket strainers for the left and right side to give you more height. cut the PVC at the wall and install a WYE and 45 with traps for each drain. that or cut the wall and drop the drain down a few inches so you can keep the disposal. these are the headaches Plumbers deal with all the time, good luck!
 

Reach4

Well-Known Member
Messages
38,882
Reaction score
4,433
Points
113
Location
IL
Try working around this by pushing in one of the flaps on the disposal splash shield.

Longer term solution is to either get rid of the disposal, or lower the drain port. Or replace the sink with one that has a shallower bowl for disposal. If the piping goes down at the trap adapter, then lowering the trap adapter will be easier than you might think. If the drainage goes sideways, typically because of a window above the sink, that lowering gets more involved. Is there a basement under the kitchen? A new drain line thru the bottom of the cabinet, into the basement or crawlspace, would also solve the problem.

Were you your own general contractor? I think the general contractor gets the blame.
 
Last edited:

Randall Herron

New Member
Messages
29
Reaction score
2
Points
3
Location
Virginia
T.R. and A.F.D, thanks for your replies. Your info is not what I wanted to hear but exactly what I thought I would hear. The thought of cutting into my brand new cabinet makes me ill.
Reach4...I've actually removed the splash shield completely and it made no difference. I don't think replacing the sink is going to be an option. It's brand new and my wife absolutely loves it. She'd give up the G.D. 100 times over swapping the sink out. I'm pretty certain the drain goes straight down into the basement and is a straight run across so it won't be too bad to lower it, I just really don't want to cut up my new cabinet.
Right now my plan is to, first snake the drain...just in case one of the little ones thought it would be fun to see how far something like a hot wheels car would make it in. Then temporarily pull out the G.D. to see how bad the wife really misses it. It doesn't get used all that much. If she can't live without, then a cuttin' I will go. And yeah...I'm definitely the one to blame.
Thanks for everyone's help!!
 

Terry

The Plumbing Wizard
Staff member
Messages
29,942
Reaction score
3,459
Points
113
Location
Bothell, Washington
Website
terrylove.com
Just a little current history on plumbing.
For decades kitchen sinks were 7" and maybe 8" deep. We used to rough the drains in at 19" above the plywood floor.
Then kitchen designers decided that sinks should be 10" deep. As homeowners started changing out countertops, they would also go with the new, really cool 10" deep sinks. Seemed like a good idea.
Now the plumber goes into to install using the old 19" high drain, and it really should have been moved down to 16" or lower for the new sink. Most of the time, the old plumbing came in from the side at a horizontal. The only way to have changed it was before the cabinets went in. And even then, it involved a lot of drilling into studs there were bearing walls. This confusion will now be going on for decades as people update their kitchens. A new 10" deep sink draining into a drain at the wall that was only meant for an 8" sink at best.
In the homes of the 1920's before anyone had a disposer, the drains were even higher.
 

Randall Herron

New Member
Messages
29
Reaction score
2
Points
3
Location
Virginia
Just a little current history on plumbing.
For decades kitchen sinks were 7" and maybe 8" deep. We used to rough the drains in at 19" above the plywood floor.
Then kitchen designers decided that sinks should be 10" deep. As homeowners started changing out countertops, they would also go with the new, really cool 10" deep sinks. Seemed like a good idea.
Now the plumber goes into to install using the old 19" high drain, and it really should have been moved down to 16" or lower for the new sink. Most of the time, the old plumbing came in from the side at a horizontal. The only way to have changed it was before the cabinets went in. And even then, it involved a lot of drilling into studs there were bearing walls. This confusion will now be going on for decades as people update their kitchens. A new 10" deep sink draining into a drain at the wall that was only meant for an 8" sink at best.
In the homes of the 1920's before anyone had a disposer, the drains were even higher.
That's exactly the situation I'm in...a 10" deep sink. Plus it's an under mount so I'm loosing even more. Oh well, at least it can be remedied with a little more time and $$. Thanks!!
 

Tuttles Revenge

In the Trades
Messages
4,193
Reaction score
1,449
Points
113
Cutting the back of the cabinet isn't really that big of a deal. Similar issues happen more frequently than you might think.

Get a new back panel of similar veneer that is as larger or larger than the panel there now. Remove the angle stops and electrical trim. Lower the drain appropriately and add a cleanout above the drain. Then trim the new panel to snugly fit left and right but short enuf that you can slide it in and not see the top. cut out holes and squares for the drain, electrical and water lines where needed and press it in.. maybe tack it in a couple spots with brad nails. Use the factory finished edges on the bottom and one side to reduce oddity in the edges.
 

Randall Herron

New Member
Messages
29
Reaction score
2
Points
3
Location
Virginia
Cutting the back of the cabinet isn't really that big of a deal. Similar issues happen more frequently than you might think.

Get a new back panel of similar veneer that is as larger or larger than the panel there now. Remove the angle stops and electrical trim. Lower the drain appropriately and add a cleanout above the drain. Then trim the new panel to snugly fit left and right but short enuf that you can slide it in and not see the top. cut out holes and squares for the drain, electrical and water lines where needed and press it in.. maybe tack it in a couple spots with brad nails. Use the factory finished edges on the bottom and one side to reduce oddity in the edges.
Hey T.R.,
That's kind of my plan. I hadn't thought about a clean out though. That's a great idea. I have a little time to think it through properly since my next step is onto the back splash. Hope to have that done by the weekend and maybe tackle the plumbing over the weekend. I really appreciate your...and everyone's help. Don't know what a DIYer would do without forums like this! I'll let y'all know how it goes once I get it done. Pic's and all. ;)
 

WorthFlorida

Clinical Trail on a Cancer Drug Started 1/31/24. ☹
Messages
5,761
Solutions
1
Reaction score
997
Points
113
Location
Orlando, Florida
Kitchen sinks are generally under a window or an island, sometimes on an interior wall. If there is a wall on the other side or on an island, opening the wall from the other side can allow access. It may be easier than having to cut through a new cabinet.
 

Randall Herron

New Member
Messages
29
Reaction score
2
Points
3
Location
Virginia
Kitchen sinks are generally under a window or an island, sometimes on an interior wall. If there is a wall on the other side or on an island, opening the wall from the other side can allow access. It may be easier than having to cut through a new cabinet.
That's a great idea but I'm SOL on that one. It's under a window of an exterior wall. Good advice nonetheless.
 

Reach4

Well-Known Member
Messages
38,882
Reaction score
4,433
Points
113
Location
IL
For your thinking, pull the trap, and look into the trap adapter. Are there paths up and down (easiest), or is there a path left/right?
 

Randall Herron

New Member
Messages
29
Reaction score
2
Points
3
Location
Virginia
I just wanted to give everyone an update to the status of this project. Hopefully it will be helpful to someone in the future. After following Reach4's advice and checking the direction of flow I realized that the drain did not go straight down like I originally thought...it actually runs left about 24", then down into the basement (which has a drop ceiling). This was not the scenario I was hoping for but there is some good news. The exterior wall in which the pipe is enclosed is part of a recessed front porch. This section of the house is the only portion covered with vertical cedar siding. The siding can be semi-easily removed...just have to go slow and cautious not to damage the wood, it is 32 years old. I will be tackling this in the somewhat near future...after the interior remodel is completed. I'll be back with an update as to how the job went. Big thanks again to everyone. I love this forum!
 

Reach4

Well-Known Member
Messages
38,882
Reaction score
4,433
Points
113
Location
IL
Another option is to install a new drain thru the bottom/floor of the cabinet. The trap would be vented with an AAV under the cabinet.

Importantly, the transition from vertical to horizontal in the drop ceiling would be a long sweep or two 45s.

The way you are planning would be more elegant, and would preserve space under the sink. But the new drain thru the floor would be fully functional.
 

Randall Herron

New Member
Messages
29
Reaction score
2
Points
3
Location
Virginia
Well, it's done. I wanted to post this in case it could possibly help someone in the future. Again, all the help/advice has been much appreciated!!
- As I mentioned the outer wall is covered in vertical cedar siding which was the first step in the fix. Thanks to a few choice videos on the WWW I was able to remove/replace it with no damage to any of the boards.
- Next I removed a large enough section of sheathing to allow ample room to work
- cut out the old lines
- hole saw for the new lines. the stud spacing required a coupler to be installed
- installed the new line about 4"-5" below the old
- patched the old hole in the sheet rock (glued (liquid nails) a piece of sheet rock over it)
- I actually glued (wood glue) the hole saw plug back into the hole that was left from the old line. It was almost a perfect fit.
- replaced the insulation & screwed the panel back into place
- taped the house wrap back into place and replaced the siding
In all it took about 6 hours to complete...not counting my trip to the big box store. The majority of time was spent on removing and replacing the siding and as you can see from the photo I have plenty of fall now and the new sink is draining...well, like new.
 

Attachments

  • 01.jpg
    01.jpg
    73 KB · Views: 141
  • 02.jpg
    02.jpg
    80.6 KB · Views: 132
  • 03.jpg
    03.jpg
    104.4 KB · Views: 151
  • 04.jpg
    04.jpg
    105.1 KB · Views: 150
  • 05.jpg
    05.jpg
    83.5 KB · Views: 155
  • 06.jpg
    06.jpg
    83.6 KB · Views: 149

Terry

The Plumbing Wizard
Staff member
Messages
29,942
Reaction score
3,459
Points
113
Location
Bothell, Washington
Website
terrylove.com
The 90 at the end should have been a medium 90. It looks like a 90 without any sweep there like you might use on a vent, or a water fitting, not made to be a waste fitting.

Nice job though on lowering the trap arm and fixing the draining issue. :)
 

Tuttles Revenge

In the Trades
Messages
4,193
Reaction score
1,449
Points
113
The 90 at the end should have been a medium 90
I've had inspector tell me they should be Long Sweeps!! But if that is the worst mistake, its still an improvement that will take only 4hrs to fix with what was learned. Fortunately that 90 is before the waste has had much chance to make up its mind which way to go.
 

Reach4

Well-Known Member
Messages
38,882
Reaction score
4,433
Points
113
Location
IL
What does 05.jpg represent? I think it represents how you think the pipes in the wall currently are. If that is the case, and if there is drainage coming in from the right, I don't think that is how it is supposed to be.

On the other hand, 04.jpg looks pretty good, except for your needing that medium or long bend at the wall. You could also come out of the wall with a 45, but that does not look as dressy.
 

Terry

The Plumbing Wizard
Staff member
Messages
29,942
Reaction score
3,459
Points
113
Location
Bothell, Washington
Website
terrylove.com
I've had inspector tell me they should be Long Sweeps!! But if that is the worst mistake, its still an improvement that will take only 4hrs to fix with what was learned. Fortunately that 90 is before the waste has had much chance to make up its mind which way to go.
When did they go to long sweeps there? I've been doing service and quit doing new work like I used to do.
 

Randall Herron

New Member
Messages
29
Reaction score
2
Points
3
Location
Virginia
The 90 at the end should have been a medium 90.
I can't believe I did that. I actually had the correct one but in my haste installed the regular 90. How much of a problem might this create? I can replace it easy enough but probably won't have a chance to get to it until spring time.
What does 05.jpg represent?
That photo just shows where I taped my house wrap back together before putting the siding back up. Really didn't need to include that one I guess.
 
Top
Hey, wait a minute.

This is awkward, but...

It looks like you're using an ad blocker. We get it, but (1) terrylove.com can't live without ads, and (2) ad blockers can cause issues with videos and comments. If you'd like to support the site, please allow ads.

If any particular ad is your REASON for blocking ads, please let us know. We might be able to do something about it. Thanks.
I've Disabled AdBlock    No Thanks