How to connect this plumbing - part 2

Users who are viewing this thread

Sqrjay

New Member
Messages
20
Reaction score
0
Points
1
Location
CO
I got help in another thread (https://terrylove.com/forums/index.php?threads/how-to-connect-this-plumbing.97145/) for what I think was the more complicated problem. I also am looking for suggestions on how to connect a toilet, bathtub/shower, and a vent.

IMG_2648.jpg


Originally, the 3" pipe was below the joist. The goal is to move them up to run through the joists.

They originally started at the WC, then connected vent and then tub. I don't think I have the space without putting some bends in to connect them the same way between the joist. The WC is between one pair, and then the vent and tub is between the next 2 joists.

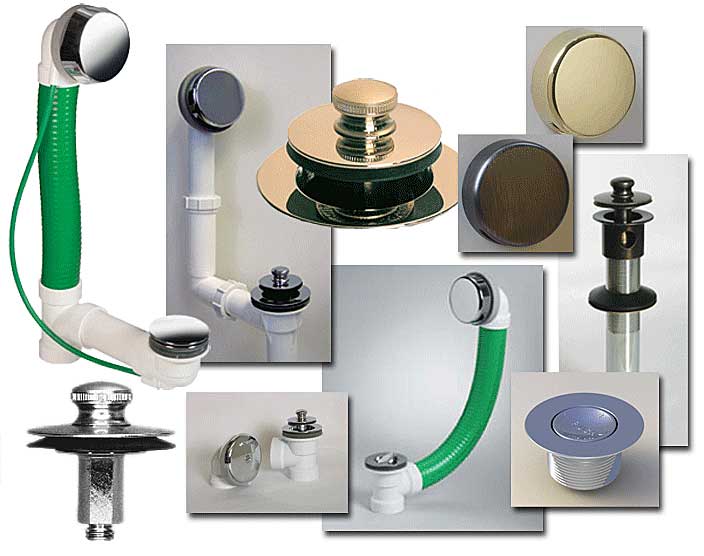
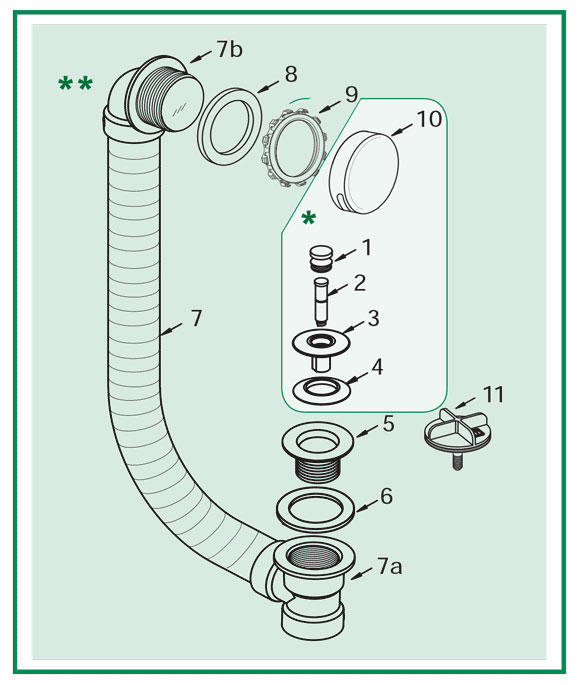
I wanted to reinforce the notch under the tub drain. The part looks like this:

skyline-building-solutions-floor-joist-notch-repair-kit-210nr-repair-and-reinforcing-notched-2x10-and-12-joists-for-offset-toilet-flange-or-running-utilities-through-openings-29630164_110x110@2x.png


That means it will be blocking the edge by 6 inches. So I think I need to angle stuff away from the wall and tie it together, then have it bend back to the edge to make the connection a few joists down. I'm just not sure what the best way to do this would be and hoping someone has an idea.
 

wwhitney

In the Trades
Messages
6,567
Reaction score
1,847
Points
113
Location
Berkeley, CA
I think sticking with the original thread would be clearer, but I'll respond here.

What is the depth of the notch at the tub? If the joists are 9" deep, a notch is allowed to be 1.5" deep by 3" wide (scale by joist depth D, so D/6 x D/3 in general). If your notch is no bigger than that, you don't need the reinforcement. And I'm not sure if your notch reinforcement product can be installed over the hole reinforcement product you'll need for a 3" pipe through a 2x10. Also, your hole will need to be 2" away from the notch, which I would interpret conservatively as having a 2" horizontal length of joist that is full depth without any holes or notches.

Leaving aside the notch for the moment, you don't want to try to run the 3" line diagonally through the joists, it needs to be perpendicular. So other than some possible jogging you do in the first joist bay, you need to pick a line and stick with it (possibly jogging downstream within another joist bay if necessary). That line needs to avoid the notch (by 2"), avoid the tub drain, and pass close enough to the vent location. If the drain passes directly under the vent, then you'd preferably use an upright combo for the connection, but the IPC (which CO uses) would all you to use a san-tee on its back for the vent takeoff, which I would suggest only if the combo doesn't fit. If the drain passes alongside the vent, then you can roll your combo or san-tee on its back 22.5 or 45 degrees and hit an elbow to go vertical and connect to the vent. So the use of a 45 and rolled san-tee is a limit on far away from the vent the WC drain can pass bay.

Then you'd take your tub trap and arrange it so that the outlet is parallel to the WC drain and at a very slightly higher centerline elevation (maybe 1/4"), and not super close to it The tub drain can go through the nearby joist, and then hit a horizontal 45 to a horizontal wye in the tub drain (which will impose a minimum separation between the two parallel drains, the smallest you can go is a street 45 directly into the wye). Hopefully both fittings will fit in one joist bay. That wet vents the tub via the WC, which the IPC allows.

Cheers, Wayne
 

Sqrjay

New Member
Messages
20
Reaction score
0
Points
1
Location
CO
I think sticking with the original thread would be clearer, but I'll respond here.

What is the depth of the notch at the tub? If the joists are 9" deep, a notch is allowed to be 1.5" deep by 3" wide (scale by joist depth D, so D/6 x D/3 in general). If your notch is no bigger than that, you don't need the reinforcement. And I'm not sure if your notch reinforcement product can be installed over the hole reinforcement product you'll need for a 3" pipe through a 2x10. Also, your hole will need to be 2" away from the notch, which I would interpret conservatively as having a 2" horizontal length of joist that is full depth without any holes or notches.

Leaving aside the notch for the moment, you don't want to try to run the 3" line diagonally through the joists, it needs to be perpendicular. So other than some possible jogging you do in the first joist bay, you need to pick a line and stick with it (possibly jogging downstream within another joist bay if necessary). That line needs to avoid the notch (by 2"), avoid the tub drain, and pass close enough to the vent location. If the drain passes directly under the vent, then you'd preferably use an upright combo for the connection, but the IPC (which CO uses) would all you to use a san-tee on its back for the vent takeoff, which I would suggest only if the combo doesn't fit. If the drain passes alongside the vent, then you can roll your combo or san-tee on its back 22.5 or 45 degrees and hit an elbow to go vertical and connect to the vent. So the use of a 45 and rolled san-tee is a limit on far away from the vent the WC drain can pass bay.

Then you'd take your tub trap and arrange it so that the outlet is parallel to the WC drain and at a very slightly higher centerline elevation (maybe 1/4"), and not super close to it The tub drain can go through the nearby joist, and then hit a horizontal 45 to a horizontal wye in the tub drain (which will impose a minimum separation between the two parallel drains, the smallest you can go is a street 45 directly into the wye). Hopefully both fittings will fit in one joist bay. That wet vents the tub via the WC, which the IPC allows.

Cheers, Wayne
The notch is 2 1/4" deep and 4" wide. So I guess I will have to add that reinforcement.

I'm curious why you shouldn't run diagonally through the joists? I was just saying I would connect it all and then if it did line up where the connection will be in the partition wall, then I'd go diagonal between 2 joists and then make a straight shot from there.

I'm going to have to reread this a few times. I thought this would be the less complex one...
 

wwhitney

In the Trades
Messages
6,567
Reaction score
1,847
Points
113
Location
Berkeley, CA
You could run diagonally through joists if you really had to, it's just hard to drill a diagonal hole, and the net removal of material is greater (although only wider, not deeper, which is good).

Cheers, Wayne
 

Sqrjay

New Member
Messages
20
Reaction score
0
Points
1
Location
CO
You could run diagonally through joists if you really had to, it's just hard to drill a diagonal hole, and the net removal of material is greater (although only wider, not deeper, which is good).

Cheers, Wayne
Okay, that makes more sense. I should have been more clear. I wasn't actually going to drill diagonal holes. I was just going to use 45 to angle it right after a joist, then another 45 to straighten it back out before the next joist. The holes would be straight through.
 

Sqrjay

New Member
Messages
20
Reaction score
0
Points
1
Location
CO
Okay, so I have to use the joist reinforcer on the notch plus the joist reinforcer to do the whole for the 3" ABS. That pushes me out about 16", because of how they are designed.

IMG_2652.jpg


I marked up an idea, but maybe this isn't the best idea. I believe the connections could be made, but I'm not sure if it is right.

IMG_2648 copy.jpg


I'd connect the tub into the vent first, then that to the WC in white. The orange line down a few joists would be moving it back into place to make the connections in the partition wall.
 

wwhitney

In the Trades
Messages
6,567
Reaction score
1,847
Points
113
Location
Berkeley, CA
The dry vent has to come off the drain on the vertical, which means plumb or up to 45 degrees off plumb.

Those reinforcements each are two pieces, right? I think it's fine to nest the two tracks one inside the other, so you could get the notch and the hole closer.

Also, that orange jog back wouldn't be required, assuming you could do it in the wall instead. Is the wall a 2x6 wall?

Cheers, Wayne
 
Last edited:

Sqrjay

New Member
Messages
20
Reaction score
0
Points
1
Location
CO
The dry vent has to come off the drain on the vertical, which means plumb or up to 45 degrees off plumb.

Those reinforcements each are two pieces, right? I think it's fine to nest the two tracks one inside the other, so you could get the notch and the hole closer.

Also, that orange jog back wouldn't be required, assuming you could do it in the wall instead. Is the wall a 2x6 wall?

Cheers, Wayne
Correct, the reinforcements are 2 pieces. I had not even considered nesting them. I can call the company that makes them and ask if this would be an acceptable application. If so, then that means I only need to be out about 6" from the edge of the notch - or possibly even less.

The wall is built with 2x4 not 2x6.

I am not understanding what you mean that the dry vent has to come off the drain on the vertical. Are you just saying it needs to come in from the top or at most 45 degrees off plumb? If so, then my idea above wouldn't work since I'm coming in 90 degrees. I attached the original plumbing, and it does come in from top. I'm really frustrated that whoever did that notch overcut it so much for no reason.

IMG_2593.jpg


If I left a gap between the notch repair and the hole repair reinforcements, then I could drill a hole and pass the tub to the next set of joist. This would be similar to what was there before -

IMG_2648 copy 2.jpg


Would something like that work? That would for sure give more room to work getting everything connected by not being limited to the space between just 2 joists.
 

wwhitney

In the Trades
Messages
6,567
Reaction score
1,847
Points
113
Location
Berkeley, CA
I am not understanding what you mean that the dry vent has to come off the drain on the vertical. Are you just saying it needs to come in from the top or at most 45 degrees off plumb? If so, then my idea above wouldn't work since I'm coming in 90 degrees.
Correct. Which is why I mentioned nesting the reinforcements, so you could get the 3" horizontal WC drain closer to the notch, so you have some chance of hitting your existing vent before emerging through the floor, by coming off the WC at 45 degrees off plumb. If there's a wall above parallel to the joists, you also have the option to open that wall up and come through the floor in a different location with the vent, although you couldn't change stud bays within a 2x4 wall with a 3" vent.

Wayne
 

Sqrjay

New Member
Messages
20
Reaction score
0
Points
1
Location
CO
Correct. Which is why I mentioned nesting the reinforcements, so you could get the 3" horizontal WC drain closer to the notch, so you have some chance of hitting your existing vent before emerging through the floor, by coming off the WC at 45 degrees off plumb. If there's a wall above parallel to the joists, you also have the option to open that wall up and come through the floor in a different location with the vent, although you couldn't change stud bays within a 2x4 wall with a 3" vent.

Wayne
There is a wall parallel to the joists above there between the toilet and tub/shower. I will have to open it up and see if I could reroute the vent to come out on the other side. That would be perfect, because it could come straight down into the 3" from the WC. Assuming that works out, then could I connect in the tub on the next set of joists similar to how it was before?
 

wwhitney

In the Trades
Messages
6,567
Reaction score
1,847
Points
113
Location
Berkeley, CA
A couple more comments: Do you need the notch to remain for your tub plumbing? If not, then if you contact that manufacturer, you could ask them if you could just install their hole repair over the notch and if that would reinforce it as well (possibly also nesting the other repair flange). Likewise, since that one hole product is intended for both 2x8 and 2x10, you ask about installing the hole repair product with the top flange a bit lower than the top of the joist, if you do need to maintain part of the notch.

Also, if you want to the tub drain in the next joist bay, you can get a tub waste and over flow when the combined pipe comes down below the drain, rather than below the overlow.

Cheers, Wayne
 

wwhitney

In the Trades
Messages
6,567
Reaction score
1,847
Points
113
Location
Berkeley, CA
Assuming that works out, then could I connect in the tub on the next set of joists similar to how it was before?
Yes, that's what I originally drew, as the joist bay with the vent is congested. Your tub trap arm extends from the tub trap outlet to the wye where the tub joins the WC that is wet venting the tub, and that tub trap arm has to fall at 1/4" per foot, while falling no more than one pipe diameter overall (to the point of hitting that wye). So maximum length 6' for a 1-1/2" trap/trap arm, 8' for a 2" trap/trap arm, if you get perfect 1/4" per foot fall.

Cheers, Wayne
 

Sqrjay

New Member
Messages
20
Reaction score
0
Points
1
Location
CO
I forgot I had that wall opened up already. I wouldn't be able to just move the vent easily in the wall since the shower stuff is in there. It is a super tight space above there in the attic, but I could just run a new vent on the other side of the shower controls and have it come out further from the wall. It is starting to seem like maybe that is the best way to go though.

As far as do I need the notch - I'm not sure. I was just trying to keep it since it was there. Would it work routing the overflow down and then through the joist, tie into drain and then add the ptrap in the next set of joists? I'm starting to feel stupid for missing some these things.

IMG_2653.jpg
 

wwhitney

In the Trades
Messages
6,567
Reaction score
1,847
Points
113
Location
Berkeley, CA
Would it work routing the overflow down and then through the joist, tie into drain and then add the ptrap in the next set of joists?
That's a very good question, I'm not sure I know the answer, so perhaps someone else will comment.

I think that would be OK, it might be hard to find the correct parts to do that. You'd need a drain shoe that just goes straight down. The ones I've seen are either a 90, or a tee with the outlet down (to put the combined waste and over flow below the drain rather than below the overflow).

Also, you already have that notch there, so you'd have to repair it with a suitable repair that you could drill a new hole through, since the notch is lined up with where you would need the hole. That could be done with a sufficient length of 2x10 sistered on, with a sufficient quantity of structural screws on either side of the notch. Unfortunately, the values of "sufficient" in both those cases aren't something you can look up somewhere, typically you'd have a structural engineer calculate it.

So I think it's probably simplest to keep the notch and take advantage of it. If you use a waste and over flow with the tee part below the drain, then you don't have to drill the notched joist for the combined waste and overflow. E.g. here's one (not a recommendation):

https://www.plumbingsupply.com/direct-bathtub-drains.html

Cheers, Wayne
 

Sqrjay

New Member
Messages
20
Reaction score
0
Points
1
Location
CO
I think I'm going to put that part on hold for now.

I got up there with fittings just to play around and see what fits, and now I realize I'm going to have to hit that vent right over the run from the WC. That is really the only way to fit it. If I try to put in a 45, then I'm going to be too far down the bottom of the joist to make it slope the rest of the run.
 

Sqrjay

New Member
Messages
20
Reaction score
0
Points
1
Location
CO
That's a very good question, I'm not sure I know the answer, so perhaps someone else will comment.

I think that would be OK, it might be hard to find the correct parts to do that. You'd need a drain shoe that just goes straight down. The ones I've seen are either a 90, or a tee with the outlet down (to put the combined waste and over flow below the drain rather than below the overflow).

Also, you already have that notch there, so you'd have to repair it with a suitable repair that you could drill a new hole through, since the notch is lined up with where you would need the hole. That could be done with a sufficient length of 2x10 sistered on, with a sufficient quantity of structural screws on either side of the notch. Unfortunately, the values of "sufficient" in both those cases aren't something you can look up somewhere, typically you'd have a structural engineer calculate it.

So I think it's probably simplest to keep the notch and take advantage of it. If you use a waste and over flow with the tee part below the drain, then you don't have to drill the notched joist for the combined waste and overflow. E.g. here's one (not a recommendation):

https://www.plumbingsupply.com/direct-bathtub-drains.html

Cheers, Wayne
This became a lot more difficult project than I initially thought!

So I have the new vent now moved to the other side of the shower head on the floor above.

From the toilet, I have a long sweep 90 into a 60 and 1/16 to get it headed in the right direction through the joist. This lines it up in between the next 2 joists to get the vent from a san tee. In the next set of joists, I’ll have the tub drain connect.

Originally I was thinking of using 2 45’s between 2 joists - twice - to get it lined up where it needed to go down near the partition wall. Now I wonder if that is not such a good idea having that many turns on a horizontal line.

I got up there and played around with the fittings and realized I don’t need to do that. I could just let that 3” line run straight, and then I have just enough room to turn it into the wye with the other toilet. A 45 to move it to the left to miss the hot water, then a 90 to turn down, and then a final 45 to line up with the wye.

If I go this route, then the 2” shower from the other side would come in right where this 3” comes in. So I’m thinking I’ll just turn it where it starts similar to how I did the toilet at the beginning of the initial side and then have it run through the joists close to the wall. Then it would have only a 90 to go straight down into the wye to catch the new stuff and then down into the existing drain.

IMG_2729.jpg


Does this sound reasonable? I honestly couldn’t have done this without your help!
 

wwhitney

In the Trades
Messages
6,567
Reaction score
1,847
Points
113
Location
Berkeley, CA
Does this sound reasonable?
Sounds reasonable, a couple comments:

I'm leery of 60s because they have the curvature of a regular quarter bend, unlike 45s and 22.5s, which have the curvature of LT 90s. Can you not just point the LT 90 (quarter bend) at a 45 degree angle to the joists and use a single 45? Or if it would hit the joist too soon, use a 45 and a 22.5?

As far as avoiding the hot water line at the other end, can you not just pick a slightly different line through the joists that would avoid the need for the first 45? A LT90 going down and a 45 to connect to the wye should work with most any line you pick through the joists. And while it's not the neatest, you could pick a line through the joists that's at a slight angle to perpendicular, maybe a couple degrees, and that way drift a couple inches left or right as you go through the joists. Although it would make layout of the holes a bit trickier.

I didn't quite follow the comment about the shower, but I expect what you said is reasonable.

Cheers, Wayne
 

Sqrjay

New Member
Messages
20
Reaction score
0
Points
1
Location
CO
watco_tub_drains.jpg


The tub drain to overflow like this?

watcoflex-2.jpg
It looks like the top left one.

I was looking for something like:

watco-515-direct-drain-tubular-polypropylene-md.jpg


But, the joist is already notched, and I'm just going to live with what is already there.
 

Sqrjay

New Member
Messages
20
Reaction score
0
Points
1
Location
CO
Sounds reasonable, a couple comments:

I'm leery of 60s because they have the curvature of a regular quarter bend, unlike 45s and 22.5s, which have the curvature of LT 90s. Can you not just point the LT 90 (quarter bend) at a 45 degree angle to the joists and use a single 45? Or if it would hit the joist too soon, use a 45 and a 22.5?

As far as avoiding the hot water line at the other end, can you not just pick a slightly different line through the joists that would avoid the need for the first 45? A LT90 going down and a 45 to connect to the wye should work with most any line you pick through the joists. And while it's not the neatest, you could pick a line through the joists that's at a slight angle to perpendicular, maybe a couple degrees, and that way drift a couple inches left or right as you go through the joists. Although it would make layout of the holes a bit trickier.

I didn't quite follow the comment about the shower, but I expect what you said is reasonable.

Cheers, Wayne
Yeah, with a single 45 it would hit the joist way too soon. I just checked and a 45 and a 22.5 would actually work perfect.

I like your idea of just a slight angle all the way down to eliminate that last 45. I was so focused on getting it perpendicular to the joist and having a straight line that I didn't even think of that. What would be the best way to do that? I'm thinking just get a long piece of string and a couple of tacks and tack them at start and finish and then mark the joists on that line where the center needs to be. The joist support I have allows up to a 6" hole to be put in it - I'm not going that big, but I can definitely go big enough for it allow this to pass at a slight angle.

On the shower - I was just saying now that I have the 3" running down from this way - at the partition wall it was going to meet head on with the 2" from the shower coming from the other side of the partition wall. I'm just angle it at the beginning and have a straight shot instead to the main line near the wall.

I feel like I'm finally getting close to being able to do some actual work on this. I've been taking it slow so that I make sure I get the joist supports and holes in the right spot since I don't want to mess that up and still need another hole!
 
Top
Hey, wait a minute.

This is awkward, but...

It looks like you're using an ad blocker. We get it, but (1) terrylove.com can't live without ads, and (2) ad blockers can cause issues with videos and comments. If you'd like to support the site, please allow ads.

If any particular ad is your REASON for blocking ads, please let us know. We might be able to do something about it. Thanks.
I've Disabled AdBlock    No Thanks