My thoughts:
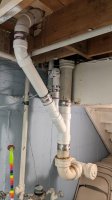
Don't use the pressure 45s, they don't have the required radius, you need DWV fittings.
On the vent takeoff, you have it vertical, have you confirmed that if you stick a street 45 in the wye branch inlet pointed towards your vent stub down you'll reach there low enough to fit in a 45 elbow? If you need just a little more height, you could use a street reducing wye in the 3" wye. You could also rotate the wye, but that will complicate the in plan vent layout considerably. You may need to use 2 more Ferncos to connect up the vent.
On the main question, I suggest sticking with the pic 1 layout, you almost got it. The closet flange center point and the 3" stack center line defines a plane, and I trust you are putting the wye branch and the 45 side bend on the closet flange within that plane? Then it's a 2D problem to get everything lined up, you can do it.
I suggest the following approach: dry fit everything with nothing solvent welded and the closet flange not screwed down. (Well, the 3" wye on the stack should have its stub ends solvent welded, and the Ferncos should be snug enough to hold the wye in the correct final position). For the dry fit, don't try to insert the pipe all the way into the hub at each connection; just insert it enough to ensure it is coaxial and not cocked. So you're going to be cutting pipe pieces that are temporary just for layout aids.
Once you have it all dry fit, then measure the hub to hub distance between every pair of fittings. Then take a reference length of pipe, say exactly 12", and glue it up with hubbed fittings on each end. Make sure you get the pipe fully seated in the hub, to the extent you are typically going to be able to (which should be fully seated). Then measure the hub to hub length of your test piece.
The difference tells you your joint takeup on two joints. You can add that to the hub to hub distance in your dry fit to get your final pipe length. Then start gluing up at the 3" wye going upward. If you're worried that you're off at any point, you can reassemble your dry fit to confirm (when the last piece glued on is a fitting).
Getting the rotation correct on the first (closest to stack) 45 will be a bit tricky, but if your stack is plumb, you can just ensure the top hub is level (e.g. stick a piece of pipe temporarily in the hub, rotate it so the pipe is plumb, and mark the hub rotation for glue up). Another trick is if the fittings have casting lines on the hubs, and lining up the casting lines is the goal, then you can use the pipe marking as a straight line, i.e. line up the text with the casting line on each joint.
Gluing up the last joint will be tricky, as well. If access from above allows you to glue the closet flange into the coupling, that would work but is a little fraught. I think the straight section between the coupling and the highest 45 would be easier. You can temporarily loosen the Ferncos so that you can tilt the whole assembly below that point out in order to make up the joint(s).
Cheers, Wayne