Delta shower rough valve installation

Users who are viewing this thread

Jadnashua

Retired Defense Industry Engineer xxx
Messages
32,770
Reaction score
1,191
Points
113
Location
New England
Delta doesn't call it a min/max, but they want the front of the plaster guard to be flush with the finished wall +/- 1/4", based on their thinking, you have a 1/2" between the min and the max. But, I think you'll find that different trim/valve packages may have a bit more leeway. If you install it as they say within their limits ANY of their compatible trim sets will fit. I think you'll find that some look better at one end or the other of those limits.
 

hj

Master Plumber
Messages
33,610
Reaction score
1,050
Points
113
Location
Cave Creek, Arizona
Website
www.terrylove.com
And one other thing. When I install that valve for a shower only, I invert it and use the "tub" outlet for the shower. Then I cap the "shower" outlet on the valve.
 

JohnfrWhipple

BATHROOM DESIGN & BUILD
Messages
3,225
Reaction score
104
Points
48
Location
North Vancouver, BC
And one other thing. When I install that valve for a shower only, I invert it and use the "tub" outlet for the shower. Then I cap the "shower" outlet on the valve.

Why do you do that HJ? Do you do the same with the Grohe I Box? Is the tub port larger?
 

hj

Master Plumber
Messages
33,610
Reaction score
1,050
Points
113
Location
Cave Creek, Arizona
Website
www.terrylove.com
I especially do it with Kohler valves. When you install it conventionally, the plug in the tub port creates a "well" at the bottom which can accumulate debris and once that happens it shuts off water flowing back up to the shower head. I have had many Kohler valves that I have had open up the bottom and clear it out, along with the connecting tube. Upside down on a "180 degree symmetrical valve" eliminates the problem. Moen is one that is NOT symmetrical so it cannot be done with them. AND the tub port is "by definition" larger than the shower port.
 

Themus

New Member
Messages
10
Reaction score
1
Points
3
Location
South Carolina
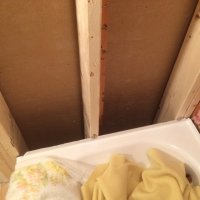
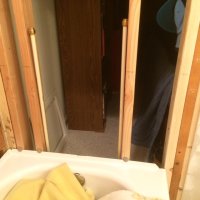
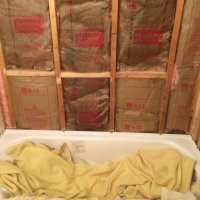
I was going to put my valve in Saturday, taking everyone's suggestions seriously, and even made a complete mock-up. It looks like for my personal preference to have the handle stick out where I would like, it looks like my stringer is about 1." However, as I readied myself to put the valve in, I forced myself to step back and ask which comes first, the walls or the valve. Shimming the studs would affect that final number I had just worked so hard to figure.

So my studs are up, outside wall nicely insulated, tub is secured, drained connected down below and I reckon since I will need to shim my studs to get the CBU over the flange, I should wait on the valve (shimming might make a difference)?

Either way I go, I face a puzzling question.

1. Shimming the studs {about 3/8 - 1/4"} all the way to the top with Hardie backer board the first 5 feet, and the last feet with green drywall is going to cause quite a bump from the green board transition to the rest of the normal 1/2' drywall.

Is that a common occurrence and one just has to feather it out with drywall compound that much?

It looks like the Hardie backer board is about 1/8" thinner than the drywall it will bump up against so the bump against the drywall isn't nearly as much.

2. Even though I extend out from the tub about 5 inches, I should still use thinset for taping that Hardie transition to the drywall?

Thank you all very much. I have been thrilled with the support on this forum.
 

JohnfrWhipple

BATHROOM DESIGN & BUILD
Messages
3,225
Reaction score
104
Points
48
Location
North Vancouver, BC
Hardi Backer is a crap backer board. So is Durock. Durock is crapper than Hardie. If you want a decent backer board use WonderBoard Lite.

Furring out the wall studs depends on the placement of the tile flange.

IS the tile flange close to or far away from the wall studs?

Can you back cut some of the tile to make a lap joint over the tile flange?

Lots of ways to skin a cat.

Have you checked out the flush tile to drywall transition posts I have made here?
 

Jadnashua

Retired Defense Industry Engineer xxx
Messages
32,770
Reaction score
1,191
Points
113
Location
New England
Some people notch the studs when installing the tub to get the flange flush...it's more work, as you may or may not be able to slide the tub in, but it can work as an alternative if the situation allows it. Often, that opening is too large, so that leaves you with a big space on one end, so it isn't viable, but it may work.

Having the shower walls thicker than the rest of the room can be a design pain that has to be worked out. Depending on how thick and tall the tub flange is and the size of the tile you are using, you may not need the cbu to go over the flange, but stop slightly above it. You need more than half of the tile supported by the cbu, but if you bring your Kerdi down and seal it to the flange with Kerdifix, you can backfill that area with thinset when tiling and have a slight cantilever, supported by the flange and thinset. Since you can't walk on the wall, it normally isn't an big issue. Have you watched any of the Schluter You-Tube videos showing making that connection?

Hardiebacker in nominal 1/2" is 7/16" thick, if I remember correctly. Note, there are two classes of cbu: 'normal' cbu, and fiber-cement cbu...Hardie is the later and has some design considerations that apply to it that is not true with a true cement board. For your application, though, as long as you maintain a gap at the tub surface, it will work.
 

ShowerDude

Showers
Messages
710
Reaction score
66
Points
28
Location
Minnesota
a pickle that we are facing all the time.

fur studs out with a level and drywall shims and a staple gun.

you can force all studs in plane and get things plum to land at or over tub flange.


then youll likely have to float your drywall walls to tiled walls transition after you install cbu.


i happen to know this because i employ these tactics in my field.

i dont just post stuff ive read i actually employ said tactics, unlike the fella from maryland that was supposedly at one time an engineer.


contact me directly if you need more help-


these are thing that we pros are looking for well in advance, if you dont actually tile showers for a lving you will arrive to this party a bit late and have to back up a bit to rectify.... sleep easy its fix-able

xoxo -counter
 

Themus

New Member
Messages
10
Reaction score
1
Points
3
Location
South Carolina
I appreciate everyone's feedback. I really do!

On the Hardie Backer board being 'crap.' That really has caught me off guard. In tackling this project, I have had to do some research and I was thinking based on what I read, Hardie Backer board was generally considered the best choice. Harder to cut and heavier, but the most durable.

Am I off the mark on what I was thinking? I have three sheets of 1/2' at home, but I can return it if the consensus is it is the wrong thing for my application.

I would have loved to notch the 2 x 4's! Problem is my drain on the right is maxed out against the floor joist and trust me, it was a lot of work getting it even to work in there. I did have to notch two 2 x 4's where the tub flange on the back bowed out some.

I have included some pictures. My tub flange is thin so to speak. But because it is not a true 90 degrees, it fans out near the bottom. I reckon all tubs do that. The screws and washers add to the problem, but I figured to notch the backer board where it came in contact with them. Not all the way through, but just enough to lessen the outward pressure of the CBU.

Thank you all for your help. It is very much appreciated. I know my wife will be happy when she gets her bathroom back.
 

Attachments

  • IMG_1681.JPG
    IMG_1681.JPG
    102.8 KB · Views: 778
  • IMG_1682.JPG
    IMG_1682.JPG
    110.6 KB · Views: 797
  • IMG_1683.JPG
    IMG_1683.JPG
    134.1 KB · Views: 816

Jadnashua

Retired Defense Industry Engineer xxx
Messages
32,770
Reaction score
1,191
Points
113
Location
New England
Ask five people their favorite car, and you may get five answers. Same with CBU. Hardie isn't crap, but it's different than some of the others. One reason why it is stronger than most is the fact that it is in the class called fiber-cement. If you look at their MDS info, you'd see that it can contain nearly 15% cellulose (paper). Those fibers help it with the strength, but while they're encased in cement, is one reason why it has its own installation instruction set when building a shower. In your application, it isn't a big deal. Because it is dense, it is harder to get the screws to countersink, but if you use the ones designed for that board (they have what amounts to a reamer on the bottom of the head), it works. On the others, it ends up crushing the board, but on Hardie, that typically doesn't happen and to get them flush, it must essentially drill it IF you've used the right screws; otherwise, you'll not get them flush. Cutting it is harder than some others, too. But, it is harder to have it crack the edge out when putting in the screw. So, it's a matter of preference and application.

Unless you are using a really small tile on the walls, as long as most of the tile is supported by the cbu there, you do NOT need to run it down or over the tub flange. You do, as with anything, have to be careful how you waterproof that joint, though.

WHen tiling (or embedding a membrane with thinset), your friend is SSD (surface saturated, dry (to the touch))...Hardie can really suck a lot of moisture out of your thinset, so wipe it down with a wet sponge, maybe multiple times, until it stops absorbing moisture. Then, the water in your thinset can do what it was designed to do, cure the cement, not be sucked out, leaving a dried out mix of uncured cement and sand. While this is a good thing to do with any cbu, it is more important with Hardiebacker. Pros don't like to spend the time, as time is money to both cut it, screw it in place, or prep it for tile. As a DIY'er, use what is available, and don't worry about it, you're already slow, the difference is minor. Do it a lot, and you will gravitate to something that can be done faster.
 
Top