Delta shower rough valve installation

Users who are viewing this thread

Ratherbefishing

New Member
Messages
9
Reaction score
0
Points
0
Location
atlanta
I hate to ask such a basic question, but....

I'm about to install my new Delta R1000 rough valve. What size wood do you guys use for the stringer? By my arithmetic, it looks like it should be about 1.5 inches from the back of the studs. Shower framing is 2x4s, 1/2" permabase, Kerdi, 1/4" thick tiles. Does my math sound right?

I know the second one of these I install will be a piece of cake. But this is the first.

Thanx!
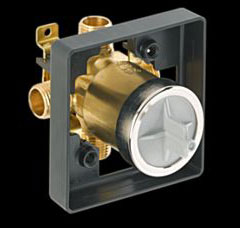
delta_multichoice.jpg
 
Last edited by a moderator:

Hackney plumbing

Homeowner
Messages
1,130
Reaction score
3
Points
38
Location
Alabama
I hate to ask such a basic question, but....

I'm about to install my new Delta R1000 rough valve. What size wood do you guys use for the stringer? By my arithmetic, it looks like it should be about 1.5 inches from the back of the studs. Shower framing is 2x4s, 1/2" permabase, Kerdi, 1/4" thick tiles. Does my math sound right?

I know the second one of these I install will be a piece of cake. But this is the first.


Thanx!

The valve should have a rough in guide. Its black plastic and snaps onto the brass body. The finished wall should be flush with the guides front edge. I use a 2x4 or a 2x6.

Remember to orientate the valve correctly...it has and up and down.
 

Ratherbefishing

New Member
Messages
9
Reaction score
0
Points
0
Location
atlanta
I have the instructions. After I found some stonger glasses to read the tiny print, they still seemed kinda cryptic to a first timer. Online is easier; larger print! But harder to carry to the jobsite. Then I guess I had a late night brain fart. 1.5 inches from the back of the studs = 2x4. That makes sense, Delta. And it worked out even better. The "similar threads" at the bottom of the page answered my next question about soldering into the threaded inlet and outlet.

Thanx!
 

LLigetfa

DIYer, not in the trades
Messages
7,567
Reaction score
612
Points
113
Location
NW Ontario, Canada
I'm about to install my new Delta R1000 rough valve...

Does Delta make a 1000 series? I know they make a 10000 series cuz I have one. I know you can also download the instructions from the internet cuz I did just that. It spec's 70mm from the front of the plaster guard.
 

Hackney plumbing

Homeowner
Messages
1,130
Reaction score
3
Points
38
Location
Alabama
I have the instructions. After I found some stonger glasses to read the tiny print, they still seemed kinda cryptic to a first timer. Online is easier; larger print! But harder to carry to the jobsite. Then I guess I had a late night brain fart. 1.5 inches from the back of the studs = 2x4. That makes sense, Delta. And it worked out even better. The "similar threads" at the bottom of the page answered my next question about soldering into the threaded inlet and outlet.

Thanx!

1.5" from the back of the studs doesn't mean anything. The valve should have came with a plastic rough in guide. You set the valve in the wall with the front edge of the black plastic guide so that it will be flush with the finished wall.

Its really that simple.
 

Jadnashua

Retired Defense Industry Engineer xxx
Messages
32,770
Reaction score
1,191
Points
113
Location
New England
All of these valves have a min/max on the rough-in. If it is installed with the finished wall between min/max or the rough-in plaster guard device, the trim will fit BUT, if you are at one end or the other, you MAY NOT LIKE IT! So, temporarily, put it together with the trim to see how much of the shaft/handle you want sticking out, then measure, and mount the valve there. There are LOTS of people here that have posted complaining about how it looks (not how it functions) because they didn't mock it up first. To the manufactuer, if it fits, it's right. To the consumer, they usually, don't like it at either extreme. The engineer's version of min/max may not meet the fashion design sense of the user. CHECK IT FIRST!
 

hj

Master Plumber
Messages
33,610
Reaction score
1,050
Points
113
Location
Cave Creek, Arizona
Website
www.terrylove.com
quote; It spec's 70mm from the front of the plaster guard.

We do not use metric in the USA. But if we did 7 cm would be easier to read on the ruler. When installing any recessed valve, you measure from the "face" of the finished wall back, because that is the only "positive" measurement you have.
 
Last edited:

patma

New Member
Messages
23
Reaction score
0
Points
0
Location
Kentucky
W/ delta, better to be too deep or too shallow (if you gonna mess up). I've installed extension kits when valve too deep or tile changed at last minute but have never had to correct one too shallow. I guess the only solution would be to reset the whole body?

Delta give you 1/16 or so to play w/ on the normal trim kits? tia
 

Loudgonzo

New Member
Messages
24
Reaction score
0
Points
0
Location
Wylie, Tx
I'm installing the R10000, and after mocking it up, the handle sticks out too far, so we would need to install it about a 1/4" -3/8" deeper into the wall. However now the problem is that using a 2x4 as the stringer, the stringer won't be flush between the studs, it would also need to be pushed further back.

Is there any problem using a thinner hardwood as the stringer, allowing it to remain flush with the studs. I was thinking something like 1x3 oak, which is still rigid/hard enough to mount the valve too.

thanks,
 

hj

Master Plumber
Messages
33,610
Reaction score
1,050
Points
113
Location
Cave Creek, Arizona
Website
www.terrylove.com
1 x 3 PINE would be adequate. You are not going to be hitting it with a sledge hammer. In fact, once the trim plate is attached and tightened up, the backing may be incidental anyway.
 

Loudgonzo

New Member
Messages
24
Reaction score
0
Points
0
Location
Wylie, Tx
Since the depth will be greater by about 1/4" outside the max specified depth, does this affect the operation? What happens if the valve is too deep?
 

Jadnashua

Retired Defense Industry Engineer xxx
Messages
32,770
Reaction score
1,191
Points
113
Location
New England
The min/max on the instructions just guarantees that any of the compatible trim will fit, not how well it looks. As long as you can get enough of the trim screws into the body and hold things on properly, and can get your hand on the handle without pinching or things rubbing, it will work. Someone with arthritis might like it further from the wall since it may be easier to grab and turn. Another thing with that rough-in valve...since it is used with lots of their trim, if it isn't within their min/max, should you decide to change the trim later on, it may not fit if you wanted a different finish or style later on...you'd have to move the valve, which could be problematic.
 

Loudgonzo

New Member
Messages
24
Reaction score
0
Points
0
Location
Wylie, Tx
here's a visual reference, ended up about 3/4" shorter by using a 1x4 instead of 2x4.

thanks
leo

1.jpg2.jpg
 

Themus

New Member
Messages
10
Reaction score
1
Points
3
Location
South Carolina
@loudgonzo. You are exactly where I am at. I have Moen valve and it looks like using a 2 x 4 would put the valve a good 1/4 - 1/2 beyond my finished surface. Looking at your pictures, are you showing the tile and CBU on top of a table? If so, how are you getting the valve to show the measurement differences? It looks like you have an extension on the handle in the one picture. Reading your text above the pictures it would seem you are suggesting you have the valve on a 2 x4 and the other picture showing it on a 1 x 4.

Getting this right is key it seems to be able to figure out when to mount my shower head line and tub valve.
 

Jadnashua

Retired Defense Industry Engineer xxx
Messages
32,770
Reaction score
1,191
Points
113
Location
New England
Mock it up...the instructions will tell you how to make everything fit, but you may not like it at either the min or max. Keep in mind that there is no cure for a valve out too far, and the one for when it is in too far doesn't always look great (some valves have a deep wall extension kit, not all). But, if you can place the valve where it is within the min/max, everything WILL fit...just that it may stick out further than you want it to for aesthetics.
 

Themus

New Member
Messages
10
Reaction score
1
Points
3
Location
South Carolina
Mock it up...the instructions will tell you how to make everything fit, but you may not like it at either the min or max. Keep in mind that there is no cure for a valve out too far, and the one for when it is in too far doesn't always look great (some valves have a deep wall extension kit, not all). But, if you can place the valve where it is within the min/max, everything WILL fit...just that it may stick out further than you want it to for aesthetics.

Thank you. That is what I am trying to do actually by asking about those pictures. I am assuming that is what loudgonzo did there. I don't see on the plaster guard any min or max markings. Just the words Optional on one side and Standard on the side facing up. The plaster guard has two notches cut out top and bottom.

I've taken my tile sample, a piece of drywall I had, and laid it against my studs. Placed the valve and plaster guard flush with it and then placed a 2 x 4 directly behind it. The 2 x 4 looks to be a good 1/4 too far in. {I figured the drywall though a bit thicker than Hardie Backer board, would end up being the same thickness in the end due to the thinset.

I guess I should take the plaster guard off, put the cover plate and handle on, and then align it to the same as I described above? Is that the best way to mock it up?
 

Jadnashua

Retired Defense Industry Engineer xxx
Messages
32,770
Reaction score
1,191
Points
113
Location
New England
SOmewhere in the instructions, it will define the min/max, which on that one, may be the slots, but I do not remember. Yes, I'd put the trim on, adjust it so that you can both get the screws in and the handle sticks out the distance you want and it looks good, then mount the valve where it is required. HardiBacker is 7/16", 1/2" dryall is really 1/2" (except on the tapers), but you'll have at least that difference in thinset to make it up. What you don't want, is to be so close to either the min/max that if you have a little variation in finishing out your wall stackup, things no longer fit. Most people like less of the handle shaft sticking out, so having the valve deeper in the wall looks best to them...just don't make it too deep, or the handle will bind and/or the screws wont' reach, or you'll have trouble reaching around it to grab!
 

Themus

New Member
Messages
10
Reaction score
1
Points
3
Location
South Carolina
SOmewhere in the instructions, it will define the min/max, which on that one, may be the slots, but I do not remember. Yes, I'd put the trim on, adjust it so that you can both get the screws in and the handle sticks out the distance you want and it looks good, then mount the valve where it is required. HardiBacker is 7/16", 1/2" dryall is really 1/2" (except on the tapers), but you'll have at least that difference in thinset to make it up. What you don't want, is to be so close to either the min/max that if you have a little variation in finishing out your wall stackup, things no longer fit. Most people like less of the handle shaft sticking out, so having the valve deeper in the wall looks best to them...just don't make it too deep, or the handle will bind and/or the screws wont' reach, or you'll have trouble reaching around it to grab!

Thank you. My big and only goal tomorrow is to get this valve in. I desire the valve handle to be close to the face plate so I will set it up as you all have suggested and see how much room is left behind it. It's looking like I will need to run my 2 x 4 through my table saw to take off a good half inch or so. Someone above suggested 3/4" plywood may work.

I've read that manual till I have almost memorized it. Can't seem to find any min max in it and the slots are the exact same size. They are really just a cut-out leaving a little more than a quarter inch plastic lip.

I appreciate all the advice. I was a bit frustrated with myself. Had to remind myself experience takes time. Next time I could probably do it in half the time.
 
Top