1/2 copper pipe for sink cold water

Users who are viewing this thread

Richb2

New Member
Messages
59
Reaction score
0
Points
0
Location
New York
I have been trying to get my plumber here to move some pipes, and I left a message for him on Sunday, but here it is Tuesday afternoon, and still no call back. So I guess I need to do it on my own. I have a 1/2" copper water pipe running along a wall, and ending in a 90 degree turn out and then a shutoff valve. I need to cut off the 90 dgree turn/valve combo, and then extend the 1/2 copper tube another 12 inches, and then add on a 90 degree turn. Then I need another 6 inches of copper tube, and then a 90 degree and a new shutoff valve. The issue is that this copper tube runs right next to the wall.

1) what do I cut it off with? There is not enough space to use one of those twist around cutoff tools. Can I just get a cut off wheel for my grinder and use that to slice the old one off with?

2) How about soldering a new one on? Since I am right next to the wall, how can I be sure not to burn down the place? Also, I can't get the flame on the side where the wall is. Will this matter?

3) I saw pre-solder supplied fittings at Homers. Do these work well?
 

Finnegan

New Member
Messages
248
Reaction score
2
Points
0
Location
CT
Can you just pull the pipe away from the wall a bit and gut a mini pupe cutter around it? If not, you should be able to pull it off the wall just anough to wedge something behind it and use a hack saw on it. Though, a guess a grinder would work as well. Make sure you debur the cut end well. You can just slide a piece of sheet metal or other noncombustible material behind the pipe and solder away. Keep a fire extinguisher around just in case. I have never used the presoldered fittings, but I have heard that they are fine. I do not think they offer much of a convenience though. Good luck.
 

Prashster

New Member
Messages
936
Reaction score
4
Points
0
not a pro

I'm not a pro, but I've done what you're trying to do without burning the house down.

First (of course) make sure you turn off the water to the branch you're cutting. You can use a metal grinding wheel on a rotary tool, or just use a hacksaw, being careful not to leave burrs. You might have to wait for up to an hour for all the water to drain out of the severed end.

Next, I'd dry fit and solder as much of the extension as possible on the ground.

If you must solder next to a wall, use a piece of fire retardant cloth to protect the wall. As a double safety measure, I stick a huge piece of sheet metal between the pipe and wall AND the fireblocking cloth. When you heat the fitting, move the heat across as much of the fitting as you can. It will heat up sufficiently to pull solder even in the portion against the wall. It's amazing, how a heated joint sucks up solder fairly evenly. It also doesn't hurt to keep a bucket of water handy and a few wet-but-not-dripping rags on hand.

There's an art and feel to doing this properly, so I'd practice on spare parts first so you get the idea of how hot the fitting needs to be and what it feels like when solder flows properly.

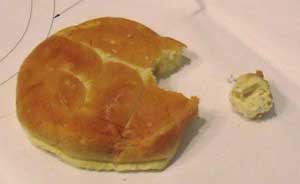
Of course, make sure you clean and flux all ends, remove burrs, and get ALL of the water out of the line before soldering. If you have problems getting all the water out, use a little bread to temporarily stop up the end. When you're done, the water pressure will blow it out the end.

As for pre-soldered fittings: they're nice because you only need to heat the fitting. However, I (and this is probably bkz I'm a novice) can't always get the solder to bead around the joint - which would tell me that it's set. Because removing and refitting the joint is a big pain, I prefer to just feed solder manually until I can see a good bead around the perimeter. I've heard it's possible to feed TOO MUCH solder into a joint, but I think you really have to overdo it for this to be a problem.

One last thing: when you're soldering the valve, keep it in the open position. If closed, the heat might damage the seal. I also hear that the 1/4 turn ball valves are much more reliable than faucet-style gate valves.

soldering_bread.jpg
 
Last edited by a moderator:

Richb2

New Member
Messages
59
Reaction score
0
Points
0
Location
New York
Did I mention that there are already white tiles on the wall? Will this preclude the sheet metal and the firecloth? And what type of torch do I need to buy? I am always looking to go with the cheapest.
 

Prashster

New Member
Messages
936
Reaction score
4
Points
0
Use the metal sheet still. An open flame could tarnish the grout or sheen of the tile.

Get a propane torch (not MAPP or acetylene). The blue Bernzomatic kits they sell at HD or Lowes are probably the cheapest way to go. They have the flux and solder already. If yr gonna be doing this infrequently, you don't need the quicklight attachment. You'll also need a flint or a butane lighter to ignite the torch.

Also, make sure you only use lead-free solder on water supply lines.
 

Richb2

New Member
Messages
59
Reaction score
0
Points
0
Location
New York
OK. I cut off the old one. I tried using a "tool" that you spin around the pipe, but that didn't work, so I ended up using my Dremel with a cut off blade in it. Only thing is that the end of the pipe is not totally flat now; it is a little torn. How flat must it be before I try to solder it?
 

Lakee911

I&C Engineer (mostly WWTP)
Messages
1,254
Reaction score
1
Points
0
Location
Columbus, OH
If the pipe is a little out of square, you should be ok. IIRC, you'll be inserting about 1/2" to 5/8" of the pipe into the fitting. My professional opinion is it should be "square enough" to get at least half of it in there. If the pipe is crushed a little it won't be concentric with the fitting and if you can get it on there, it may not seal very well. Try to square it up, keep it in shape, keep it clean and you're good to go. Good luck!

Jason
 

Richb2

New Member
Messages
59
Reaction score
0
Points
0
Location
New York
OK. Thanks. The fitting I got is pre soldered (ie it has a ring of solder around the inside). How will i know when it has been cooked long enough, since the solder is really internal?
 

Jadnashua

Retired Defense Industry Engineer xxx
Messages
32,770
Reaction score
1,190
Points
113
Location
New England
Make sure you clean the fitting and the pipe well (it should be bright and shiney) then use flux on both pieces prior to heating the thing.

You should see some solder around the end of the fitting once it melts. You can add some solder, too. Heat the pipe and fitting, do not hold the solder in the flame, in fact once it is hot enough, remove the flame as you add solder, if you do. It will get sucked into the joint.

Don't move it until it cools. Wipe the flux off, and you are done.

It wouldn't be a bad idea if you used a spare fitting or two and practiced a little bit, but you'll probably be okay.
 

Gary Swart

In the Trades
Messages
8,101
Reaction score
84
Points
48
Location
Yakima, WA
I have had good success using a jigsaw with a metal cutting blade for copper pipe that I can't get my regular pipe cutter on. It will leave a little burring that will have to be filed smooth, but that isn't too difficult. Just be sure to get the base of the saw solidly against the pipe and to square the saw up with the pipe before starting to cut. The end result may not be perfectly square, but it will be pretty close and will work fine. Forget about the per soldered fittings, that's a gimmick. A shield can be improvised by splitting #10 can or a piece of sheet metal to protect the wall from scorching and/or burning. You still need water handy just in case (remember the water supply will be turned off) If you've never sweat a joint, read the directions that come with the torch carefully. It's really not a complicated process if you follow the basic principals. Sandpaper the ends of the pipe and the inside of the joints just prior to soldering, apply flux, position the fitting(s) exactly where you want them, heat the fitting until solder touch to the fitting away from the flame melts, remove the flame, and move the solder around the joint. Then don't move the joint for a few minutes, use a damp rag to wipe the excess flux from the joint while it's still warm, and don't turn the water on until the joint has cooled. This won't give you the prettiest solder job, but it will work and hold just fine. Pretty comes with practise. :)
 

Richb2

New Member
Messages
59
Reaction score
0
Points
0
Location
New York
well, it failed. I did manage to solder together a new piece consisting of a valve, a 90 deg turn, and a connector. this worked fine. I worked on my stove top all all was AOK. When I tried to connect this assembly onto the pipe going along the wall, that is where issues came up. I soldered it OK, but when I put the water back on, it leaked badly. One of the issues maybe that although I left the water off overnight, it still had a spot of water on the end of the copper tube. I soldered anyway. I tried removing the part I just soldered on, but it wouldnt come off (the heat) so I sawed it off. I am now going back to Homers to pick up another connector tube. Any suggestions?
 

Prashster

New Member
Messages
936
Reaction score
4
Points
0
Don't mess around with the pre-soldered tee. Get a regular one and just feed the solder manually.

Make sure you:

1) Plug up the severed existing end with some bread. This will eliminate the possibility that water was preventing a good bead.

2) Sand the ends of the the pipe with emery cloth AND the inside of the fitting until it shines. Wipe away all residue. Don't touch it with your hands. This will eliminate the possibility that oxidation is preventing a bond.

3) Flux up the pipe AND the fitting good and proper. This will eliminate any residual oxidation and assist the joint in sucking the solder evenly.

4) Heat the fitting and keep feeding the joint from the top and sides until you see it drip underneath.

5) If you want it to be neat, wipe itwith a wet cloth immediately after.
 

Richb2

New Member
Messages
59
Reaction score
0
Points
0
Location
New York
Thta worked great! I used a defrosted hot dog roll and waited until I got a drip of solder out the bottom. One more question.

I was told that i need to use teflon tape on the drain pipes going from a cast iron pipe in the stack to my plastic pipe. The threads in the cast iron pipe are pretty well filled with dirt. Is there some way to clean these threads prior to screwing in my teflon taped connector piece?
 

Prashster

New Member
Messages
936
Reaction score
4
Points
0
Isn't it satisfying? When it's done right, there are few things that can compare to the feel of solder flowing into a copper joint. I have yet to obtain the Holy Grail of a perfectly smooth, dripless joint yet. Ahhh...I can dream!

To de-crud your threads, I'd use a firm, plastic bristled brush and a little soapy water to coax it out of there. Brush in parallel to the threads of course. I'd be afraid of using anything stiffer (like a metal bristled brush) for fear of scratching or nicking the threads.

One bit of advice before you start: Make sure the threads are of the same type. I ran into this pblm when I tried to thread a kitchen sink sprayer onto a copper male screw thread. The copper thread I had wasn't tapered, but the sprayer end was. If you didn't know that, you might be sit there like I did for 10 minutes trying like mad to awkwardly line up threads that won't ever mate.
 
Top
Hey, wait a minute.

This is awkward, but...

It looks like you're using an ad blocker. We get it, but (1) terrylove.com can't live without ads, and (2) ad blockers can cause issues with videos and comments. If you'd like to support the site, please allow ads.

If any particular ad is your REASON for blocking ads, please let us know. We might be able to do something about it. Thanks.
I've Disabled AdBlock    No Thanks