Help. Stuck.
Replacing all valves/cartridges (hot and cold stops, pressure balancing spool, cartridge) for late 80s/early 90s American Standard UltraMix single lever shower w volume control lever. (1363 series)
Needed to replace all valves/cartridge and pressure balancing spool after it
1. Stopped having a hard “stop”. Rather than turning off with a hard stop, the handle would continue rotating ramp the shower up again, requiring the user to find the “sweet spot” where the shower was not turning back on again.
Managed w that until
2. The shower yielded only hot water
Given the age, as I had to take off the handle, escutcheon etc in order to replace the cartridge and pressure-balancing spool, I decided to replace the hot and cold check stops while I was at it.
Replacing check stops w/o incident. Removed old cartridge and confident I will be able to install replacement w/o difficulty.
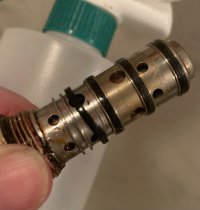
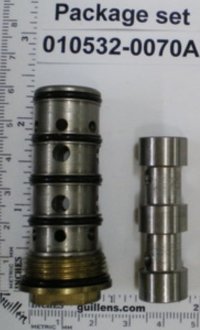
My problem? Unable to remove the pressure balancing spool. (Replacement spool assembly has a hex head so won’t have this problem in future. For now, I am at an impasse for removing the original.
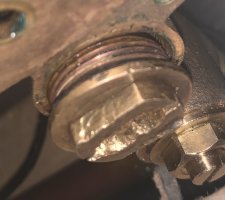
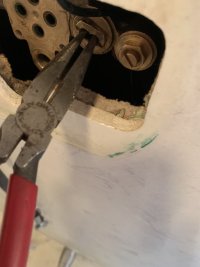
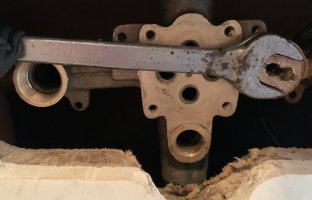
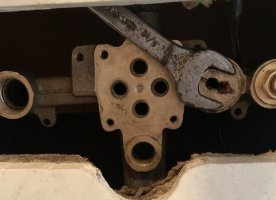
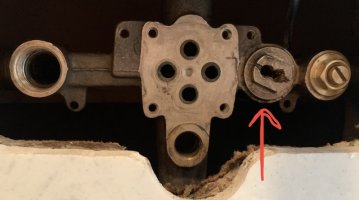
Top of the spool assembly (see photo) has two parallel edges, ant the top and bottom and two round sides, with slot between the parallel edges for a screwdriver. No socket I’ve seen will fit, as the distance between the parallel top and bottom edges is less than the distance between the rounded sides.
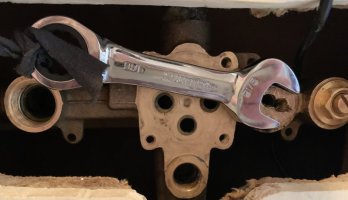
Adjustable wrench and 9/16” open ended crescent wrench will fit around the parallel portions, but have failed to budge it. Have tried regular length wrenches and a stubby wrench.
Have also tried letting it sit w a citric acid soaked towel wrapped around it. No success.
Have been hesitant to use a penetrant like Liquid Wrench, but eventually tried that, too. It failed.
Have even drilled two spots for inserting needlenose pliers so I could turn those with a wrench (video on YT showed that working). All that happens for me is the plier jaws start to twist. Sticking bolts in the two drilled holes and grabbing and turning w adjustable wrench only succeeded in twisting and deforming bolts.
Have tried inserting wide flathead screwdriver (with straight sided shaft) into holes and grasping shaft w adjustable wrench and turning. No success. Screwdriver eventually just pops out.
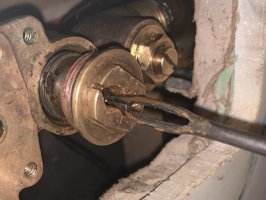
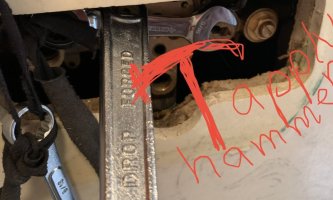
Open ended wrench proving difficult to get enough leverage on, given limited space. Tends to pop off if much torque is applied. Have tried using hammer on wrench running perpendicular to shaft of wrench on spool head, to try to loosen it. (See photo w red “hammer” illustration.)
Now that I’ve drilled into it, it MUST be removed.
This is all that is standing between us and using the shower again.
Everything is being held up by this stubborn balancing spool.
Anyone w a similar experience who overcame this? Short of C4 or other suggestions that would destroy the bower or home, any tips that have worked, or other helpful suggestions? In the photos you can see I have removed the hot valve stop temporarily to provide more access.
Photos show 9/16” wrenches (reg and stubby) in both orientations - neither orientation has succeeded.
Thank you in advance for your time and effort.
Replacing all valves/cartridges (hot and cold stops, pressure balancing spool, cartridge) for late 80s/early 90s American Standard UltraMix single lever shower w volume control lever. (1363 series)
Needed to replace all valves/cartridge and pressure balancing spool after it
1. Stopped having a hard “stop”. Rather than turning off with a hard stop, the handle would continue rotating ramp the shower up again, requiring the user to find the “sweet spot” where the shower was not turning back on again.
Managed w that until
2. The shower yielded only hot water
Given the age, as I had to take off the handle, escutcheon etc in order to replace the cartridge and pressure-balancing spool, I decided to replace the hot and cold check stops while I was at it.
Replacing check stops w/o incident. Removed old cartridge and confident I will be able to install replacement w/o difficulty.
My problem? Unable to remove the pressure balancing spool. (Replacement spool assembly has a hex head so won’t have this problem in future. For now, I am at an impasse for removing the original.
Top of the spool assembly (see photo) has two parallel edges, ant the top and bottom and two round sides, with slot between the parallel edges for a screwdriver. No socket I’ve seen will fit, as the distance between the parallel top and bottom edges is less than the distance between the rounded sides.
Adjustable wrench and 9/16” open ended crescent wrench will fit around the parallel portions, but have failed to budge it. Have tried regular length wrenches and a stubby wrench.
Have also tried letting it sit w a citric acid soaked towel wrapped around it. No success.
Have been hesitant to use a penetrant like Liquid Wrench, but eventually tried that, too. It failed.
Have even drilled two spots for inserting needlenose pliers so I could turn those with a wrench (video on YT showed that working). All that happens for me is the plier jaws start to twist. Sticking bolts in the two drilled holes and grabbing and turning w adjustable wrench only succeeded in twisting and deforming bolts.
Have tried inserting wide flathead screwdriver (with straight sided shaft) into holes and grasping shaft w adjustable wrench and turning. No success. Screwdriver eventually just pops out.
Open ended wrench proving difficult to get enough leverage on, given limited space. Tends to pop off if much torque is applied. Have tried using hammer on wrench running perpendicular to shaft of wrench on spool head, to try to loosen it. (See photo w red “hammer” illustration.)
Now that I’ve drilled into it, it MUST be removed.
This is all that is standing between us and using the shower again.
Everything is being held up by this stubborn balancing spool.
Anyone w a similar experience who overcame this? Short of C4 or other suggestions that would destroy the bower or home, any tips that have worked, or other helpful suggestions? In the photos you can see I have removed the hot valve stop temporarily to provide more access.
Photos show 9/16” wrenches (reg and stubby) in both orientations - neither orientation has succeeded.
Thank you in advance for your time and effort.
Attachments
-
 IMG_0193.png152 KB · Views: 293
 -
 IMG_0182.jpeg52.2 KB · Views: 273
 -
 IMG_0183.jpeg57.5 KB · Views: 275
 -
 71304258389__1A420686-26EA-4FF1-A480-F1BB3B42DEAB.jpeg49.8 KB · Views: 263
 -
 IMG_0184.jpeg70.2 KB · Views: 264
 -
 IMG_0181.jpeg59 KB · Views: 260
 -
 IMG_0179.jpeg66.2 KB · Views: 256
 -
 IMG_0177.jpeg51.8 KB · Views: 271
 -
 IMG_0188.jpeg49.2 KB · Views: 275