Toilet Flange & Cutting Shims

Users who are viewing this thread

JWolfe

New Member
Messages
7
Reaction score
1
Points
3
Location
Iowa
Hi all,

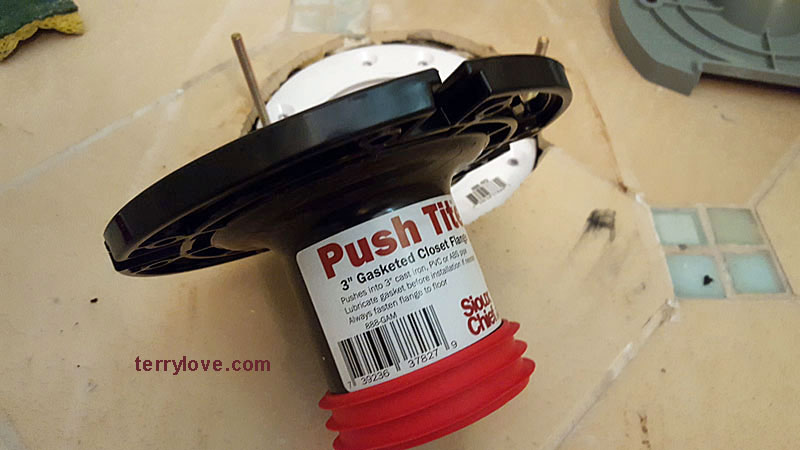
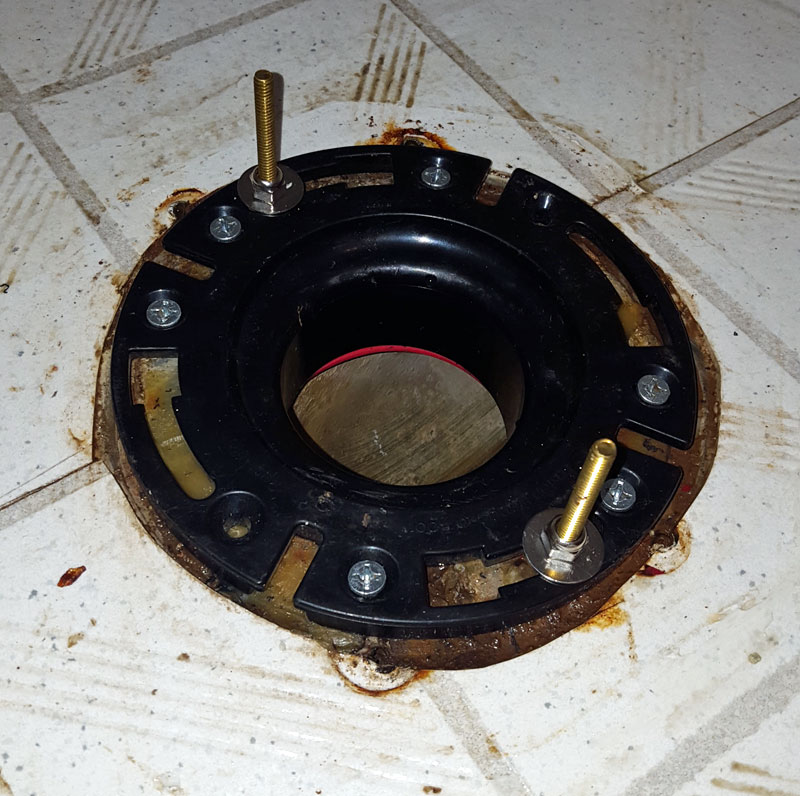
I recently went to replace a toilet, that turned into quite the project. The hardwood floor was rotten so I tore that out, found out the underlayment was rotten, tore that out, then subfloor... rotten, tore that out. Ended up replacing the subfloor, underlayment and removed all hardwood from the half bath and installed tile. Well a few issues here, my flange extenders somehow were opposite direction of the metal replacement flange (original was corroded and broken) so I made the executive decision to go without a metal flange - as you'll see below the drain pipe that was already installed is flush with the subfloor. What I ended up doing was caulking a flange extender directly to that drain and fastening the extender to the subfloor. I'm certain that's not common practice, the only real issue was that I had to put the closet bolts under the extender before screwing it down because extenders are flat by nature. It did bend the plastic a tiny amount (however thick the bottom of a closet bolt is). I then added two more extenders with silicon caulk between and screwed those down.

All said and done, 3 x 1/4 extenders to even out with the tile. Now I've placed the toilet using a fluidmaster better than wax seal to find out that my tile job is just slightly uneven. Incredibly frustrating considering I used a tile leveling system. So now I'm placing plastic shims (https://www.homedepot.com/p/Everbil...x1w0qaGWOHr6EGxqOCRoC8VUQAvD_BwE&gclsrc=aw.ds) but I cannot for the life me cut them with a razor blade as so many internet videos have suggested.

Questions: Did I totally butcher the flange situation or will it work and any suggestions on how to cut these shims?

Also I know terry recommends shimming from the back but I figure I plan on caulking the front to hide the shims anyway and that’s where the tile is low. So adding front shim makes the toilet completely level.

42A6ED07-A4B6-4815-B318-082FF4C8A1BF.jpeg
B8734792-50CF-4F21-9761-F965BFFE8018.jpeg
 

Reach4

Well-Known Member
Messages
38,904
Reaction score
4,439
Points
113
Location
IL
Well a few issues here, my flange extenders somehow were opposite direction of the metal replacement flange (original was corroded and broken) so I made the executive decision to go without a metal flange - as you'll see below the drain pipe that was already installed is flush with the subfloor. What I ended up doing was caulking a flange extender directly to that drain and fastening the extender to the subfloor. I'm certain that's not common practice, the only real issue was that I had to put the closet bolts under the extender before screwing it down because extenders are flat by nature. It did bend the plastic a tiny amount (however thick the bottom of a closet bolt is). I then added two more extenders with silicon caulk between and screwed those down.
I would add something like this over your spacers. That will add strength.
https://www.siouxchief.com/products/drainage/residential/closet-flanges/spacer-repair/ringer
 

Terry

The Plumbing Wizard
Staff member
Messages
29,942
Reaction score
3,459
Points
113
Location
Bothell, Washington
Website
terrylove.com
Having installed thousands of toilets, I would never place spacers over the top of the flange. I have used them under a flange.

neorest-install-03.jpg


Spacers placed under a repair closet flange.

lead-bend-flange-fix-2.jpg


Another example of the repair flange.

wedge-it-terrylove.jpg


Rubber shims that will cut with a knife.
 

JWolfe

New Member
Messages
7
Reaction score
1
Points
3
Location
Iowa
E3AAEDD0-081D-465D-8EAD-969B8928ED74.jpeg


Alright fortunately the caulk wasn’t cured yet. Here’s my situation tell me where to go from here. Tile is just below 3/4” high. Be specific please, exact parts (pictures or links appreciated). Thanks everyone!
 

JWolfe

New Member
Messages
7
Reaction score
1
Points
3
Location
Iowa
Okay so is the Sioux Chief closet flange push-tite 3” my best bet? Seems like there should be a better option with my current drain being flush with the subfloor. One that wouldn’t reduce capacity. But if that’s my best option I’ll go with it! Also, thanks for the recommendation on the rubber shims.
 

Reach4

Well-Known Member
Messages
38,904
Reaction score
4,439
Points
113
Location
IL
Okay so is the Sioux Chief closet flange push-tite 3” my best bet?
Using that requires that the ID of the hole is 3 inches. Your hole looks less than that to me, such as would happen if the original closet flange was an inside 3-inch flange.
 

JWolfe

New Member
Messages
7
Reaction score
1
Points
3
Location
Iowa
Using that requires that the ID of the hole is 3 inches. Your hole looks less than that to me, such as would happen if the original closet flange was an inside 3-inch flange.
You might be right. I tried to measure it’s either very close or very slightly less. I couldn’t get a great measurement because the tape kept bending. I might grab the 3” flange from menards and give it a shot. If it doesn’t fit... then what?
 

Reach4

Well-Known Member
Messages
38,904
Reaction score
4,439
Points
113
Location
IL

JWolfe

New Member
Messages
7
Reaction score
1
Points
3
Location
Iowa
Alright it fits! And yes I know it’s upside down I just wanted to see how much room I had from the flange to the top of the tile, and yes I made sure the other end fit into the pipe. Any tips on installation? Should I be caulking around the outside of the flange between the tile/cement board? Also the better than wax seal outlet is slightly bigger than the push-tite outlet, is that a problem? One more thing, add a spacer below or just leave the flange about 1/4” below the tile and add the spacer that came with the wax less fluid master “better than wax seal”: https://www.homedepot.com/p/Fluidma...versal-Wax-Free-Toilet-Seal-7530P24/205762183

B93A7E87-7288-4E5E-A608-9029AAFF86FA.jpeg
 
Last edited by a moderator:

Terry

The Plumbing Wizard
Staff member
Messages
29,942
Reaction score
3,459
Points
113
Location
Bothell, Washington
Website
terrylove.com
I normally use wax for a seal. Putting a spacer under the flange to raise it can be a good idea.
Also with those, if it's too long, you can remove the rubber seal, cut the spigot end shorter and put the rubber seal back on. Just remember to remove the paper label if you do.
 

DIYmatt

New Member
Messages
10
Reaction score
0
Points
1
Location
college park
Restarting this old thread I found in the course of trying to answer my question, with a couple pics of my solution to a similar problem...

My old 1930's flange (iron parts set in concrete basement floor) presented multiple problems, and here's hoping I made a good solution since I just laid the tile today. The bath is getting a huge redo, and the floor around the toilet was sloped all over the place so I used leveler. Between the leveler (about 1/8in at the flange, over half an inch elsewhere) and the tile going in (old toilet was set on the concrete), the flange would be almost half an inch below the tile surface.

The next problem was the old flange was not set straight relative to the wall- it has the little indents for the mounting bolts rather than the long slots that the bolts slide around in- and was off by over half an inch. I considered drilling through the flange to create new indents in the right spots, but there would not be enough (any) metal between the old hole and the new to hold the oval head of the mounting bolts. So I couldn't do Terry's fix above where a replacement flange is sandwiched between old and flange and the toilet by the bolt with two nuts on it. On a related topic, wtf do they still make steel mounting bolts instead of all brass?

Anyway, after some head scratching and YouTube I got a gasketed flange like Terry likes showing for my old 4in pipe. I was stuck with ABS given my local supply stores' stocks, but the bonus was the rubber gasket was adjustable on the tapered tail so I was able to get a really tight fit. I tapped it in with a rubber mallet, with a fat bead of silicone packed between the rings. Bingo, now I'm 1/8in above the tile. Not the recommended 1/4in but within tolerances insofar as I've read on the internet.

And square to the wall since I needed the narrow toilet tank (under 17in) of a 12in rough in A/S Edgemere. They have a 10inch RI available, which is great, but the tank is wider and wouldn't fit into the recess between the boxed-in drainpipes from the bath above. Since the old bath was unfinished, once I firred/drywalled/tile the bare foundation wall behind the toilet, I had 1/4in to play with on the rough-in distance and would have otherwise preferred the 10in R/I version. Tight fit!

So, to solve the problem of anchoring the new flange onto the old, I drilled through the old metal flange and down into the slab. Then I anchored the new flange with -gasp- Tapcons. I didn't know what else to do. I'm not worried about the toilet rocking (leveled floor, favorable space for the wax ring, new flange extends tightly down about 4in inside the old one) but I know those screws don't last forever.

Anyone have a better solution?

IMG_0211.jpg
IMG_0212.jpg
 
Top
Hey, wait a minute.

This is awkward, but...

It looks like you're using an ad blocker. We get it, but (1) terrylove.com can't live without ads, and (2) ad blockers can cause issues with videos and comments. If you'd like to support the site, please allow ads.

If any particular ad is your REASON for blocking ads, please let us know. We might be able to do something about it. Thanks.
I've Disabled AdBlock    No Thanks