Three Sinks Back to Back proper DWV

Users who are viewing this thread

Mr.T

Member
Messages
62
Reaction score
5
Points
8
Location
MI, USA
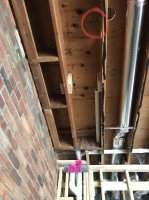
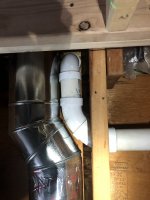
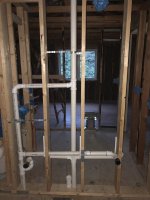
On the side where the joists are sagging and the joists will be sistered, there will be no existing Drain lines. The only one currently present is the one through all those hacked holes. That is the one I intend to remove and wanted to reroute (per my very first post). Subfloor will not be removed. I plan to jack, level, sister from underside, shim on ends if needed.

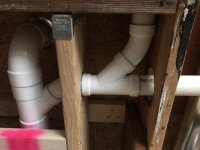
Totally agree about the one joist and inability to use a joist hanger. Also a reason why I want to reroute the one sink drain and the existing shower drain. :)

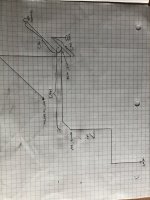
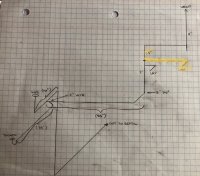
I really want to completely eliminate the line going through the all the joists including the one header. I have an idea on how to do this. I’ll try to draw something up.
 

Mr.T

Member
Messages
62
Reaction score
5
Points
8
Location
MI, USA
Here is another angle. The red circle is approximately where the shower drain will eventually land. I need to bring it down th joist bay to meet the 3” along with the originally lab drain (ideally”). To get room, I’m probably going to remove and reconfigure the short joist that has the hanger and also sister in a second header.

To bring this back, my real problem is routing the one lav and the shower drain and insuring it’s properly vented.
 

Attachments

  • A1B2DC3A-50C9-4948-9178-7C8FFE4B5A71.jpeg
    A1B2DC3A-50C9-4948-9178-7C8FFE4B5A71.jpeg
    98.9 KB · Views: 112

wwhitney

In the Trades
Messages
6,574
Reaction score
1,850
Points
113
Location
Berkeley, CA
An overhead scale diagram with the fixture locations and all the floor framing would be best for discussing DWV routing.

On the sistering, if the existing joists are only 9", you may need to slightly notch the ends of the sisters to get them to fit between the existing bearing and subfloor. If you do that, you might as well notch an extra 1/8" to help with the "diagonal" issue: if you are going to put the joists in place flatwise to start, and then roll them up as the last movement, the diagonal of a 9" x 1.5" rectangle is about 9.125". When notching, best practice is to make the transition from notched region to the full depth region with a gradual taper, rather than a right angle.

Cheers, Wayne
 

Mr.T

Member
Messages
62
Reaction score
5
Points
8
Location
MI, USA
Update. So I think I can reinforce what I have without tearing apart all of the existing plumbing. That said, I need to confirm if the existing drain that the previous contractor installed will work. My concern is if the venting (which is a wet vent for the toilet and shower) is appropriate.

Attached is a pic of the existing set-up along with a simple print to show the lengths of the runs in parantheses. Thanks!
 

Attachments

  • 6317E03F-308B-4835-8652-5F5D655D958B.jpeg
    6317E03F-308B-4835-8652-5F5D655D958B.jpeg
    95 KB · Views: 107
  • 334B7060-344F-40E2-8A0D-4335EA60CFFE.jpeg
    334B7060-344F-40E2-8A0D-4335EA60CFFE.jpeg
    98.7 KB · Views: 109
  • 191A1FC2-D0DE-4D02-A304-226F554D6239.jpeg
    191A1FC2-D0DE-4D02-A304-226F554D6239.jpeg
    64.6 KB · Views: 108
  • 6471914F-2D0E-4BCE-9E93-4AE7814078AD.jpeg
    6471914F-2D0E-4BCE-9E93-4AE7814078AD.jpeg
    74.8 KB · Views: 107

wwhitney

In the Trades
Messages
6,574
Reaction score
1,850
Points
113
Location
Berkeley, CA
The layout looks OK to me. The thing to verify is that the shower trap arm is both falling at least 1/4" per foot, and has a total fall from the trap outlet to the crotch of the wye of no more than 2". [Don't assume your subfloor is level when checking this.]

Cheers, Wayne
 

Mr.T

Member
Messages
62
Reaction score
5
Points
8
Location
MI, USA
Thanks Wayne! The P trap for the shower is not roughed in yet. So I’ll make certain when I set it I maintain proper pitch. I totally agree that I can’t trust my subfloor to measure off of. I’ll likely set up my laser and measure to that.
 

Mr.T

Member
Messages
62
Reaction score
5
Points
8
Location
MI, USA
Wayne,

One more possible change to this one. Can I have a second lav tied in to the vertical vent stack in this manner (highlighted in diagram and shown in pic). This was already plumbed by the previous plumber.

(Note that the double santee you see roughed in on the opposite side will be getting removed and replaced.
 

Attachments

  • B567BB10-224B-42DA-A0EA-460B62CA25AB.jpeg
    B567BB10-224B-42DA-A0EA-460B62CA25AB.jpeg
    112.7 KB · Views: 98
  • F4D959C8-0A69-4355-AAEE-866DB6296ADC.jpeg
    F4D959C8-0A69-4355-AAEE-866DB6296ADC.jpeg
    81.3 KB · Views: 95

wwhitney

In the Trades
Messages
6,574
Reaction score
1,850
Points
113
Location
Berkeley, CA
Using two vertical stacked san-tees is fine, that's an IPC-allowable vertical wet vent or common vent. As long as the upper 1-1/2" trap arm is at most 6' long and sloped at least 1/4" per foot, the upper trap arm looks good.

But the lower trap arm is wrong, the vertical offset between the stub out and the san-tee is not allowed. For the stack to vent the lower trap arm, the basic rule is that the bottom inside of the stub-out (really, of the p-trap elbow outlet) needs to be below the top inside of the side entry of the san-tee (really, the little cusp where the side entry meets the top entry).

If you want the left stub-out as close as possible in elevation to the right stubout, I'd suggest the following sequence, going downstream: upper horizontal trap arm -- branch inlet of street 1-1/2" wye (in the plane of the wall) -- 2x1-1/2x1-1/2 san-tee at a 45 degree angle off plumb, side inlet perpendicular to wall -- 2" pipe -- 2" 45 so the outlet is in line with the current pipe through the floor plate. The side entry of the san-tee gets your sink stub out. The top straight inlet of the wye gets a 45 to rise up in the stud bay to meet the current horizontal vent pipe with a quarter bend.

Cheers, Wayne
 

Mr.T

Member
Messages
62
Reaction score
5
Points
8
Location
MI, USA
Hey Wayne. Resurrecting this one. Would another possible more simple solution (although the stubs won’t be quite as close in equal height) be to simply go from bottom up:

2” clean-out tee——2”x2”x1.5” santee (feeding the right sink)——2”x2”x1.5” street santee (feeding left hand sink)——reducer to 1.5” vent.

the 1/4” per foot rise will end up getting the outlet of right sink a bit higher and closer.

Thoughts?
 

wwhitney

In the Trades
Messages
6,574
Reaction score
1,850
Points
113
Location
Berkeley, CA
I've lost the thread of the overall project, but as a localized question, sounds fine. I'm assuming the two lavatories are wet venting some fixtures downstream, are getting a 1.5" dry vent, and that each 1.5" trap arm falls no more than 1.5" total from the 1.5" trap outlet to its san-tee. 2" is the correct minimum size for the common lav drain if it is also a wet vent.

Cheers, Wayne
 

Mr.T

Member
Messages
62
Reaction score
5
Points
8
Location
MI, USA
Wayne,

Thanks for the reply. Sorry I got back to this so late. I had some family issues out of state and I had to put a pause on everything for a bit.

You are correct. Downstream is a shower and then a toilet. I intend to upsize the vent to a full 2” vs the 1.5” it is now.
 
Top
Hey, wait a minute.

This is awkward, but...

It looks like you're using an ad blocker. We get it, but (1) terrylove.com can't live without ads, and (2) ad blockers can cause issues with videos and comments. If you'd like to support the site, please allow ads.

If any particular ad is your REASON for blocking ads, please let us know. We might be able to do something about it. Thanks.
I've Disabled AdBlock    No Thanks