Three Sinks Back to Back proper DWV

Users who are viewing this thread

Mr.T

Member
Messages
62
Reaction score
5
Points
8
Location
MI, USA
This site and its contributors continue to be some of the best resources on the web! Thank you to all.

I think this is a simple one. I have a double lav in a master bathroom that shares a wall (back-to-back) with a guest bathroom. I want to have all three sinks share the same 2" drain. I think that I have the most appropriate and simple layout for the drains drawn up. Does this look proper? Thanks!
 

Attachments

  • 3 Sink Drain.jpg
    3 Sink Drain.jpg
    70.9 KB · Views: 223

Breplum

Licensed plumbing contractor
Messages
1,954
Reaction score
792
Points
113
Location
San Francisco Bay Area
UPC would not allow that layout.
What I would recommend is vertical wet venting:
What would work, is to have the single lav come off the 2" vertical via a 2 x 1.5" tee, either above or below the double fixture fitting (not a double tee, but use what is called figure 5 or "double fixture fitting" which will have 1.5" trap arms).
The vent can be all 1.5" if you want.
 

wwhitney

In the Trades
Messages
6,563
Reaction score
1,844
Points
113
Location
Berkeley, CA
If the right hand horizontal branch on the double fixture fitting is 2", I think the drawing would be OK under the UPC. The drain between the right hand vent and the central lav would be a wet vent for the central lav. And 2" is sufficient for 2 DFUs on the horizontal, and for a wet vent.

Under the IPC, in use in MI, I believe it's OK as drawn.

Cheers, Wayne
 

Mr.T

Member
Messages
62
Reaction score
5
Points
8
Location
MI, USA
Thank you for the fast responses! I should have noted in the body of my post that this project is, indeed, in MI and under the IPC. Frankly, if I can set things up as breplum suggested, it may actually be a better solution. I did not think I could do it that way.

I should note that the 2" drain then travels under the floor and then has the tub/shower tie in to it (which is currently wet vented through this line) and then ties in to the 3" horizontal from the toilet that then goes to the main vertical stack. I have some questions on this setup as well I will ask separately. Thank you again!
 

wwhitney

In the Trades
Messages
6,563
Reaction score
1,844
Points
113
Location
Berkeley, CA
Is the WC vented before its 3" fixture drain joins the tub/lav drain, or is it relying on the tub/lav drain for a wet vent?

A 2" wet vent is limited to 4 DFUs of drainage, so if you previously had just 2 lavs, it was maxed out: 1 DFU for each lav, plus 2 DFUs for the tub. In which case adding a third lav puts you at 5 DFUs. That means you are supposed to upsize the drain between the tub and WC to 3" if it is a wet vent for the WC.

Cheers, Wayne
 

Mr.T

Member
Messages
62
Reaction score
5
Points
8
Location
MI, USA
No, it is not. And I realize this is an issue. But I have another drain/vent issue for the master shower that I also need to resolve as well and I would be taking care of the venting of that WC at the same time. I will post the layout I am planning for the entire thing next. I'm taking some measurements tonight so I can finish my drawing.

Thanks so much for the feedback. I'm fixing some major issues from two previous contractors and trying to take it al one step at a time.
 

Mr.T

Member
Messages
62
Reaction score
5
Points
8
Location
MI, USA
Wayne,
Per your previous note, here is my complete layout. Note that the dotted lines represent the additional DWV lines I am plan to add:

- The third lav originally proposed above (I may change the routing based on the feedback here)
- An added vent after the tub/shower to resolve the wet vent code issue for the WC. Also good insurance for the tub itself I would think.

Note that I still need to resolve the vent for the WC and the shower shown in the bottom left corner. I am thinking of extending a vent line near the union of the wye that ties in to the 3" line from the WC and then tying that in to the "dotted line" vent after the tub/shower. Will that work?
 

Attachments

  • DWV Layout #1.jpg
    DWV Layout #1.jpg
    93.2 KB · Views: 209

Jeff H Young

In the Trades
Messages
8,910
Reaction score
2,227
Points
113
Location
92346
no that doesn't work not close to code 1 on the w/c that has a shower wye off you have no vent 2 the other bathroom has an illegal dry vent ( dotted line) 3 lower level looks like floor drain not vented proper . a few tweaks before you start running pipe
 

Mr.T

Member
Messages
62
Reaction score
5
Points
8
Location
MI, USA
Jeff,
Thanks for the reply. Unfortunately, I am trying to fix an existing set up, so the majority of the pipe is already run. Some comments:

1) Totally agree. In the body of my note above, I was suggesting that I would add a vent line near the union of the shower and WC and then bring it over and up to the second floor and tie in to the "dotted line" vent.
2) What is illegal about the "dotted line" dry vent that I have shown between the tub/shower and WC wye?
3) The floor drain is existing and is under concrete.

Appreciate yours and everyone's thoughts and feedback!
 

wwhitney

In the Trades
Messages
6,563
Reaction score
1,844
Points
113
Location
Berkeley, CA
On (2) the dry vent you show coming off after the tub and before the WC can't be a flat vent takeoff; dry vents have to have a vertical takeoff (no more than 45 degrees off plumb) and stay vertical to 6" above the flood rim. It also doesn't really help, as the issue is venting that WC, which has to be a wet vent unless you pull a dry vent off the WC before it joins. And since that wet vent is carrying 5 DFUs (proposed), that wet vent has to be 3"; the presence or absence of that extra dry vent doesn't change that.

So rather than add the dry vent between the and WC, you would need to upsize the drain from the tub to the WC to 3".

Or else leave the existing tub and double sink alone, and run your new sink drain separately to the 3" WC line (before or after the current tub/WC juncture). If you were somehow able to hook it around to join the shower drain before it hits the other WC, then it could solve problem (1) as well by wet venting those fixtures.

Cheers, Wayne
 

Mr.T

Member
Messages
62
Reaction score
5
Points
8
Location
MI, USA
Wayne,
Thanks. I will think about if it makes more sense to upsize the 2" to 3" between the tub and WC or run a separate line. Frankly, it may make sense to run the separate line and tie it in to the the other shower for the reason I am going to describe next. The real issue that has me repairing things.

The original GC did not properly repair/reinforce the floor joists for the second floor that will be under the master bathroom. To make matters worse, the plumber drilled holes to run the drain for the master shower and the guest lav mentioned in my first post that further weakened the structure.

I am now going to have to remove the existing drains (along with pulling some wiring) so that I can properly sister in three additional 2x10's while at the same time raising/leveling the floor out. I was hoping to avoid drilling through the new/repaired joists to route the drain for the sink. It will also allow me to get rid of that ovaled and slightly restricted HVAC line and go with round duct.

I have attached some pics to show the existing condition:
1) Simply the 3" lines that come together to feed down to the main.
2) The existing guest lav drain line that feeds over to a wye that that is also fed by the master shower and then goes in to the 3" line.

It's a very busy area and I'm probably doing a terrible job explaining it. I'm heading to the house today and I'll capture some additional pictures to show more detail. Continue to appreciate everyone's help here!
 

Attachments

  • IMG_6526.jpg
    IMG_6526.jpg
    52.4 KB · Views: 171
  • IMG_6530.jpg
    IMG_6530.jpg
    81.9 KB · Views: 173

wwhitney

In the Trades
Messages
6,563
Reaction score
1,844
Points
113
Location
Berkeley, CA
What is the span and spacing of those 2x10s, do they have a grade and species stamp, and what is the space above used for (bedroom only, or is part of it bathroom or hallway or something else)? And for each hole, what is the diameter and distance from the bottom edge?

Cheers, Wayne
 

Mr.T

Member
Messages
62
Reaction score
5
Points
8
Location
MI, USA
Additional pics:
 

Attachments

  • 7CBD56C4-2E88-487A-A4A7-0990CE195A62.jpeg
    7CBD56C4-2E88-487A-A4A7-0990CE195A62.jpeg
    85.7 KB · Views: 151
  • 39CD7DB9-CB10-49AC-B4FB-1B3380934FBF.jpeg
    39CD7DB9-CB10-49AC-B4FB-1B3380934FBF.jpeg
    69.5 KB · Views: 155

wwhitney

In the Trades
Messages
6,563
Reaction score
1,844
Points
113
Location
Berkeley, CA
The new picture raises the question of the details of the joist configuration for those joists headed off for the toilet drain. Sometimes the header or trimmer joists need to be doubled.

Cheers, Wayne
 

Mr.T

Member
Messages
62
Reaction score
5
Points
8
Location
MI, USA
- Joist span is 14’, 16” on center
- area above is master bathroom (will be fully tiled ~5’x4’ shower near mid span)
- no lumber grade marks. Actual dimension of joist is 1.5” x 9”
- actual hole size in two joists are about 3.25”. They are rather hacked holes.
The other two joists have two holes next to one another. One 2.5” the other over three inch with a partially cut hole in one.
Then there is a 3” at mid span directly under the shower near the top of the joist that is near where he put a drain. I intend to move it one joist bay over to avoid needing that hole
 

Attachments

  • 05A12374-6DB2-4BB0-B92A-0027164AC4A2.jpeg
    05A12374-6DB2-4BB0-B92A-0027164AC4A2.jpeg
    67.8 KB · Views: 147
  • 583C37AE-AA73-40E8-818B-D60EBFAF8BF5.jpeg
    583C37AE-AA73-40E8-818B-D60EBFAF8BF5.jpeg
    68.5 KB · Views: 146
  • 3958FBDE-7D8D-4A97-B29B-7033EB920792.jpeg
    3958FBDE-7D8D-4A97-B29B-7033EB920792.jpeg
    64.7 KB · Views: 162

Mr.T

Member
Messages
62
Reaction score
5
Points
8
Location
MI, USA
Given the weight of the bathroom after installation, and the fact that the existing joists have some slight sag already along with the holes I absolutely have to reinforce everything. I’m just hoping I can avoid a massive tear up to all the existing DWV lines. But it has to be done correctly. So I will do what I need to do.
 

wwhitney

In the Trades
Messages
6,563
Reaction score
1,844
Points
113
Location
Berkeley, CA
So, the absence of a grade and species stamp complicates things. But if they at least #2 grade (or #1 grade if southern pine), then per this table, they are adequate for a 14' span at 16" o.c.:

https://up.codes/viewer/michigan/mi-residential-code-2015/chapter/5/floors#table_R502.3.1-2

This assumes that your shower is going to be tiled with ceramic or porcelain tile; natural stone tile has a deflection limit of L/720, so you'd need to sister every joist (I recommend KD lumber) under the shower in that case. But natural stone is not a great choice for a shower floor (particularly marble, don't do marble), as it is more porous than a porcelain tile.

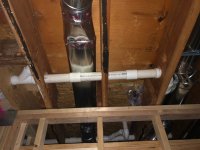
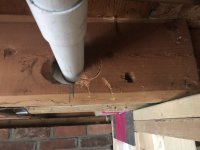
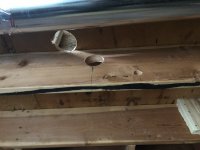
So that leaves the question of the holes and the sag. On the holes, they are supposed to be no more than 3" in diameter (9" / 3) and surrounded by 2" of solid wood all around (i.e. 2" from the top and bottom edges and 2" from any other hole). Any holes that deviate from that should be reinforced. Joistrepair.com has a pre-engineered solution which is good if you are being inspected and need the engineering; otherwise it's fairly pricey, and you can just do something similar.

As to the sag, it would be good to know whether the supports at both ends are at the same elevation, and if not, to investigate whether there is a reason one of them has subsided. That could indicate a problem that should be addressed (e.g. an undersized central girder, or basement posts that are rotting/rusting at the bottom, etc.)

Otherwise, how much is the sag, i.e. maximum deflection from a straight line at the middle? If it's 1/4" or 1/2" then it's likely just age related creep and not a concern. If it's a lot more it bears further investigation. For flattening/leveling for sagged joists from creep, a 2x4 nailer alongside the top of the joist to create a new plane for subfloor attachment would be sufficient.

Of course, you might prefer to just sister each joist (assuming you can drill proper sized holes and figure out the installation sequence), rather than having to separately reinforce holes and add nailers. But that will be harder to do.

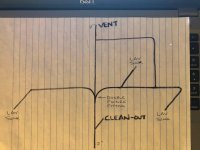
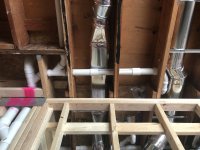
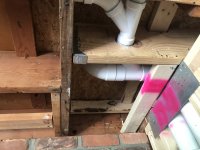
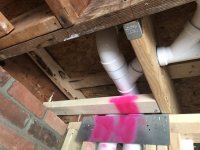
Still interested in the configuration at that joist header, some of those joists may require sistering for strength.

Cheers, Wayne
 

Mr.T

Member
Messages
62
Reaction score
5
Points
8
Location
MI, USA
Wayne, one end of the joist is supported by the outside wall and the other end is by a load bearing wall on the inside. Both are in good shape and at an equal level.

All drywall is completely removed from the ceiling. My exact plan is to sister each joist, not just reinforce certain sections. The worst joist is only sagging about 3/8”, but it’s in the middle and right under where the shower will be. So I’m fixing this all now while I can.

Here is the config near the joist header. I intend to add some reinforcement here as well.
 

Attachments

  • 0839670A-F2BD-4920-9C79-FF1046398345.jpeg
    0839670A-F2BD-4920-9C79-FF1046398345.jpeg
    83.7 KB · Views: 146
  • 3AF82283-DA27-4B45-8027-0CCE1D0007E6.jpeg
    3AF82283-DA27-4B45-8027-0CCE1D0007E6.jpeg
    80.4 KB · Views: 143
  • 57CE291D-16AB-4075-B732-A7BD0816D664.jpeg
    57CE291D-16AB-4075-B732-A7BD0816D664.jpeg
    74.1 KB · Views: 179

wwhitney

In the Trades
Messages
6,563
Reaction score
1,844
Points
113
Location
Berkeley, CA
All drywall is completely removed from the ceiling. My exact plan is to sister each joist, not just reinforce certain sections. The worst joist is only sagging about 3/8”, but it’s in the middle and right under where the shower will be. So I’m fixing this all now while I can.
Are you going to be removing the subfloor in the bathroom, so you can set each sister above its mate? Or will you be jacking the existing joists to level before sistering (which could affect your DWV penetrations, you'd need to check that)? Because otherwise the existing subfloor deflection will remain, and you'll need to do your flattening/leveling above the subfloor in the bathroom before finishes.

So unless you are going to be taking one of those two measures, I don't see the upside to sistering. 3/8" sag over 14' isn't alot; the sister will reduce any future deflection, but there's not any reason to expect future deflection (well, there may be some small additional creep if your new bathroom finishes weigh more than the previous bathroom finishes).

Here is the config near the joist header. I intend to add some reinforcement here as well.
So the header is just carrying one cut joist, and the header is within 3' of the bearing end of the trimmer? Then per this section, no additional wood is required:

https://up.codes/viewer/michigan/mi-residential-code-2015/chapter/5/floors#R502.10

Reinforcing the connection of the header to the trimmer joist seems like a good idea. The DWV going through the very end of the header is poor, as that means there's no room for a joist hanger, and the hole is in the compression zone of the header. You could use a 4.5" to 6" long structural screw through the trimmer into the header, above and below the DWV pipe. E.g. a 5/16" SPAX Powerlag or other lag screw alternative from Simpson, GRK, etc.

(Edit) What's going on on the other side of the wall, is there another header for the joist that would be lapping the cut joist?

Cheers, Wayne
 
Top
Hey, wait a minute.

This is awkward, but...

It looks like you're using an ad blocker. We get it, but (1) terrylove.com can't live without ads, and (2) ad blockers can cause issues with videos and comments. If you'd like to support the site, please allow ads.

If any particular ad is your REASON for blocking ads, please let us know. We might be able to do something about it. Thanks.
I've Disabled AdBlock    No Thanks