Sub Slab Advice

Users who are viewing this thread

Jayjayla

Member
Messages
53
Reaction score
0
Points
6
Location
Idaho
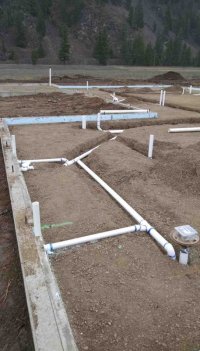
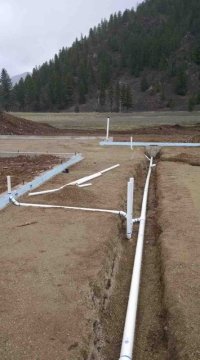
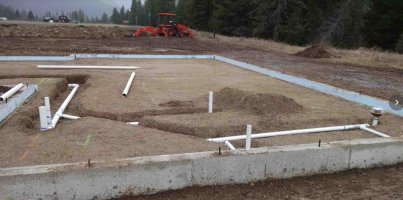
Hey guys...Been on this site a thousand times in the past, figured I'd finally join. Thanks in advance for any info and all previous info people have contributed. I'm by no means a pro plumber, I just re-learn everything every few years when I build a new house for myself. If anybody has the desire to take a quick look at my sub slab DWV design and tell me if anything stands out as a problem or if anything can be more efficient. This is a full slab house with a 36" stem wall.

My 3" main trunk should pop out around 24" below grade which brings me to more questions about septic depth. We have an irrigation ditch behind the house that we will likely need to be 50' away from with the drain field. At 1/4" slope that could put a little more than 3' of soil on top of the Infiltrator chambers. What does a guy do in a situation like this short of pushing top soil around? I was under the impression part of the magic of chambers is that you can drop PVC in there to create airflow.

Thanks guys.
Jay
 

Attachments

  • DWV.pdf
    134.4 KB · Views: 99

John Gayewski

In the Trades
Messages
4,360
Reaction score
1,345
Points
113
Location
Iowa
Have you thought about just having two sewer mains that connect outside of thr building? I think that would save some digging inside of the building which is harder to access later not to mention easier tio dig now.
 

Jayjayla

Member
Messages
53
Reaction score
0
Points
6
Location
Idaho
Have you thought about just having two sewer mains that connect outside of thr building? I think that would save some digging inside of the building which is harder to access later not to mention easier tio dig now.
I thought of it but didn't think it was a common practice and it seemed like it would end up being more digging since I'd have to pass the kitchen anyway. I live in climate zone 6 so having as much in my conditioned space as possible I think is maybe prudent, but obviously the line doesn't freeze once it leaves the building so I'm sure it would work. I guess the big benefit would be that I wouldn't have to sleeve out of the stem wall as low. I'm all ears though.

Also, if I ever have to access any of this later then something major went wrong anyway.
 

wwhitney

In the Trades
Messages
6,567
Reaction score
1,847
Points
113
Location
Berkeley, CA
My comments:

- Idaho's plumbing code is based on the UPC. So I assume that means you need a 2" vent for the WCs, and a 2" drain for the shower(s).

- In the bathrooms, you are showing an individual dry vent for each fixture. Is that a personal preference over wet venting?

- In the right bathroom, the vent routing for WC and tub dry vents is probably not going to work. No horizontal dry vents under the slab.

- Likewise in the 3/4 bath at the bottom, the WC dry vent routing, and maybe the shower vent routing (not sure you have in mind there, as you drew a blue line instead of a green line).

- If you produce a new version of the document, using fatter lines for the drains would make it easier to read.

Cheers, Wayne
 

John Gayewski

In the Trades
Messages
4,360
Reaction score
1,345
Points
113
Location
Iowa
I used to do a lot of digging. You could pretty much dig the whole thing from outside of the buildings footprint, plus your turning one whole bathroom group 180°then connecting another. This is more likley to cause a problem than a more straightforward flow path.
 

Jayjayla

Member
Messages
53
Reaction score
0
Points
6
Location
Idaho
My comments:

- Idaho's plumbing code is based on the UPC. So I assume that means you need a 2" vent for the WCs, and a 2" drain for the shower(s).

- In the bathrooms, you are showing an individual dry vent for each fixture. Is that a personal preference over wet venting?

- In the right bathroom, the vent routing for WC and tub dry vents is probably not going to work. No horizontal dry vents under the slab.

- Likewise in the 3/4 bath at the bottom, the WC dry vent routing, and maybe the shower vent routing (not sure you have in mind there, as you drew a blue line instead of a green line).

- If you produce a new version of the document, using fatter lines for the drains would make it easier to read.

Cheers, Wayne
Thanks Wayne. I'll reply again after I upload a new version. I agree completely about the line thickness, the software I'm using doesn't seem to want to play nicely with me though.
 

Jayjayla

Member
Messages
53
Reaction score
0
Points
6
Location
Idaho
My comments:

- Idaho's plumbing code is based on the UPC. So I assume that means you need a 2" vent for the WCs, and a 2" drain for the shower(s).

- In the bathrooms, you are showing an individual dry vent for each fixture. Is that a personal preference over wet venting?

- In the right bathroom, the vent routing for WC and tub dry vents is probably not going to work. No horizontal dry vents under the slab.

- Likewise in the 3/4 bath at the bottom, the WC dry vent routing, and maybe the shower vent routing (not sure you have in mind there, as you drew a blue line instead of a green line).

- If you produce a new version of the document, using fatter lines for the drains would make it easier to read.

Cheers, Wayne
Ok, new drawing attached, sorry its kinda clunky. I changed a couple of things based on the replies so far. Answers below. Also it just feels kinda tight around the left shower/bath etc. I'm sure there is a much more efficient way to do this.

- I just labeled it wrong because I couldn't see the colors either! 2" drain for shower and 2" vent all toilets.

- I only do individual dry vents because an old school plumber friend of mine told me to do it that way a long time ago. I prefer as simple as possible but I'll have to get educated on wet vents.

- How would you do it then? Wet vent? I've done it this way in Montana (pics attached) which is UPC too and it passed. Ideally if I could figure out how to wet vent it would save me from having to hide the stub ups since the slab is the finished floor. Like hiding behind the bathtub for example.

Thank you very much. For your time, wish I could buy you a beer.
 

Attachments

  • DWV.v2.pdf
    129.7 KB · Views: 79
  • 1.jpg
    1.jpg
    97.5 KB · Views: 112
  • 2.jpg
    2.jpg
    80.1 KB · Views: 100
  • 3.jpg
    3.jpg
    87.2 KB · Views: 104

Jayjayla

Member
Messages
53
Reaction score
0
Points
6
Location
Idaho
I used to do a lot of digging. You could pretty much dig the whole thing from outside of the buildings footprint, plus your turning one whole bathroom group 180°then connecting another. This is more likley to cause a problem than a more straightforward flow path.
Thanks John. I guess I'm just not able to picture it how you're seeing it. I took a bend out of one of the WC's, thanks for saying something. I agree though, it feels inefficient. Maybe as Wayne was alluding to, going to wet vents will make this simpler.
 

wwhitney

In the Trades
Messages
6,567
Reaction score
1,847
Points
113
Location
Berkeley, CA
I'm having a little trouble reconciling the pictures with the PDF. The first and third picture show the bathroom on the right?

- How would you do it then?
For the tub on the right, send the trap arm up and to the right (on the page) to the wall with the lav vent already, pull off your dry vent under the wall (upright combo), and then join the tub drain to the lav drain. Note that the tub drain has to be 2" after the vent comes off. I prefer to just use a 2" trap for tubs and make the trap arm 2".

For the two toilets and the shower on the left, the building drain is quite deep. So the conceptually simplest way is to have the horizontal trap arm/ fixture drain up high, run to under a wall, use a san-tee under the wall to pull the vent off into the wall while the drain turns down, and then a LT90 to go horizontal at the depth of the building drain, running at 45 to the building drain to join it with a wye. Some slightly more complicated patterns might be easier to do or involve less digging.

Wet vent?
If you want to look at wet venting, post a PDF that just has your 3" building drain on it (since you've already got that dug), and I'll add in the other drains in a configuration that maximizes wet venting.

Cheers, Wayne
 

Jayjayla

Member
Messages
53
Reaction score
0
Points
6
Location
Idaho
I'm having a little trouble reconciling the pictures with the PDF. The first and third picture show the bathroom on the right?


For the tub on the right, send the trap arm up and to the right (on the page) to the wall with the lav vent already, pull off your dry vent under the wall (upright combo), and then join the tub drain to the lav drain. Note that the tub drain has to be 2" after the vent comes off. I prefer to just use a 2" trap for tubs and make the trap arm 2".

For the two toilets and the shower on the left, the building drain is quite deep. So the conceptually simplest way is to have the horizontal trap arm/ fixture drain up high, run to under a wall, use a san-tee under the wall to pull the vent off into the wall while the drain turns down, and then a LT90 to go horizontal at the depth of the building drain, running at 45 to the building drain to join it with a wye. Some slightly more complicated patterns might be easier to do or involve less digging.


If you want to look at wet venting, post a PDF that just has your 3" building drain on it (since you've already got that dug), and I'll add in the other drains in a configuration that maximizes wet venting.

Cheers, Wayne
I'm sorry Wayne, those pictures are from my last project. I was just showing you what I thought was sub slab horizontal venting which passed inspection.
 

Jayjayla

Member
Messages
53
Reaction score
0
Points
6
Location
Idaho
I'm having a little trouble reconciling the pictures with the PDF. The first and third picture show the bathroom on the right?


For the tub on the right, send the trap arm up and to the right (on the page) to the wall with the lav vent already, pull off your dry vent under the wall (upright combo), and then join the tub drain to the lav drain. Note that the tub drain has to be 2" after the vent comes off. I prefer to just use a 2" trap for tubs and make the trap arm 2".

For the two toilets and the shower on the left, the building drain is quite deep. So the conceptually simplest way is to have the horizontal trap arm/ fixture drain up high, run to under a wall, use a san-tee under the wall to pull the vent off into the wall while the drain turns down, and then a LT90 to go horizontal at the depth of the building drain, running at 45 to the building drain to join it with a wye. Some slightly more complicated patterns might be easier to do or involve less digging.


If you want to look at wet venting, post a PDF that just has your 3" building drain on it (since you've already got that dug), and I'll add in the other drains in a configuration that maximizes wet venting.

Cheers, Wayne
Wayne, you're being too nice. I'm going to figure out where you are in Berkely and send you a care package. Attached is a blank and just the 3" line. I'm not married to that layout but the septic does have to be either on the south or west (garage) side of the house. In fact it might work better on the west but I was having a hard time laying it out. Seriously, thanks very much for your help. I wish you guys on this site had a design service that people could pay for so we don't feel like were weaseling something for free. My main goal is obviously to do something that works but also be efficient with my labor and materials.

Thanks again, I don't feel like I deserve this much help.
 

Attachments

  • 2.pdf
    116.7 KB · Views: 116
  • 3.pdf
    125.2 KB · Views: 91

wwhitney

In the Trades
Messages
6,567
Reaction score
1,847
Points
113
Location
Berkeley, CA
OK, here's an example of how you might lay out the right hand bath for wet venting. One 2" dry vent at the lav vents everything. What matters is this:

(a) that the lav vent and drain is 2"
(b) the order in which the fixtures join the lav drain (tub and shower could be swapped)
(c) that the drain upsizes to 3" once both the tub and the drain have both joined the lav
(d) that the 2" trap arms are no more than 60" long and fall no more than 2"

With wet venting, the trap arm is from the shower or tub trap until the wye where the lav drainage joins. The WC fixture drain from the flange to the wye is similarly limited to 72".

Beyond that, it's flexible on where to put the drains under the slab (and where to put the lav stub-up), I didn't put too much thought into optimizing that. The 60" trap arm for the tub and the shower is the primary constraint. If you want to keep the building drain full size to the lav and then run out the wall for an exterior cleanout, that's obviously fine, and may be required (not so informed about the cleanout rules).

Cheers, Wayne


BathroomAWetVent.jpg
 

wwhitney

In the Trades
Messages
6,567
Reaction score
1,847
Points
113
Location
Berkeley, CA
And here's a possibility for the two bathrooms on the left side. There the building drain will be quite deep, so I've represented that by a wide green line. Everything else is meant to be at a higher elevation.

On the upper half bath, the idea is that the red 3" drain just hits a 45 to dive into the top of the building drain with a wye. And the 3" line in the lower 3/4 bath could do the same (not shown). The path of the shower drain seems a bit convoluted, but I didn't immediately see a better geometry. I could see dry venting it instead, if that seems easier/better.

One principle shown here is that the wet vent bathroom group needs to be isolated, in that you end up with a drain carrying just the bathroom fixtures, nothing else, which can then join the building drain. You can't join each fixture individually to the building drain, with horizontal wet venting.

Cheers, Wayne


BathroomsBC.jpg
 

Jayjayla

Member
Messages
53
Reaction score
0
Points
6
Location
Idaho
Wayne, you are a good man, I don't care what I've heard about you. This looks much simpler, much less digging and I should be able to keep my main 3" run a fair bit higher coming out of the building. For me the hardest part is I only do this once every few years and have to re-learn everything, so I can't tell you and everyone else on this site how much I appreciate your experience. Everything has always worked well in my builds plumbing wise but I committed to upping my game this time around. I've also spent the $300 to have Uponor engineer my domestic water which seems like a steal that people should take advantage of. You can't replace a plumber that has done this a thousand times over 30 years, there are just too many tricks that come from experience. Thank you, I appreciate your time.

So the toilets are all venting off the nearby sink as well, that's great. Makes for much less fumbling with 3" fittings and trying to get the 2" dry vent directly under a 2x4 plate. The only code I remembered was the 72" arm for the WC, thanks for clarifying what matters here. I think the left/lower shower design would be easy enough rather than running its own dry vent through a wall with valves and pex. Just seems like a couple extra 45's and wyes I think. Seemed a little crowded to me too but I like how you picked up the vanity drain/vent as well as venting the toilet.

Wayne, I can't thank you enough for getting me down the right path. I feel way better about this now.
 

John Gayewski

In the Trades
Messages
4,360
Reaction score
1,345
Points
113
Location
Iowa
As a plumber I don't agree with the convoluted drainage path to avoid running one vent for the shower in this second bathroom. Not worth the clogs.
 

wwhitney

In the Trades
Messages
6,567
Reaction score
1,847
Points
113
Location
Berkeley, CA
I don't care what I've heard about you.
Oh? : - )

I should be able to keep my main 3" run a fair bit higher coming out of the building.

I don't follow that comment. If you stick with the single building exit, then you still have 90' of 3" building drain under the building, so it has to fall 90/4 = 22.5" along its length, and the upper end will need to be under the slab, so the top of the pipe will still exit at least 27" below top of slab.

If you switch to two separate exits like John suggested, then your main run is reduced by 30-40', so that could exit 8" - 10" higher. You'd want a different layout for the right hand bath depending on where you want to exit (under the toilet would be easy with little change). I think the building drain under the two left baths would be still be low enough to use two different levels as I drew.

A couple more comments on the left bath--you have flexibility on where to run the building drain, it doesn't have to pass directly under that toilet. I'm not sure if it would be better to keep it unaligned, e.g. for ease of future access for some reason. And I think that there may be a better layout for the bottom shower, I don't care for the extra bends (as John just commented).

Cheers, Wayne
 

wwhitney

In the Trades
Messages
6,567
Reaction score
1,847
Points
113
Location
Berkeley, CA
As a plumber I don't agree with the convoluted drainage path to avoid running one vent for the shower in this second bathroom. Not worth the clogs.
Yeah, I'm not a fan of that, do you see any better options?

One option that occurred to me, if the building drain is low enough (which I think it would be even with two separate exits), would be to have the shower drain run straight up the page, pick up the lav for wet venting, then the WC joins in, and then it just turns vertical briefly to join the building drain running down the page.

Is that a reasonable option? I've not done any underslab DWV work.

Cheers, Wayne
 

wwhitney

In the Trades
Messages
6,567
Reaction score
1,847
Points
113
Location
Berkeley, CA
running its own dry vent through a wall with valves and pex.
If you dry vent the shower, the vent could come off in the wall next to the shower entrance, not the valve wall. So that wall should be unobstructed. You'd just run the trap arm to a san-tee under the wall.

Cheers, Wayne
 

John Gayewski

In the Trades
Messages
4,360
Reaction score
1,345
Points
113
Location
Iowa
Move the main to below the framed wall with the valve. Then it's the easiest simplest design.
 

wwhitney

In the Trades
Messages
6,567
Reaction score
1,847
Points
113
Location
Berkeley, CA
Move the main to below the framed wall with the valve. Then it's the easiest simplest design.
So on underslab work, running drains under bearing walls is obviously to be avoided, as they'd be in the footing, but for non-bearing walls, there's no reason not to do it?

That would make dry venting the shower and WC easy, just put a san-tee under the wall, and the drain drops down into a combo on the building drain. The shower san-tee can be in a corner so that the vent avoids the valve area. The WC could still be wet vented if preferred.

Or if the building drain can't be under the wall for some reason, the shower could be dry-vented via a san-tee under the wall next to the entry to the shower.

Cheers, Wayne
 
Top
Hey, wait a minute.

This is awkward, but...

It looks like you're using an ad blocker. We get it, but (1) terrylove.com can't live without ads, and (2) ad blockers can cause issues with videos and comments. If you'd like to support the site, please allow ads.

If any particular ad is your REASON for blocking ads, please let us know. We might be able to do something about it. Thanks.
I've Disabled AdBlock    No Thanks