Master bathroom waste/vent rough in

Users who are viewing this thread

ChrisGTE

New Member
Messages
8
Reaction score
0
Points
1
Location
Washington State
Terry got me pointed in the right direction with my vanity waste/vent a few months back and now I am on to my toilet/shower/washing machine.

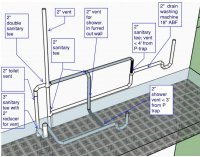
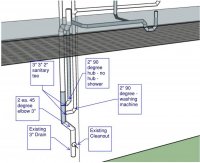
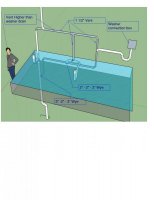
The original layout had the vanity, toilet and shower all on this wall. I moved the vanity to the other side of the bathroom and am adding a combo washer dryer unit in an adjacent closet.

All the fixtures are served by an existing 3” waste in the garage below and a 2” vent through the roof. All horizontal drain lines will get ¼” per 1’ and I plan to do everything in ABS. Wall construction is exterior 2x4 and I am planning on adding 2x4 furring to the wall which will move the toilet flange out to avoid a joist and will give me a place to run the shower vent past the washing machine drain line.

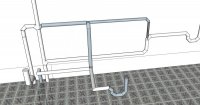
I modeled everything the best I could in Sketchup, I hope it is clear on what I am trying to do. Any suggestions or feedback on things I have laid out incorrectly would be appreciated.
 

Attachments

  • master bath drain and vent #1.jpg
    master bath drain and vent #1.jpg
    98.4 KB · Views: 219
  • master bath drain and vent #2.jpg
    master bath drain and vent #2.jpg
    68 KB · Views: 212

Terry

The Plumbing Wizard
Staff member
Messages
29,942
Reaction score
3,459
Points
113
Location
Bothell, Washington
Website
terrylove.com
The shower vent needs to come up vertically. You can run the line below the furred out line and then 90 over to pick up the shower.
That way the vent comes off vertical.
 

ChrisGTE

New Member
Messages
8
Reaction score
0
Points
1
Location
Washington State
Thanks Terry,

So would something like this be correct?

Thanks again for the help!
 

Attachments

  • master drain and vent #3.JPG
    master drain and vent #3.JPG
    52.5 KB · Views: 187

wwhitney

In the Trades
Messages
6,574
Reaction score
1,850
Points
113
Location
Berkeley, CA
Yes, with a few caveats:

- That fitting you show for the shower vent takeoff doesn't exist. You have to turn the corner with a LT90 first, and then have a vent take off with an upright combo.

-No need for an immediate LT90 after the p-trap, just point the p-trap outlet towards the wall.

- Where the laundry drain hits the vertical pipe that goes all the way up, that segment between the laundry drain and the vents above is not needed. The drain is already vented, you don't need to vent it again.

- There's no need for 3 separate drains going through the floor, and you probably can do the whole thing without furring out the wall. Just keep the shower drain as high as possible in the floor, and drop the horizontal laundry drain (after the vent takeoff) underneath the shower drain. The two of them can combine on the horizontal after the shower vent takeoff (and those two vents only need to be 1.5"). Then bring the combined drain into a vertical wye just below the WC 3x2x3 san-tee (aka low-heel inlet quarter bend).

Cheers, Wayne
 

ChrisGTE

New Member
Messages
8
Reaction score
0
Points
1
Location
Washington State
Wwhitney, thanks for the input!

Good call on turning the shower p-trap, it is close but it looks like I can make that work with my joist layout.

I am not seeing where the laundry drain is vented before the vent leg (leg above drain). The vertical pipe I had to the right site is the laundry drain (I will install a combo drain/water connection box in the wall), am I missing something?

The wall still needs to get furred out to eliminate the existing conflict between the toilet flange and joist (see attached photo of current condition) but making the shower and laundry connections the way you suggested does work a lot better.

I think I have captured your “corrections” in the attached drawing, is this what you were suggesting?

Thanks again for the help.
 

Attachments

  • joist.jpg
    joist.jpg
    109.6 KB · Views: 176
  • master bath #4.jpg
    master bath #4.jpg
    43.5 KB · Views: 184

wwhitney

In the Trades
Messages
6,574
Reaction score
1,850
Points
113
Location
Berkeley, CA
I am not seeing where the laundry drain is vented before the vent leg (leg above drain). The vertical pipe I had to the right site is the laundry drain (I will install a combo drain/water connection box in the wall), am I missing something?
Note that your previous drawing had 4 vertical vents at the elevation just above the laundry trap arm. You only need 3, as your latest drawing shows. And that drawing does match my suggestions, yes.

The wall still needs to get furred out to eliminate the existing conflict between the toilet flange and joist (see attached photo of current condition)
That joist with the huge notch in it clearly needs to be repaired. Can you sister a joist to the side of it, full length to bearing on the supports at each end? You have a choice of side to put it on, I expect the side away from the wall would be better. Once you do that, can you use a 45 degree closet flange, and/or a 10" rough-in instead of the usual 12", to keep the closet flange clear on the wall side of the sister? If so, you don't need to fur out the wall.

If you do fur out the wall (or use a 14" rough-in), and sister the joist on the wall side of the existing joist, then your WC drain would have to cross through the joist. That's allowable for a 3" pipe with a 3.75" hole in a 2x12 (with the edges of the hole at least 2" from the edges of the joist), but for a 2x10 or smaller you'd need an approved metal reinforcing bracket. The prescriptively allowed hole size is D/3, where D is the actual joist depth (7.25, 9.25, etc).

but making the shower and laundry connections the way you suggested does work a lot better.
One more option for you, in case it works out better. Instead of having the shower drain briefly over the laundry drain, you can make it work having them side by side and then joining on the horizontal. The laundry drain will be under the wall, so the shower drain would be a couple inches away from the wall. But your vent takeoff can be a wye that is rolled up to 45 degree from vertical. If you roll it 45 degrees, I think the vent should be able to get under the wall before emerging through the floor. Then you can use a 60 degree bend to go directly to vertical.

Cheers, Wayne

P.S. (Edit) Another possible alternative for the WC drain and joist repair, depending on some variables that aren't disclosed, would be to cut that joist for the WC drain (it's most of the way there already) and then head off the two ends to the adjacent joists. Although that may be problematic for getting your shower/laundry drain through the header.
 
Last edited:

ChrisGTE

New Member
Messages
8
Reaction score
0
Points
1
Location
Washington State
Yeah, when I opened up that floor I was shocked at how bad that joist is notched. Crazy thing is that the tile/grout that was redone almost 20 years ago was undamaged.

I can’t sister a joist full length but since the notch is in the top of the joist my plan is to fill the notch with a 2x4 bock. I am going to jack up the floor to get it flat (it is sagging about 1/8” with the room empty), square the notch off and add blocking to the notch with glue. The notch is about 6” deep and I am planning on squaring it off 3 1/2" and using a piece of 2x4 to fill it. I will do a partial sister on 1 side for added strength.

I am moving he toilet over about 20” and with the furring the flange will clear the joist so I will drill a new hole through the joist. Joists are (9” actual dimension) so I am planning on using the joistrepair.com “joist hole repair kit” to reinforce the joist unless someone can recommend a better per-engineered solution. I would have tried to use their “joist notch repair kit” to fix the notch but it is slightly taller than 9” so it won’t fit in my floor.
 

wwhitney

In the Trades
Messages
6,574
Reaction score
1,850
Points
113
Location
Berkeley, CA
I can’t sister a joist full length but since the notch is in the top of the joist my plan is to fill the notch with a 2x4 bock. I am going to jack up the floor to get it flat (it is sagging about 1/8” with the room empty), square the notch off and add blocking to the notch with glue. The notch is about 6” deep and I am planning on squaring it off 3 1/2" and using a piece of 2x4 to fill it. I will do a partial sister on 1 side for added strength.
So you're going to restore the top 3-1/2" height of the notch, leaving a 2-1/2" hole, and the bottom 3" of the joist is undamaged? A tightfitting block will restore the compression capacity of the top chord, but I'd suggest supplementing it with at least a longer 2x4 on the side that runs past the damage and is well fastened to the undamaged portion of the joist on each side.

Or you could use a length of dry 2x10 instead of the 2x4, maybe 24" long past the notch on each side? And maybe fastened with 2 rows of 3" SDS screws or the like, 6 fasteners each row on each side of the notch (24 total)? The choices of 24" and 24 total fasteners are just guesses, the rational choice for those numbers would require more engineering than I can do off the top of my head.

Cheers, Wayne
 

ChrisGTE

New Member
Messages
8
Reaction score
0
Points
1
Location
Washington State
So you're going to restore the top 3-1/2" height of the notch, leaving a 2-1/2" hole, and the bottom 3" of the joist is undamaged? A tightfitting block will restore the compression capacity of the top chord, but I'd suggest supplementing it with at least a longer 2x4 on the side that runs past the damage and is well fastened to the undamaged portion of the joist on each side.

Or you could use a length of dry 2x10 instead of the 2x4, maybe 24" long past the notch on each side? And maybe fastened with 2 rows of 3" SDS screws or the like, 6 fasteners each row on each side of the notch (24 total)? The choices of 24" and 24 total fasteners are just guesses, the rational choice for those numbers would require more engineering than I can do off the top of my head.

Cheers, Wayne

That is exactly my plan. There will be a 2 ½” hole in the middle of the joist but in theory it will be back to an acceptable hole size (i.e. less that 1/3). Any suggestion on glue, Titebond, Gorilla, ect?

I am going to sister a 2x10 to the joist that will bear on structure on 1 end and I will run it long on the other end past the hole. I am planning on using construction adhesive and like your idea of SDS screws, I was planning on nails.

I am also going to add some blocking between joists to try and tie everything together.
 

wwhitney

In the Trades
Messages
6,574
Reaction score
1,850
Points
113
Location
Berkeley, CA
Gluing end grain to end grain isn't going to get you much, but it won't hurt. I would think you'd want a gap filling glue because it will be hard to get a nice straight cut in place on the joist. Maybe a polyurethane glue? Or since you'll have construction adhesive anyway, some of it?

Cheers, Wayne
 

ChrisGTE

New Member
Messages
8
Reaction score
0
Points
1
Location
Washington State
Gluing end grain to end grain isn't going to get you much, but it won't hurt. I would think you'd want a gap filling glue because it will be hard to get a nice straight cut in place on the joist. Maybe a polyurethane glue? Or since you'll have construction adhesive anyway, some of it?

Cheers, Wayne

Gorilla Glue is Polyurethane I think. I liked it because I know it expands, figured it would fill in any small gaps.

Wayne and Terry, I really appreciate you taking the time to answer questions and provide input, thanks.
 
Last edited:
Top
Hey, wait a minute.

This is awkward, but...

It looks like you're using an ad blocker. We get it, but (1) terrylove.com can't live without ads, and (2) ad blockers can cause issues with videos and comments. If you'd like to support the site, please allow ads.

If any particular ad is your REASON for blocking ads, please let us know. We might be able to do something about it. Thanks.
I've Disabled AdBlock    No Thanks