buckyswider
Member
Hi all, I've read through the threads here about the perils of an Ikea sink. Well, due to circumstances beyond my control (our home's prior owner built the new bathroom around a 31.5" IKEA vanity, and the wife wanted drawers in the new vanity) I ended up with a mess.
Problem #1: Like I said, the bathroom was sort of built around the vanity- it's a very small bathroom with the slanted ceilings of a 1790's house. So the partition wall between the sink and loo is exactly 31 1/2". Got the old vanity out, and put the new vanity in OK. Unfortunately, the sinks that are made for the circa 2016 vanities have an overhang and are actually 32 5/8". So the new sink didn't fit. I ended up going to the trash pile and salvaging the old sink, which is 31 1/2". BUT the old sink is much deeper than the new one (which is made shallow to accommodate the offset drain with drawers underneath), so I had to put 2" risers on top of the new vanity to raise the sink high enough to create enough clearance for the drawer. Got that all out of the way.
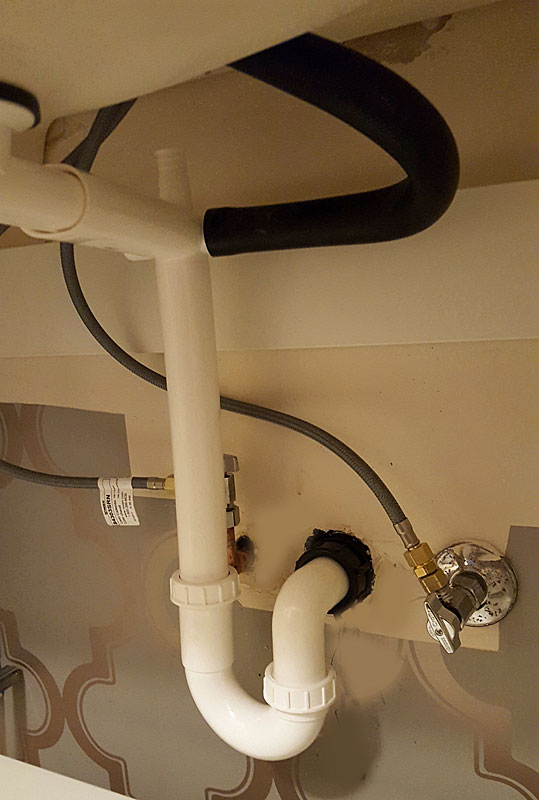
Now onto Problem #2: the old sink is metal, and the new sink is ceramic, so the unique Ikea hardware for each is different, including the drain gasket, as the conical shape at the bottom of the sink is slightly different for both. The new gasket is made to fit in funky horizontal drain pipe, but doesn't seal against the bottom of the sink properly. The old gasket fits on the bottom of the sink, but doesn't fit the drain pipe. So I glued them together with silicone! Alas, I still can't get a good seal. It holds just fine on a slow pour, but if I dump a lot of water into the sink it leaks around the gasket.
I'm trying my bestest to not use silicone on either the sink side or the drainpipe side, but I fear I'll have to do one. (Both is really horrible; then I'd never be able to disassembly the pipes if there is ever a need). So given that I probably need to do one, I need to figure out which side the water is coming from. The old sink-side gasket has a flange that goes into the sink drainhole- maybe the new strainer doesn't close off the slight opening between that gasket flange and the sink? Or maybe there's enough flex in the horizontal drainpipe that it's making the connection to the bottom gasket go slightly askew?
I will take a pic in the morning and post, but I'm leaning towards sealing the top gasket first, especially around the flange. There's very little clearance there (but any at all could be too much), so I'm not sure plumber's putty would be effective there. Silicone definitely, but there's that permanance factor that scares me with that.
So I guess my initial queries are: is plumber's putty effective in tight places like that? And, is there any trick I can use to find out which side of the gasket it leaking?
Thanks for listening!
Problem #1: Like I said, the bathroom was sort of built around the vanity- it's a very small bathroom with the slanted ceilings of a 1790's house. So the partition wall between the sink and loo is exactly 31 1/2". Got the old vanity out, and put the new vanity in OK. Unfortunately, the sinks that are made for the circa 2016 vanities have an overhang and are actually 32 5/8". So the new sink didn't fit. I ended up going to the trash pile and salvaging the old sink, which is 31 1/2". BUT the old sink is much deeper than the new one (which is made shallow to accommodate the offset drain with drawers underneath), so I had to put 2" risers on top of the new vanity to raise the sink high enough to create enough clearance for the drawer. Got that all out of the way.
Now onto Problem #2: the old sink is metal, and the new sink is ceramic, so the unique Ikea hardware for each is different, including the drain gasket, as the conical shape at the bottom of the sink is slightly different for both. The new gasket is made to fit in funky horizontal drain pipe, but doesn't seal against the bottom of the sink properly. The old gasket fits on the bottom of the sink, but doesn't fit the drain pipe. So I glued them together with silicone! Alas, I still can't get a good seal. It holds just fine on a slow pour, but if I dump a lot of water into the sink it leaks around the gasket.
I'm trying my bestest to not use silicone on either the sink side or the drainpipe side, but I fear I'll have to do one. (Both is really horrible; then I'd never be able to disassembly the pipes if there is ever a need). So given that I probably need to do one, I need to figure out which side the water is coming from. The old sink-side gasket has a flange that goes into the sink drainhole- maybe the new strainer doesn't close off the slight opening between that gasket flange and the sink? Or maybe there's enough flex in the horizontal drainpipe that it's making the connection to the bottom gasket go slightly askew?
I will take a pic in the morning and post, but I'm leaning towards sealing the top gasket first, especially around the flange. There's very little clearance there (but any at all could be too much), so I'm not sure plumber's putty would be effective there. Silicone definitely, but there's that permanance factor that scares me with that.
So I guess my initial queries are: is plumber's putty effective in tight places like that? And, is there any trick I can use to find out which side of the gasket it leaking?
Thanks for listening!
")