Humidifier Install Questions

Users who are viewing this thread

Cr0ntab

Member
Messages
31
Reaction score
0
Points
6
Location
Corona, CA
Hey Guys!

I want to install a humidifier for my new home.

I just moved in and the RH levels have been incredibly low from what we're used to. (Used to having 40-50%, now we average 11-20%)

The wife and I have had very dry skin, chapped lips, and lots of nose bleeds since moving in a few weeks ago.

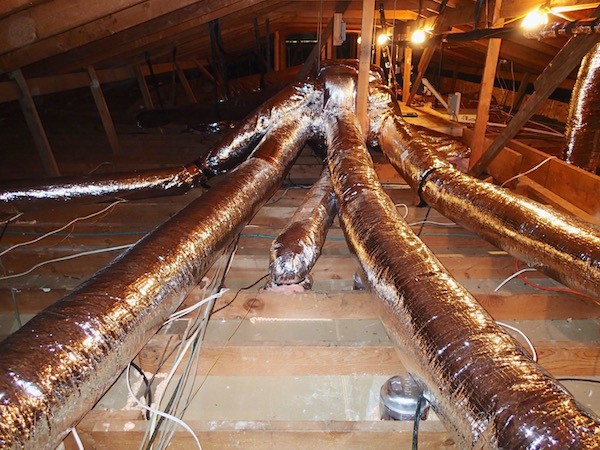
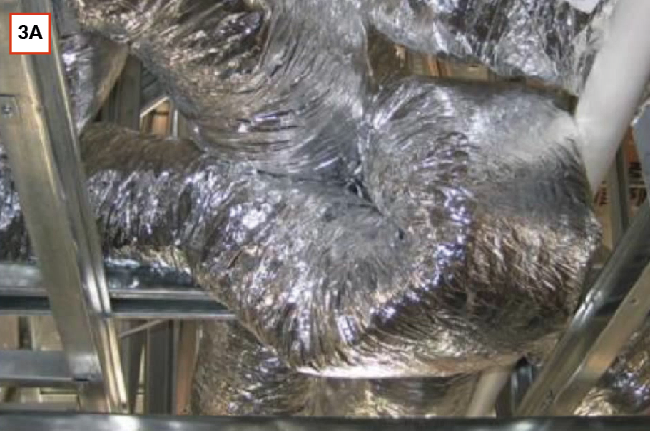
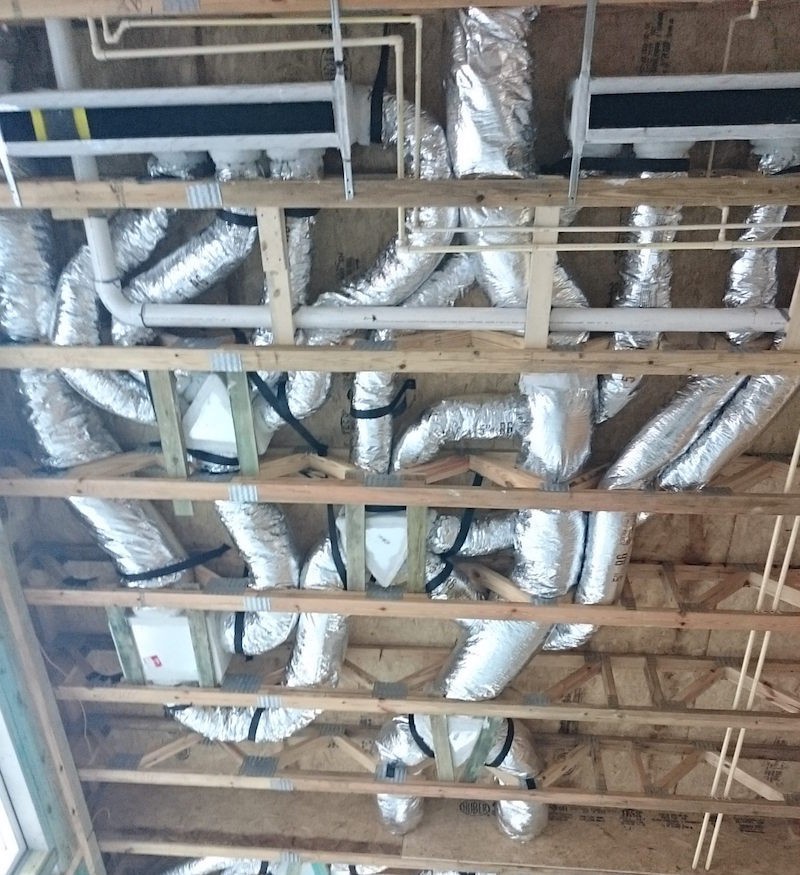
I went up to the attic to take a look at things and it looks like much of the vent work is flex duct?

I have some pictures here:

https://photos.app.goo.gl/B3UfJz80upZp04Su2

The supply side enters the bottom left of the blower, goes up through the furnace, then through the evaporator coil and out of the top for distribution.

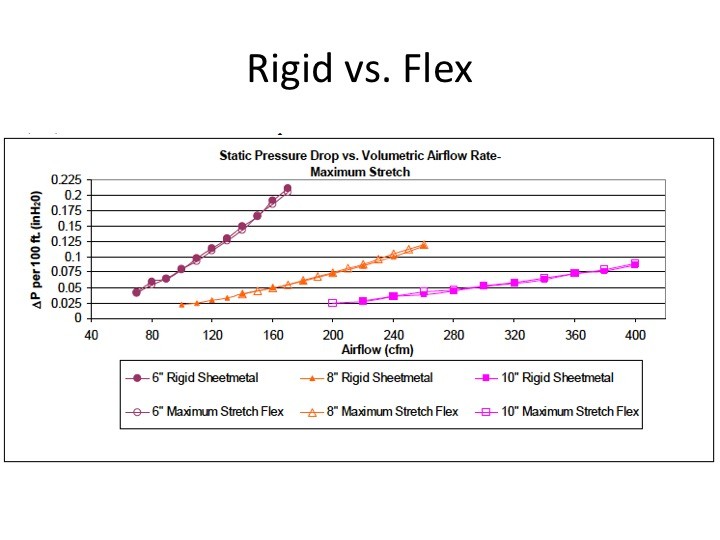
The supply side of the HVAC system looks like a giant flex duct.

I was looking at installing an Aprilaire Model 700 humidifier the installation instructions specify that I need to mount this on the supply side and the bypass needs to tie into the return.

All of the installation video's I've seen mount this to rigid ducting below the furnace, which unfortunately I don't really have.

How would I go about installing this?

Would I need to cut out some of the flex duct on the supply side and splice in some rigid ducting to mount the humidifier to?

What about the return side bypass, the HVAC stack gets pretty close to the roof so not much wiggle room up there.

Would I have to make up some 90* rigid duct work to get more space for the bypass?

Hopefully I've provided enough information and photos to help answer some of this, if not let me know and i'm happy to add more details/photos.
 

WorthFlorida

Clinical Trail 5th session completed 4/24/24.
Messages
5,763
Solutions
1
Reaction score
998
Points
113
Location
Orlando, Florida
In your case I probably would call on a HVAC company. It will cost more but they'll have all the parts and tools and probably be able to do it in a few hours. For a DIY'er with limited access to duct work and tools it could take a whole weekend. Maybe you can add the water line that you'll need to save a few dollars but you are in a tight spot. Humidifiers takes a lot of maintenance and you may need to check it at least once a month during your heating season. Is your attic easy access? These things are not buy and forget once installed.

If you need a quick fix (for your health) you can get a floor humidifier and they do work quite well. Most homes up north do not have forced air systems for this is then the only option. I had one and I would go throught about 2-3 gallons a day in the peak heating season. Sounds like a lot but I had a drafty house with the out air temp around 10 degrees F.
 

Reach4

Well-Known Member
Messages
38,892
Reaction score
4,436
Points
113
Location
IL
I was looking at installing an Aprilaire Model 700 humidifier the installation instructions specify that I need to mount this on the supply side and the bypass needs to tie into the return.
I think the 700 does not have a bypass, so no connection to the return. It has a built-in fan.

Some humidifiers run water through the pad and drain part out. Those take more water, but they are more resistant to liming up. The water saver type is the classic of not draining water out, and controlling the water in with a float valve.

I put in an Aprilaire 500. It is a bypass unit that is smaller than some. I feed it with softened water, and it does not lime up.
 

Cr0ntab

Member
Messages
31
Reaction score
0
Points
6
Location
Corona, CA
Hey Guys,

Thanks for the replies!

I've contacted 3 or 4 different local HVAC companies and none of them install humidifiers. I don't think it's very common in this area.

Hence the question posted here. I'm pretty handy and i'm happy to buy the tools to get this done in the name of my comfort.

As my "fix" right now I have a bunch of humidifiers running in the house but it's a pain in the arse to refill them all the time.

Good call on the soft water. I'm actually going to be getting that installed in the next week here, so that should help with the liming up.
 

Cr0ntab

Member
Messages
31
Reaction score
0
Points
6
Location
Corona, CA
Reach4 had mentioned in a PM about a blower door test.

I asked the same local HVAC specialists about the blower door test, they all said they didn't do them.

Which is why I gave up on that so quickly.

I still think that is the "right" solution, to see how drafty the house is and to seal it up a bit more.

I just have to do some digging to find someone that will do it.
 

Dana

In the trades
Messages
7,889
Reaction score
509
Points
113
Location
01609
It's almost impossible to hit 15% or lower RH @ 70F in your location. That would corresponds to a dew point of 22F or lower. The average OUTDOOR dew point for Corona CA for the month of December was 24F, which is pretty dry, but it takes high ventilation/infiltration rates, or an unoccupied house with no house plants, nobody cooking or bathing for the dew point of the interior air to drop that low.

My local outdoor dew point hasn't been north of positive single digits for a week, and averaged -2F for the month of December , and the indoor RH has been running 25-30%, even WITH a small heat recovery ventilator running ~25cfm continuously and plenty of duty cycle on kitchen & bath fans. This isn't some super-tight new house, it's a 2x4 framed bungalow built in 1923, but there has been a decent amount of tightening up. But all ducts and air handlers are fully inside of the pressure and insulation boundary of the house too, which makes a difference.

When the furnace, ducts and air handler are in the attic outside the pressure boundary of the house any duct leakage will drive air infiltration rates sky high whenever the air handler is running. If the duct design isn't up to ACCA Manual-D standards air handlers can drive room to room pressure differences to 5, or even 10 pascals or higher, making the "great outdoors" part of the return path when there are any leaks to the outdoors.

Sealing duct boot seams with duct mastic, and sealing the duct boots to the ceiling gypsum with polyurethane caulk or can-foam are critical leak points to the building envelope to address for both the net energy use and infiltration drives. This needs to happen for both supply and return ducts. It's fine to apply the duct mastic to the interior side of the duct boot if it's too hard to get to it on the attic side or if it's in a wall, but every seam and joint needs to be sealed.

Buy a $50-$75 hand held 2 port manometer with a measurement resolution of 0.01 water inches (= ~3 pascals) or less, and start by measuring adjacent room pressures when the air handler is running, with the door close (slip one tube under the door). Anything over 0.05 water inches (= ~13 pascals) is likely to be a major air infiltration driver, and even 0.3" is something worth working on. The usual cause is a large imbalance in the duct design, most often from a lack of a dedicated return path for a supply duct, but that can be corrected with jump ducts, door cuts, transom grilles, etc. What's most appropriate depends on the use of the room, and the aesthetic issues. Partition wall stud bay cavities can be employed as a jump duct by installing a grill in the wallboard near the floor on the pressurized room, and near the ceiling on the other side of the wall.

An Energy Star house with ducted HVAC has to be commissioned with room to room pressure differences of no more than 3 pascals (0.012 water inches) with the air handler running under all conditions (doors open/closed), so getting it under 5 pascals (0.02 water inches) should be do-able with a bit of tweaking.
 

Cr0ntab

Member
Messages
31
Reaction score
0
Points
6
Location
Corona, CA
Wow thanks Dana!!!

This is why I love this forum, so many intelligent folks!

It's almost impossible to hit 15% or lower RH @ 70F in your location. That would corresponds to a dew point of 22F or lower. The average OUTDOOR dew point for Corona CA for the month of December was 24F, which is pretty dry, but it takes high ventilation/infiltration rates, or an unoccupied house with no house plants, nobody cooking or bathing for the dew point of the interior air to drop that low.

We don't have any house plants but I can look into getting some (even for air quality!)

The home is relatively empty (only two of us for now) we sized it to accommodate the rugrats that are to come.

I was actually showering twice a day to see if I could get the RH in the home up (and to get some moisture in my skin)

We don't cook that often, we do big batches of food on the weekend and then just reheat them during the week with the microwave.

Outdoor humidity has gone up quite a bit recently (and I think we're just getting used to things) so it's not as bad. However, based off of your comments this is a red flag for me due to air infiltration.

When the furnace, ducts and air handler are in the attic outside the pressure boundary of the house any duct leakage will drive air infiltration rates sky high whenever the air handler is running. If the duct design isn't up to ACCA Manual-D standards air handlers can drive room to room pressure differences to 5, or even 10 pascals or higher, making the "great outdoors" part of the return path when there are any leaks to the outdoors.

This makes a lot of sense. I also run the air handler for a few minutes every hour to cycle the air in the house. (Which is to say it's been running quite a bit) I think this was adding insult to injury in terms of air infiltration.

Buy a $50-$75 hand held 2 port manometer with a measurement resolution of 0.01 water inches (= ~3 pascals) or less, and start by measuring adjacent room pressures when the air handler is running, with the door close (slip one tube under the door). Anything over 0.05 water inches (= ~13 pascals) is likely to be a major air infiltration driver, and even 0.3" is something worth working on. The usual cause is a large imbalance in the duct design, most often from a lack of a dedicated return path for a supply duct, but that can be corrected with jump ducts, door cuts, transom grilles, etc. What's most appropriate depends on the use of the room, and the aesthetic issues. Partition wall stud bay cavities can be employed as a jump duct by installing a grill in the wallboard near the floor on the pressurized room, and near the ceiling on the other side of the wall.

An Energy Star house with ducted HVAC has to be commissioned with room to room pressure differences of no more than 3 pascals (0.012 water inches) with the air handler running under all conditions (doors open/closed), so getting it under 5 pascals (0.02 water inches) should be do-able with a bit of tweaking.

Data driven approach, I like that. I'll get my hands on a manometer and get to work.

Thanks so much Dana!
 

Dana

In the trades
Messages
7,889
Reaction score
509
Points
113
Location
01609
Even before picking up a cheap imitation manometer (the HVAC pros use more robust hand-helds costing a few hundred, for multiple purposes), pull some registers to inspect the duct boot sealing. You won't be able to tell if the seams have been sealed on the other side, but you should be able t tell if it's sealed to the wallboard/ceiling gypsum. You might be able inspect a few duct boots from the attic side. If they look well sealed they probably did all of them that way, but if not, buy bucket of fiber reinforced duct mastic and seam-seal them from the inside (something like $15-20 per tub at box stores.) Wear the grubbiest clothes you own (better yet, the grubbiest clothes your brother owns :) ) and apply it about 1/8" thick over any overlapping metal seam. The stuff sticks to anything (makes a great hair-setting gel if that's the look you're after ;-) ) but it's impossible to get out of fabrics.

From the pictures it's clear that somebody put some effort in to trying to seal the air handler seams with aluminum tape and refrigerant/electrical penetrations with some type of goop, so you may luck out on not having to seal the duct boots yourself.

Then look around for any obvious air leaks, such as unsealed plumbing stack or electrical chases, attacking the big leaks first. If the house has a crawl space or basement (rather than slab on grade), one of the biggest leaks in most house is the long skinny seams of foundation sills & band joists as well at both to the foundation to the sill, and band joist to subfloor. The wood-to-wood seams can be sealed with polyurethane caulk (don't cheap out and use painters caulk or something), but expanding foam does a more reliable job on the sill-to-foundation seam. Don't count on a thin foamy polyethylene sill gasket to provide an air seal on it's own. While better than nothing, they are notoriously leaky. (Only higher performance home builders spring for the much more reliable but more expensive EPDM sill gaskets, which save the labor costs of retrofit air sealing. They are also much better capillary breaks between potentially damp concrete and susceptible wood.)
 

Cr0ntab

Member
Messages
31
Reaction score
0
Points
6
Location
Corona, CA
Hey Dana,

The house is on slab, so no crawlspace.

I got the manometer and I did some checking with the air handler on.

Upstairs there are 3 bedrooms and two baths.

Each room has a dedicated supply:

Master Bedroom (Shares door with master bath) - 14x6 register
Master Bath (Shares door with master bedroom) - 10x4 register

Bedroom 1 (Shares door with jack/jill bathroom) - 12x6 register
Bedroom 2 (Shares door with jack/jill bathroom) - 12x6 register
Jack/Jill Bath (Shares door with bedroom 1 and 2) - 10x4 register

The system has a single return in the upstairs hallway/loft area that measures 30x18

Now I measured the pressure differences between the rooms:

Jack/Jill Bath --> Bedroom 1 - 0.01-0.02 h20in
Bedroom 1 --> Jack/Jill Bath- 0.01-0.02 h20in

Jack/Jill Bath --> Bedroom 2 - 0.01-0.02 h20in
Bedroom 2 --> Jack/Jill Bath- 0.01-0.02 h20in

Bedroom 1 --> Hallway - 0.04-0.05 h20in
Hallway --> Bedroom 1 - 0.01-0.02 h20in

Bedroom 2 --> Hallway - 0.04-0.05 h20in
Hallway --> Bedroom 2 - 0.01-0.02 h20in

Master Bedroom --> Hallway - 0.01-0.02 h20in
Hallway --> Master Bedroom - 0.00 h20in

Master Bedroom --> Master Bath - 0.00 h20in
Master Bath --> Master Bedroom - 0.01 h20in

In all cases the bedrooms were positively pressured relative to the hallway (I could feel air coming into the hallway from under the doors).

One thing that confused me was the measurements.

When I was in the hallway and put the tube under the door into bedroom 1 and 2 I saw that the pressure was 0.01-0.02 h2oin

I could feel the air being force out of the rooms from under the door, so I know the rooms were positively pressured.

However, when I changed perspective and measured from within bedroom 1 and 2 , putting the tube under the door into the hallway, that's when I saw the much bigger difference of 0.04-0.05 h20in.

I'm not sure why that was, but it's a good thing I checked both perspectives.

The master bedroom surprised me too, I would have expected an even greater pressure difference into the hallway than bedrooms 1 or 2 because it has a larger register.

However, I forgot that there is an attic access door in the master closet, I'm guessing that's a huge air leak and lots of air is going into the attic from that.

Need to investigate the attic hatch a bit more.

When I pulled all the registers to check the sizes I did see that none of them were sealed against the drywall, so I'll put something there to seal things up.

Would it be better to use foil tape around the edges or caulking/foam?

I'm also going to buy some of these to even out the pressure differentials between the bedrooms and the hallway:

http://www.tamtech.com/Return-Air-Pathway-14x6-Existing-Construction_p_110.html
 

Dana

In the trades
Messages
7,889
Reaction score
509
Points
113
Location
01609
The size of the register doesn't determine the flow- duct impedances (and balancing vanes) make a huge difference.

It's pretty clear that Bedrooms #1 & #2 need more return air path. Increasing the door cut would be one method, but utilizing a stud bay of the partition wall can also work as a jump duct, with a grille in the wallboard near the floor on the bedroom side, and another near the ceiling on the hallway side. A shot of black paint on the back side of the wallboard at the grill penetrations deals with the light issues pretty well. That's likely to offer somewhat better sound privacy than the purpose made Tamarack product, and it's quite a bit cheaper too, unless you opted for decorator oak grilles or something. A pair of white steel grilles suitable for 6 x 14" rough opening (full width on a 16" o.c. stud bay) is about $15 at box stores. A pair of 4 x 10"s is about $10.

If the gap at the register boots is less than 3/8" it's probably going to work better using polyurethane caulk in the gap. Bigger than that using can foam is better. Foil tape sticks pretty well to shiny clean metal surfaces or even to gloss paints if the paints are smooth. Housewrap tapes work better on matte or eggshell paint. If you don't mind the extra work, the redundancy of taping over the caulk and (trimmed flush) can-foam seals ensures a longer lasting air tightness as the caulk or foam ages, or the edge of the gypsum board loses adhesion, etc. I'm not sure that I would trust tape alone for this unless it was something really g'dawful grippy & flexible, such as EPDM flashing tape of the type used around window rough framing or something.

When you're operating at the very bottom end of the measurement scale it's good to test in both directions. It's not surprising that the measurements differ depending on direction. It's still a good enough instrument to find & fix the worst offenders without spending hundreds on more sensitive better calibrated pro equipment that you'll probably never use again.
 

Cr0ntab

Member
Messages
31
Reaction score
0
Points
6
Location
Corona, CA
Hey Dana,

Thanks for the tips.

I don't want to cut the doors any more for aesthetic purposes.

Good idea on the stud bay usage. This will work for one of the bedrooms but for the master and the other bedroom the layout of the home won't work for that.

Either way, it'll save me $50 on one of the return pathway things, so i'll take that.

I'll make a trip to the hardware store for some caulk and house wrap tape, all the paint is eggshell.

I don't mind the extra work if it'll keep this solution working longer.

I also noticed that in the vented attic all the ducts are run with R4.2 flex duct. Would it be worthwhile to upgrade that to R8 flex duct?

I'll post back once I have these first steps completed!
 

Dana

In the trades
Messages
7,889
Reaction score
509
Points
113
Location
01609
Replacing a medusa of flex with R8 hard-piped runs (with perhaps the last few feet being flex) would be even better, since the air flows would be more predictable.

If the flex ducts are on the attic floor, recommissioning the existing ducts to maximum stretch, mastic sealing all joints, seams & connections then, burying it in blown cellulose (by at an inch or more over the top of the ducts) might be a better expenditure of funds. Hard piping any ells is WAY better than making at tight radius with flex duct. Mounding over it to a skinny inch of cellulose over the top of an R4.2 duct brings even the thinnest part of the total insulation to ~R8, and higher along the sides. Cellulose is cheap stuff. A 30lb bag would be enough to mound over about 15' of 8" flex duct for about $10-11 material cost, and would be enhancing the attic insulation performance a bit too, not just the ducts. Replacement 8"/R8 flex duct runs about $2/foot, at box store pricing, 6"/ R8 flex runs about $1.50/foot. In your location no matter how deeply buried there is essentially no risk of the outer surface of buried R4.2 duct being so cold as to condense moisture out of the attic air, wetting the blown insulation or dripping through, the way it might in the southeastern US.

Most flex duct is poorly installed, which may be part of the room to room pressure differences. To flex perform at spec flex duct needs to be stretched tight, for minimum turbulence/impedance. When flex is twisted, flattened, doubling back on itself like a mating octopus it's not predictable at all.

Only when it's stretched tight does flex match hard-piped duct performance:
slide27.jpg

It should look something like this, at worst:

flex-duct-insulation-mike-macfarland.jpeg


Spotlight_ducts_3A_PR0116.png
<< DEFINITELY NOT THIS...

joy-of-flex-800.jpg

^^...OR THIS....^^
 

Cr0ntab

Member
Messages
31
Reaction score
0
Points
6
Location
Corona, CA
So it took me longer than I had hoped but I finally managed to air seal the 20 vents in the home.

Photos were an after thought in the process so I only managed to grab a few:

https://photos.app.goo.gl/PzfObBKBMBqwfyr02

I used foam to fill in the big gaps, then I went around and caulked the smaller gaps to make a clean seal, and finally I went around and I used Tyvek homewrap tape to complete the seal.

Hopefully this helps.

Up next is adding jump vents to the rooms to balance the air and headed to the attic to air seal the can lights that are on the second floor.

It's starting to get very hot here so I'm holding out for a cold day to get back up into the attic, if not I'll have to just get up early and start.
 

Dana

In the trades
Messages
7,889
Reaction score
509
Points
113
Location
01609
Air sealing the duct boots to the surfaced they penetrate can defnitely be a tedious process, but a necessary part of managing air handler driven air infiltration. (It's a lot quicker/easier to do as part of the initial installation.)
 
Top
Hey, wait a minute.

This is awkward, but...

It looks like you're using an ad blocker. We get it, but (1) terrylove.com can't live without ads, and (2) ad blockers can cause issues with videos and comments. If you'd like to support the site, please allow ads.

If any particular ad is your REASON for blocking ads, please let us know. We might be able to do something about it. Thanks.
I've Disabled AdBlock    No Thanks