"Fill" or just seal foundation/sill plate gap?

Users who are viewing this thread

DIYer101

Member
Messages
86
Reaction score
2
Points
8
Location
Colorado
I recently bought a house built in 1940. I'm planning to seal any gaps between the sill plate and foundation (and maybe insulate as well).

Do I really need to fill those gaps with something substantial before sealing, or can I just seal them with spray foam and/or caulk?

It seems like it'd be best to put non-shrink grout or similar in there to prevent any more structural movement, but I have no clue if that's helpful (if it's not, I'd rather not do it...). The gaps are maybe 1/2 inch at their biggest.

My concern is that the spray foam will just get squished over time and the house will shift (causing cracking walls and who knows what else). But if gaps are normal and harmless on old houses, I'll let them be.

Thank you for any ideas.
 

Dana

In the trades
Messages
7,889
Reaction score
509
Points
113
Location
01609
Where the gaps are big enough, slipping in some 6-mil polyethylene or EPDM membrane then filling with can-foam is a good idea, since that becomes a capillary break for potential moisture migration from the foundation (which is moisture tolerant) to the foundation sill and band joist( which are moisture-susceptible.) If you're more ambitious you can jack the house up 1/8" in sections and install EPDM sheeting (or an EPDM sill gasket) everywhere to have a guaranteed capillary break.

The LAST thing you'd ever want to do is install cemeticious grout without a capillary break, since that creates a moisture path for liquid & adsorb. The tiny air gap has been serving as both a capillary break (since liquid or adsorbed water can't move upward through air, only water vapor can) and drying path (due to the air leakage). If you install an capillary path such as grout it will increase the moisture content of the foundation sill, since ground water moisture is constantly moving up the foundation from the footing and sub-grade portion of the foundation wall (a phenomenon that used to be called "rising damp".) But with a decent capillary break like 6-10 mil poly or EPDM it's fine to pound grout or mortar in there. (Grace's 9" x 50' self-adhesive roof membrane detail roll is about $35/roll, and is a suitable EPDM product wide enough for most foundations. In some 2x4 framed houses you can cut the roll into 4.5" and make it work.)
 

DIYer101

Member
Messages
86
Reaction score
2
Points
8
Location
Colorado
Thank you Dana - that's why I come here and ask (so I don't do the exact wrong thing...).

FWIW I realize that paying professionals is the way to get it done right (and I've been doing that - a lot, unfortunately), but I gotta try and do a few things myself. Nobody likes my crawlspace, so I can save a lot of cash by working down there, and it keeps things moving along.

I'll get ahold of some tape. I'll hold off on jacking up the house until we really need to do that. Which will hopefully be never, but won't surprise me a ton if that day comes.
 

Dana

In the trades
Messages
7,889
Reaction score
509
Points
113
Location
01609
If there's a slab to work against a couple of bottle-jacks and a steel beam (or a stout wood beam), make jacking up the house a hair a section at a time a lot easier than it sounds for 1 & 2 story framed houses.

But in a CO climate on well drained soil with the rain gutters and bulk-water well managed on the exterior it's unlikely to be as important as it would be in swamp in FL or the rain-drenched western slopes of the Cascades in WA.
 

DIYer101

Member
Messages
86
Reaction score
2
Points
8
Location
Colorado
Thanks again. There is no slab but I'm sure there's a way to do it if needed.

The drainage is a work in progress. There were termites here many years ago so it's on my radar to make sure they don't get any water (it looks like there was some sort of leak, although I think it was coming down from the roof).
 

Dana

In the trades
Messages
7,889
Reaction score
509
Points
113
Location
01609
With a history of termites it's worth installing copper flashing between the foundation sill and the foundation as the capillary break. The sheet metal itself is insect-proof, and any copper leaching through the concrete into ground next to the foundation is toxic to termites. There are copper-clad plastic sill gaskets for that purpose, but I'm not sure how well those hold up over time.

I'm assuming this is an unvented crawlspace? If yes, a ground vapor barrier is a good idea, and protecting the vapor barrier with a 1.5-2" rat-slab would be even better.

Is there insulation between the joists above? Any plumbing down there to freeze-protect?
 

DIYer101

Member
Messages
86
Reaction score
2
Points
8
Location
Colorado
Thanks again. I like the sound of that copper.

The crawlspace is unvented. We just got a radon system installed, which is a sheet of plastic over the dirt, with perforated tubes underneath that suck air out.

There is no insulation down there. My next project was going to be sticking rigid 2" foamular insulation between the floor joists (and sealing again) all the way around the edge of the house. But that's still to come... For pipes, there's a bit of pipe exposed for outdoor spigots, and the heating (boiler) pipes, which supposedly should have some kind of antifreeze in there. I'm going to test that in the fall.

I was hoping that sealing the gaps and putting rigid insulation around the perimeter would keep the floorboards warm and prevent any pipes from freezing. The radon system, if it pulls air from anywhere besides the ground (due to leaks), will probably pull air from the heated living space.
 

Reach4

Well-Known Member
Messages
38,858
Reaction score
4,428
Points
113
Location
IL
Pay attention to what Dana said about pipes. You would like the pipes on the house side of the insulation.

I wonder if a vent or two to kill the house-sucking vacuum above your radon plastic would be wise. I suspect so.
 

Dana

In the trades
Messages
7,889
Reaction score
509
Points
113
Location
01609
The approach to insulating the band joists works, and would be the right thing to do.

But cut'n'cobbled foam between joists is a waste of good foam, since the R1-R1.2/inch wood is thermally bridging the foam, providing a path for the heat to move around the insulation. If installing foam on the joists it's far better to make a continuous layer cap-nailed to the underside of the joists, and tape the seams to make it an air barrier. Using a fire-rated foil-faced polyisocyanurate (eg Dow Thermax) in that location rather than XPS (Foamular) is a far better choice, since it's much easier to seal reliably using a 1.5-2" temperature rated foil tape (eg Nashua 324a, found in mostt box stores), and doesn't need a thermal barrier against ignition the way other foam board does when used in that way.

But in a crawl space it's usually less foam and more reliable to insulate the crawlspace walls instead of at the joists, but you would need to leave a termite inspection strip, and not fully cover it with foam. Fire rated Thermax can be glue to the foundation wall using foam board construction adhesive, leaving a 3" strip at the top of the foundation where you can cut & fit high-density R15s (rock wool preferable to fiberglass) that youj can just pull for termite inspection. To meet current IRC code minimums in your climate zone (Zone 5B) takes R15 continuous insulation, which would mean 2.5-3" of foam depending on type. The cheapest thing to do would be 2.5" of EPS glued to the foundation, (in 1 or two layers, seams taped and staggered), with a 1/2" layer of fire-rated polyiso on the interior. An alternative would be 1" of EPS trapped to the foundation wall with a non-structural 2x4/R13-R15) studwall with unpainted wallboard on the interior as the thermal barrier for the foam, but that's a lot more labor.

If it isn't already, the ground vapor barrier should be sealed tight to the foundation walls, and it's OK to install the foam overlapping the vapor barrier.

That way the entire crawlspace is now conditioned space, and even unheated there is zero freeze risk, and any "musty crawlspace" smells should go away, since the joists will be in conditioned space, settling in at a moisture content less than 10% year-round.
 

Dana

In the trades
Messages
7,889
Reaction score
509
Points
113
Location
01609
I may have been presumptive that your location is in zone 5B- it kinda depends on your altitude in CO. Could be anything from 4B to 7B:

iecc-climate-zone-map-energy-code-warm-moist-line-800.jpg


If you opt to insulate at the joists, cheap R19 batts at the bottom of the cavity held up with 1.5" Thermax cap-nailed to the joist edges would deliver slightly better than code performance, despite the lower-than code (R27 instead of R30) center-cavity R, due the fact that the joists are thermally broken by the ~R9 foam. The foam would run a bit less than a buck a square foot in my neighborhood, and R19s are often heavily discounted, since they no longer meet code for 2x6 wall cavities in most of the country.
 
Last edited:

DIYer101

Member
Messages
86
Reaction score
2
Points
8
Location
Colorado
Thanks again - I truly appreciate it. So if you've got any patience left, some clarifying questions please.

The approach to insulating the band joists works, and would be the right thing to do.
For somebody like me who's not great with all the terminology, does this mean that the plan to insulate the wood above the foundation is a good one so far (doing it like the FamilyHandyman.com shows)? When I mentioned "between floor joists" I meant along the perimeter of the house (which I think is the band joist), but I'm not planning to insulate under the floorboards.

And the bonus question: is a fire barrier typically required (and smart) if we're just talking about the band joist area and plain-old rigid foam?

Now, onto the suggestion to use Thermax. Are you suggesting that mainly for the concrete walls in the crawlspace (or the area below the sill plate)? If I can make a large dent by just sealing and insulating the band joist and sill plate, I may start there, and have a pro do the rest.

I'm not seeing Thermax easily available, but I probably don't know where to look. I live in a smallish town with 20K people in Southwest CO, but there is a Home Depot... After your posting and a bit more reading, I'm now aware that fire-resistance is an issue.

Thanks again.
 

Dana

In the trades
Messages
7,889
Reaction score
509
Points
113
Location
01609
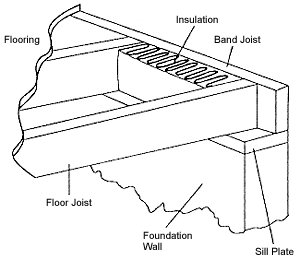
The band joist aka "rim joist" is the vertical joist on top of the sill plate that girds the entire house. The spanning joists supporting the floor are called floor joists:

band-joist.gif


In the band joists most local codes usually give rigid foam a pass without the thermal barrier, even if the joists are open, as long as there are no ignition sources nearby. If you covered it with R15 rock wool (unfaced) the rock wool would meet the requirements, and add quite a bit of R.

But the ratio of foam-R to fiber-R has to be adequate for the exact climate zone to prevent frost/condensation build-up over a winter at the foam/fiber boundary. In your relatively dry climate you can usually cheat a bit on foam-R, as long as you don't actively humidify the conditioned space. In zone 5 as long as ~25-30% of the total R is foam the risk of moisture accumulation is low. With 2" EPS is about R8, R8 EPS + R13 fiberglass= R21 total, R8/R21= 38%, you have plenty of margin.

But with just 1"/R4 you'd be at R17, and R4/R17= 23%, so there is some risk of creating mold/rot conditions at the sill plate where the fiber & foam meet in the early spring, but not a huge risk in a dry climate. Cobbling air-tight foam over the sill plate including it's edges takes that risk down even further. EPS is comparatively cheap per-R relative to XPS, and found in most box stores, and quite a bit greener. Polyisocyanurate is too, but it has performance issues at cold temps if it's just a thin layer on the exterior. (An inch of R6 polyiso on the exterior of R13 in a zone 5 or colder climate will underperform an inch of R4 EPS over the winter, even though it will outperform it in the spring and fall.)

In SW you could be in either in zone 5, 6, or 7 depending on altitude. Can you share the ZIP code? (Or just find yourself on that map, and name the zone.)

For larger surface areas such the foundation walls code requires either a fire rated foam (like Thermax), or a thermal barrier (half-inch wallboard), or in some jurisdictions, and intumescent (fire retardent) paint.

Most box stores also carry polyisocynaurate from other manufacturers, and ANY foil faced polyiso is more fire-safe than polystyrene ( EPS or XPS.) You can identify polyiso by it's off-white color and fairly uniform texture on the cut edges between the foil facers, and it's ~R6/inch labeled R-values. EPS is usually white, and has a pronounced macroscopic bead structure (it's the stuff cheap coolers are made of), and somtimes comes with foil or smooth plastic facers. Polyiso has a higher ignition point, and chars in place even when fully engulfed and burning, whereas polystyrene foams melt while burning, spreading via a flaming puddle of liquid polymer. But when installed correctly with thermal barriers, by the time polystyrene actually ignites it means the house is probably close to gone anyway.

Without insulation under the floor, the conduct heat losses through the ~R1 above-grade foundation walls are large- it makes a real difference in an otherwise insulated house. In zones 6 & higher the below grade foundation walls or even the dirt floor of the crawlspace can be significant heat losses. Sealing and insulating the band joist and foundtion sill takes a big chunk of the infiltration heat loss down (and that IS significant), but it's just getting stared on the conducted losses. When it's 0F outside an air-tight uninsulated crawl will run maybe 50F. At 50F in the crawlspace, 0F outside every square foot of above-grade foundation is losing 50 BTU/hr. If you insulate the foundation walls to even R10 (code is higher than that) the crawlspace (and your floor) won't drop below 60F when it's 0F outside, and the losses per square foot of above-grade foundation wall will be about 5 BTU/hr. That's an order of magnitude difference in heat loss despite the higher crawlspace temp, and a big uptick in barefoot comfort.
 

DIYer101

Member
Messages
86
Reaction score
2
Points
8
Location
Colorado
Thanks again, that is all good to know.

My climate zone is 5. I'll PM my zip code (I'm weird about putting things online, and being new to a smallish town with a very slow real estate market doesn't help).

Some quick searching around says I might be able to find polyiso locally at roofing or lumber suppliers. The box store here (and the other one an hour away) don't seem to sell any of the brands that I was able to come up with. Time for me to use the phone apparently.
 

Dana

In the trades
Messages
7,889
Reaction score
509
Points
113
Location
01609
Your local orange box store sells 1.5" EPS with plastic facers for about 8.5 cents/R-ft^2. It's low-density "Type-I" (1lb per cubic foot nominal) goods manufactured by R-Tech, labeled only R5.78 (R3.85/inch ) @ 75F mid-foam temp, but at your average winter temp it would run ~R6 if it's the only insulation, higher if it's on an exterior layer. It's the right thickness to insulate any concrete ledge at the top of the foundation up to the level of the foundation sill. So if you first install insulation over the band joist, then the ledge strip (with a bead of can-foam at the foundation-sill/concrete boundary), and then a layer the covers the top of the band joist & ledge strip, you can then cobble a piece over the top of the foundation sill and ledge-foam to completely block the wood from interior side moisture drives. In the remaining space you could then add another layer of foam bringing the band-joist R up to ~R12-ish, or carefully sculpt a plug from high density fiberglass or rock wool batt to completely fill that space.

This is almost the right detail showing foam at the ledge ontinuous with the fall foam but they don't show the lappin layer over the foundation sill that you'd need with a normal-width sill:

Rim%20joist%20insulation%20-%20BSC.jpg


With a 2 x 4 sill and a 2x band joist, with only 1.5" foam against the band joist there would be 1/2" of exposed sill plate, so you'd have to double up at least one of the layers (either the ledge or the band joist) to fully cover the sill. As shown there is a low-R bridge or air-gap where the sill and ledge foam meet.

The cut'n'cobbled foam can be cut 1/2" narrower than the space, tacked in place with cap nail &/or foam board construction adhesive, then sealed in place with can-foam. By cutting it narrow it makes it easier to put in place allowing for dimensional irregularities, and leaves a 1/4" perimeter so you can get the can-foam straw-nozzle all the way in, guaranteeing a good air seal.

The 1.5lb density 1"/R5 pink XPS sold in the same store comes in at 13.4 cents/R-ft^2, and their 2.5lb density 2"/R10 pink XPS comes in at 13.5 cents/R-ft^2. That's >50% more expensive per R than the Type-I EPS.

Sharpening the side edge of a 4" putty knife makes a great tool for cutting rigid foam cleanly. Marking it ahead of time and using a framing square for a straight edge makes quick work of the smaller blocks at the joist bay ends. A 4' level can be used for the straight edge for the long sections of ledge & band-joist.

A 10" bread knife works great for sculpting high density batts. Box stores usually carry purpose made batt-knives if borrowing the bread knife out of the kitchen would get you in hot water at home. :)

If you wanted to DIY the wall insulation, 1.5" EPS glued to the wall w/ foam board adhesive, seams taped with housewrap tape (works for foam with plastic facers, you'd have to use 3M All Weather Flashing Tape or similar for XPS), and trapped in place with a mini-studwall w kraft faced/R13s would work just fine. The 15" x 32 foot contractor rolls are pretty cheap compared to high density goods. A strip of foam board under the bottom plate is also advisable. You can use a single top-plate (since it's non-structural) nailed to the underside of the floor joists. To fully meet fire code the you'd need half-inch gypsum on the interior, but there's no need to paint it.

There's a long term rationale for ~R6-R8 on the floor of the crawlspace too, but you can treat that as a separate project. Ideally you'd put down 1.5-2" of foam and pour a thin rat-slab over it to protect the foam & vapor barrier. In terms of energy savings and under-foot comfort the crawlspace floor is very low priority compared to the walls and band joists. In more humid climates there's a mold-mitigation aspect to putting some R on the crawlspace floor, but at your generally low summertime outdoor dew points it's not as urgent as in more humid climates with your deep subsoil temps. By mid-summer your nose would be able to tell you if mold is going to be an issue without crawlspace floor insulation.
 

DIYer101

Member
Messages
86
Reaction score
2
Points
8
Location
Colorado
This is extremely helpful - thank you so much. I'm digesting all of it but I think I'm getting a decent idea of how everything should look and work.
if borrowing the bread knife out of the kitchen would get you in hot water at home. :)
I could make the case that it's going to a good cause...

I think my only concern for now is about termite inspection if I insulate the foundation walls. Is it wise to leave a strip (3" based on comments above) of exposed foundation (which can be temporarily covered with a removable batt)? Presumably that way I'll be able to see if they make a mud tunnel up from the ground. The plastic from the radon system is glued to the walls so I'm not sure how they'd get past that, but I'd like the peace of mind (plus there are cracks in the foundation and irregularities in the glue-job I'm sure).

Thanks once again.

"Doing it right" is more complicated than I realized, but it's obviously the way to go.
 

Dana

In the trades
Messages
7,889
Reaction score
509
Points
113
Location
01609
For the 3" termite inspection strip it's fine to use removable insulation plugs of batt or foam to the concrete. It adds up to several square feet of R1 foundation, so it's worth doing. Pick a date every year to go down and inspect it "just in case", even if there are no signs of termite infestation just for the peace of mind. With removable plugs it shouldn't take more than 10-15 minutes to run the perimeter in most houses.
 
Top
Hey, wait a minute.

This is awkward, but...

It looks like you're using an ad blocker. We get it, but (1) terrylove.com can't live without ads, and (2) ad blockers can cause issues with videos and comments. If you'd like to support the site, please allow ads.

If any particular ad is your REASON for blocking ads, please let us know. We might be able to do something about it. Thanks.
I've Disabled AdBlock    No Thanks