fcrick
New Member
Hi there - was going to make my first cuts into drains actually being used and I figured I would write out my plan here, ensuring a) I have a plan, and b) if I'm about to do something dumb, some nice person here might save me from myself. Sorry if this is a bit long-winded.
House is 1959 and all the drainage below slab is cast iron. A previous owner added a bathroom in the basement, but the drainage wasn't done correctly, so the shower could overflow and the vanity sink also wouldn't drain well. The bathroom had a poor layout and no one would even use it, so I decided to make redoing the bathroom a covid DIY project, and demolished it. I discovered the vanity sink drain in the wall had a 1 1/2" trap arm that went over about 3', then down 1', then went into a CI sanitary tee on a 1 1/4" drain used by the sink in the bathroom on the floor above.
We eventually decided that the only way to fix the layout we'd like would involve moving drainage under the slab, and we decided if we're gonna do that, we'd actually prefer to have the bathroom 15' away in a different part of the basement.
I made a long hole in the slab where the old shower trap was, and discovered an assembly I'd seen on several "top 10 mistakes DIY plumbers make" lists - the shower trap arm ended with a 45 and a wye instead of a sanitary tee, and also was sloped toward the p-trap instead of away from it. This ABS drain continued down and turned to horizontal and eventually connected straight into a 2" CI pipe with a fernco. Since it's not used, I cut out the whole thing near the main house drain, and put on temporary caps there and on the vent pipe.
To get my 3" pipe to the new bathroom started, I plan to hook it into the main house drain where the old 2" shower drain did - it ran into a CI 4" double wye with 2" pipes coming out of both sides. The 2" pipe on the other side of the wye used to be the drain for the bathroom sink, the upstairs bathroom sink, _and_ the kitchen sink, but in previous drainage adventures I redirected both the kitchen and upstairs bathroom sink so they drained elsewhere, so today, this double wye drains everything in the house through it's straight part, and nothing drains into either side.
My plan, hopefully for tomorrow, is to cut out this 4" CI double wye, and replace it with a 4" ABS double wye, but one with larger 3" pipes coming out of the sides. One side would serve the new bathroom 15' away, and the other side will eventually become a new toilet stack for the upstairs bathroom once we get to renovating it. For tomorrow though, I just want to do the minimum so when the family gets home from their outing, everything works like it did before.
Here's what I've prepared:
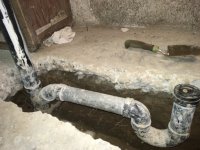
The cast iron double wye, using the cap I was using above to block sewer gasses:
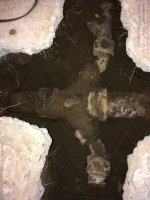
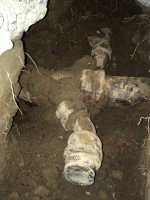
The new ABS wye:
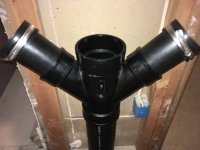
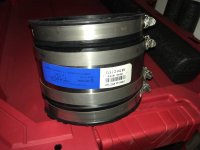
Some Canadian Fernco knock-off? It's 4 1/8" long and has 4 fasteners and no inside ridge in the middle.
Any thoughts/advice/warnings? Did I need to buy those extra beefy couplings? What kinds of things could go wrong that I could be better prepared for? Is it ok to have a 15' trench in my slab, or should I pour part of it so I'm dealing with two smaller holes? House is 40' by 25', and the wye is about a foot from the retaining wall-side of the walkout basement. Any tips on making recipricating saw cuts straight? Thanks so much!
House is 1959 and all the drainage below slab is cast iron. A previous owner added a bathroom in the basement, but the drainage wasn't done correctly, so the shower could overflow and the vanity sink also wouldn't drain well. The bathroom had a poor layout and no one would even use it, so I decided to make redoing the bathroom a covid DIY project, and demolished it. I discovered the vanity sink drain in the wall had a 1 1/2" trap arm that went over about 3', then down 1', then went into a CI sanitary tee on a 1 1/4" drain used by the sink in the bathroom on the floor above.
We eventually decided that the only way to fix the layout we'd like would involve moving drainage under the slab, and we decided if we're gonna do that, we'd actually prefer to have the bathroom 15' away in a different part of the basement.
I made a long hole in the slab where the old shower trap was, and discovered an assembly I'd seen on several "top 10 mistakes DIY plumbers make" lists - the shower trap arm ended with a 45 and a wye instead of a sanitary tee, and also was sloped toward the p-trap instead of away from it. This ABS drain continued down and turned to horizontal and eventually connected straight into a 2" CI pipe with a fernco. Since it's not used, I cut out the whole thing near the main house drain, and put on temporary caps there and on the vent pipe.
To get my 3" pipe to the new bathroom started, I plan to hook it into the main house drain where the old 2" shower drain did - it ran into a CI 4" double wye with 2" pipes coming out of both sides. The 2" pipe on the other side of the wye used to be the drain for the bathroom sink, the upstairs bathroom sink, _and_ the kitchen sink, but in previous drainage adventures I redirected both the kitchen and upstairs bathroom sink so they drained elsewhere, so today, this double wye drains everything in the house through it's straight part, and nothing drains into either side.
My plan, hopefully for tomorrow, is to cut out this 4" CI double wye, and replace it with a 4" ABS double wye, but one with larger 3" pipes coming out of the sides. One side would serve the new bathroom 15' away, and the other side will eventually become a new toilet stack for the upstairs bathroom once we get to renovating it. For tomorrow though, I just want to do the minimum so when the family gets home from their outing, everything works like it did before.
Here's what I've prepared:
- 4" ABS double wye with 3" on both sides. I've added and glued two short 3" pipes on each side, and capped them with 3" fernco caps I've tightened to 60 inch-pounds with torque wrench.
- Few feet of 4" ABS pipe to measure and cut once the CI wye is cut out
- New 9" reciprocating saw blade for cutting the 4" cast iron pipe out, and the saw
- Two 4" Mission Rubber Adjustable Repair Couplings (see picture) to connect the ABS and CI
- Torque wrench so I can tighten the couplings to 50 inch-pounds
- Sanding sponge for the ABS
- Iron file for sanding and smoothing cast iron
- ABS cement
- Cut the CI wye out by cutting the pipes to it, making a gap large enough to fit the new wye and the two couplings. This should be the length of the new wye plus 4" and change. The new wye is about 2" shorter then the CI one.
- Sand and smooth and round off the outside edge of the cuts so they don't damage the couplings.
- Clean the outside of the two 4" CI pipes I'll be connecting up again so they both have 4" of clean pipe to slide the couplings all the way onto.
- Measure and cut two pieces of 4" ABS pipe, carefully deburring and rounding one end of each so they don't damage the couplings.
- Dry fit the cut pipes into the new wye, and dry fit that in place to make sure it all fits.
- Put all the ABS pieces together with cement.
- Put the assembly in the gap, and slide the couplings into place, and gradually tighten them with torque wrench until it pops on each clamp.
- Do some tests to make sure it's not leaking.

The cast iron double wye, using the cap I was using above to block sewer gasses:


The new ABS wye:

Some Canadian Fernco knock-off? It's 4 1/8" long and has 4 fasteners and no inside ridge in the middle.

Any thoughts/advice/warnings? Did I need to buy those extra beefy couplings? What kinds of things could go wrong that I could be better prepared for? Is it ok to have a 15' trench in my slab, or should I pour part of it so I'm dealing with two smaller holes? House is 40' by 25', and the wye is about a foot from the retaining wall-side of the walkout basement. Any tips on making recipricating saw cuts straight? Thanks so much!
Last edited:
