Bathroom Bypass doors on new bathroom leaking from Silicon Sealant

Users who are viewing this thread

pectin232

New Member
Messages
1
Reaction score
0
Points
0
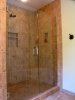
It is for a small bathroom/ toilet bypass door... that is put on porcelain tile to the metal frame of the glass door. What should I do... even using a heater to make sure it holds [prevents water from leaking]... it is still leaking. I got the silicon sealant from Home depot. Should I get a better one like immerseal sealant or others? Does it make a difference. BTW I had sealed the bathroom before using the 'Tile and Grout sealer' before I used the Silicon Sealant to sealed the door to the tile..

check attachment..

water is coming out from the bottom of the metal part of the glass door to the tile.. I had sealed it with a tile and grout sealant... is that why it is not sealing well??
 

Attachments

  • tile-shower.jpg
    tile-shower.jpg
    45 KB · Views: 343

Rb249

New Member
Messages
2
Reaction score
0
Points
0
Website
moorelandscaping.webs.com
Sealant problem

Hi,
Had this problem once. Remove the metal part if screwed to the tile. Install a
rubber strip gasket caoted with bathtub sealer and then the metal part back to the tile, sandwiching the rubber gasket strip. Cut any excess rubber strip exposed with a "sharp" knife without pullling the gasket out. Use bathtub caulking to form a finished bead on both sides for the finished look. This bead should be no more than 3/8" inch wide on the 45 degree face of the bead (the part you see. 1/4" preferred. The combination of the two will prevent leakage for years to come. The sealant you used on the tile could be affecting the seal of the caulk sealer you are using. Chemical compounds are tricky when in contact with eachother. The rubber strip sandwiched in between will help ( similar to a gasket) To form a nice bead without mess, clip off the end of the caulk tube at a 45 degree angle. Place into gun, and place the tip against the surfaces in a 45 degree fashion with the extended part of the tip outward from you and the surfaces. As you squeeze the caulk out, run the gun across the section to be caulked with the proper speed to let just enough out to form the bead. When done, it should look close to professional.
 
Top
Hey, wait a minute.

This is awkward, but...

It looks like you're using an ad blocker. We get it, but (1) terrylove.com can't live without ads, and (2) ad blockers can cause issues with videos and comments. If you'd like to support the site, please allow ads.

If any particular ad is your REASON for blocking ads, please let us know. We might be able to do something about it. Thanks.
I've Disabled AdBlock    No Thanks