Dropping sink drain for new deeper sink

Users who are viewing this thread

Ladiesman217

Member
Messages
142
Reaction score
8
Points
18
Location
MA
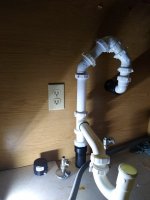
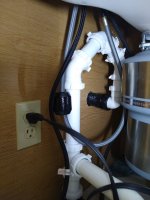
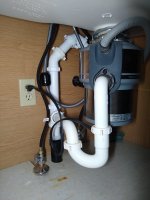
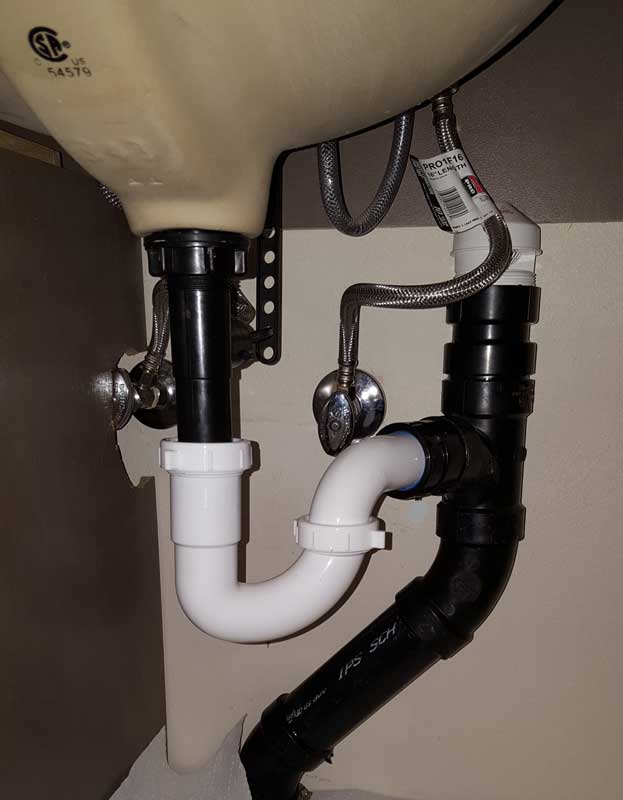
Use a 2" T instead of the 2" 90° connector. Sink and disposal connect here.

The top of the T is the vent pipe that slopes up and is connected to the old abandoned dry drain that is vented somewhere in the wall.

The bottom of the T is the new drain line down through the floor.

The vent prevents syphoning of the p trap(s).

You should dry fit everything together before you drill the new drain hole through the floor. At least you have plenty of room for pipes in that corner cabinet.

Perhaps others have a better idea?
 
Last edited:

Gifty74

New Member
Messages
16
Reaction score
1
Points
3
Location
Lancaster, PA
Ok. So just to confirm, if I'm connecting into the existing line down under the floor, and the assumption is the vent is somewhere between where the drain enters the wall, and where I'm wye'ing into it under the floor...do I still need to connect to this same old drain line above the trap?
 

Ladiesman217

Member
Messages
142
Reaction score
8
Points
18
Location
MA
Yes, the vent has to be above the p trap. When you abandon the existing drain, the 2" wall connection can be used for a vent connection.

The existing drain in the wall presently has to be vented with your current setup. Otherwise, the drain water in your current setup would be sucked out of the p trap when you use the sink. That could let sewer gas enter the house through the kitchen sink drain.
 

Terry

The Plumbing Wizard
Staff member
Messages
29,942
Reaction score
3,459
Points
113
Location
Bothell, Washington
Website
terrylove.com
Ok. So just to confirm, if I'm connecting into the existing line down under the floor, and the assumption is the vent is somewhere between where the drain enters the wall, and where I'm wye'ing into it under the floor...do I still need to connect to this same old drain line above the trap?

If you use an AAV for the vent, you won't need to reconnect at the wall. You can cap the wall outlet.

aav-lav.jpg


A lav done with 1.5" piping. Kitchens normally are run in 2" except for the 1-1/2" p-trap.
 

Gifty74

New Member
Messages
16
Reaction score
1
Points
3
Location
Lancaster, PA
Ok. So I'll put the stack on the new line and cap it. If an AAV is needed I'll be able to put one on easily. I'll tie into the existing line as the vent and see if it is sufficient. My only concern is that the existing line is not much higher than the horizontal feed into the new drain, but should have enough to get a little slope, off the top of a tee.

In the basement, can I use this flexible fitting to make the connection? I'm only using one so I could care less if it's a little more expensive, but seems so much simpler than cementing in a stub and trying to get a repair coupling to work on both sides, in a very tight space. Seems with this flexible one I could wiggle it in there without much hassle as both sides are rigid.

And actually, I need a wye, not a tee. Looks like they do not make a 2" flexible WYE
wye.jpg
 
Last edited:

Terry

The Plumbing Wizard
Staff member
Messages
29,942
Reaction score
3,459
Points
113
Location
Bothell, Washington
Website
terrylove.com
The rubber fitting will collapse over time. Plumbing inspectors don't let us use them for that reason. I've seen plenty of failed joints where homeowners have installed those and then the weight of the pipe crushes them later on. I would never have a rubber joint in a home of mine, or for a customers home.
 

Gifty74

New Member
Messages
16
Reaction score
1
Points
3
Location
Lancaster, PA
Ok, I can take that advice. Though both sides where I'm splicing in are very rigid and don't appear that they'll move, and I'll be aware of this potential for collapse and source of issues in the future.

So if I'm to take the advice of using a wye to get 45° off that angle in the below pic, straight up the center of the joist to the 2.5" hole I'm about to cut in the floor under the sink. The issue is there is only about 8" of pipe to work with, in a tight spot. Here's is what I'm envisioning as the steps to get this wye in there.
  1. Cut out a 6" section of the pipe leaving 1" showing on each side
  2. Cement a 1" stub of 2" pipe into one side of the wye
  3. Slide a 2" rubber coupling over the end with the 1" stub showing
  4. Cement the side of the wye without the stub, to the 1" stub showing from the original splice into the pipe
  5. Tighten rubber coupling on the other end
  6. Plumb into the wye to get to the new hole in the floor
Let me know if something doesn't sound right.

floor drain.jpg
 

Reach4

Well-Known Member
Messages
38,896
Reaction score
4,436
Points
113
Location
IL
You want to use shielded couplings, not straight rubber. Try "shielded" as a search term in this forum.

When a drain transitions from vertical to horizontal, as in your latest picture, the elbow should be a long sweep elbow or a 45.

I don't know what your 1 inch references are about. You might illustrate what you are trying to do.
 

Ladiesman217

Member
Messages
142
Reaction score
8
Points
18
Location
MA
Ok, I can take that advice. Though both sides where I'm splicing in are very rigid and don't appear that they'll move, and I'll be aware of this potential for collapse and source of issues in the future.

So if I'm to take the advice of using a wye to get 45° off that angle in the below pic, straight up the center of the joist to the 2.5" hole I'm about to cut in the floor under the sink. The issue is there is only about 8" of pipe to work with, in a tight spot. Here's is what I'm envisioning as the steps to get this wye in there.
  1. Cut out a 6" section of the pipe leaving 1" showing on each side
  2. Cement a 1" stub of 2" pipe into one side of the wye
  3. Slide a 2" rubber coupling over the end with the 1" stub showing
  4. Cement the side of the wye without the stub, to the 1" stub showing from the original splice into the pipe
  5. Tighten rubber coupling on the other end
  6. Plumb into the wye to get to the new hole in the floor
Let me know if something doesn't sound right.

View attachment 45577


I think that I would cut out that 45° fitting shown on the left close to the fittings on both ends and work from there.

You will probably need to use one shielded coupling to make things fit.
 

Gifty74

New Member
Messages
16
Reaction score
1
Points
3
Location
Lancaster, PA
I think that I would cut out that 45° fitting shown on the left close to the fittings on both ends and work from there.

You will probably need to use one shielded coupling to make things fit.

Ok, sounds great. So that 45 can be replaced with the wye, giving me the connection I need for the new drain line coming in from up the joist. Then the shielded fitting will bridge the little extra gap I will create from cutting out that 45 fitting. Correct?
 

Ladiesman217

Member
Messages
142
Reaction score
8
Points
18
Location
MA
If any gap is too big, you can always cut the existing pipe shorter and add a section of pipe with a standard plastic coupler.

The shielded fitting is used to connect pipes where you can not use a fitting with a hub.

When you do the work, just buy a few extra parts to keep you out of trouble. You can always return what you do not use.
 

Jadnashua

Retired Defense Industry Engineer xxx
Messages
32,770
Reaction score
1,190
Points
113
Location
New England
You should only have maybe 1/4" max of a gap between the pipes when using a shielded coupling to make the connection. You have to usually remove the shield, slid it on the pipe, install the rubber on one side up to the internal stop, then fold the other end over it to make room to then place it next to the pipe you're connecting it to unless you have enough room to slide it on that side, too. Then, once the rubber is folded back and connecting the two pipe, you slide the shield back over it and tighten it down. The whole reason for the shielded coupling is to ensure the ends of the pipe stay aligned. The all rubber ones are only code when used underground where the two pipes can be properly supported by the backfill.
 

Gifty74

New Member
Messages
16
Reaction score
1
Points
3
Location
Lancaster, PA
Attempted to cut out the existing 45 eblow but the space is so limited I cannot get any type of saw in there. The string trick that I've seen online also did not work. String I had was breaking so I went to a twine, which held up, but I don't think I was getting enough motion to build up enough heat to cut through. Any ideas?? Central vac exhaust just underneath, and pex water lines right below that, so have to be very careful with any type of cutting instrument.
 

Cwhyu2

Consultant
Messages
1,615
Reaction score
22
Points
38
Location
Cincinnati OH
Cable saw cuts PVC in tight places $5.00 Home Depot.
 

Attachments

  • general-tools-pipe-tube-cutting-858-64_1000.jpg
    general-tools-pipe-tube-cutting-858-64_1000.jpg
    30.8 KB · Views: 260

Gifty74

New Member
Messages
16
Reaction score
1
Points
3
Location
Lancaster, PA
Well, got the job done thanks to you fine people! The toughest part was cutting out the 45. Took just the right tool, ended up using a Bosch 'pocket' or mini sawzall. Cut was totally blind, as was all of the cementing in that location, which added to the challenge. The shielded fitting was the ticket, worked it back on the longer side of the pipe, then after having the extension coming out of the wye in place had to work it back. Left just enough gap between those pieces so the recessed ring in the center of the rubber fitting would fill the gap. The pic is a shot looking the other direction from earlier pics, with the new wye and flexible fitting. As you can see, pretty tight quarters as the block wall comes up and occludes over half of the joist gap.

install.jpg
 
Last edited by a moderator:

Kevin71246

Member
Messages
31
Reaction score
0
Points
6
Location
Chicago burbs
Do you have a window at your sink? I'm guessing you do. That's why the drain goes past a few studs then down... Before it goes down it probably connects to a tee where vent goes up and drain goes down. While you can't see a vent directly above that location it can travel in the Attic.

Your proposal if I'm understanding it will work... It just won't be compliant... And won't work 100%. And you'll have an s trap which isn't allowed. Others mentioned an idea that may work... Tap in straight down, but you need the right wye fitting not a t. And hopefully use the existing line for a vent. But there are a lot of rules about vents, and dry vents if that's what it becomes...

It's hard for us to respond, and I have this issue all the time: the easy way that will probably work, and the right/legal code way... What answer do you want? :)
 

Gifty74

New Member
Messages
16
Reaction score
1
Points
3
Location
Lancaster, PA
Job is done. Went down through the floor under the sink and T’d into the existing line. Put on an AAV. Still have the existing line under the sink that is vented so can tie into that if an inspection requires it (to sell the house).
 

Brian W.

New Member
Messages
1
Reaction score
0
Points
1
Location
Ohii
Not to resurrect a old thread but I ran into this exact same problem and ended up using the old drain as my vent line in kinda a u-vent set up, not sure if this is code but here's how it looks.
 

Attachments

  • IMG_20191018_185842113.jpg
    IMG_20191018_185842113.jpg
    64.7 KB · Views: 229
  • IMG_20191018_203030449.jpg
    IMG_20191018_203030449.jpg
    80.9 KB · Views: 215
  • IMG_20191018_203025204.jpg
    IMG_20191018_203025204.jpg
    74.9 KB · Views: 218
Last edited:
Top
Hey, wait a minute.

This is awkward, but...

It looks like you're using an ad blocker. We get it, but (1) terrylove.com can't live without ads, and (2) ad blockers can cause issues with videos and comments. If you'd like to support the site, please allow ads.

If any particular ad is your REASON for blocking ads, please let us know. We might be able to do something about it. Thanks.
I've Disabled AdBlock    No Thanks