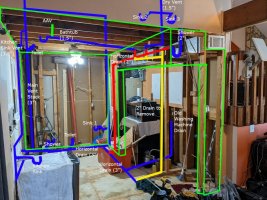
Hi, first time posting on here and appreciate any advice. I'm in the process of remodeling my kitchen and have removed a non-load bearing wall that was between a storage closet and pantry. Above the kitchen is the master bath. As you can see in the attached pic the stand up shower (1) 2", the sink (2) 1.5", and the stand alone tub (3) 1.5" all drain to the same 2" line. I would like to remove the existing pipes (yellow) and connect each to a new drain (red) turning down into the short wall near the HVAC unit (the new line is approximate and will be connected / sloped as required). Currently there is no vent on any of these fixtures. The blue line is the existing 3" drain in the basement, a 1.5" line coming from the adjacent bathroom sink (4), and a 2" branch vent that I believe connects back with the main vent about 12' above the ceiling. The green line is where I was thinking of tying the branch vent in. Just wondering if the rough drawing would be acceptable for rerouting the drain line as well as tying into the existing branch vent or if there is a better way? Thanks!

You are using an out of date browser. It may not display this or other websites correctly.
You should upgrade or use an alternative browser.
You should upgrade or use an alternative browser.
Users who are viewing this thread
Total: 2 (members: 0, guests: 2)
wwhitney
In the Trades
The general idea of running the drain to the left and connecting to the blue stack is fine.
On where to connect the red drain to the blue line, the way you show the red drain turning down parallel to the blue stack is appropriate if the highest fixture draining into the blue stack is (4), and (4) depends on the blue stack for its vent. If anything else is draining into the stack on the floor above, then (4) needs a separate vent, and the red drain can just run horizontal across to the blue stack.
As far as venting (1), (2) and (3), the vent connection to any trap arm needs to occur within at most one pipe diameter of fall from the trap. Since the lav (2) has the highest trap, it will need a dry vent, either atmospheric, or an AAV if the TN plumbing code allow them. Then the lav drain (2) can be used to wet vent the shower (1) and possibly the tub (3), if the tub trap is close enough.
For the lav (2) drain to wet vent the shower (1), all you need to do is raise the red line to be in line with the trap outlet on (1). Then as long as the trap arm from (1) to the connection to the lav drain at (2) is sloped at least 1/4" per foot, but falls no more than 2", that's a wet vent for the shower. You can do the same thing with tub, but that means that the tub trap has to be within 6' of the connection to the red branch drain, and at the correction elevation. That's because the 1-1/2" tub drain can only fall 1-1/2", and 1-1/2" / 1/4" per foot = 6'; that's for the IPC, the UPC limits a 1-1/2" trap arm to 42" in length.
You could instead pull a separate dry vent off the trap arm of the shower or the tub; that dry vent has to come off vertically and stay vertical until at least 6" above the fixture flood rim, at which point it can also connect to another vent (that's at least 6" above its fixture flood rim(s)). So the green line you drew would not comply with that requirement. A dry vent also needs to come off before the trap arm joins a branch drain. These vent rules would apply to an atmospheric vent for the lav (2).
Cheers,
Wayne
Sponsor
Paid Advertisement
Thanks!
Jeremy
wwhitney
In the Trades
I take it the yellow line is to "erase" some existing plumbing in your photo? And the bathtub trap arm does not connect to the "Sink 1" vent? [The latter could be portrayed by breaking whichever line is rearward.]
The bathtub trap arm you've drawn is not a compliant wet vent, that little red vertical section at the end is not allowed. The trap arm has to connect directly to the horizontal red line. So basically, other than the 1/4" per foot slope, the tub trap and shower trap have to be at the same elevations. Also, if your trap arm is near 6', I would suggest using 2" for the tub trap and trap arm.
Are you under the IPC or the UPC? If the IPC, then one AAV can serve both Sink 2 and Sink 3 with a couple stipulations. First, starting at the point where the two lavs combine, the drain has to be 2". Also, the fittings would be simpler if the common drain turned vertical on one side or the other of the two lavs, rather than in between them. With the common drain in the middle, I guess at the joint you'd need to use a 2x1-1/2x1-1/2x1-1/2 double fixturing fitting and just plug the top entry.
Cheers, Wayne
I'm under IPC. Correct, the yellow line is plumbing I plan to remove, and the bathtub trap arm does not connect to the "Sink 1" vent. Everything in blue is existing. The plumbing for both sink 2 and 3 is 1.5" from both traps until the 90 turning down to the branch vent (first red vertical section), and is behind painted tongue and groove making it quite difficult to access. Based on what you said would I be ok if I were to shorten the shower tailpiece / raise the shower trap, run the branch drain through the joists at the correct elevation to meet the trap arm from both the tub and sinks, and add an AAV to each sink in the vanity? I'm open to any other suggestions btw. Never had any issues with the current setup, but the vertical plumbing in yellow must be removed, and want to avoid creating new problems down the road.
Oh, one additional thing that may help. It's not shown in the pic, but the washing machine used to be where the stove/microwave are sitting. The 1.5" drain pipe is still in place and is located almost directly below the vertical drain from the sink.
Thanks!
Jeremy
Oh, one additional thing that may help. It's not shown in the pic, but the washing machine used to be where the stove/microwave are sitting. The 1.5" drain pipe is still in place and is located almost directly below the vertical drain from the sink.
Thanks!
Jeremy
wwhitney
In the Trades
If everything in blue is existing, are you sure the two lavs really have no vent currently?
A 1.5" drain pipe carrying two separate lavs is too small for a wet vent under the IPC. So the proposals so far wouldn't work unless you can upsize that to 2" starting at the point where they join. How about the backside of the T&G paneled wall, is that drywall you could open up to access the lav DWV?
A slight twist on opening up the wall to upsize to 2" is to open up the wall to separate the two lav drains, running a second 1.5" drain pipe for the second lav. Then each lav would need an AAV, but the 1.5" drain with just one lav on it is OK for a wet vent.
Another option the IPC allows is that if the two sink bowl outlets are within 30" of each other, they could share a single trap, like double kitchen sinks often do. Then the 1-1/2" drain would be sized OK for the wet vent, as it would just count as one lav.
A third option is to use 3 AAVs--one for both sinks, one for the shower and one for the bath. Each AAV goes on the fixture trap arm, before the drain joins any other fixture, and has to be 4" above the trap arm. Actually, if the horizontal red pipe is 2" and you either raise the shower trap or lower the bath trap as discussed, the AAV on the shower would be enough for wet venting the tub, so you'd only need 2 AAVs. That AAV in the joist space would need to remain accessible, behind a ventilated cover, say.
Cheers, Wayne
I borrowed an inspection camera and ran it into the wall cavity behind the bathroom fan directly above where the vent from Sink 1 runs through and was able to see that you are correct, there is what appears to be a 1.5" vent connected coming from the adjacent wall and Sinks 2 & 3. Sorry for the confusion, but from looking behind the vanity it did not appear to have one. Given that the sinks are vented what do you think would be my best option?
Thanks,
Jeremy
Thanks,
Jeremy
wwhitney
In the Trades
As far as best option, is that best option without changing anything above the floor for the lavs? And just to triple check, the drain coming down through the subfloor that carries both lavs is 1.5"?
Then I think you've got basically two possible approaches. Both involve adjusting the shower and/or tub trap heights so that their trap arms can run across and hit the (adjusted elevation) new red horizontal drain, with everything running at 1/4" per foot drop, without any vertical offsets.
1) Pretend that 1.5" double lav drain is 2", let it hit the shower trap arm and call it a wet vent. The arrangement will be similar to what you had before, except you'll have fixed the trap weir rule violations (those vertical offsets), and of course moved the stack.
2) Same as (1) but you add a dry vent takeoff for the shower trap arm, between the shower trap and where the dual lav drain joins in. If you don't want to do any work above the subfloor, that would have to be an AAV in the joist bay, at least 4" above the shower trap arm, with a ventilated access cover.
Cheers, Wayne
Yes, I double checked and the drain coming down through the subfloor that carries both lavs is definitely 1.5". As this has functioned well thus far I'm going to go with your first suggestion and pretend it's 2" and use it as a wet vent for the shower arm. The problem now is that I've measured and it doesn't appear that I'll be able to get enough fall on either the lav or tub drains and keep them inline with the shower drain without wiolating notching/hole rules for the 8" joists. The more I think about it I would prefer not to cut them as I just addressed a bad joist notching situation I found in the upper left portion of the picture. That being said could I do the following?
1. since the 1.5" drain coming from the 2 lavatories (#2) is dry vented would that allow me to keep the vertical offset into the horizontal drain?
2. based on the same logic in question 1, if I add an AAV after the trap in the tub drain (there is a tub surround I can put an access door in) would that allow me to keep the vertical offset from it into the horizontal drain as well?
If the answer to both of these questions is no, do you see any other options?
Also, picture has been updated however the old washing machine drain does have a p-trap which is not shown
Thanks,
Jeremy
Last edited:
wwhitney
In the Trades
I don't follow this comment. Are you trying to limit the area where the drains are below the joists? As otherwise, you can just raise the shower trap arm/drain as high as possible without hitting the joists, and then lower the tub trap so that the trap arm hits the horizontal shower/lav drain without the vertical offset.The problem now is that I've measured and it doesn't appear that I'll be able to get enough fall on either the lav or tub drains and keep them inline with the shower drain without wiolating notching/hole rules for the 8" joists.
Anyway, there's nothing about the configuration outside of the tub trap arm that would allow that vertical drop before the tub trap arm is vented. So if for some reason you can't eliminate that vertical drop, your only option is to add a vent takeoff to the trap arm before it. That could be an atmospheric vent if the tub trap arm runs under a wall you open up, or it could be an AAV.
For an AAV, it needs to be 4" above the tub trap arm, and the AAV has some height itself, so I don't think the trap arm, the 4" riser, and the AAV would all fit within a 2x8 joist bay. But if you figure that out, and provide ventilated access, that will vent your trap arm.
Cheers, Wayne
wwhitney
In the Trades
I guess there is one more possibility you could look at. You could route the lav drain to join the tub drain within the floor framing before either one drops below the framing to join the shower. So the lav wet vents the tub first, then the shower.
You'd need to be sure the tub and shower trap arms are within the length limits (max one diameter fall while at 1/4" per foot minimum slope). And you can only really run the lav drain a bit over 6' through the joists: if they are 7.25" tall, and you drill a 2.25" hole that needs to be 2" clear from the top and bottom of the joist, then you only have 1" of variation in your hole location. And 1" / 1/4" per foot = 4'. At 16" o.c. that would work out to 4 joists, so 5 joist bays.
Cheers, Wayne
Sorry for the confusion. Yes, I would like to keep the drain from the tub from dropping below the joist until it gets inside the area on the right side I plan to box in. I've attached an updated drawing showing the areas I plan to frame and drywall if it helps. The drain from the lav's depth is limited by the ductwork below it. I can raise both to where the tub trap is above the bottom of the joist and raise the lav drain to match, but this would mean I would then be going through the joist to run horizontally for both the shower connection as well as downstream to the vertical drain section.I don't follow this comment. Are you trying to limit the area where the drains are below the joists? As otherwise, you can just raise the shower trap arm/drain as high as possible without hitting the joists, and then lower the tub trap so that the trap arm hits the horizontal shower/lav drain without the vertical offset.
Anyway, there's nothing about the configuration outside of the tub trap arm that would allow that vertical drop before the tub trap arm is vented. So if for some reason you can't eliminate that vertical drop, your only option is to add a vent takeoff to the trap arm before it. That could be an atmospheric vent if the tub trap arm runs under a wall you open up, or it could be an AAV.
For an AAV, it needs to be 4" above the tub trap arm, and the AAV has some height itself, so I don't think the trap arm, the 4" riser, and the AAV would all fit within a 2x8 joist bay. But if you figure that out, and provide ventilated access, that will vent your trap arm.
Cheers, Wayne
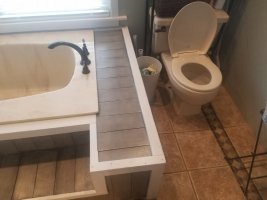
The tub actually has a large wooden cabinet that run the full height and I could add an access door to so I believe there would be enough room... (See second pic)
Attachments
Ok, if I'm understanding you correctly I think this may be the best option. See attached updated drawing. If this is correct should I upsize the pipe after the tub trap to 2" as the trap arm length would be around 78" before meeting the wet vent/drain from the lav? Also, lav wet vent/drain from the lav would have to have a 90 attached, go through the joint then have another 90 added to meet the tub drain. Once this is done would it need to meet at the same elevation or can it be turned down and have the tub trap arm tie into the vertical with a sanitary tee (like I've shown in the new drawing)?I guess there is one more possibility you could look at. You could route the lav drain to join the tub drain within the floor framing before either one drops below the framing to join the shower. So the lav wet vents the tub first, then the shower.
You'd need to be sure the tub and shower trap arms are within the length limits (max one diameter fall while at 1/4" per foot minimum slope). And you can only really run the lav drain a bit over 6' through the joists: if they are 7.25" tall, and you drill a 2.25" hole that needs to be 2" clear from the top and bottom of the joist, then you only have 1" of variation in your hole location. And 1" / 1/4" per foot = 4'. At 16" o.c. that would work out to 4 joists, so 5 joist bays.
Cheers, Wayne
Attachments

wwhitney
In the Trades
Yes, the diagram matches what I described in my last post. A few comments to address your questions:
- The tub trap arm should match the trap size. So if your trap arm is 78", you need a 2" trap arm and a 2" trap. You can adapt the 1.5" tub waste to the 2" trap.
- A 2" solvent weld trap is 6-1/16" from the bottom of the trap to the outlet center-line. So if the bottom of the trap is at the bottom of the joists, the center of the trap arm will be at 4-1/16" (max fall) to 4-7/16" (min slope) from the bottom of the joists at the end of the trap arm where it needs to join the lav drain. If the 1.5" lav drain only has to go through one hole in a joist to get to the correct joist bay, and the joist is 7-1/4" tall, that hole could be 2-1/8" diameter (minimum) and located at the highest 2" clear from the top, or 4-3/16" from the bottom of the joist.
That means you only have an 1/8" of vertical overlap as far as lining things up, and you couldn't bring the lav drain through more than one joist, unless the joists are taller than 7-1/4". So how many joists are between where the lav drain goes through the subfloor and where the tub waste does? And how tall are the joists?
If the geometry doesn't work you, sticking an AAV under your tub surround seems like a good option, if you have room and can provide ventilated access.
Cheers, Wayne
There is only one joist between the lav drain and tub trap arm, and joists are 7-1/4" tall so it sounds like this would work. Just to make sure, the 2 additional 90 degree turns for the lav drain would not be a problem?
Thanks,
Jeremy
Thanks,
Jeremy
wwhitney
In the Trades
No, the two 90s on the lav drain aren't a problem, they would both need to be LT90.
The geometry is a little tricky, though, I'm trying to think of how to do it elegantly. As you drew it, you'd need a fitting that connects horizontally to the tub drain, horizontally to the lav drain, but perpendicular to the tub drain, and the common outlet is vertical. That would be a san-tee with sanitary side inlet and the top entry blocked, a bit unusual.
You could consider the following, which would let you keep the tub trap and trap arm at 1-1/2", allowing you a bit more vertical leeway, although you may still have to adjust your existing tub trap height:
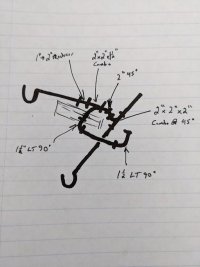
The lav drain comes through the subfloor and hits a LT90 to run to the the left in your picture (towards the tub). It runs past the shower drain by at least 12". Then it hits a horizontal LT90 to go through the joist (check the height limits on the hole), where it hits a horizontal combo to join the tub trap arm. That shortens the tub trap arm to under 72". The combo outlet needs to be 2" (so it could be a 2x2x1-1/2" combo, with a 2x1-1/2" bushing in the straight entry for the tub). Then the 2" runs back to the line of the shower drain, where it turns down to join it.
As to that last detail, here's a slightly more elegant way to join the 2" tub/lav drain between the joists with the 2" shower drain below the joists, assuming you have enough clearance in the joist bay. First the tub/lav drain hits a 45 pointed downward, then it hits the side entry of a combo on the shower drain, where the combo is rolled 45 degrees off upright, so that the 45 outlet and combo inlet line up.
Then if you do that how far you run the lav drain towards the tub is limited on the low end by the need to leave room for the horizontal combo, 45, and rolled upright combo all in a row. There's also a limit to how high up in the joist bay the lav drain can start, assuming you are installing the LT90 from below. If you install a 1-1/2" LT90 with the hub tight to the subfloor, the centerline of the outlet will be a little under 3-1/2" from the top of the joist. If you are able to open up the subfloor sufficiently for access, you could install the 1-1/2" LT90 higher, with its hub partially or fully above the bottom of the subfloor.
Cheers, Wayne
The geometry is a little tricky, though, I'm trying to think of how to do it elegantly. As you drew it, you'd need a fitting that connects horizontally to the tub drain, horizontally to the lav drain, but perpendicular to the tub drain, and the common outlet is vertical. That would be a san-tee with sanitary side inlet and the top entry blocked, a bit unusual.
You could consider the following, which would let you keep the tub trap and trap arm at 1-1/2", allowing you a bit more vertical leeway, although you may still have to adjust your existing tub trap height:
The lav drain comes through the subfloor and hits a LT90 to run to the the left in your picture (towards the tub). It runs past the shower drain by at least 12". Then it hits a horizontal LT90 to go through the joist (check the height limits on the hole), where it hits a horizontal combo to join the tub trap arm. That shortens the tub trap arm to under 72". The combo outlet needs to be 2" (so it could be a 2x2x1-1/2" combo, with a 2x1-1/2" bushing in the straight entry for the tub). Then the 2" runs back to the line of the shower drain, where it turns down to join it.
As to that last detail, here's a slightly more elegant way to join the 2" tub/lav drain between the joists with the 2" shower drain below the joists, assuming you have enough clearance in the joist bay. First the tub/lav drain hits a 45 pointed downward, then it hits the side entry of a combo on the shower drain, where the combo is rolled 45 degrees off upright, so that the 45 outlet and combo inlet line up.
Then if you do that how far you run the lav drain towards the tub is limited on the low end by the need to leave room for the horizontal combo, 45, and rolled upright combo all in a row. There's also a limit to how high up in the joist bay the lav drain can start, assuming you are installing the LT90 from below. If you install a 1-1/2" LT90 with the hub tight to the subfloor, the centerline of the outlet will be a little under 3-1/2" from the top of the joist. If you are able to open up the subfloor sufficiently for access, you could install the 1-1/2" LT90 higher, with its hub partially or fully above the bottom of the subfloor.
Cheers, Wayne
wwhitney
In the Trades
Yep, that's what I described. Slightly convoluted but it addresses a couple issues with some of the previous options.
For the tub 1-1/2" to 2" transition, you can of course use a 2"(H) x 1-1/2"(H) reducer coupling as you've drawn, but you can also put a 2"(S) x 1-1/2"(H) reducer bushing directly into the hub of the 2"x2"x1-1/2" combo. H = Hub, S = Spigot (goes into a hub, sized like a pipe).
Now you can review all my various ideas and figure out which one actually works best for your conditions.
Cheers, Wayne
Thanks for all the help Wayne! Once last question.. While I have the walls and ceiling opened up would you recommend replacing the existing copper water lines and brass tub drain assembly with pex and pvc? Neither currently has any leaks, but I can see oxidation on both especially around the joints and fittings, and there are two inline sharkbite connectors on the water lines.
wwhitney
In the Trades
This is not my area of expertise, but here's my understanding: if your copper pipes are < 50 years old, and you're not in an area with acidic water, there's no reason to think they are near end of life.
Tubular brass DWV can have a shorter lifespan, which depends a lot on the thickness. So certainly it would make sense to at least look at the state of the tubular brass, and replace it with tubular polypropylene or Schedule 40 plastic if it appears near end of life (or if it's the really thin gauge).
BTW, tubular connections need to be accessible without damaging any finishes, so at least an access panel.
Cheers, Wayne
Similar threads
- Replies
- 4
- Views
- 425
- Replies
- 0
- Views
- 157
- Replies
- 1
- Views
- 136
- Replies
- 29
- Views
- 1K
- Replies
- 0
- Views
- 178