Staircase question

Users who are viewing this thread

GabeS

Remodel Contractor
Messages
293
Reaction score
0
Points
0
Location
Brooklyn NY
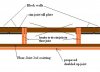
I understand what you're saying. I ran into a similiar problem and ended up with 9 inch tread and 8 inch rise which worked but is not ideal. Only other way to make the stairs better would have been to remove joists and reframe which would have affected 1st floor living space.

I would try and split everything between the rise and run. For me, I think have a longer tread is safer than having a shorter rise. With a shorter tread, when you go to put your foot down and can't place it you can easily trip. Taking a deeper step also can cause you to trip, but less so in my opinion.

You have to put a one inch overhang. I wasn't saying to omit the overhang, just saying when you calculate the tread length, don't include the overhang into the calculation.

Also, this is just a worst case scenario: Make the treads and risers comfortable and with the last step make it a bigger drop.

Reasoning: If you fall on the last step, you can't go rolling down the stairs.:)
 

Master Brian

DIY Senior Member
Messages
368
Reaction score
0
Points
0
Location
Kansas
Yea, I know you aren't saying to omit the overhang.

The last step thing does make some sense. I just wish I could cut into the rim joist and sill plate. Maybe I'll snap some pics of those and see what you guys think.

The crazy part, is my dogs are the ones who trip up over the current setup....

It's amazing how quickly your brain adjusts to things such as steps. My parents had 3 step redone off their back door leading to their patio. They were all slanted different directions and not the same height. They now have deeper treads and are all equal heights. It took weeks to get used to them....
 

GabeS

Remodel Contractor
Messages
293
Reaction score
0
Points
0
Location
Brooklyn NY
Definitely better to reframe if possible. One more thing you can do to gain an extra inch or two of headroom is to cut the bottom of the joist on a 45 degree. In other words, bevel the bottom of the joist(the one your head gets close to towards the bottom of the staircase).
 

Master Brian

DIY Senior Member
Messages
368
Reaction score
0
Points
0
Location
Kansas
On the reframe idea, which would solve a lot of issues and get me somewhat closer to new code guidelines, here are a few pics I snapped at lunch. I hope they are clear.

The 1st picture, stairway 001, is showing a wall pantry that is directly above the headspace going down this last flight of steps. This pantry is scheduled to be totally redone and I don't mind tearing into the plaster/drywall to see how the wall is framed. I do know there is no framing several inches to the left of this cabinets frame as the cabinet goes to the left several inches behind the trim. The right side, I'm not as sure about. I am actually wondering if there isn't one header that goes accross the door, pantry and the opening on the right. If not, then whomever put this in, just cut a stud out, which isn't good and will be redone at a later date.

The 2nd picture, stairway 002-1, shows the view going down the last flight of stairs. I've labeled all of the parts. It is clear how questionable, although it's holding up great, the pantry framing from the rear is. All the electrical shown will be removed as it's safety is a concern to me and I'm taking steps to have new it replaced. So it shouldn't be of concern regarding a possible re-frame.

The 3rd picture, stairway 003-1, shows the view going up the last flight of stairs. Again, parts are labeled and again, the electrical will be reworked along with the air duct shown. *The 2x4's shown in yellow are just a really short wall that goes from the sill plate to the sub-floor. They are like this all around the outside walls. I should also state, since the floor joists show a different picture, the wall that sits above all of this is the wall perpindicular to the gables. So it is the load bearing wall for the house! With that said, this short section of sill plate really has no load above it, except for the floor and the pantry.

The 4th picture, stairs3, show what I would like to do if possible. Cut the sill plate and the rim joist, that are directly above the staircase. My thoughts, if it would work and remain structural, would be to cut that section out. Then install doubled up 2x8's tied into the rim joist and the sill plate, extending over to the 1st floor joist. Do this for both sides, then I would also double up the floor joist they are attached to. This pic shows what is there in dark brown, with proposed work shown in orangish brown and a black X across the part to be cut out. The gray/black parts, represent the block wall everything sits on.

I might also go back 2-3 joists and install solid blocks between the joists where I cut this out, to prevent any racking. I have "X" bracing in there now, but just an idea for extra beefiness. My concern is that cutting out this section might cause the block wall to want to shift inwards and collapse. I think that with what is there the sill plate and rim joist help hold it straight. Is that a valid thought?

Again, I'll likely pass all of this by my friend, just playing with ideas and trying to get 2nd/3rd opinions....
 

Attachments

  • stairway 001.jpg
    stairway 001.jpg
    71.5 KB · Views: 254
  • stairway 002-1.JPG
    stairway 002-1.JPG
    33.5 KB · Views: 292
  • stairway 003-1.JPG
    stairway 003-1.JPG
    61.9 KB · Views: 271
  • stairs3.JPG
    stairs3.JPG
    21.7 KB · Views: 284
Last edited:
Top
Hey, wait a minute.

This is awkward, but...

It looks like you're using an ad blocker. We get it, but (1) terrylove.com can't live without ads, and (2) ad blockers can cause issues with videos and comments. If you'd like to support the site, please allow ads.

If any particular ad is your REASON for blocking ads, please let us know. We might be able to do something about it. Thanks.
I've Disabled AdBlock    No Thanks