Leaking Under slab ABS connector

Users who are viewing this thread

Ken

New Member
Messages
4
Reaction score
0
Points
1
Location
Benson Arizona USA
Hi All,
I have reviewed post already covering this issue but didn't get a solid answer from them so any further advice will be greatly appreciated.

My problem is that I have a couple of 3" ABS combo's that have a very slow leak at one of the hubs. My project is a whole house under slab DWV installation. All of my plumbing is contained in 2'-3' trenching 4" wide.
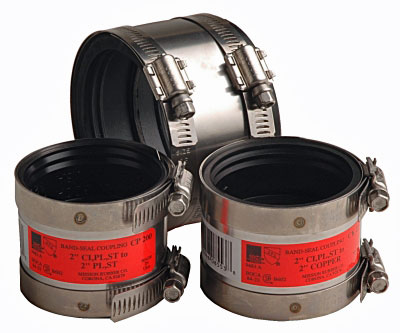
I know that I have to cut out the existing fittings and replace them so I have a lot of digging to do to get reasonable access. My concern is connecting the new fitting into an existing, non-flexible system. I have read up on Fernco and Mission no hub couplings but become very confused as to which model to use in my under slab project. Furthermore, I become concerned about the integrity of the system, which will be inaccessible once the pad is poured. I am guessing that I will have to use at least two couplings to install a new combo which leads me to believe that this will create a very weak spot in my plumbing system.

First off, are these couplings permitted under a slab? If so which model should I use. Secondly, it seems to me that the joints that theses couplings create are subject to failure over time due to soil shifts, rusting/corroding metal, or rotting rubber.

I would sure like to get some opinions and advice on the reliability of these couplings for under slab plumbing (if they are permitted), which model to use, or perhaps other solutions for this problem.

BTW, I am not a professional plumber, but have plumbed a smaller, whole house, project in the past with out issues.
 

wwhitney

In the Trades
Messages
6,567
Reaction score
1,847
Points
113
Location
Berkeley, CA
For 3" ABS to 3" ABS, your basic Fernco option would be the Proflex 3005-33: https://www.fernco.com/dimensional-drawings/3005-33

If you want something beefier, you could use a wider model with two clamps on each side: https://www.fernco.com/dimensional-drawings/1056-33rc

Your other option would be to use an ABS repair coupling, where there is no stop in the middle. Then you'd get one shot to glue it into place.

I don't have any actual experience in your application, so I can't comment on the relative merits.

Cheers, Wayne
 

Reach4

Well-Known Member
Messages
38,898
Reaction score
4,436
Points
113
Location
IL
My problem is that I have a couple of 3" ABS combo's that have a very slow leak at one of the hubs.
Do you know that because you have already dug down that far? What symptom caused you to dig?

The reason that I ask is that a small leak at a buried abs hub would probably go unnoticed, unless there was also some other problem, such as a clog.
 
Last edited:

Tuttles Revenge

In the Trades
Messages
4,205
Reaction score
1,459
Points
113
No hub / Fernco shielded couplings are rated for under slab use because they work. It will not create a weak spot in you plumbing system as long as the piping is supported properly for a groundwork.

Installing a shielded coupling is by far the easiest least PITA way to perform the repair you're describing. You will want to make up your replacement fitting first with stubs of pipe that protrude at least the length of the socket of the coupler (fernco) you choose to use. Use the overall length of that fitting with stubs and add 1/2" to your cut out section. Dig extra deep and about 6" back around the 2 areas that you need to cut the old fitting from so that your saw doesn't go into dirt and for the ferncos to fit around. Make sure your cuts are as square as possible. When you go to insert your new fittings, place the steel jacket over the pipe in the extra area you've dug out for them, place the rubber coupler onto each end, fold the empty side up and over the socketed end (this is where that extra 1/2" of cut space comes into play as the coupler has a shoulder/stop built into the inside). Now you can insert your "made up" new fitting in between the pipe ends and fold the rubber over that. Make sure the rubber folds over evenly and no part are pinched as commonly occurs. Slide your stainless steel bands into position covering the rubber evenly on all sides and lightly snug the bands leaving it loose enough to rotate your work. Rotate your new fitting to its proper position and then evenly torque your bands switching from each nut till you have achieved proper torque.. finish the rest of your work and test for leaks before you backfill. wash your hands and have a cool refreshing beverage.

mission_bandseal.jpg
 

Reach4

Well-Known Member
Messages
38,898
Reaction score
4,436
Points
113
Location
IL
Slide your stainless steel bands into position covering the rubber evenly on all sides and lightly snug the bands leaving it loose enough to rotate your work.
You can also install the shield without having it slid out of the way. This could be useful if there was not enough room to have the stainless band, so you remove it, place the rubber, and bring the saved band around the rubber.

This is also useful if some absent mined person forgot to slide the band on and out of the way before working the rubber into postion. :oops:
 

wwhitney

In the Trades
Messages
6,567
Reaction score
1,847
Points
113
Location
Berkeley, CA
I'm curious to hear the answers to Reach4's questions, about why this replacement is required.

If the solvent weld connection has a slight defect at just one point, a very makeshift solution would be to cut open a pipe-to-hub rubber coupling, wrap it around the joint so the cut is opposite the leak (or vertically at the top, perhaps), and install the metal bands. A better way to use the pipe-to-hub rubber coupling would be to remove a section of pipe past the bad joint, slide the pipe-to-hub coupling over the compromised joint, and then replace the pipe segment using the shielded rubber couplings.

But if you need to replace the combo(s), Tuttle gave a great description of the process when working between two fixed ends. For a combo with all 3 connections fixed, the procedure would be a slight variation on that. Easiest would be to use 3 banded couplings; the procedure is as Tuttle described with respect to the main axis on the combo, and the final rotation step would be to get the stub on the side connection into the third coupler.

It would also be possible to use 2 banded couplings and one solvent cement joint, the side connection on the combo. For that to work, you'd need to simultaneously solvent weld the side connection while inserting your combo with stub ends between the two folded back rubber couplings. That can be tricky to get everything in place during the solvent cement open time, but is doable.

Cheers, Wayne
 

Ken

New Member
Messages
4
Reaction score
0
Points
1
Location
Benson Arizona USA
Do you know that because you have already dug down that far? What symptom caused you to dig?

The reason that I ask is that a small leak at a buried abs hub would probably go unnoticed, unless there was also some other problem, such as a clog.
My project is still in the pre slab stage so all the trenches are exposed. I did a pre-inspection leak test which reveled the issue.
 

Tuttles Revenge

In the Trades
Messages
4,205
Reaction score
1,459
Points
113
I used to believe that leaks in ABS fittings were impossible. Till i uttered those words to a guy I was working for... the fitting above me in the most impossible place to reach had a leak. This is where I learned that too little glue can be bad, wire pull/cable saws are a good back up tool, and being a cocky 20yr old comes back to bite you in the ass.
 

Ken

New Member
Messages
4
Reaction score
0
Points
1
Location
Benson Arizona USA
No hub / Fernco shielded couplings are rated for under slab use because they work. It will not create a weak spot in you plumbing system as long as the piping is supported properly for a groundwork.

Installing a shielded coupling is by far the easiest least PITA way to perform the repair you're describing. You will want to make up your replacement fitting first with stubs of pipe that protrude at least the length of the socket of the coupler (fernco) you choose to use. Use the overall length of that fitting with stubs and add 1/2" to your cut out section. Dig extra deep and about 6" back around the 2 areas that you need to cut the old fitting from so that your saw doesn't go into dirt and for the ferncos to fit around. Make sure your cuts are as square as possible. When you go to insert your new fittings, place the steel jacket over the pipe in the extra area you've dug out for them, place the rubber coupler onto each end, fold the empty side up and over the socketed end (this is where that extra 1/2" of cut space comes into play as the coupler has a shoulder/stop built into the inside). Now you can insert your "made up" new fitting in between the pipe ends and fold the rubber over that. Make sure the rubber folds over evenly and no part are pinched as commonly occurs. Slide your stainless steel bands into position covering the rubber evenly on all sides and lightly snug the bands leaving it loose enough to rotate your work. Rotate your new fitting to its proper position and then evenly torque your bands switching from each nut till you have achieved proper torque.. finish the rest of your work and test for leaks before you backfill. wash your hands and have a cool refreshing beverage.

mission_bandseal.jpg
Thanks for the detailed procedure for repairing this problem. I contacted Fernco and that said I should use their 1056-33RC coupling which is what I will end up doing using the steps the you outlined. I guess my main concern was integrity of the system after such a repair and you (and others) addressed that concern.
 

wwhitney

In the Trades
Messages
6,567
Reaction score
1,847
Points
113
Location
Berkeley, CA
I contacted Fernco and that said I should use their 1056-33RC coupling
Looks like that one doesn't have an internal stop. So you don't need to use the "fold over" technique and can just slide it all the way onto one side of the joint to lay in the new section. Which also means you don't need to leave as much of a gap between the pipe segments as with the fold over technique.

Cheers, Wayne
 

Ken

New Member
Messages
4
Reaction score
0
Points
1
Location
Benson Arizona USA
I'm curious to hear the answers to Reach4's questions, about why this replacement is required.

If the solvent weld connection has a slight defect at just one point, a very makeshift solution would be to cut open a pipe-to-hub rubber coupling, wrap it around the joint so the cut is opposite the leak (or vertically at the top, perhaps), and install the metal bands. A better way to use the pipe-to-hub rubber coupling would be to remove a section of pipe past the bad joint, slide the pipe-to-hub coupling over the compromised joint, and then replace the pipe segment using the shielded rubber couplings.

But if you need to replace the combo(s), Tuttle gave a great description of the process when working between two fixed ends. For a combo with all 3 connections fixed, the procedure would be a slight variation on that. Easiest would be to use 3 banded couplings; the procedure is as Tuttle described with respect to the main axis on the combo, and the final rotation step would be to get the stub on the side connection into the third coupler.

It would also be possible to use 2 banded couplings and one solvent cement joint, the side connection on the combo. For that to work, you'd need to simultaneously solvent weld the side connection while inserting your combo with stub ends between the two folded back rubber couplings. That can be tricky to get everything in place during the solvent cement open time, but is doable.

Cheers, Wayne
Thanks Wayne. I agree that replacing the entire combo is a bit of a PITA especially since the leak is verrrry small. I am unable to find a pipe-to-hub coupling which would make the job much easier and even if I could find one I am unsure how the county inspectors would react to it. I have pretty much decided to replace the entire combo using Fernco 1056-33RC couplers.
 

wwhitney

In the Trades
Messages
6,567
Reaction score
1,847
Points
113
Location
Berkeley, CA
Thanks Wayne. I agree that replacing the entire combo is a bit of a PITA especially since the leak is verrrry small.
Too bad there's no way to inject a little ABS cement into the correct place to just plug the leak.

I am unable to find a pipe-to-hub coupling which would make the job much easier and even if I could find one I am unsure how the county inspectors would react to it.
https://www.fernco.com/products/flexible-couplings/plastic-socket-couplings

But they're not fully shielded, so I have the same uncertainty about suitability. On the other hand, if you were literally installing it over the defective solvent weld joint, that would provide all the rigidity required.

Cheers, Wayne
 

Reach4

Well-Known Member
Messages
38,898
Reaction score
4,436
Points
113
Location
IL
I contacted Fernco and that said I should use their 1056-33RC coupling which is what I will end up doing using the steps the you outlined.
Seems like overkill, except for somebody who worries about using a 3005-33.

Just musing, if you could draw a vacuum, could you suck cement into the joint? A shop vac might be enough vacuum. I am not a plumber.
 
Top
Hey, wait a minute.

This is awkward, but...

It looks like you're using an ad blocker. We get it, but (1) terrylove.com can't live without ads, and (2) ad blockers can cause issues with videos and comments. If you'd like to support the site, please allow ads.

If any particular ad is your REASON for blocking ads, please let us know. We might be able to do something about it. Thanks.
I've Disabled AdBlock    No Thanks