Leaking Fitting

Users who are viewing this thread

JB412

New Member
Messages
24
Reaction score
0
Points
1
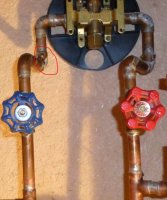
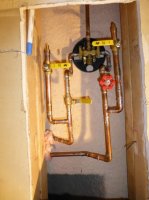
Was wondering if anyone could give me some advise on the best way to fix a leaking copper elbow at a shower. I tapped into the water line of a basement shower to feed new pex lines to a powder room above the shower. In the process, I developed a leak at one of the existing elbows (please see picture - not sure if it's the one that's visible or the one behind the board that goes in toward the shower valve). Should I disconnect the shower valve from the board it's attached to and then remove the board to get access or is there a better approach? It would be difficult to remove all the water from that line, so would I be better off cutting the line just above the gate valve and redoing from there up or chould I try putting heat to the elbow and cross my fingers? Any advise would be appreciated. Thanks. Jerry
 

Attachments

  • Basement Shower.JPG
    Basement Shower.JPG
    102.4 KB · Views: 321

Gary Swart

In the Trades
Messages
8,101
Reaction score
84
Points
48
Location
Yakima, WA
When a copper fitting leaks, there is just one way to fix it. You first have to accept that there is no patch or easy way that will work. The problem is the joint got heated when you worked on it and that has caused the leak. NO you can't just reheat and hope for the best. You have to completely disassemble the joint and reassemble. It may be easier to just cut the joint out and start anew, although copper can be reused is cleaned and prepped. Either way, the joints have to be dry, clean, and fluxed. (Solder will not work if there is moisture present and will not work if there is no flux) The joint very well could have been poorly made in the beginning, but that's really not part of the solution. And while you are at it, replace those gate valves with ball valves.
 

JB412

New Member
Messages
24
Reaction score
0
Points
1
Gary, thanks for your response. I agree that the gates valves need to go, but I was hoping to avoid replacing at this time since they do function. Would it be possible to re-do the leaking side without removing the 2x4 that the valve is mounted on, like all from the front of the valve (in the fiberglass shower) or do I need to completely remove the 2x4 and the valve in order to re-do the line? I didn't take the handle and cover off from the shower side but I question if there would be enough room to re-do the line without completely removing the faucet.
 

FullySprinklered

In the Trades
Messages
1,897
Reaction score
208
Points
63
Location
Georgia
If removing the 2x4 would be helpful, do so. I have always clamshelled the valve onto the fiberglass between the plaster guard and the escutcheon on t he finish side and never used a brace in that location. Nicely done, though. Loosening the valve might help get the flame away from the shower wall when you go to do your repair. I wouldn't get too surgical with it because you don't have a whole lot of room in there. Maybe make one cut out where it's easy to resection, then heat the bad elbow and twist and tap it off. Clean it up intensely, and reinstall.
 

Gary Swart

In the Trades
Messages
8,101
Reaction score
84
Points
48
Location
Yakima, WA
It's your call on replacing the gate valves. I mentioned it because you are going to be involved in fixing the leak and it just might be a good time to consider the valves. They look new, so it's likely they will last for a long time if you want to wait.
 

JB412

New Member
Messages
24
Reaction score
0
Points
1
Well it looks like removing the 2x4 brace isn't an option. I removed the faucet trim on the shower side and there is only a 2 inch dia. hole through the fiberglass which just fits the chrome cover on the valve. At this point I'm thinking of putting in a ball valve on the leaking side and running pex up to the valve body.

Fullysprinklered - when you say you clamshell the valve do you mean just securing it by the 2 screws through the escutcheon? Is that enough to hold it solid without any wood mounting of the valve?
 

FullySprinklered

In the Trades
Messages
1,897
Reaction score
208
Points
63
Location
Georgia
Yes. That's the only way I've ever done those. The shower head drop eared el should be screwed to a brace, though. The plaster guard should be rotated to the thin-wall position if not already done.
 

JB412

New Member
Messages
24
Reaction score
0
Points
1
When I removed the 2x4 brace, I found the leak to be at a very poorly done solder joint at the elbow (see red circled elbow in attached pic). I also discovered that the copper fitting into the valve body is soldered to the body, which prevents me from re-doing with pex line. So my new plan is to cut the line below the gate valve, add in a ball valve, use a slip coupling to re-do the line up through the bad elbow. However, I've never done a slip coupling on a vertical line - any ideas on how to solder this type of fitting to assure that the coupling remains centered between the copper tubes?
 

Attachments

  • Basement Shower-2.JPG
    Basement Shower-2.JPG
    77.6 KB · Views: 257

Onokai

Member
Messages
128
Reaction score
11
Points
18
Location
Arcata,Ca
I would cut out the pipe just above the leaking 90 and cut the feed going to gate valve 1/2 way between the valve and 90. Put in new ball valve and new pipe and a new 90-put a heat shield between fiberglass-cut and flux and assemble all fittings and carefully solder them working up or down-take your choice. Its a tight area and starting fresh is the only way. Looks like a mini hack saw on the close to fiberglass pipe may be your only choice-spend your time cleaning the pipe of old solder and smoothing the cut before trying to reassemble.
Also you may have an easier time cutting below that new ball valve going to nowhere yet and just redo that back to the way it was.-This may make some play to get the fittings in place easier.
Mark
 

JB412

New Member
Messages
24
Reaction score
0
Points
1
Yeah, all fixed and ready to move on to the demolition of the powder room. Thanks for your comments and suggestions. Only had one leak after the final repair and that was because I missed soldering one of the joints. Funny how much of a difference it makes when you add solder to a joint!
 

Attachments

  • Basement Bath - Final.jpg
    Basement Bath - Final.jpg
    76.2 KB · Views: 246
Top
Hey, wait a minute.

This is awkward, but...

It looks like you're using an ad blocker. We get it, but (1) terrylove.com can't live without ads, and (2) ad blockers can cause issues with videos and comments. If you'd like to support the site, please allow ads.

If any particular ad is your REASON for blocking ads, please let us know. We might be able to do something about it. Thanks.
I've Disabled AdBlock    No Thanks