Center Drain to Linear Drain Space Issue

Users who are viewing this thread

Mundyz

New Member
Messages
12
Reaction score
0
Points
1
Location
Libertyville, IL
Hello,

Thank you in advance for any feedback.

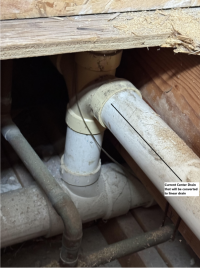
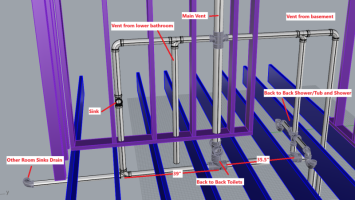
I'm replacing an existing shower and moving the center drain to a linear drain against a wall. This shower is back-to-back with a tub/shower in the other room. The current center drain is connected into a Double Sanitary Tee Hub. I was going to go with a Kerdi Linear drain with either a center or offset drain.

By moving the drain from the center to the wall, it really limits my travel from the drain to the main drain. The new drain location would be about 5.5” from the main drain line.

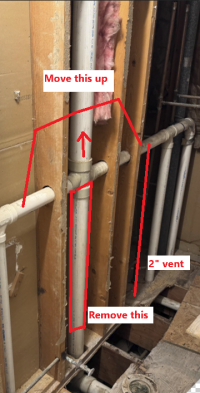
I’m trying to avoid cutting into the main drain line by reusing the PVC connect to the Double Sanitary Tee Hub.

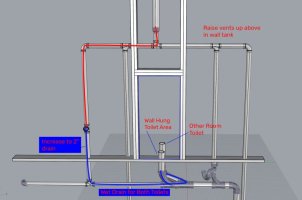
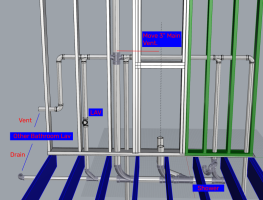
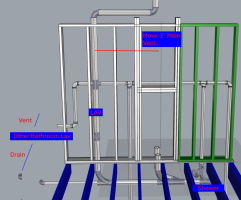
If I take a P-Trap and 90-degree elbow and place it in a configuration like the idea below, I can attach into the existing Double Sanitary Tee Hub. I would cut down the existing PVC to the center drain, but there isn’t much room for slope between the existing Double Sanitary Tee Hub and the new drain location. The blue lines in the image are the floor joists to show the left to right space I have available. The lower 3" PVC is the main line that goes from the second floor into the basement.

Idea 1.png


Would this idea work for my application? Do you see any issues?

Thank you.
 

wwhitney

In the Trades
Messages
7,155
Reaction score
2,028
Points
113
Location
Berkeley, CA
Hopefully your illustration is incorrect in showing a 3x3x2 san-tee on its back as the connection between the 2" stack and the 3" horizontal branch below the joist. If that is what you have, it is wrong, so you should cut it out and replace it with a 3x3x2 combo. That will also let you adjust the 2" stack to your convenience, e.g. maybe you'd prefer a 2" san-tee with 2" side entry to the double sanitary tee (or at a minimum, you should change the 2" double sanitary tee to a 2" double fixture fitting, I believe).

Anyway, if you are keeping the existing double sanitary tee, the arrangement you show for the new trap and LT90 elbow is acceptable. The elbow and trap arm does need to have the proper 1/4" per foot slope. Also, you show the outlet hub of the trap hard up against the inlet hub of the LT90, so you may want to explore whether a street LT90 would work better for you.

Cheers, Wayne
 

Mundyz

New Member
Messages
12
Reaction score
0
Points
1
Location
Libertyville, IL
Hopefully your illustration is incorrect in showing a 3x3x2 san-tee on its back as the connection between the 2" stack and the 3" horizontal branch below the joist. If that is what you have, it is wrong, so you should cut it out and replace it with a 3x3x2 combo. That will also let you adjust the 2" stack to your convenience, e.g. maybe you'd prefer a 2" san-tee with 2" side entry to the double sanitary tee (or at a minimum, you should change the 2" double sanitary tee to a 2" double fixture fitting, I believe).

Anyway, if you are keeping the existing double sanitary tee, the arrangement you show for the new trap and LT90 elbow is acceptable. The elbow and trap arm does need to have the proper 1/4" per foot slope. Also, you show the outlet hub of the trap hard up against the inlet hub of the LT90, so you may want to explore whether a street LT90 would work better for you.

Cheers, Wayne
Hi Wayne,

Thank you for the reply! I did have that part facing the wrong way in my illustration, but it looks to be a 3 x 3 x 2 san-tee on it's back. I was able to take a photo of the current setup.

Thanks,
Zach
 

Attachments

  • Existing Plumbing.png
    Existing Plumbing.png
    611.4 KB · Views: 45

wwhitney

In the Trades
Messages
7,155
Reaction score
2,028
Points
113
Location
Berkeley, CA
Yes, that 3x3x2 san-tee on its back is wrong and always has been, it needs to be a 3x3x2 combo. I suggest cutting it out and replacing it. As a consequence of that, you'll be able to adjust the 2" stack connections to better accommodate your new fixture layout.

Clearance for a combo looks a bit tight on the right side, you might need to move the 2" stack to the left at least below the floor and as it rises into the wall. [Although that water pipe may be in the way, too.] In the wall you can offset to reconnect to your existing stack at any elevation using two 45s; or once the stack is 6" above the fixture flood rim of the fixtures being vented, you could offset with two 90s. [Or for tiny offsets, you might need to use a street 45 plus a 45, or a street 22.5 plus a 22.5.]

So I guess I further suggest that before you cut out that 3x3x2 san-tee on its back, you get a 3x3x2 combo and try placing it down in the joist bay alongside the existing 3" line to figure out if and how it will fit properly.

Cheers, Wayne
 

Mundyz

New Member
Messages
12
Reaction score
0
Points
1
Location
Libertyville, IL
Yes, that 3x3x2 san-tee on its back is wrong and always has been, it needs to be a 3x3x2 combo. I suggest cutting it out and replacing it. As a consequence of that, you'll be able to adjust the 2" stack connections to better accommodate your new fixture layout.

Clearance for a combo looks a bit tight on the right side, you might need to move the 2" stack to the left at least below the floor and as it rises into the wall. [Although that water pipe may be in the way, too.] In the wall you can offset to reconnect to your existing stack at any elevation using two 45s; or once the stack is 6" above the fixture flood rim of the fixtures being vented, you could offset with two 90s. [Or for tiny offsets, you might need to use a street 45 plus a 45, or a street 22.5 plus a 22.5.]

So I guess I further suggest that before you cut out that 3x3x2 san-tee on its back, you get a 3x3x2 combo and try placing it down in the joist bay alongside the existing 3" line to figure out if and how it will fit properly.

Cheers, Wayne
Thank you again, Wayne. I appericate the help.

I was so focused on getting the drain to the wall, I wasn't thinking that the main drain may have an issue. I'm going to go pick up a combo and see where it will fit in the space. I'll put an update here when I make some progress.

Thanks,
Zach
 

Mundyz

New Member
Messages
12
Reaction score
0
Points
1
Location
Libertyville, IL
Update and Feedback/Suggestions Apperciated

I took out all of the drywall and cut away the subfloor to expose the rest of the plumbing. It looks like I'll need to remove all of the drain system in this bathroom. The sink drain goes into a sanitary tee on it's back. The back to back toliets go into a double sanitary tee that sits on top of another sanitary tee on its back with an adapter at one side to receive the sink drain.

On the bright side, that means I might be able to put in a wall hanging toilet now.

I have a few questions and also looking for suggestions on what to do since it will be a blank slate mostly.

1. If I go with a wall mounted toilet in this room, would you try to have both toilets enter the main drain at the same point like before, or have the other toilet enter the main drain a little down the line? How would you work around that vent pipe going to into the attic?
2. Related to the vent pipe.
3. For the shower. I can't find any sanitary tee with a side inlet in all 2" that isn't special order. I don't mind having each shower drain connect into the main drain with separate connections. I only have 5" of horizontal space from the center of the linear drain to the center of the main drain. If the P-Trap is straight, it ends directly above the main drain. What would you suggest I do in that area?

Thanks again in advance for any feedback and suggestions.

Zach

Attached is the existing layout for reference and a close up of the back to back toilet.
 

Attachments

  • Existing Plumbing 1.png
    Existing Plumbing 1.png
    293.2 KB · Views: 35
  • Existing Plumbing 3.png
    Existing Plumbing 3.png
    635 KB · Views: 36
  • Existing Plumbing 2b.png
    Existing Plumbing 2b.png
    796.3 KB · Views: 38

wwhitney

In the Trades
Messages
7,155
Reaction score
2,028
Points
113
Location
Berkeley, CA
A couple comments: wet venting could possibly simplify the vent side of your double bathroom DWV redo, but IL has its own plumbing code, which I'm not familiar with. So I'm going to stick with the idea of dry venting everything like you previously had. If you're interested in reading about the wet venting provisions, they are readable here (might require a free account):


Also, I assume if you are going to redo both bathrooms, you don't want to change any of the drains under the other bathroom, but rather work with them starting with where they current enter into the space below the wall you opened up?

1) Definitely easier to connect the WCs separately to the horizontal drain. The double san-tee over san-tee on its back in your photos has its two hubs touching. The proper replacement for that configuration would be a double wye/combo over a combo, and the height difference between between the two incoming horizontal upper drains and the outgoing horizontal lower drain would be much greater with that configuration than with what you have. The only downside to separating the connections is that you'll have separate dry vents rising up to your dry vent header. The one not in line with your "main vent" could be 2".

2) If this is a question, I think you never actually posted it. : - )

3) If you connect the drains separately to the horizontal drain, then again you'll have two separate dry vents rising up to your vent header, but they could each be 1-1/2". Anyway, as per your rendering in the OP, you have a degree of freedom at the trap joint between the u-bend and the outlet elbow. It matters not at all what direction that u-bend is pointing. So if you want more space, you could point the u-bend almost directly away from the lower horizontal drain and then point the outlet elbow back towards the lower horizontal drain [Obviously the u-bend can't be directly away from the lower horizontal drain with the outlet directly back, as then the trap arm would intersect the linear drain tailpiece, so you do need some clearance.] Then just hit a 2x2x1-1/2" san-tee (which is available street if necessary) and drop into an upright 3x3x2 combo to join the lower horizontal drain.

If that would be too high (the difference in elevation between the combo outlet and the san-tee inlet), then as long as your trap arm is coming towards the horizontal drain perpendicularly in plan (when seen from above; the two lines are actually skew, so they don't actually intersect), you have the option to rotate the san-tee 45 degrees around the horizontal inlet/trap arm, and then the outlet can go straight into an upright wye. The top entry gets a street 45 so the vent can rise straight up from there.

Cheers, Wayne

P.S. In case you would find it useful for some reason, you don't have to have everything drop into the same 3" horizontal drain line below the joists. You could have a parallel horizontal drain line below the joists for some of the fixtures. The two parallel drain lines could join on the horizontal after the showers if there's room before the horizontal drain eventually turns downward, or before the showers if not. Could be useful if you want to wet vent one WC from one lav, for example. [If you are going to maintain the 3" vent stack, you might as continue to dry vent one WC using that.] But maybe not useful.
 
Last edited:

Mundyz

New Member
Messages
12
Reaction score
0
Points
1
Location
Libertyville, IL
Hello Wayne,

Thank you again for your reply.

You are correct, I did not want to mess with the other bathroom at this time so I would like to fix the toilet plumbing issue from this side while I fix the drain for the new linear drain.

For that missing 2nd question - It was to ask about moving the toilet vent from that area to make room for the wall hung toliet. This is what I'm thinking of doing.
Combo Y for the new Wall Hung Toilet
A long 90 going into a Y on the horizontal "main drain".
Combo Y for a 2" vent
The new vent location ties into the existing vents and travels back to the original vent location but a bit higher up on the wall to make room for the wall hung toliet tank assembly.

What do you think about this arrangement?

I'll be working on the linear drain this week and will try what you suggested as options.

Thanks,
Zach


Plumbing Idea.png
 

Attachments

  • Plumbing Idea Part 2.png
    Plumbing Idea Part 2.png
    597.4 KB · Views: 37

wwhitney

In the Trades
Messages
7,155
Reaction score
2,028
Points
113
Location
Berkeley, CA
Two comments on the latest rendering:

- The configuration of your wye vent takeoff shown is backwards. The idea is that if water backs up into the vent due to a clog, when the clog is released, the water is to be directed to drain normally. You have it directed uphill in your wye orientation.

- If you want to individually dry vent everything, then each fixture needs to have a dry vent taken off from the fixture drain before that drain joins any other drains.

Now individually dry venting everything is onerous when you have 5 fixtures (the other lav is the 6th, but you are not showing its venting in your rendering; I'm assuming it is properly individually dry vented). That would mean that if you take a plane say 30" above the floor (above the lav traps but below their flood rims), you'd have 5 different vertical vent pipes from the 5 fixtures, unless some of the fixtures are common vented via a double fitting, as in your previous arrangement (where that happens twice, so you only 3 vertical vent pipes from the 5 fixtures).

So you could look at wet venting, but you'll need to check your IL code; I'm only familiar with what the UPC and IPC allow. The UPC would let you use one dry-vented lav drain to wet vent one shower and one WC (but the WC has to be last on the wet vent, except for WA state which amended that rule); you could have two separate branch drains, one for each bathroom. One problem with using a drain running below the joists to wet vent a shower is that the the trap arm (from trap outlet to the horizontal wye where the fixture drain joins the horizontal drain providing the wet venting) is limited in fall to one trap diameter. So basically the shower trap arm would also need to be below the joists, and the trap would stick down even farther.

The IPC allows horizontal wet venting for up to two bathroom groups at once, and doesn't require the WC to be last. So you could use the dry-vented lav coming in on the left to wet vent both WCs (e.g. via your last rendering with the 2" vent is deleted), and both showers if that doesn't put the shower traps too low for you.

So check what the IL code allows if you want to look at wet venting. I can say with confidence that you could use the lav coming in from the left to wet vent one of the WCs (possibly in the configuration shown in your last rendering, although the rules may prohibit the WC from joining the drain providing the wet vent from above, in which case you'd have the WC being wet vented join the lav via a horizontal wye), and then you could use a dry vent takeoff on the other WC's fixture drain to dry vent it. But the IL code might require that the lav drain and its vent be 2" (the UPC does; the IPC would allow 1-1/2"); I don't recall if you've said what size those are for the lav coming in on the left.

As for dry venting both WCs, with a wall hung WC you are looking at two separate vent risers going up to your vent header. If you have a 3" horizontal branch below the joists in line with the wall, you can vent the wall hung WC with a wye (vertical barrel) between the elbow in the wall behind the WC, and a combo for the drain to join that horizontal branch. The branch of the wye would point upwards to a 45 (possibly street) to turn the vent straight up.

Cheers, Wayne
 

Mundyz

New Member
Messages
12
Reaction score
0
Points
1
Location
Libertyville, IL
Wayne,

Thank you again for the detailed responses. I'm going to take all this in and create a new rendering hopefully in a day or so.

I went ahead and took a panoramic picture to show the entire existing plumbing for reference.

From left to right for the current venting.
1-1/2 vent from the other bathroom Lavs
That goes into a 2" vent pipe from this bathrooms Lav.
There is a 1-1/2" vent that I am assuming goes from the bathroom Lav on the lower level.
2" into a 3" vent for the existing back to back WCs.
The 3" vent goes up to the roof
On the other side is the existing back to back shower/tub and shower with a 2" vent.
That last vent is a 2" vent that I'm assuming is coming from the toilet in the bathroom on the lower level. The metal vent right by it is the lower level bathroom exhaust.


It looks like I'm able to wet vent my 2 bathrooms based on this from the Illinois Code:
  1. Bathroom groups installed back-to-back consisting of two water closets, two lavatories, and two bathtubs, showers or floor drains may be installed without individual vents, provided that:
    1. The water closets are wasted to a proper vertical drainage fitting;
    2. The bathtubs, showers or floor drains connect to the stack at the same level as the water closets;
    3. The lavatories connect to the stack at the same level; and
    4. The vent is a minimum of 2 inches in diameter. (See Appendix K.Illustration T.)

Thank you again for your help,
Zach
 

Attachments

  • Full Plumbing 2.jpg
    Full Plumbing 2.jpg
    84.2 KB · Views: 42

wwhitney

In the Trades
Messages
7,155
Reaction score
2,028
Points
113
Location
Berkeley, CA
It looks like I'm able to wet vent my 2 bathrooms based on this from the Illinois Code:
The illustrations for the IL code are quite helpful:


What the text you quoted means is illustrated in illustration T. I don't think you'd easily be able to do that for a number of reasons.

Also, the lower part of illustration S shows that any wet vent has to be 2". If your lav drain coming in on the left from the other bathroom is 1-1/2", then it is not currently useful for wet venting. You'd have to upsize the lav drain to 2" starting at the san-tee behind the lav.

Cheers, Wayne
 

Mundyz

New Member
Messages
12
Reaction score
0
Points
1
Location
Libertyville, IL
The illustrations for the IL code are quite helpful:


What the text you quoted means is illustrated in illustration T. I don't think you'd easily be able to do that for a number of reasons.

Also, the lower part of illustration S shows that any wet vent has to be 2". If your lav drain coming in on the left from the other bathroom is 1-1/2", then it is not currently useful for wet venting. You'd have to upsize the lav drain to 2" starting at the san-tee behind the lav.

Cheers, Wayne
Hi Wayne,

I really apperciate your replies.

The illustrations were helpful, but I'm not 100% sure on this. This attached seems like it should work. Increase the drain size on the LAV in the bathroom to 2", like you are saying. Change out the sanitary tee on it's back at the LAV to a combo. I believe that would allow it to be the wet vent for both Water Closets. If that works, I would remove that 3" vent where I need the in wall tank to be and lift all the dry vents up above the in wall tank area and rejoin them at the top and go back up to the existing 3" vent.

Thank you,
Zach
 

Attachments

  • Plumbing-Update.jpg
    Plumbing-Update.jpg
    48.9 KB · Views: 30
Last edited:

wwhitney

In the Trades
Messages
7,155
Reaction score
2,028
Points
113
Location
Berkeley, CA
So, you need to read all of Subpart K to see if your venting will work. [It would comply with the IPC, but not the UPC. But that's just for reference, as the IL plumbing code.]

The first thing I notice is that 890.1420(c) requires a main vent of minimum 3" for each building drain. So if the 3" stack that your WCs currently connect to is the only 3" vent from the building drain through the roof, you can't interrupt it like you propose in your last rendering.

Even that aside, the allowances for wet venting in 890.1500 are somewhat limited, and I don't see an allowance that would allow one lav to wet vent two WCs, or an allowance for back to back bathrooms on other than a stack.

So while you have various options, a simple one that occurs to me, if you can make the layout work, would be to maintain the 3" stack vent and use it to vent the floor mounted WC with just a san-tee (or combo) were you have a double san-tee. Then install the wall hung WC in an adjacent stud bay, and use the lav drain to wet vent it, i.e. a separate 2" wet vent drain that joins that wall hung WC fixture drain, and then the combined lav/WC drain could join your existing 3" horizontal drain.

If you really want the wall hung WC to be in the stud bay with the 3" vent, then you could move that vent to the left or right and then jog it back before the roof terminal (in the attic if that is what is above). And if you have a different 3" main vent, the moved vent could be reduced to 2".


Cheers, Wayne
 

Mundyz

New Member
Messages
12
Reaction score
0
Points
1
Location
Libertyville, IL
Hi Wayne,

Thank you for your help and patience.

That is indeed my main 3" vent and happens to be in the only place a toilet will fit in this small bathroom. If I move the 3" vent over, it looks like there may be an option for me that will work in the space. I'll need to move some of the 2 x 6 studs around a little. Hopefully this works.

Move Vent 1 = Move the vent over and sort of recreate all the vent connections a little higher up on the wall and 90 degree it back over and 90 degree it up into the existing vent in the attic.

Move Vent 2 = This looks cleaner and has less connections, but would be wet venting two toilets through a LAV. Move the vent over to where the LAV is and add in a 3 x 3 x 1.5 Sanitary Tee and recreate the vent connections above like in option 1.

What are your thoughts?

Thank you,
Zach
 

Attachments

  • Move Vent 1.png
    Move Vent 1.png
    271.2 KB · Views: 27
  • Move Vent 2.png
    Move Vent 2.png
    240.8 KB · Views: 27

wwhitney

In the Trades
Messages
7,155
Reaction score
2,028
Points
113
Location
Berkeley, CA
Both of these renderings have two WCs on the same horizontal wet vent, which from my one time reading of the IL code is not allowed. Otherwise, I don't see much difference between the two, do whichever is easiest. [BTW, are you happy with your double shower solution, which was your original question?]

Can you make the lav drain and vent in this bathroom 2" (the dry vent maybe only need to be 1-1/2", check the IL code, but I seem to recall 2"), and instead of bringing the lav drain directly into the 3" horizontal drain below the san-tee, have it turn to be parallel to and behind that drain, and then join with a 3x3x2 wye to the horizontal WC fixture drain from the other bathroom, between the closet bend and the 3" wye?

That would let this lav drain wet vent the other bathroom's WC, while this bathroom's WC is wet vented by the other bathroom's lav.

Also, the dry vent you show for the other lav is not compliant, you have a horizontal vent segment below the fixture flood rim (at least judging from the rendering). Every horizontal dry vent segment needs to be at least 6" above the fixture flood rim.

Cheers, Wayne
 

Mundyz

New Member
Messages
12
Reaction score
0
Points
1
Location
Libertyville, IL
Hi Wayne,

I think I understand what you are saying and it makes good sense. The other bathroom LAV drain was only 1.5", so what if I used the main vent as the Wall Hung WC vent in this bathroom and use this bathroom's LAV to vent the other one like you were saying? It would look roughly like the attached.

As for the original question about moving the center drain, I think I have that sorted thanks to your suggestions.

Thank you,
Zach
 

Attachments

  • Main Vent 3.png
    Main Vent 3.png
    339.8 KB · Views: 31

wwhitney

In the Trades
Messages
7,155
Reaction score
2,028
Points
113
Location
Berkeley, CA
That doesn't quite work as you now have a horizontal vent below the floor, upstream of the wall hung WC. With no fixtures washing that horizontal vent (it's a dry vent), that's not allowed below the fixture flood rim. With the other bathroom lav washing that horizontal vent (it's a wet vent), that is allowed below the floor.

Instead, keep the 1.5" other lav drain as is going into a 3" combo under the 3" main vent. When the 2" lav drain from this bathroom's lav comes through the floor, hit a 45 to turn to downward and away from the camera, then a LT90 to turn horizontal under the joists and parallel to the 3" horizontal line, connecting to the other bathroom's WC fixture drain same as you show in your last diagram.

Cheers, Wayne
 

Mundyz

New Member
Messages
12
Reaction score
0
Points
1
Location
Libertyville, IL
Thank you Wayne!

That makes perfect sense to me now. I'm going to go buy some parts and dry fit together.

Thank you,
Zach
 
Top
Hey, wait a minute.

This is awkward, but...

It looks like you're using an ad blocker. We get it, but (1) terrylove.com can't live without ads, and (2) ad blockers can cause issues with videos and comments. If you'd like to support the site, please allow ads.

If any particular ad is your REASON for blocking ads, please let us know. We might be able to do something about it. Thanks.
I've Disabled AdBlock    No Thanks