Insulating connector between house and garage

Users who are viewing this thread

brankulo

New Member
Messages
6
Reaction score
0
Points
1
Location
Denver, CO
currently our garage is detached with about 9' wide breezway between house and garage. the breezway floor is curently hardwood decking over 2x8 joists that are attached to the house on one side and garage on other. there is about 6" space between grade and bottom of joists. we are going to turn this space into a mud room. will remove decking, install osb floor deck, walls and roof. i am not sure how to handle floor insulation. we are in denver so zone 5 and would need r-30 in floor. i am thinking to install 4" of polyiso with foil facing between the joists and on top of that fill the rest of the cavity with batt. this would give me about r-41 (r-26 polyiso plus r-15 batts).
what i am worried about is moisture accumulating in batts. am i better to do 5" polyiso snugged to the bottom of floor deck instead? any other suggestions?
thanks
 

Dana

In the trades
Messages
7,889
Reaction score
509
Points
113
Location
01609
currently our garage is detached with about 9' wide breezway between house and garage. the breezway floor is curently hardwood decking over 2x8 joists that are attached to the house on one side and garage on other. there is about 6" space between grade and bottom of joists. we are going to turn this space into a mud room. will remove decking, install osb floor deck, walls and roof. i am not sure how to handle floor insulation. we are in denver so zone 5 and would need r-30 in floor.

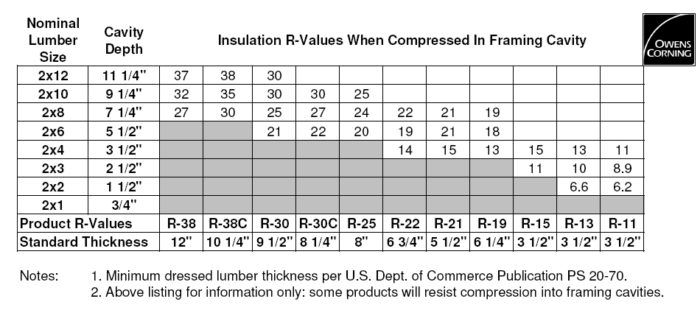
R20 rock wool batts fit into 2x8 framing, but you still need to put a bottom cladding (half inch OSB is fine) on the underside of the joists, preferably well air-seald.

i am thinking to install 4" of polyiso with foil facing between the joists and on top of that fill the rest of the cavity with batt. this would give me about r-41 (r-26 polyiso plus r-15 batts).
what i am worried about is moisture accumulating in batts. am i better to do 5" polyiso snugged to the bottom of floor deck instead? any other suggestions?
thanks

The ratio of foam-R to total R would be way more than the minimum necessary for dew point control, even if it were an unvented roof. In zone 5 walls with foam on the exterior of the sheathing only need ~28% of the total R to have adequate dew point control at the wall sheathing, roofs need about 40% (due to the radiational cooling yielding an average wintertime roof temp cooler than the outdoor air temp.) With R24 polyiso and worst-case R15 batts you're looking at R39 total, a 62% foam-R/total-R ratio. You could back off to 2" of polyiso (R12) and compress crummy R19 fiberglass batts into the remaining 5.25", which would perform no more than about R17 at that thickness, which is a very comfortable 41% foam-R/total R ratio. Floors can get away with even less than 28% ratio since there is effectively zero radiational cooling to the ground (both walls and roof experience radiational cooling to the night skies, roofs more than walls) and very little convective cooling.

A somewhat better bang/buck might R25 fiberglass batts (which perform at R24 when compressed to 7.25" in a 2x8 bay), and a continuous 2" polyiso (R12) covering over the joist edges as well as the R25s, cap-nailed to the bottoms of the joists or held in place with 1x4 furring cap-nailed to the joists. That's still better than a 30% foam-R/total-R ratio. You could even get away with used 2" roofing polyiso (which is dirt cheap), though you'd have to derate it to R10 due to age and density. Even derated to R10 you'd have more than 29% foam/total ratio. A continuous layer would more than double the R-value at the joists (a 2x8 runs about R9), with less temperature striping on the floor during cold snaps, and much higher performance than cut'n'cobbled foam between the joists. Any high R/inch foam between framing is a waste, robbed of it's potential by the thermal bridging of the low R/inch wood.

If it were my house (which it isn't) I'd detail the subfloor as an air barrier and install a continuous 2" of used foam on the bottom side, filling the joist bays with cellulose (R25-R27), but that's primarily because I own an insulation blower. Rock wool R30s + 2" used foam would be my second choice. Even though that's potentially below the inherent 28% R-ratio found in the IRC's prescriptives for walls, a plywood or OSB subfloor is a very powerful Class-II vapor retarder, which allows only 1/10th the amount of water vapor diffusion of latex painted interior wall. A 3/4" subfloor is even more vapor-tight than 2" of fiber-faced roofing foam.
 

brankulo

New Member
Messages
6
Reaction score
0
Points
1
Location
Denver, CO
Dana, thanks for taking time to dive into this. i would sure like to install polyiso as continuous layer at the bottom, but i just cant figure out how as there is just 6" below the joists and with 2" it would leave me 4" of space, so i would not even be able to fit my hand there. but i like your idea of 2" polyiso between joists, with r-20 batts. now as far as air sealing, i am putting 23/32" t@g decking subfloor that i could tape the seams on top, and tape at perimeter to the walls once installed. i assume this would be adequate? for 2" rigid between joists, i assume these need to be sealed to joists to prevent drafts into batt layer?
what would you recommend here? cut the pieces 1/4" smaller around its perimeter and fill with foam? or should i aim for tight fit against the joists and just seal with caulk from the top?
thanks again, very helpful. especially with rigidR/overallR info. was not aware of that. does that hold true also when closed cell foam is installed on the inside of the wall/roof sheathing? i think you mentioned its true for rigid is installed over exterior of sheathing as continuous insulation.
 
Last edited:

wwhitney

In the Trades
Messages
6,557
Reaction score
1,841
Points
113
Location
Berkeley, CA
Dana, thanks for taking time to dive into this. i would sure like to install polyiso as continuous layer at the bottom, but i just cant figure out how as there is just 6" below the joists and with 2" it would leave me 4" of space, so i would not even be able to fit my hand there.
Here's an idea, I think it would work if you have 6" height of access from the outside (remove siding/skirt as required):

The goal is to end up with the sheets suspended ~1" clear below the bottom of the joists, with any seams offset from the joists, so that you can seal the seams from above through the joist cavity. The 1" clear is to allow access to seal the transverse seams below the joists. The sheets will be hung with upright 2x3 ribs that are preattached to the sheet and screwed to the joists alongside them.

So carefully map out your joist spacing, and attach the ribs to the backside of the foam sheet at the correct spacing, leaving the ribs 2" short at each end. I would think foam washer and 3-1/2" screws would be a good method to attach the foam to the ribs. Then also start horizontal 3" screws along the rib, about 3/4" down from the top of the rib, driving them almost through the 2x.

The assembly is now 4-1/2" high. Slide it under the joists through the 6" space, and then lift it into place from above using the ribs and projecting screws. Finish driving the screws to secure the ribs to the joists (you might need a right angle attachment). To seal the seams, maybe try can foam in between the sheets when setting the sheet, but use quality foil tape on the top surface.

Cheers, Wayne
 

brankulo

New Member
Messages
6
Reaction score
0
Points
1
Location
Denver, CO
thanks for an idea. i have also been playing with another idea of using simpson 2.5 hurricane ties, that i would bend 90 deg at one end to create little platform for foam to sit on and then just scew the tie to the side of the joist. this would require the boards run perpendicular to the joists and would only support the edges, but 2" board is pretty stiff without any bend in 4' direction. now i could combine it with your idea if i wanted to add additional supports in the middle.
 

Dana

In the trades
Messages
7,889
Reaction score
509
Points
113
Location
01609
Dana, thanks for taking time to dive into this. i would sure like to install polyiso as continuous layer at the bottom, but i just cant figure out how as there is just 6" below the joists and with 2" it would leave me 4" of space, so i would not even be able to fit my hand there. but i like your idea of 2" polyiso between joists, with r-20 batts. now as far as air sealing, i am putting 23/32" t@g decking subfloor that i could tape the seams on top, and tape at perimeter to the walls once installed. i assume this would be adequate? for 2" rigid between joists, i assume these need to be sealed to joists to prevent drafts into batt layer?
what would you recommend here? cut the pieces 1/4" smaller around its perimeter and fill with foam? or should i aim for tight fit against the joists and just seal with caulk from the top?
thanks again, very helpful. especially with rigidR/overallR info. was not aware of that. does that hold true also when closed cell foam is installed on the inside of the wall/roof sheathing? i think you mentioned its true for rigid is installed over exterior of sheathing as continuous insulation.

For a not too technical but somewhat deeper dive into the R-ratio biz see this, and this. (Access to those articles require signing up for the free trial subscription.) But the bottom line is yes, the ratio remains the same even with cut'n'cobbled foam between the joists.

With 2" of polyiso (R12-R14 if foil faced)) and 5.25" of compressed R15 rock wool or fiberglass (R14 at that thickness) would yield R27 performance, but still meets IRC code since the entire cavity would be filled and it's above the R19 minimum.

Another perhaps less complicated way to achieve a continuous layer- when the existing floor & subfloor are gutted exposing the joists, threading wire through the sheets of foam to be able to pull them up tight to the joists, and gluing the foam to the joists with continuous beads of foam board construction adhesive (available at most box stores these days) would work. If possible, also through-screw 1x4 or 2x4 furring every other joist to the bottom at the edges more accessible edges every other joist to further support the foam as backup support for the adhesive. If adhesive-only, give it a half day to set up before installing any batts. Don't substitute standard construction adhesives- they have solvents that will compromise the foam.

There isn't really any need for the 1" clearance between the foam & joists, and that gap creates a potential thermal bypassing of the foam. Atter tapeing the seams, sealing the edges of the foam to the joists with either foam board construction adhesive or polyurethane caulk makes a reliable air seal without creating an channel the full length of every joist.
 

wwhitney

In the Trades
Messages
6,557
Reaction score
1,841
Points
113
Location
Berkeley, CA
There isn't really any need for the 1" clearance between the foam & joists, and that gap creates a potential thermal bypassing of the foam.
How's that? It would still be a continuous plane of foam. Obviously it would depend on filling and sealing the 1" vertical gap around the perimeter.

After taping the seams, sealing the edges of the foam to the joists with either foam board construction adhesive or polyurethane caulk makes a reliable air seal.
That does seem simpler and good enough. With the ribs method (now could be 2x2) and offset longitudinal joints, you'd just seal the foam to the joists for a few inches at each transverse joint. With the adhesive only method, I guess you'd put the longitudinal seams under each joist and continuously seal each foam sheet to the joists at each longitudinal edge.

Cheers, Wayne
 

Dana

In the trades
Messages
7,889
Reaction score
509
Points
113
Location
01609
How's that? It would still be a continuous plane of foam. Obviously it would depend on filling and sealing the 1" vertical gap around the perimeter.

That's right- the sealing at the perimeter has to be reliably perfect over the long haul to avoid that thermal bypass. In construction there's good better & best, but never perfect. Unless high density batts are used that gap even allows air infiltration through the batts along any axis of the floor, even perpendicular to the joists.

Foam snugged up to and glued to the bottoms of the joists will also not be perfect forever, but any leakage will always be highly resistant to air movement, unlike 1" air gaps and low density bats.

That does seem simpler and good enough. With the ribs method (now could be 2x2) and offset longitudinal joints, you'd just seal the foam to the joists for a few inches at each transverse joint. With the adhesive only method, I guess you'd put the longitudinal seams under each joist and continuously seal each foam sheet to the joists at each longitudinal edge.

Cheers, Wayne

Ideally there would be a bead of adhesive at EVERY joist, not just at the edges. That gives it more structural support and is more air-tight. Sealing any exposed seams with HVAC tape (if foil faced) or housewrap tape (with used fiber faced foam, and covered with duct mastic if it doesn't seem to stick well to the facer) works. A bead of caulk or adhesive a foot or more either side where a seam crosses under a joist or the full perimeter of every joist bay limits the leakage.

Taping and sealing the subfloor makes the subfloor into a reliable primary air barrier. The foam layer doesn't need to be hermetically sealed air tight, but in order for low density batts to work it can't allow any medium or large leaks, otherwise wind washing (or even convection) would undercut the true performance of low density R25 batts.

With higher density batts such as R30C "cathedral ceiling" fiberglass (which performs at R27 when compressed to 7.25" or R30 rock wool (designed to perfectly fit 2x8s) the wind washing effects are very low, making the air tightness of the foam layer less critical as long as the batts are carefully trimmed and fitted with no compressions or voids, snugging them into the corners and edges where the foam crosses under a joist. Simply dropping high density batts in place without edge tucking would lead to long skinny thermal bypasses along every joist (though smaller than a 1" air gap).

Compressing%20fiberglass_0-700x310.jpg
 

wwhitney

In the Trades
Messages
6,557
Reaction score
1,841
Points
113
Location
Berkeley, CA
[I've been assuming this space is 3' to 6' wide by 9' long, with 9' long joists, but I see I may have misunderstood. Getting both dimensions and the joist direction would be helpful.]

Dropping the foam layer 1" to accommodate better taping of the foam joints would certainly call for filling that 1" void under each joist; it would work better with loose fill insulation than with batts. And at the longitudinal perimeter, there'd be ribs to provide the connection along with a 1" by 1-1/2" gap to be filled and air sealed, e.g. with gun foam. The transverse edge treatment would depend on the conditions, perhaps a strip of rigid foam could be used.

But I agree with you that on balance it causes more complexity/difficulty than the benefit of better air sealing at the foam layer, so it's not a good choice. [Another probably not worth it option would be to raise the foam layer up the final 1" after doing the transverse taping, by resetting the rib height.]

I like your suggestion of gluing the foam to the bottom of the joists, if they are sufficiently close to being in plane. The foam could be pressed against the underside of the joists with upright 2x4s slid underneath, with the ends shimmed against the ground. The battens you suggest could be treated flat 2x4s transverse to the joists, held up by 6" or 7" screws installed on a diagonal through the lower portion of the joist face and the 2" of foam into the battens.

Cheers, Wayne
 
Last edited:

brankulo

New Member
Messages
6
Reaction score
0
Points
1
Location
Denver, CO
thanks everyone for suggestions. i spent quite a bit of time in local HD and Lowes today and based of availability i decided to go with 2" polyiso attached to the underside of joists and 2 layers of r-13 batts in joist cavity. based on this i have a few items that i am not sure how to handle.
1. the polyiso sheets that are available are 2" thick with foil on both sides. will foam board adhesive work in this case? i am thinking of using one of the mechanically attaching methods mentioned above and just use polyurethane caulk at joists for sealing purposes. i also plan to use foam board adhesive where sheets butt together and than foil tape the seams from the top. ( i am planing to offset 1st sheet so that the long seams dont fall under joist)
2. i can get r-13 batts locally but they are kraft faced. if i leave the paper, will it be a problem? otherwise, i can peel it off, its not that difficult.
3. since r-13 bats are 3.5", this will make 2 layers just 7" thick, 2x8 joists are 7.25" thick, is this going to be a problem?
4. i will lay 23/32" t&g osb on top of this, glued and screwed to joists. then tape all the seams with zip tape.

does this sound like a solid plan?
thanks
 

wwhitney

In the Trades
Messages
6,557
Reaction score
1,841
Points
113
Location
Berkeley, CA
As to air sealing the top surface of the insulation, polyiso is made in 4' x 9' and 4' x 10' sizes. So if you could source those, you could run the 4' sheet dimension parallel to your 18' framing dimension and eliminate all the transverse joints.

Otherwise, it occurs to me that you could use split backing tape and preinstall one side to the 4' edge of 4' x 8' sheeets. Then you'd only have to reach in 8" to remove the backing before installing an 8" rip. [Or if an 8" reach in is too hard, you could center the sheet and install two 4" rips.]

As to your questions:

1) I don't really know, but I would think there is an adhesive that would work. I do like the idea of mechanical fasteners, and angled screws into a batten would work, the tricky part is getting the batten temporarily supported so that everything stays tight together as you drive the screw.
2/3) You don't want the paper, so it would be simpler to source unfaced batts. E.g. something like this (which was the best value the last time I sourced fiberglass at big boxes):
https://www.homedepot.com/p/Owens-C...-Insulation-Roll-15-in-x-25-ft-RU70/202585906
4) Sounds good. If you're planning to tile with natural stone, you'll need a second layer of subfloor (with specific installation requirements), but otherwise what you propose should be sufficient.

Cheers, Wayne
 

Dana

In the trades
Messages
7,889
Reaction score
509
Points
113
Location
01609
thanks everyone for suggestions. i spent quite a bit of time in local HD and Lowes today and based of availability i decided to go with 2" polyiso attached to the underside of joists and 2 layers of r-13 batts in joist cavity. based on this i have a few items that i am not sure how to handle.

An R13 is designed to perform at that value and fit fairly well in a 3.5" deep cavity. A 2x8 is nominally 7.25" deep, so pair of R13s isn't going to be a nice springy compression fit, since it's manufactured loft would only be 7.0". It can be made to work if you're obsessive about fit though.

A low density R19 also performs at R13 when compressed to 3.5"- it's essentially a "fluffed" R13 (same weight per unit area), but has a manufactured loft of about 6", which would guarantee a compression fit when paired with R13s.

1. the polyiso sheets that are available are 2" thick with foil on both sides. will foam board adhesive work in this case? i am thinking of using one of the mechanically attaching methods mentioned above and just use polyurethane caulk at joists for sealing purposes. i also plan to use foam board adhesive where sheets butt together and than foil tape the seams from the top. ( i am planing to offset 1st sheet so that the long seams dont fall under joist)

Foil facers are well bonded to the polyisocyanturate foam (which is a similar chemistry to Gorilla Glue), so a bead of glue between the facer and framing would be as good as applying the adhesive to un-clad foam.

2. i can get r-13 batts locally but they are kraft faced. if i leave the paper, will it be a problem? otherwise, i can peel it off, its not that difficult.
3. since r-13 bats are 3.5", this will make 2 layers just 7" thick, 2x8 joists are 7.25" thick, is this going to be a problem?

Kraft facers are not true vapor barriers, and will not create a moisture problem. Installing the bottom layer facer-side up allows side-stapling to the joist at the required depth. After firmly tucking all the edges and corrners, then gently tugging it back up to the designed/prescribed 3.5" loft, or an adjusted 3.75" loft.

4. i will lay 23/32" t&g osb on top of this, glued and screwed to joists. then tape all the seams with zip tape.

does this sound like a solid plan?
thanks

Seems like a pretty good plan to me!
 
Top
Hey, wait a minute.

This is awkward, but...

It looks like you're using an ad blocker. We get it, but (1) terrylove.com can't live without ads, and (2) ad blockers can cause issues with videos and comments. If you'd like to support the site, please allow ads.

If any particular ad is your REASON for blocking ads, please let us know. We might be able to do something about it. Thanks.
I've Disabled AdBlock    No Thanks